It has been said that cosmetic dentistry represents the second largest nonsurgical beauty industry, behind only makeup.1 This means plentiful opportunities exist for dentists to market and capitalize on patients’ desires for white, bright, and straight teeth. According to the American Academy of Cosmetic Dentistry’s State of the Cosmetic Dentistry Industry: 2017 Survey Report,2 patients spend an average of $5,000 on cosmetic dental procedures. According to survey respondents, in 2017, the most commonly performed procedures in the dental practices were crown and bridge (98%), anterior direct bonding (89%), bleaching/whitening (89%), veneers (84%), and posterior direct bonding (83%). While other cosmetic dentistry options are available, including implants, inlays/onlays, and orthodontics, no procedure offers a more immediate smile enhancement than veneers.
Today, many dental laboratories offer various veneer options. Historically, DenMat Laboratory has been noted as the first to design fabricated thin veneers in 1984. Many years of experience with this aesthetic product, coupled with improvements in ceramic materials and digital technology, helped the company refine its veneers; and, in 2004, Lumineers made their debut, quickly gaining acclaim for unmatched aesthetics and their minimal tooth-preparation requirements. To this day, according to DenMat, Lumineers remain the No. 1 patient-requested veneer worldwide.
However, the concept of minimal-prep veneers is daunting to some dentists. Cases may be over- or under-contoured; either of which may compromise the final aesthetic result. Furthermore, dental patients today have a greater understanding of, and expectations related to, the final outcome of their investments. As such, clinical predictability and patient communication are more critical than ever for the general practitioner who provides cosmetic dental services. To address these needs, DenMat offers a service called A.R.T. (Additive-Reductive Template), which has become a mandatory technique employed for every veneer case we deliver in our practice.
A.R.T. relies on custom templates for contouring and adjusting dentition to ensure a minimally invasive approach, along with a custom “Trial Smile” provisional to gain patient acceptance. The A.R.T. templates provide a “guided” approach to tooth reduction, as well as a communication tool between the practice and the laboratory technician. The patient leaves the prep appointment with a beautiful provisional restoration that allows him or her to visualize the final restoration and communicate any changes desired prior to delivery of the final case.
This clinical case report highlights the beauty of this cosmetic procedure and discusses our go-to techniques for ease of use and predictability when delivering veneers—specifically, minimally invasive veneers.
CASE REPORT
Diagnosis and Treatment Planning
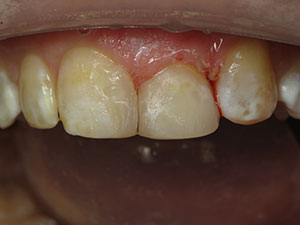
A 35-year-old female patient presented in good oral health, expressed her desire to reduce her anterior diastema (Figure 1). Another clinician had previously closed the diastema by placing composite resin on the mesial surfaces of teeth Nos. 8 and 9 (Figure 2). However, the patient was still unhappy with the aesthetics of her smile. She wanted to know what other cosmetic dentistry options were now available.
 |
| Figure 1. Dr. Madrigal describes and discusses minimal-prep veneers with the patient. |
The patient was an ideal candidate for minimal-prep veneers. During the consultation, we walked her through the procedure and explained what it entailed. She liked the idea of veneers but was concerned that teeth Nos. 8 and 9 would look too big once the diastema was closed. The patient remained apprehensive that the end result would appear unnatural.
Thanks to the Lumineers A.R.T. case product offering, we received 2 smile wax-ups on stone models for the patient to observe (Figure 3). In addition, a clear Trial Smile matrix and 3 A.R.T. templates (incisal template, facial template, and interproximal template) were provided. As Figure 3 shows, wax-up option 1 presented with a closed diastema, and wax-up option 2 presented the option of a smaller diastema to address the patient’s concern of natural aesthetics. After try-in of both chairside Trial Smiles, the patient selected option 1.
 |
 |
| Figure 2. The patient’s existing dentition prior to treatment; the previous addition of composite resin was noticeable on teeth Nos. 8 and 9. | Figure 3. Smile mockups on stone models for patient review and selection. |
 |
 |
| Figure 4. The second of 3 A.R.T. templates was used to guide adequate tooth removal and preparation. | Figure 5. A size 000 retraction cord (Knit-Pak size 000 [Premier Dental Products]) was in place while the teeth were smoothed and polished. |
 |
 |
| Figure 6. A centric occlusion bite registration (Mega Bite [DenMat]) was captured. | Figure 7. The Trial Smile matrix was bonded to the upper arch. |
 |
 |
| Figure 8. The delivered veneers were tried on the stone model. | Figure 9. Teeth were etched and bonded after veneer try-in. |
 |
 |
| Figure 10. Veneers were delivered via a high-speed suction device (LumiGrip [DenMat]) for ease of handling and precise placement. | Figure 11. Excess cement was removed, and minor adjustments to the occlusion were made. |
Clinical Protocol
The A.R.T. templates were used as guides for minimal tooth prep and to avoid under-prepping and/or the over-reduction of existing tooth structure. This tooth reduction was done using a high-speed handpiece (Ti-MAX Z95L [NSK America]) with a tapered diamond bur (8847KR [Komet USA]) (Figure 4). The patient’s old composite restorations on the mesial were removed prior to template use.
Once all 3 templates had been utilized for minimal tooth preparation, we prepared teeth Nos. 5 to 13 for the post-prep impression. A retraction cord (Knit-Pak size 000 [Premier Dental Products]) was placed into the sulcus. Figure 5 shows the retraction cord in place while we conducted a final smoothing of the teeth using a carbide finishing bur (H336 [Komet USA]), followed by 2-step polishing (Footsies [Komet USA]). Achieving complete smoothness ensured a solid foundation for capture of a highly detailed impression and improved adaptation of the veneers.
Next, we captured upper and lower impressions using light-body impression material (SplashMax [DenMat]), which was extruded intraorally, and medium-body impression material (SplashMax) placed in the impression tray (PERFECtray [DenMat]). We also captured a centric occlusion bite registration (Mega Bite [DenMat]) (Figure 6). The impressions, bite registration, stone models, and A.R.T. templates were then sent to the DenMat Laboratory team for fabrication of the custom veneers.
Post impression, the patient was fitted with the DenMat Trial Smile created using the clear matrix (Clear Bite [DenMat]) and a high-end temporary material (Perfectemp 10 [DenMat]) (Figure 7). The Trial Smile was tacked in place by spot-etching (Etch ‘N’ Seal [DenMat]) for 20 seconds on the center of each tooth and applying a bonding agent (Tenure MPB [DenMat]) only to the etched areas. The patient’s custom Trial Smile was designed to mimic the anticipated final result, and she left the office excited by the preview of her smile makeover.
The finished Lumineers were received from the lab, and they were placed and checked on the patient’s stone model (Figure 8).
The patient returned, her temporary Trial Smile provisional was removed, and her teeth were prepared for veneer placement. Prior to the intraoral try-in, the internal surfaces of the Lumineers were treated with Porcelain Conditioner and Cerinate Prime (Lumineers Placement Kit [DenMat]). Simultaneously, the patient’s Trial Smile was removed with a Schure 349 Instrument (Lumineers Placement Kit), and her teeth were cleaned using a polishing brush (9685 Brush [Komet USA]) with polishing paste (Universal Diamond Polishing Paste 9302 [Komet USA]). Next, try-in paste (Ultra-Bond Plus Try-In Paste A1 [DenMat]) was syringed into each veneer before careful placement. The excess try-in paste was removed, and the patient previewed her smile once more before cementation. Upon patient approval, high-speed suction and wetting resin (Tenure S [DenMat]) were used to remove the try-in paste from the veneers.
 |
| Figure 12. Pre- and postoperative photos of the happy patient. |
The patient’s teeth were again cleaned with a polishing brush and polishing paste in preparation for bonding. The teeth were etched for 20 seconds (Etch ‘N’ Seal), then rinsed thoroughly and dried. Next, 4 to 6 coats of a total-etch bonding adhesive (Tenure MPB) were applied to the tooth surfaces (Figure 9). A bond-enhancing resin (Tenure S) was applied and then air-thinned. Veneer placement was started at the midline with teeth Nos. 8 and 9. A resin cement (Ultra-Bond Plus Try-in Paste A1) was applied to each veneer. An ergonomic, fully autoclavable high-speed suction device (LumiGrip [DenMat]) attached to a high-volume evacuator was utilized (a standard technique used by the authors in the delivery of veneers) (Figure 10). This technique ensures a gentle delivery that can be executed with ease and confidence. This same method was employed for the delivery of teeth Nos. 7 and 10; Nos. 6 and 11; and then Nos. 5, 12, and 13. The veneers were tack cured for 2 seconds using a curing light fitted with a 2.0-mm tacking tip (Sapphire Plus Curing Light and Ceri-Taper [DenMat]). Once all Lumineers were tacked into place, one final light-curing of all surfaces was done using a 9.0-mm tip.
Finally, all excess cement was removed, and the lingual occlusion was adjusted (Figure 11) using the instruments and tools provided in the Lumineers Finishing Kit. This kit, when complemented with the Lumineers Placement Kit, includes all the products needed to successfully deliver Lumineers.
Figure 12 shows the complete transformation of the patient’s smile. She thanked us multiple times for helping her achieve her longstanding wish of a perfectly straight and gap-free smile.
CLOSING COMMENTS
Patients who express a strong desire to improve the aesthetics of their smiles may be willing to pay for high-quality cosmetic products, such as minimal-prep veneers. Becoming comfortable with this technique will help boost practice revenue, and delivery of this high-end product is made simple when done in collaboration with a competent and well-trained laboratory team.
References
- Lee DP. Why is America obsessed with perfect teeth? Harvard Medical School. https://hms.harvard.edu/news/why-america-obsessed-perfect-teeth. Accessed August 13, 2018.
- American Academy of Cosmetic Dentistry. State of the Cosmetic Dentistry Industry: 2017 Survey Report. http://2017survey.pagedemo.co/. Accessed August 13, 2018.
Dr. Madrigal is a general dentist practicing in Turlock, Calif, and Leon, Guanajuato, Mexico. He is focused on cosmetic and minimally invasive dentistry, with a special interest in biomimetics and adhesion. Dr. Madrigal is also an international dental photography lecturer, with courses taught in the United States, Mexico, United Arab Emirates, and India. He can be reached via email at 87madrigal@gmail.com.
Dr. Patel is a general practitioner in Mooresville, NC. She is a graduate of Purdue University and received her doctorate from the University of North Carolina at Chapel Hill. She can be reached at lkndds@gmail.com.
Disclosure: The authors report no disclosures.
Related Articles
Resin-Modified Glass Ionomer Shines with Unique Formulation and Exceptional Biocompatibility
Radical Reconstruction of a Class II Division II Patient with Splinted Veneers
Today’s Dentists Must Be Able to Correct Botched Cosmetic Dentistry