
INTRODUCTION
Dentists often want a recipe or list to guide us in our approach to everything we do in our practices. We want our jobs systematized to the point that we have developed principles and philosophies such as Golden Proportion,1 Golden Percentage,2 ideal length-to-width ratios, and more that allow us to define various aspects of a pleasing smile. These are all important concepts for a dentist to understand and study. However, what if patients want something different—something that falls outside of the parameters and standards that we have been trained to follow? We can spend significant amounts of time and effort creating ideal systematic approaches to smiles and performing computer simulations and cosmetic imaging only to find that patients do not know what we know and often do not care, or want, what we feel is ideal based on our education and principles.3 Every patient has their own perception of what is pleasing, and we can certainly show them options that are considered accepted or ideal, but, in reality, these are merely discussion points because patients ultimately must like what they see in the mirror, no matter how perfect a wax-up or smile design is or how much it conforms to Golden Proportion. Ultimately, the patient must like your work; otherwise, you risk needing to treat the same case over again.
Learning What the Patient Desires
How do you get into the mind of the patient to identify concepts they find appealing? Are those concepts based more on the life someone lives, or does the patient truly desire a certain smile and teeth, regardless of all external factors? Exposing those truths and beliefs in the patient’s mind is critical to achieving a successful outcome, but the dentist must do that in the most efficient manner possible in order to operate a productive practice while giving each patient exactly what they want.
A digital markup of a photograph allows the dentist to create hypothetical appearances that can be shown to patients in an attempt to create an emotional response that is pleasing or displeasing; this certainly shows not only what the patient likes but also what he or she does not like. When a patient says he or she wants something “believable,” what does that mean? Concepts such as believability can differ for everyone on the planet. How do you create a tangible appearance that allows us to physically see a new smile that the patient deems believable? A chairside mockup can be beneficial in determining if the treatment is going to be acceptable and if we are pursuing the correct path with the patient’s smile and appearance.4
CASE REPORT
Diagnosis and Treatment Planning
A 24-year-old woman presented with concerns about the cosmetic appearance of her smile. She was unhappy with the size and shape of her teeth, the spaces between the teeth, and their overall color. She had seen photos of smiles in magazines, on social media and websites, in movies, and on television. She was unsure of exactly what she wanted, but she had some ideas. She wanted to see some options that would be feasible for her.
 |
 |
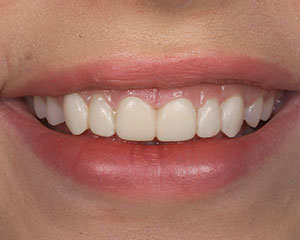
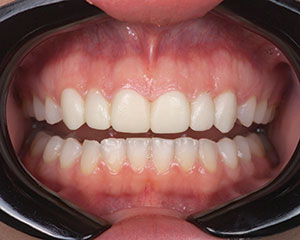
| Figure 1. Preoperative smile. | Figure 2. Pre-op retracted view. |
 |
 |
| Figure 3. Pre-op photo of the patient in centric occlusion. | Figure 4. Beadline acrylic mockup in place, allowing the patient to visualize the new smile design. |
 |
 |
| Figure 5. Retracted view of the potential new teeth appearance with the beadline acrylic mock-up. | Figure 6. Depth cuts were placed into the acrylic mockup to guide the minimal-to-no preparation tooth reduction. |
 |
 |
| Figure 7. Reduction of the acrylic and tooth structure between each depth cut. | Figure 8. All of the facial surfaces shown here had been reduced and combined. |
 |
 |
| Figure 9. A photo of the shade tab was sent to the lab team for color evaluation. | Figure 10. The final impression, using a customized tray (HeatWave [CLINICIAN’S CHOICE Dental Products]). |
 |
 |
| Figure 11. Beadline provisional restorations that would mimic the final veneers. | Figure 12. Retracted view of the beadline provisional restorations. |
 |
 |
| Figure 13. The beadline provisional restorations, shown 2 weeks later after test smiling. | Figure 14. Slight color change in the provisional restorations. |
 |
 |
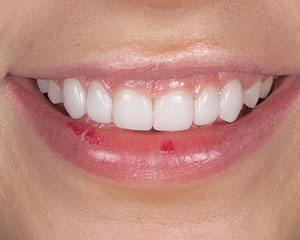
| Figure 15. Postoperative image, smiling. | Figure 16. Post-op image, retracted. |
The process started with taking photographs and a video, creating models, taking a face-bow, and doing an assessment of her occlusion (Figures 1 to 3). These days, we have the ability to mock up teeth with additions of composite resin to change the appearance of crooked, broken, and discolored teeth. Whereas a digitally altered photo can look appealing, the ability to see oneself in a mirror to visualize a direct mockup can solidify what the patient likes or dislikes. When time allows, a set of models, a bite registration, and a face-bow can be taken and sent out to the dental laboratory team for a diagnostic wax-up. The shape that is chosen for the diagnostic wax-up is based upon photo documentation, in addition to utilizing the basic shapes of the teeth. In some cases, by utilizing shapes similar to the patient’s natural dentition, the dentist can make the smile look substantially different without making dramatic tooth changes.
The diagnostic wax-up can be duplicated once it arrives in the dental office.5 To duplicate the shape into a beadline over-impression, the clinician must first use a scalpel to refine the interproximal areas, making sure that they are clean and defined. Then, working along the gingival margins, a 0.5- to 1.0-mm depression should be cut to define the area where the restoration will stop and the tooth and tissue will continue. This technique allows for the depression created to be captured into the over-impression, which develops into a positive beadline on the inside of the overimpression when it is removed from the diagnostic wax-up model. When the over-impression is introduced onto the teeth, extra material will extrude out, but a pressure point is created by the beadline onto the tooth structure and gum tissue such that the excess provisional acrylic can be quickly removed with little to no effort. The pressure point either makes the provisional acrylic extremely thin and easy to break away, or it separates the excess from the acrylic on the teeth. Either effect leads to a very fast acrylic mockup that allows the patient to see the new possibility while also allowing for simple modifications with a bur or additions with a flowable composite. In this case, the dental team utilized a darker shade of acrylic to make the underlying tooth structure more easily visible when preparing through the provisional material (Inspire [CLINICIAN’S CHOICE Dental Products]).
Seeing the outcome of the acrylic mockup in her mouth (Figures 4 and 5) created a desire that was just as compelling for the patient as the emotions that would have been created by looking at a model or a digital cosmetic simulation. However, if a patient wants to change an aspect of a tooth or the smile, it is easier to modify the intraoral mockup than to send a diagnostic model back to the lab team for wax modifications or to spend more time on a computer changing the parameters on a digital smile simulation. The dentist can easily change the shape the teeth by contouring with burs and discs or add length or shape to the teeth by using a flowable composite. The flowable composite can be added quickly and easily to the provisional acrylic mockup without the need for any etching or adhesives. The acrylic can even be wet and dried, with flowable composite added to further alter the appearance.
The case can proceed once the desired shape has been created, approved, and photo documented; consent forms have been signed; and an over-impression has been taken of the new shape. At this point, if any concerns remain, they must be addressed by everyone involved. For example, the gingival tissue on teeth Nos. 8 and 9 may not be ideal and could be treated with some osseous recontouring and a gingivectomy using either a traditional flap technique or laser recontouring (if the dentist has a hard-tissue laser). In this case, the patient elected not to undergo a gingival modification procedure because she could see when she smiled that the gumline was not a concern for her cosmetic appearance. This ability to visualize the potential case outcome so realistically provides instant insight and helps educate decisions as to how the treatment will proceed. After approval of the cosmetic appearance is obtained, the patient can either return another time or have the procedure done the same day.
Clinical Protocol
The next step is to place depth cuts into the acrylic (Figures 6 and 7). If the initial appointment was just to mock up the case, then the patient could return and have acrylic placed on the teeth again because the over-impression was taken of the prior provisional acrylic mockup. Many different depth-cutting burs are available on the market, but, in the author’s hands, a single depth cutter on the shank of the depth-cutting bur (compared to reduction burs with 3 equivalent depth cutters on a single shank) allows for a more accurate reduction and precision in the depth cut on all 3 planes of the tooth because it is curved, not flat. One of the benefits of these particular depth-cutting burs (Lasco Diamond Products) is that, in addition to the burs bottoming out with the safe barrel to prevent additional reduction, a black mark appears from the shank rubbing on the acrylic, helping to visually confirm that the proper depth has been created. After numerous depth cuts have been placed at various reduction levels on the gingival, middle, and facial thirds, a reduction can then be placed on the incisal edge (Figure 7). After placing depth cuts on the teeth, the dentist might notice that, in some areas, the cuts are still in the acrylic, while they might have gone into the enamel in areas where the tooth was rotated or more facially positioned. This technique works well for smiles that have deficiencies in arch length and tooth size or have diastemas, as well as for some crowded cases.
Next, all of the surfaces are combined by performing the same reduction between depth cuts by utilizing a chamfer diamond (Figure 8). After connecting the different areas together, the extra remaining acrylic can be teased off.
The next step in this case was for 2 retraction cords (UltraPak Knitted Retraction Cords [Ultradent Products]) to be placed for teeth Nos. 8 and 9, and a shade was taken of the prepared teeth. It is important to realize that some dehydration will have occurred during tooth preparation, so the dentist should work as efficiently as possible, letting the patient close his or her mouth periodically to keep the teeth as hydrated as possible. Nonetheless, photographs are a necessity for the laboratory team to see the prepared tooth, even if it has dehydrated a bit (Figure 9).
A thermoplastic, prefabricated tray (HeatWave [CLINICIAN’S CHOICE Dental Products]) (Figure 10) was chosen because it can be custom molded after submersion in a warm-water bath for one minute. The more accurate the fit, the easier it is to capture the impression of the teeth on the first attempt. After a tray adhesive was applied and allowed time to dry, the tray was loaded with a heavy-body impression material while the teeth were covered with a light-body wash (Thermo Clone VPS Putty [Ultradent Products]). Shimstock Occlusion Foil (Almore International) was used to assess the occlusion to assist in evaluating an accurate mounting and equilibration of the models. Next, the over-impression derived from the chairside mockup—or a beadline over-impression from a diagnostic wax-up if no modifications were made—was filled with acrylic and seated firmly over the teeth to extrude any extra material out of the impression, allowing the impression to seat completely. The teeth must be dry for this procedure, and, if used, any iron-based hemostatic agents should be thorough
ly rinsed away to avoid creating black discoloration under the provisional restorations. Upon removal, it is clear that the forthcoming smile will be very similar as well (Figures 11 and 12). Any excess acrylic material is typically wiped away. If any trimming is necessary, a sharp instrument or a 12-fluted carbide bur should suffice. Should a bubble or defect be present, the dentist can easily fill in, or add to, the acrylic by simply applying a flowable composite with a similar shade. No bonding agent is required.
The patient, upon returning to the office, still had the provisionals in place with no tissue irritation or sensitivity (Figure 13). The provisionals will often display a slight color shift based on the patient’s diet and the time between appointments (Figure 14). The provisionals can be teased off (with a cleoid or spoon instrument), often without administering any local anesthetic. Because the preparations are minimal, it is likely that enamel is still present, so there is often very little-to-no sensitivity.
The veneers (IPS e.max [Ivoclar Vivadent]) are tried in with a water-soluble jelly so that they optically connect to the tooth; without a paste, they can appear whiter due to a misleading air space when evaluating appearance. Then, upon receiving the patient’s final approval, a patient signature was obtained in the records that gave consent to cement the final restorations. The restorations were cleaned, followed by the application of a ceramic primer (Clearfil Ceramic Primer Plus [Kuraray America]) and Choice 2 Translucent Veneer Luting Cement (BISCO Dental Products). Following the manufacturer protocols for resin adhesion to tooth structure, BISCO All Bond Universal Adhesive was used with a total etch technique, and a light-cured translucent shade of resin cement (Choice 2). The gross excess of resin cement was removed, followed by light curing (VALO [Ultradent Products]). Next, any remaining excess cement material on the margins was removed using rotary and hand instruments. Any excess resin cement was removed interproximally by using a separating saw (ie, ContacEz, CLINICIAN’S CHOICE Dental Products) Minimal-to-no preparations were done, such that the occlusion had not changed; however, it was still evaluated to ensure it was not heavy on any of the interproximal ceramic.
Due to the conservative nature of the procedure, the patient maintained most of her tooth structure and required little-to-no anesthesia. She could begin smiling and showing off her new smile immediately (Figures 15 and 16). For many patients, when indicated, the ability to add 0.5 mm of porcelain onto their teeth can create a huge change to their smiles, appearance, and self-confidence. This patient was extremely pleased with her new smile.
CLOSING COMMENTS
The ability to determine if the patient finds the appearance to be pleasing is why the no-preparation or minimal-preparation smile mock-up technique is so valuable. This technique allows the patient to evaluate his or her new appearance prior to beginning any restorative work. It also allows for less tooth structure to be removed for better longevity of the teeth and restorations, which also contributes to the overall satisfaction of the patient.
Acknowledgment:
The author would like to thank V Tech Dental Lab in Lake Forest, Calif, for help with this case.
References
- Javaheri DS, Shahnavaz S. Utilizing the concept of the golden proportion. Dent Today. 2002;21:96-101.
- Snow SR. Application of the golden percentage in smile design and esthetic treatment success. Contemporary Esthetics. 2006;10:30-37.
- Albino JE, Tedesco LA, Conny DJ. Patient perceptions of dental-facial esthetics: shared concerns in orthodontics and prosthodontics. J Prosthet Dent. 1984;52:9-13.
- McLaren EA, Schoenbaum TR. The bonded functional esthetic prototype: Part 1. Inside Dentistry. 2013;9:70-74.
- Snyder TC. Beadline provisionals. Pract Proced Aesthet Dent. 2009;21:E1-E7.
Dr. Snyder received his doctorate in dental surgery at the University of California, Los Angeles (UCLA) School of Dentistry and has trained at the F.A.C.E. institute. He is an Accredited Fellow of the American Academy of Cosmetic Dentistry and is a member of Catapult Education. Dr. Snyder was on the faculty at UCLA, where he created and co-directed the first 2-year graduate program in aesthetic and cosmetic restorative dentistry. In addition to lecturing internationally, he has coauthored 3 books and written numerous articles in publications around the world. He is the owner of Aesthetic Dental Designs in Laguna Niguel, Calif, and also has an online dental education program at legionpride.com. He can be reached at drtoddsnyder.com.
Disclosure: Dr. Snyder reports no disclosures.
Related Articles
Modern Composites for Minimally Invasive Cosmetics
The Modern Aesthetic Mixed Restorative Case
Exceptional Direct Restorations: New Diagnostics, Composite Materials, and Sectional Rings

