INTRODUCTION
The ability to transform a patient’s smile and function could not be any more exciting and fun for a dentist than it is today. The myriad of materials and treatment options available to clinicians and patients alike makes the profession newer and more exciting every day. With numerous modern materials, we can be less invasive, more aesthetic, and more creative with the treatment options we offer to our patients. Creating believable, lifelike restorations across different treatment modalities within the same dentition had often been challenging prior to the advent of many newer materials.
CASE REPORT
Diagnosis, Treatment Planning, and Prerestorative Protocol
A 38-year-old female presented for the replacement of existing restorations on her front teeth, in addition to a cosmetic rehabilitation of the appearance of her smile. Upon evaluating the patient, it was noted that she was missing the maxillary right lateral incisor and had a traditional PFM bridge that was deteriorating. The contralateral lateral incisor was present but it had a previously placed crown that was also in need of replacement. The existing positions of the anterior teeth, as well as the crown-to-width ratios, were less than ideal when compared to contemporary aesthetic concepts.
 |
 |
| Figure 1. Preoperative smile. (Courtesy of Mark J. Redd, DDS, Laguna Hills, Calif.) | Figure 2. Orthodontic repositioning of the roots and creating more ideal spacing between teeth to allow for the best preparation design. |
 |
 |
| Figure 3. Retracted view of braces to evaluate tooth position. | Figure 4. Diagnostic wax-up. |
Prior to restoring the teeth, the patient opted to see an orthodontist and a periodontist to reposition the root structure to make space for the implant placement as well as creating better tooth positioning for placement of restorations (Figure 1). The patient was evaluated during orthodontic therapy to assist in tooth positioning for the best setup and outcome for restorative therapy (Figures 2 and 3).
The first step in any case is determining the final outcome prior to starting the case. This means a comprehensive exam of the oral cavity as well as the supporting structures and temporomandibular joints needed to be performed to build on a solid foundation. Additional information that was gathered for this case were photographs, radiographs, and 3 sets of models taken for evaluation. Photographic documentation and evaluation of the smile-line, lip posture, drape, and teeth position are critical to evaluate when creating a new smile.
Digital mockups were performed to further evaluate tooth shape and position, allowing for verification by the patient as to the direction the case would be heading. After drawing some conclusions on digital mock-ups of the case, we proceeded to do a cosmetic wax-up of teeth Nos. 6 to 11. A diagnostic wax-up is extremely helpful not only in determining what is possible, but it also acts as a template on which everything that follows is created (Figure 4). Various types of stents can be created to assist in the accurate placement of the implant. A reduction stent was created to enable precision tooth structure removal during the preparation appointment along with a provisional template to successfully replicate the wax-up. Templates were also fabricated for the ceramist to use in creating the same shapes for each restoration.
Once the wax-up is created, and all the reduction templates are fabricated, then the actual creation of the case becomes much easier. Having already worked out any potential problems with the treatment plan and preparation designs allows for easy duplication of the case intraorally. The wax-up, along with a CBCT of the premaxilla, enable easy conversations and treatment planning with the periodontist. The patient had a pre-existing pontic for the temporary replacement of No. 7 to be used in her braces after segmenting the bridge. Had she not had a pre-existing tooth or restoration, then a provisional flipper would have been created for implementation during the implant osseointegration. While wearing braces, the patient had the implant placement (Nobel Biocare) performed with the periodontist based on a surgical guide from the wax-up. An impression was taken of the implant’s position so that a dental technician could create a custom healing abutment and custom pickup impression cap.
Once the implant was osseointegrated, the focus turned to finalizing the braces as well as uncovering the implant and placement of the custom healing abutment. Once the custom healing abutment was in place, the remaining teeth could begin their various restorative treatments. Upon removing the braces, the patient wore a Hawley wire retainer with a single denture tooth to replace No. 7 and maintain the tooth position while waiting to restore in the coming weeks.
Preparation Appointment
The preparation appointment began with ASA infiltrations of Carbocaine (Cook Waite) and Lidocaine (Cook Waite) (Figure 5). The crowns on Nos. 6, 8, and 10 were sectioned off first to evaluate the amount of tooth remaining and document the prepared tooth colors. The preparations were then refined to a more ideal reduction, shape, and margin design. Teeth Nos. 9 and 11 were then prepared for conservative veneers with the preparation limited to enamel reduction for the best long-term adhesion.
 |
 |
| Figure 5. Post-orthodontic therapy, prior to starting restorative therapy. | Figure 6. Prepared teeth with retraction cord in place. |
 |
 |
| Figure 7. Customized HEATWAVE Tray (CLINICIAN’S CHOICE) and Panasil Binetics Putty (Kettenbach LP) with Panasil initial contact (Kettenbach LP) light body wash. The custom impression analog in place with the stone model analog attached. | Figure 8. Prepared tooth shade documented with shade tabs for the master ceramist at the laboratory. |
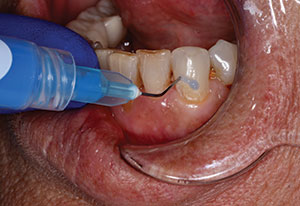
A small No. 00 retraction cord (Ultradent Products) was placed to displace tissues to refine the gingival margins (Figure 6). No astringents were used so as to minimize any irritants to the tissues and remove any risk of contaminating the impression materials. A customizable impression tray (HEATWAVE Trays [CLINICIAN’S CHOICE]) was fabricated by immersing the tray in a cup of hot water for one minute, followed by adaptation of the tray to the diagnostic model. Next, the existing custom healing abutment was removed, followed by the placement of the custom impression analog. The top of the custom impression analog was painted with an occlusal indicator spray (Occlude [Pascal]). The customized impression tray was then tried in to determine positioning of the impression analog and to mark the area to be removed inside of the tray. The tray was then perforated to allow access to the top of the analog while the impression was in place to facilitate the removal of the analog from the mouth without its removal from the impression. This allows for a more precise positioning of the implant analog in the final stone model. The modified tray was then coated with tray adhesive and allowed to dry. The top of the impression analog had a small piece of utility wax placed over the screw head to keep the impression material from covering it and minimizing cleanup. The tray was then filled with Panasil Binetics Putty (Kettenbach LP), while simultaneously, the teeth were coated with Panasil initial contact light impression material (Kettenbach LP). Upon placing the impression tray over the teeth, the excess impression material that came out of the tray access hole was wiped, allowing access to the top of the analog. The analog screw was then loosened prior to removing the impression so that upon removal of the impression from the mouth, the custom analog would be captured within the impression and the model analog could be attached (Figure 7). The custom healing abutment was repositioned back into the mouth along with a wax bite and photographic documentation of the prepared teeth for color assessment (Figure 8).
 |
 |
| Figure 9. The beadline over-impression having been removed shows the Visalys Temp provisional material (Kettenbach LP) in place with the Teflon tape (DuPont), making space between the custom healing abutment and the provisional to create space to facilitate cleaning. | Figure 10. The aesthetically pleasing Visalys Temp after wiping with gauze and pulling the Teflon tape out. |
 |
 |
| Figure 11. The provisionals evaluated for shape after one week. | Figure 12. The provisional smile evaluated after one week. |
 |
| Figure 13. Occlusal view of the uncut model to evaluate the custom implant abutment as well as margins, contacts, and occlusion of the final restorations. |
If the diagnostic wax-up is the architectural template for what is to be created, then the provisional is the working prototype that needs to duplicate the appearance and function of the wax-up and, at the same time, it needs to be durable and aesthetic. To fabricate a provisional, the diagnostic wax-up of the desired final appearance for the case will be duplicated (Figure 4) using the beadline over-impression technique.1 The procedure entailed a 0.5 mm scribe line being cut into the gingival margins of the diagnostic wax-up model for all of the teeth and a millimeter of space being created between the implant crown wax-up and the custom healing abutment. It is possible to see underneath the wax-up of the implant crown and the stone model since it is now a millimeter away from the stone model reproduction of the custom healing abutment. Next, a piece of Teflon tape (DuPont) was applied to the lingual surface of the implant crown wax-up extending down onto the gingival tissues of the stone model. This was performed to block the over-impression material from communicating from buccal to lingual underneath the diagnostic wax-up of the implant crown. An over-impression of the modified wax-up was taken using Panasil initial contact light-bodied impression material syringed around the teeth and Panasil tray soft (heavy-body) (Kettenbach LP) material loaded into a stock impression tray. The buccal and lingual aspect of the implant wax-up along the gumline was only separated by a piece of Teflon tape, which created a cut in the over-impression to allow for removal off the model as well. When used in the mouth to create the final provisional, it was possible for removal of the impression from the mouth while still leaving the provisional intact on the teeth.
Utilizing the beadline over-impression from the diagnostic wax-up, a one-piece provisional was to be created using the Visalys Temp provisional material (Kettenbach LP). A small piece of Teflon tape was placed on top of the custom healing abutment to minimize any risk of attachment or cleanup as well as improving access for hygiene. The beadline over-impression was carefully filled with Visalys Temp so as not to overfill any of the different types of tooth preparations. If too much of a provisional material is placed within the over-impression, then the tray cannot seat completely and more adjustments to the provisional will need to be performed, as well as having more flash to clean off the adjacent teeth. Upon placement, we maintained direct pressure on the over-impression while the temporary material was setting, which can help minimize distortion from incomplete seating or movement of the tray while waiting for autopolymerization to finish. After waiting for one and a half minutes, the beadline over-impression was removed, showing one very precise, durable, and aesthetically appealing provisional that was locked into place mechanically without any etching or bonding to tooth structure. Because of the various preparation designs, the provisional was intentionally locked in place so as not to necessitate any provisional cement. The minimal excess flash that was found on the gingival portion of the tooth and slightly onto the tissue was removed quickly with an explorer, periodontal knife, and a spoon excavator. The provisional was intentionally not polished to highlight the material’s aesthetic capabilities after removing the beadline over-impression (Figure 9). After removing the small amount of flash and the retraction cords, the tissues were allowed to relax back into position. The restorations were then wiped with gauze to show the natural appearance without requiring polishing (Figure 10). If adjustments are needed, fluted carbide burs can be implemented, followed by polishing with various abrasive points and cups. If no adjustments had been performed, the material would not require any polishing for aesthetic purposes but sometimes a quick buffing with a bristle brush or fine abrasive polisher can enhance the already present good appearance. If an accurate wax-up and beadline over-impression technique are implemented, the amount of adjustment can be minimized or avoided completely. The patient was evaluated one week later and was very pleased with the aesthetic appearance of her provisional teeth that were foreshadowing the shape of the final restorations (Figures 11 and 12).
Delivery Appointment
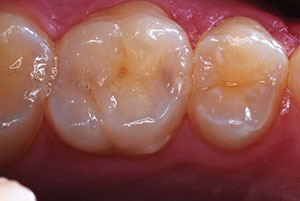
The final model work and restorations were evaluated in comparison to the original wax-up for fit, shape, and color prior to the patient’s appointment so that any additional adjustments could be made (Figures 13 to 17). Delivering the restorations was simplified by not requiring any anesthesia. The Visalys Temp provisional material was cut into 3 separate pieces and then removed manually with a crown key and a hemostat. The custom healing abutment was removed, and the zirconia custom abutment was torqued into place and verified via a radiograph. All of the restorations were then tried in to evaluate fit, contacts, occlusion, and color. To facilitate placement, the layered zirconia crowns (KATANA [Kuraray Noritake Dental]) were steam cleaned and cemented first with a new calcium aluminate cement (Ceramir [Doxa]). All of the typical steps found with resin cementation that we usually perform in our office (such as cleaning the internal aspects of the zirconia crowns and then using a universal primer) are contraindicated when using the Ceramir cementation protocol. The only requirement is for the area to stay immobilized and somewhat dry while the material is solidifying for 2 minutes, then after 4 minutes, the excess cement can be pulled away easily. The 2 feldspathic porcelain (Noritake) veneers were tried in, cleaned, silanated, and adhered to the enamel using a total-etch technique with a traditional 4th generation bonding agent (ALL-BOND 3 [BISCO Dental Products]) and light-cured resin cement (CHOICE 2 [BISCO Dental Products]) (per manufacturer’s instructions). After placement, the final restorations mimicked very closely the shape and color of the provisionals (Figures 18 and 19).
 |
 |
| Figure 14. Occlusal view of the uncut model with the final restorations in place. | Figure 15. Facial view of the uncut model to evaluate the custom implant abutment as well as margins, contacts, and occlusion of the final restorations. |
 |
 |
| Figure 16. Facial view of the uncut model with the final restorations in place. | Figure 17. The diagnostic wax-up and the final restorations were verified to be virtually identical in their shape when evaluated. |
 |
 |
| Figure 18. The layered zirconia crowns (KATANA [Kuraray Noritake Dental]) cemented in place with Doxa’s Ceramir cement, and the feldspathic porcelain (Noritake) veneers cemented with BISCO Dental Products’ ALL-BOND 3 adhesive and CHOICE 2 luting cement. | Figure 19. The new aesthetic and pleasing smile. |
DISCUSSION
The process of fabricating a provisional restoration has undergone many changes in the procedure, as well as the materials available for use within the dental profession. The simplification of the provisionalization process came from the modernization of materials and their delivery systems. Traditional acrylic monomers and polymers having to be mixed by hand and then utilized in a direct, indirect, or direct/indirect fashion have long been replaced by much faster and easier techniques and materials. The progression in the development of material chemistries continues to make the fabrication process easier, with better aesthetics and higher strength properties. There are many types of provisional materials available in dentistry, and they all can create a functional provisional restoration.3 The differences among materials can be extensive, based on ease of use, durability, staining, wear, and aesthetics. The setting time for a provisional material to harden is another very important characteristic that should be taken into consideration when evaluating provisional materials. The ability to efficiently place a provisional can save valuable time chairside during the provisional fabrication and placement technique. Kettenbach LP has done an excellent job of creating a newer material that sets in as little as 80 seconds while still maintaining little to no oxygen inhibition layer. An oxygen inhibition layer on the internal surface of a provisional can cause inadvertent adhesion to composite buildups and premature displacement of a provisional. This can create the unwanted need for an additional procedure and sometimes additional recementing appointments. The oxygen inhibition layer can also clog up the fluting of carbide burs when adjusting a provisional that can further complicate and slow the provisional placement process. All of these criteria can point the dentist toward a new multifunctional monomer provisional material that is efficient, durable, easy to use, and aesthetically appealing. Visalys Temp is unique in that it is made from a 2-component, BPA-free multifunctional acrylic composite.Ideal characteristics that a dentist would seek for a provisional material would be something that works well for any situation to minimize office overhead and inventory, is quick to fabricate, easy to use, and simple to finish. The material would offer a quick setting time with low heat release and low shrinkage while having virtually no air inhibition layer. As dentists, we would like something to have an easy aesthetic outcome with the least amount of effort to achieve the goal. Visalys Temp has all of these desired characteristics in addition to its excellent physical properties, durability, great aesthetics, and high polishability.
CLOSING COMMENTS
Many of our patients are seeking aesthetically driven treatments. The advent of stronger ceramics has allowed for more appealing, aesthetic restorations where once only metal-based restorations could be used. The increased demand for elective dentistry by consumers has created an increased need for better provisional restorations.3 The emphasis from the dental practitioner is the need for provisional restorations that can be used universally across all types of restorative procedures and placed quickly with a lifelike appearance while at the same time being durable enough to withstand the harsh environment of the oral cavity for days, weeks, or months. The creation of modern cements that facilitate quicker procedure times and offer new and unique physical properties is a great improvement for the clinician and the patient. Traditional materials, like feldspathic porcelains, 4th generation bonding agents, and light-cured resin luting cements, are still highly effective and proven to still be some of the best aesthetic treatment options for our patients. The blend of new and old technology has enhanced how we can practice aesthetic dentistry to improve our patients’ smiles and overall appearances.
References
- Kurtzman G. Crown and bridge temporization. Part 1—Provisional materials. Inside Dentistry. 2008;4.
- Snyder T. Bead line veneer provisional restorations. Pract Proced Aesthet Dent. 2009;21:E1-E7.
- Spear F. An interdisciplinary approach to the use of long-term temporary restorations. J Am Dent Assoc. 2009;140:1418-1424.
Dr. Snyder received his doctorate in dental surgery at the University of California at Los Angeles School of Dentistry (UCLA). He co-developed and co-directed the first and only comprehensive 2-year postgraduate program in aesthetic and contemporary restorative dentistry at UCLA and has been on the faculty at UCLA’s Center for Esthetic Dentistry and Esthetic Professionals. He is a graduate of the Foundation for Advanced Continuing Education (FACE) Institute for complex gnathological disorders and an Accredited Member of the American Academy of Cosmetic Dentistry. Also a member of the Catapult Elite Group, his private practice, Aesthetic Dental Designs, is located in Laguna Niguel, Calif. He lectures internationally on dental materials, techniques, occlusion, equipment, business development, and marketing. He consults for numerous dental companies, and he has authored articles in dental publications internationally. He can be reached at drtoddsnyder.com.
Disclosure: Dr. Snyder reports no disclosures.