To be sure, much has been written and spoken about the virtues of incorporating a digital photographic system into your office repertoire. Like many others, I get on my soapbox whenever the opportunity arises and exhort my colleagues to get with it; “time’s a wastin!” As indicated in the title, you’re in for an overview of the digital photography world as it relates to dentistry, but knowing that our attention spans wax short, I will attempt to streamline this piece to provide you with a reasonable reference for future use. While not intending to brief you on photo technique (you need a course for that), I hope to bring you up to speed on how and why you need to be involved. Let’s jump in.
THE WHY’S
If you acquire and learn to effectively use a digital camera in your practice you will: (1) do more crowns, particularly quadrants; (2) do more cosmetic dentistry; (3) prove to your patients, third-party carriers, and to yourself that you’re a “straight shootin’ dentist” who fixes things that need fixing; and (4) become a better dentist.
If you have already mastered points 1 and 2, certainly points 3 and 4 must be of interest to you. Consider the first 2 items a bonus that could come in handy should things slow down.
Digital photography in your dental practice is not just about learning how to take nice pictures of your finished cases. I would argue that it’s the most powerful “codiagnostic” tool available to the practitioner who learns how to take advantage of it. Radiographs, despite your patient’s nodding head as he feigns comprehension of what you are saying, are for you alone. Sure, they’ll reveal a dime-sized abscess or even advanced bone loss (maybe), but the fast-deteriorating mountains of leaking amalgam that we routinely point out with smug pride mean little to our patients (even though they will still nod). Large white spots on little black film are all they see; compelling to us, not to them.
 |
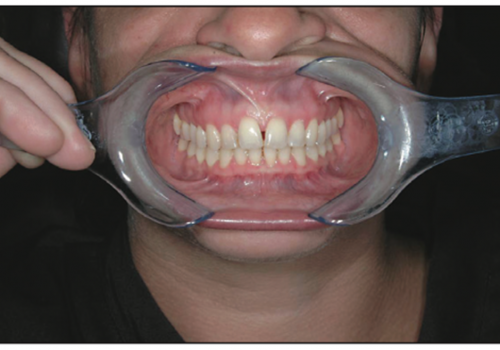
| Figure 1. Codiagnosis of a quadrant in need of help. |
Accompany that film with a crystal clear digital image of the same quadrant, demonstrating only a hint of natural tooth structure remaining, perhaps accented by a recently snapped-off DL cusp, and now you’ve got something to be smug about (Figure 1). You’ve told your patient it needs to be restored and, plain as day, he can see it. This time, when he nods in agreement, there’s something behind the nod. In most cases, you will have instantly created the “want” in your patient with respect to having the carnage repaired. So long as you’ve “sold yourself” as the one who can lead them back to the promised land, it’s now just a matter of what’s affordable, and in the good ol’ US of A, where there’s a will, there’s a way.
WHAT ABOUT INTRAORAL VIDEO CAMERA?
OK, let’s get the “intraoral video camera” (IVC) thing out of the way. The newer versions are vast improvements over many of the 5- to 10-year-old systems that still populate offices across the land. Resolution, focus capability, and ease of use have come a long way, making IVCs outstanding codiagnostic tools. But (and you knew there was a “but” coming), even the best IVC systems don’t feature resolution (levels of detail) that can compare with an off-the-shelf 4- or 5-megapixel digital still camera (digicam). Nor are they as versatile as a digital still camera. Certainly, the best of both worlds would find the practitioner employing each type of system for its strengths, but if I had only one to choose, I’d opt for the digital still camera. The image quality, which includes color accuracy, image clarity, and accurately proportioned teeth, is simply more compelling. That is, images produced by digicams look like teeth in their natural environment.
Let’s face it, some of the zooms found in today’s (and certainly yesterday’s) IVCs lend a sometimes surreal appearance to what’s being viewed. So, if you’ve got an IVC or were planning on buying one, go for it. Just don’t plan on taking portraits or photos suitable for case demonstrations or publication, or taking it home for the weekend to shoot a family outing. IVCs’ strong suit comes down to convenient close-ups of broken teeth and ailing gums. There’s something to be said for “easy,” and to be sure, today’s IVC will capture an intracoronal fracture on a maxillary first molar with much greater ease than a digicam. Certainly, there’s room for both systems in the armamentarium of the “show and tell” doctor.
TAKE AWAY MESSAGE
You have to go see a patient? File this message away before you go: NOTHING, I repeat, NOTHING will capture your patients’ dental imagination like an accurate digital image of their gnarly teeth on a 15- or 17-inch flat-panel display. Not only will patients be compelled to take action, but your own convictions will be bolstered, owing to their “now I get it” feedback as well as the shared, larger-than-life view of the very problems you are seeking to correct.
WANT MORE?
Still here? Patient cancel? Okay,…let’s talk about the how’s of digital photography.
 |
| Figure 2. All digicams feature video out jacks. |
Fortunately, the digital photography arena can be entered through several portals. While use of an in-operatory PC empowers the dentist to take full advantage of all things digital, one can get the show rolling with simply the digicam, digital film, and a modest television set. Today’s digicams all feature video out, allowing them to feed any TV equipped with a video input jack (Figure 2). In effect, your digicam becomes a high-resolution video camera that can freeze images to be viewed on the TV screen. These images may be saved on the camera’s digital film and can be edited later on a PC if you so choose. This isn’t the most elegant way to go, but it works.
I prefer the sub-$1,000 genre of digicams, as I’ve found them to be more than adequate for the uses most likely to be found in the dental office. In fact, every article photo that I’ve ever submitted has been taken with a camera that cost between $500 and $800.
Okay, there is a catch. While some digicams will allow a retracted dentition shot to be taken with fair results without any magnification or lighting aids, for the most part you’re going to need such aids to afford you the versatility of which your digicam is capable. Here’s the good news; a few enterprising companies have retrofitted very affordable, pro-consumer digital cameras (the sub-$1,000 kind mentioned above) with devices or modifications that render those same cameras dental digital cameras.
 |
| Figure 3. The Photomed macro diffuser. |
One such company, Photomed International (photomed.net), manufactures and markets a macro/diffuser device that ingeniously provides magnification and the equivalent of a balanced 2-point light source via a pretzel of acrylic, lens, and mirrors (Figure 3). The Photomed device allows the camera’s own metering system, coupled with the camera’s onboard flash, to determine proper image exposure, making it near idiot-proof to properly expose a dental image.
 |
| Figure 4. Easy removal of the Photomed device. |
 |
 |
| Figure 5a. Canon G3. | Figure 5b. Olympus 5050. |
To make things only better, Photomed mates its macro/diffuser to popular, full-featured digicams such as the Olympus Camedia series (C2000 through C5050), and Canon’s G2 and G3 series. While this may sound complicated, suffice it to say that the device is applied and removed by simply turning a single, oversized thumbscrew that mates with the camera’s tripod socket (Figure 4). There are other ways to accomplish magnification/illumination, but it really doesn’t get much simpler than this. Photomed markets the diffuser as a separate item if you choose to buy the camera elsewhere, but it also offers complete packages that take the shopping and matching equipment process out of the equation. At present, I am fond of my Photomed-outfitted Canon G2 and a similarly outfitted Olympus 4040. As of this writing, the hot digicams to own and operate dentally are the new Canon G3 and the Olympus 5050 (Figures 5a and 5b).
TV VERSUS PC
 |
| Figure 6. CAESY as the one-two punch. |
Let’s briefly back up to the TV-versus-PC issue once more. While the TV approach works, the advent of space-conserving flat-panel PC displays, coupled with today’s dirt-cheap PC power, neutralizes yesterday’s objections. And one needn’t be networked or running a practice management package on the in-op PC to justify a PC-based digital imaging system. Multimedia patient education packages such as CAESY (caesy.com), teamed up with real-time digital imaging, are a formidable marketing combination that in and of itself justifies the presence of a chairside PC (Figure 6).
 |
| Figure 7. USB film reader for easy transfer of images to a PC. |
Having a PC chairside will also allow the dentist to have a digital film reader in place. This small USB wonder can be thought of as the “floppy drive” into which the operator plugs the digital film. Once plugged in, the film content is instantly viewable on the chairside display. As an added bonus, your digicam remains cable-free. The process of taking an image, removing the film from the camera, plugging the film into the reader, and viewing it should take no more than 30 seconds (Figure 7).
SOFTWARE CONCERNS
Most cameras and dental systems ship with software that can be used to view, sort, and minimally edit one’s images. In some instances, only trial versions will be made available, while in others such as the Digital Solution (marketed by Lester Dine), an entire image manipulation suite is included. Take note, this package does not enable cosmetic simulation.
If the system you choose lacks satisfactory software,I can wholeheartedly recommend JASC’s After Shot. This $50 package does most anything you’d need to view, store, and edit your images. It does not, however, lend itself to cosmetic simulations. At present, Photomed includes a time-limited version of After Shot that can subsequently be upgraded to a registered version with the manufacturer. A sample can also be downloaded from jasc.com.
Important: keep this in mind—while very sweet, it is not imperative to incorporate your digital image library into your practice management package. Your images can exist separately in their own folder on a Windows desktop. Windows will cooperate by alphabetizing your images any way you choose. Newer systems running on Windows XP will create storage folders that are adorned with thumbnail images of the photos inside them. This facilitates the sorting process considerably. In fact, Windows XP has such improved digital image handling capabilities that this alone justifies a Windows XP upgrade if you are still using Windows 98. A previous Dentistry Today article by yours truly, “Digital Imaging on the Cheap,” October 2002, provides in-depth coverage of off-the-shelf software that can be used to handle our image viewing and editing.
PRINTERS
 |
| Figure 8. The HP PSC 2210 all-in-one printer on the right. |
Let’s talk about printers. Two types of printers are of interest to us. The popular color inkjet printer is the all-purpose tool that can serve as both a text printer and an excellent photo printer. Hewlett Packard’s all-in-one PSC 2210 will most likely exceed your expectations (Figure 8). For as little as today’s price of $300, the 2210 features a built-in USB film reader (all film types included), a scanner, a fax machine, and an incredibly good color inkjet printer that doubles as a copy machine. This ingenious printer will allow functionality without a PC. By simply plugging in your digital film and requesting a proof sheet, the 2210 will print a color proof of thumbnail-size images of all that resides on your film. You then “order” the desired prints by coloring in selection circles under the prints you want. You can also specify number and size. Plop the order sheet on the built-in scanner, load some photo paper, and press “print.” The scanner reads your order and the printer goes to work; all this without a PC in the loop if you elect to use the printer as a stand-alone item.
 |
| Figure 9. The Hi-Touch 630PS dye sublimation printer. |
The other printer variety, the dye sublimation printer, is intended for photo reproduction only. One model, the Hi-Touch 630PS, will work as a PC slave or as a stand-alone and will produce great borderless 4×6 color prints in under 2 minutes per print. Net cost on the prints is around $0.50 a print. The Hi-Touch is small and has a nifty color LCD in its wired remote control that allows you to choose your images for printing. The Hi-Touch also allows size, contrast, and cropping adjustments from the remote control, a very cool feature (Figure 9). This item is also available at Photomed International as well as through other photo dealers. Currently, I have a Hi-Touch in my operatory that allows me to generate quick prints of fractured teeth for third-party carriers as well as for patient distribution. I keep a 2210 in a remote location, where I can take advantage of its other capabilities.
OTHER DOODADS…
For the sake of completeness, you will need a few other doo-dads. Cheek retractors, a set of occlusal mirrors (adult and pedo), and an extra digital film will be helpful. I recommend an additional 128-MB film pack. Make sure the film pack matches the film format used by your camera; Compact Flash for Canon, and Smart Media for most of the Olympus cameras. The newer Olympus 5050, a 5-megapixel camera, will handle both formats plus the new XD format as well.
While not a must, it might also be helpful to look for a dental digital photography course in your area. Lots of great info can be had online as well (dentaltown.com).
WHERE CAN THIS LEAD?
 |
| Figure 10. A Smile Vision simulation viewed Online. |
What will all this high-tech gear net you? In addition to what’s already been described, other doors will open. The cosmetic simulation will be just a stone’s throw away, and you needn’t be a board-certified mouse jockey to take advantage. Companies such as Smile Vision (smilevision.net) will allow you to upload digital portraits for digitally simulated cosmetic rehabs; again, a formidable marketing tool (Figure 10). Additionally, programs such as Microsoft’s Publisher and PowerPoint will begin to make sense, allowing you to create your own patient presentation aids. Care to be a dental author? A digital camera is nearly mandatory these days.
 |
| Figure 11. Screen shot of Clear Match in action. |
Are you color blind when it comes to taking shades? Smart Technologies (smart-technology.net) has developed ClearMatch, an ingenious software solution that can turn your digital camera into a shade-matching device without adding any additional hardware (Figure 11).
It’s also worth noting that many insurance carriers will reimburse for diagnostic photos. I routinely include these in my initial workup at our area fee of $44. Even when not covered, patients generally do not object to the additional fee as they seem to appreciate the value of the digital imaging as a codiagnostic tool.
The intangible benefit is the new light in which your patients will view you, particularly new patients who haven’t had the history to develop trust in you. You’ll be viewed as enlightened and cutting edge. Beyond a doubt, patient compliance with your recommendations will increase. Blind faith is taken out of the equation, replaced with codiagnosis.
CONCLUSION
Admit it! The positives of digital photography are overwhelming. The short learning curve needed to make you a digital expert will be rewarded many times over. Everyone will benefit. Now GET GOING!!
Dr. Goldstein practices general dentistry in a group setting in Wolcott, Conn. He enjoys promoting the cosmetic side of his practice and has found it helpful to incorporate high-tech methodology into his daily routine to accomplish this. Dr. Goldstein serves on the staff of contributing editors at Dentistry Today and contributes regularly to multiple dental periodicals. He can be contacted at martyg924@cox.net, or at his office at (203) 879-4649. He lectures on both digitalimaging in dentistry and on the use of such high-tech methodology to further the cosmetic and restorative practice.