INTRODUCTION
Digital imaging in current dental practice is commonplace. This can include radiographs, impression taking, and intraoral and extraoral photography. The use of photography in dentistry has evolved from 35 mm single lens reflex cameras to digital image capture devices, including intraoral cameras, point-and-shoot cameras, and digital single lens reflex cameras (DSLR).
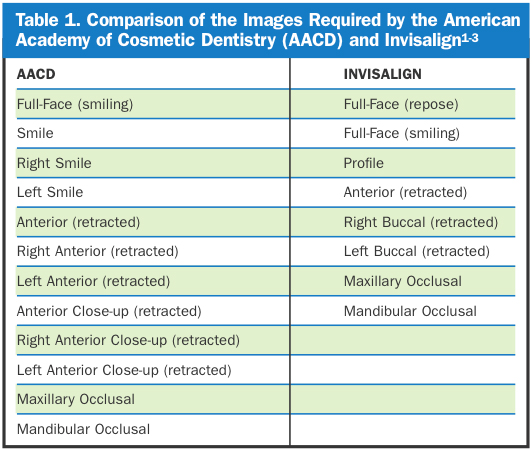
Dental practitioners utilize patient images for many reasons, including patient education, medicolegal documentation, communication with other practitioners or laboratory technicians, and marketing. The American Academy of Cosmetic Dentistry (AACD) has proposed 12 standard intraoral and extraoral views for patient documentation.1,2 However, not all of the AACD views are applicable or needed for each patient. Invisalign (invisalign.com)3 requires 8 intraoral and extraoral views for patient case submission, 7 of which are consonant with the AACD series. Table 1 compares the views for the AACD and Invisalign.
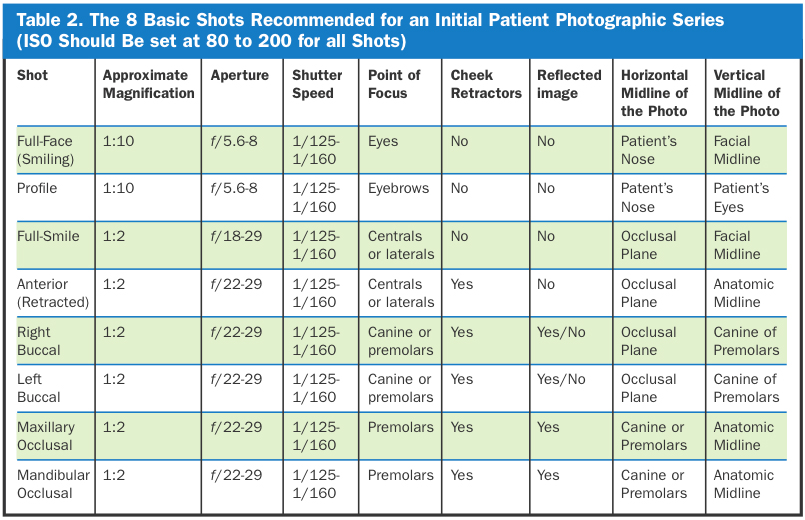
Each particular patient or clinical circumstance may dictate the need for a specific intraoral or extraoral image. In general, practitioners should capture 8 basic views to record a patient’s clinical condition during the initial patient visit. Additional views may be captured as needed based on the patient’s clinical findings or treatment provided. The 8 basic views are shown in Table 2 and include:
1. Full-face—smiling
2. Full-face—profile
3. Full-smile
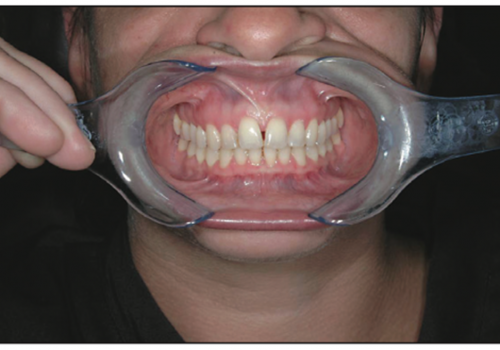
4. Anterior (frontal) view—retracted
5. Right buccal—retracted
6. Left buccal—retracted
7. Maxillary occlusal
8. Mandibular occlusal.
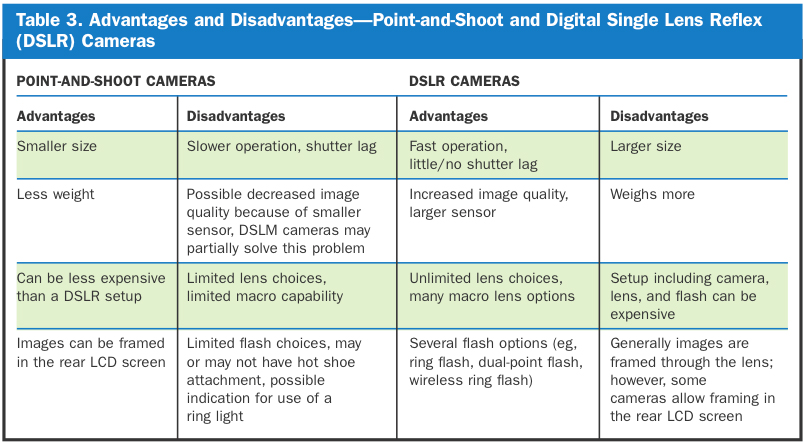
The purpose of this article is to present tips and tricks to help capture these 8 basic views with a focus on the use of point-and-shoot and DSLR cameras. Table 3 summarizes the differences between a typical point-and-shoot camera and a typical DSLR camera. Usual camera settings (eg, aperture, shutter speed, ISO, magnification) will be listed, but our intent is to describe the techniques and patient positioning required to capture the images. Exact camera settings will vary by type or camera used. Knowing how to capture each image consistently and predictably will help practitioners increase efficiency and reduce wasted chair time.
 |
EQUIPMENT
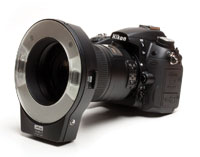
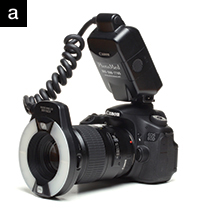
In general, there are 3 components to consider when it comes to dental photography: the lens, the flash, and the camera itself. These 3 components comprise the standard setup. In the case of a point-and-shoot camera, all 3 components are in one package; by comparison, a DSLR camera will require an additional lens and flash (Figures 1a to 3).
Additional equipment required for the basic dental photographic series includes a solid-color nondistracting background, cheek retractors, buccal mirrors, and occlusal mirrors (Figure 3). Table 4 provides some additional resources for camera equipment, accessories, and educational materials.
Cameras
Digital cameras, either point-and-shoot or DSLR, become obsolete almost as fast as they are introduced into the consumer market. The Nikon D1 DSLR was introduced in 1999 and featured a 2.7 mega-pixel sensor. This camera cost approximately $5,000, and at the time of this writing the latest Nikon D800 DSLR has a 36 mega-pixel sensor and costs $2,999. Similar histories exist for Canon and other camera manufacturers.
 |
How the digital camera and resulting images are used may help determine which camera setup to purchase. For example, if the camera is needed for “quick snaps” to capture patient images that are only for use in communication with a laboratory or consulting practitioner, a point-and-shoot camera may be ideal. However, if the images are to be used for marketing purposes, case presentations, or when more creative flexibility is needed, a DSLR may be indicated.
The advantages of a DSLR include improved image quality, speed of operation, increased depth of field, and adaptability compared to a point-and-shoot. Disadvantages include cost, size of the setup, and weight. Advantages of a point-and-shoot camera are size and weight, cost, and the ability to frame the image in the camera’s LCD screen. Disadvantages include the potential for poorer image quality, limited lens and flash choices, and slower operation when compared to DSLRs. Both point-and-shoot and DSLR cameras offer more than enough resolution (ie, megapixels) for dental use.
There is a new type of camera called an interchangeable lens camera that is a hybrid of the point-and-shoot and DSLR (such as the Sony Alpha NEX, Lumix G Micro [Panasonic], and Nikon N1). These cameras feature the flexibility of interchangeable lenses, a hot shoe flash attachment (see Flashes on next page), and a larger sensor than point-and-shoot cameras. Unlike DSLRs, interchangeable cameras are referred to as mirrorless because they do not have a mirror-based viewfinder; shots are composed on the rear LCD display. As a result, the term digital single lens mirrorless (DSLM) is used to refer to this new type of camera.
Lenses
The digital camera setup selected for intraoral and extraoral use must have one basic feature: the ability to focus up close, commonly referred to as macro focusing or close focus. Macro photography is close-up photography; the classic definition involves capturing an image on the film or digital sensor that is close to the actual size of the subject. For point-and-shoot cameras, the macro setting is usually denoted by the flower icon (or MF for macro focus) and enables the camera to focus at closer distances. For example, the Canon G1X in macro mode will focus at a distance of approximately 8 inches, but in standard mode the minimum focus distance is approximately 16 inches. Macro capability for DSLRs is a function of the individual lens chosen. Rather than listing a minimum focusing distance as with point-and-shoot cameras, macro capability is defined by the magnification where 1:1 indicates that the object size captured on the digital sensor equals the actual life size.
 |
Many interchangeable lenses for DSLR cameras are listed as “macro”; however, true macro lenses offer 1:1 magnification or greater. For example, the Tamron 70-300 mm f/4.0-5.6 interchangeable lens for Canon or Nikon is listed as a “macro zoom”; however, its maximum magnification is 1:2 (the object size captured on the digital sensor is one half the actual life size). Dedicated macro lenses (such as the Nikon 105 mm f2.8 or Canon 100 mm f2.8) are capable of 1:1 magnification, and are better suited for dental use.
Flashes
The third essential component of the standard setup for successful dental images is flash illumination. In most cases, dental images (both intraoral and extraoral) will be taken using a flash. Point-and-shoot cameras typically have an on-board flash; however, DSLR cameras allow for a hot shoe mounted flash (the hot shoe is a mounting point on top the camera that allows attachment of a external flash unit or other accessories). The most common hot shoe mounted flash used for dental photography is a ring flash. A ring flash is a circular-shaped electronic flash unit that fits around a lens and provides shadowless uniform frontal lighting, especially useful in close-up photography.
The 2 principal means of flash illumination are via on-board flash (built-in flash on a point-and-shoot or pop-up flash on a DSLR) or external hot shoe mounted flash. The use of on-board flash illumination for dental images is convenient but usually inadequate. In the case of point-and-shoot cameras, use of the on-board flash generally provides inconsistent results caused by both overexposed and shadowed areas within the same image. A flash diffuser (a frosted or white plastic attachment on the front of the lens) may help to more evenly distribute the light and illuminate the entire image (Figure 1d).
 |
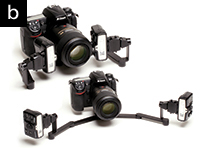 |
| Figure 1a. Canon digital single lens reflex (DSLR) with ring flash. Photo courtesy of photomed.net. | Figure 1b. Nikon DSLR with dual-point flash. Photo courtesy of photomed.net. |
 |
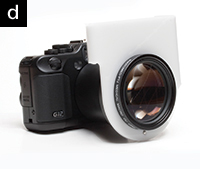 |
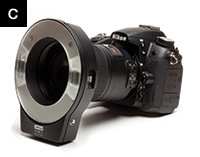
| Figure 1c. Nikon DSLR with Metz MS-1 Wireless Ring Flash. Photo courtesy of photomed.net. | Figure 1d. Canon point-and-shoot with tube adaptor, close-up lens and flash diffuser. Photo courtesy of photomed.net. |
 |
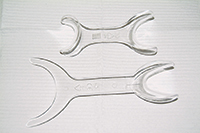 |
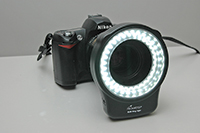
| Figure 2. Nikon DSLR with Promaster RL 50 Ring Light. | Figure 3. Universal clear plastic cheek retractors (above), adult clear plastic retractor with fork retractor for maxillary and mandibular occlusals (below, left), and buccal retractor for views without a mirror (below, right). |
There are 2 types of external flashes commonly used for capturing dental images: ring flash (Figure 1a), and dual-point flash (Figure 1b). Either flash system will provide acceptable results for dental images, and choosing one over the other may be personal preference. Ring flashes provide uniform, flat, and shadowless illumination; however, the disadvantages of a ring flash may be that surface texture and characterization are not easily captured, and reflection on facial surfaces may occur. A dual point flash is composed of 2 individual point flashes positioned at the front of the lens barrel. For creative control, one or both point flashes can be fired to produce a more 3-dimensional representation of texture and topography. The disadvantage of a dual-point flash is that images of posterior teeth can be more challenging.4-6
 |
Two variations on the above described flash units are the wireless ring flash system by Metz (Metz MS-1 Wireless Macro Flash [photmed.net]) (Figure 1c) and ring lights (Figure 2). Ring lights are very similar to ring flashes but instead of a flash firing when the shutter button is depressed, they are made up of LED lights that stay on continuously. An example is the Promaster RL50 Macro ring light (promaster.com/products.asp?product=7487) that also attaches to the front of the lens barrel and can provide adequate lighting for dental images.
GETTING THE SHOTS
Before attempting to capture images, it is critical that both camera and flash (if applicable) have charged batteries, and that an appropriate memory card is inserted into the camera. Cheek retractors and dental mirrors should be clean and ready for individual patient use. In some cases, practitioners may choose to have a hot water bath available for heating the mirrors to prevent fogging. Also, it is very helpful to have an assistant available to help with holding retractors, blowing air on a mirror to prevent fogging, or other tasks requiring an additional pair of hands.
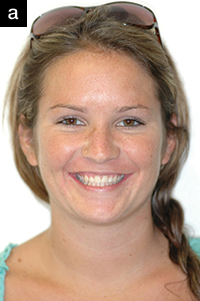
Shot No. 1: Full Face—Smiling
The full-face shot should be taken directly in front of the patient, against a solid-color, nondistracting background (eg, white, gray, or black) (Figures 4a to 4e). When possible, the operator and patient should be at the same height so that the resulting picture is not taken from below or above the patient’s eye level.5,7 The AACD recommends a horizontal orientation (ie, landscape) of the camera; however, many practitioners may choose to orient the camera vertically (ie, portrait) to more easily capture the patient’s head without excessive background showing.1 Try to center the patient’s eyes as the horizontal midline of the photo; the facial midline should optimally be centered vertically. The point of focus is the patient’s eyes.
 |
 |
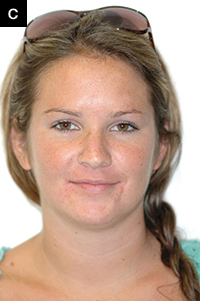 |
| Figures 4a to 4c. Example of full-face smiling, profile, and full-face in repose, vertical (portrait) orientation of the camera, light background. |
 |
 |
| Figures 4d and 4e. Example of full-face smiling and full-face in repose, horizontal (landscape) orientation of the camera, light background. |
The patient should exhibit a natural smile for this view; if possible, showing teeth. A complementary view to full-face smiling is the full-face at repose (ie, relaxation), which may be very useful to assess lip competency and incisal position. To avoid shadowing behind the patient, ensure that the patient is not up against the background but slightly in front of it.
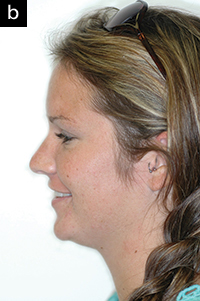
Shot No. 2: Full Face—Profile
The profile shot is accomplished similarly to the full-face shot, except with the patient turned 90° (Figures 5a to 5c). The relative heights of the operator and patient should remain the same; the camera settings are unchanged. The point of focus should be the patient’s eyebrows, and the patient’s nose should be the horizontal midline of the photo. It is recommended that the patient’s lips remain at rest; however, an additional view is the profile with the patient smiling.
 |
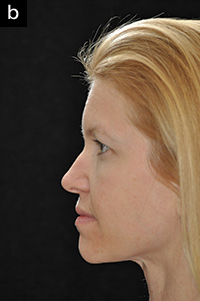 |
| Figure 5a. Example of full-face smiling, dark background. | Figure 5b. Example of profile in repose, dark background. |
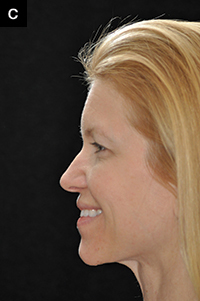 |
| Figure 5c. Example of profile smiling, dark background. |
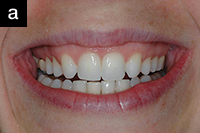
Shot No. 3: Full-Smile
For this shot, a point-and-shoot camera should be switched to macro mode; DSLR macro lenses should be used at approximately 1:2 magnification (Figures 6a and 6b). Attempt to take the photo from directly in front of the patient, avoiding a downward or upward angle of view. The patient should exhibit a natural smile, with framing of the photo extending from the right to left corner of the mouth. Point of focus for this shot is on the central or lateral incisors. The horizontal midline should be the incisal plane; the vertical midline should be the anatomic midline. The AACD recommends operators not tilt the camera to compensate for a canted incisal plane.1
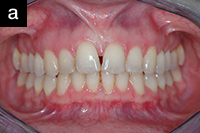
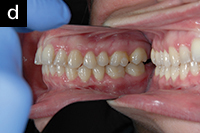
Shot No. 4: Anterior (Frontal) View—Retracted
To achieve the retracted anterior (frontal) view shot, the patient should ideally be seated in the dental chair with the operator standing in front of the patient (Figures 7a and 7b). Cheek retractors must be used with the lips retracted outward, away from the teeth. Whenever possible, minimize the appearance of the cheek retractors in the image. Clear plastic retractors are typically used because they are nondistracting and may be seen in the photograph, although they are more breakable with repeated use and sterilization; metal retractors may be more distracting but will last longer. A common error during retraction is pulling the lips outward and backward; this results in the buccal soft tissue resting against the teeth and preventing adequate visualization of the buccal corridors. Use the largest set of retractors that the patient can comfortably tolerate to avoid the center of the upper and lower lip from showing in the photograph. The horizontal midline should be the occlusal plane and the vertical midline should be the anatomic midline. If possible, air-dry the teeth to minimize the appearance of saliva and to better capture the gingival appearance. The teeth should be together in maximum intercuspation, although a complimentary image with the teeth slightly apart may help in recording the appearance of incisal edges.
 |
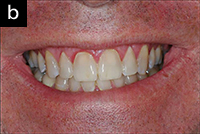 |
| Figure 6a and 6b. Examples of full-smile. |
 |
 |
| Figures 7a and 7b. Examples of anterior shot using clear plastic cheek retractors. |
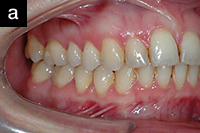
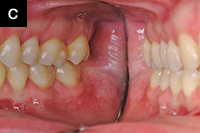
Shots Nos. 5 and 6: Right and Left Buccal Views
The right and left buccal views are accomplished using the same patient and operator position and same camera settings as the frontal view (Figures 8a to 8d). They can either be achieved using a direct view with retractors or a reflected view with a buccal mirror (Mirror No. 1B).
For the direct method, place both cheek retractors and shift the retraction to the side being photographed. For example, if the right side is to be captured, the right retractor should be pulled out and away from the teeth, while the left retractor is left slack and not pulled but simply holding the lips apart. Standard adult cheek retractors may be used; however, it is helpful to use buccal retractors to more easily capture all the teeth in the image. The difference between standard and buccal retractors is the shape: standard retractors are U-shaped while buccal retractors are V-shaped (Figure 3). The teeth should be in maximum intercuspation; the horizontal midline should be the occlusal plane. The vertical midline should be the canine, but may be variable based on the angle of view and number of teeth captured. Ideally, the canine and molar relationship should be visualized; however, with proper retraction it is usually possible to capture the entire buccal segment from second molar to incisors. Practitioners may choose to take an additional photo of the teeth slightly apart to view incisal edge position.
 |
 |
| Figure 8a. Buccal view using clear plastic buccal retractor. | Figure 8b. Positioning required for the buccal reflected view. Assistant or patient holds the retractor on the contralateral side. Operator holds the mirror. Photograph is taken in the mirror of the reflected buccal segment. |
 |
 |
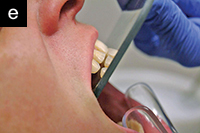
| Figure 8c. Close-up view of the position of the mirror used for capturing the buccal reflected view. Note the mirror is touching the soft tissue and retracted away from the teeth. | Figure 8d. Note that the mirror is retracted away from the teeth, and rotated outward to provide the correct angle to capture the entire buccal segment. |
The buccal view taken with a mirror is a more technically difficult shot compared to the retracted buccal view. In this instance, a single cheek retractor is used for the contralateral side and a buccal mirror is used to both retract the tissue and visualize the teeth on the side being photographed. Again, to prevent mirror fog, it is sometimes useful to warm the mirror in a water bath, or simply ask the assistant to gently blow air on the mirror. It is also useful to have the patient breathe in and hold his or her breath once the mirror is inserted to further obviate fogging. Whenever possible, eliminate excess moisture from the mirror before capturing the image. It is recommended that the assistant hold the cheek retractor and the operator hold the mirror. After the cheek retractor is inserted, ask your patient to open so that the mirror can be inserted. Once the mirror is outside the teeth, the patient should bring the teeth together. Advance the mirror so it is resting on buccal tissue behind the most distal tooth. At this point, the mirror should be pulled outward so the end is not resting on the teeth and rotated to visualize the arch. The point of focus is the premolars, and the occlusal plane should be the horizontal midline. It is sometimes useful to take an additional photo with the teeth slightly apart.
Common errors for the reflected buccal view include: allowing the end of the mirror to rest on the teeth, possibly resulting in a double image showing unreflected teeth; not using a cheek retractor on the opposite side, preventing full visualization of the anterior teeth; inadequate framing; and fog on the mirror.
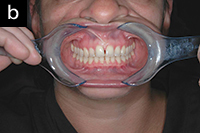
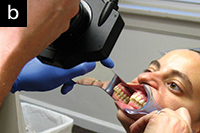
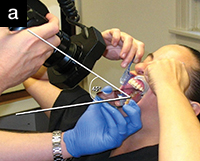
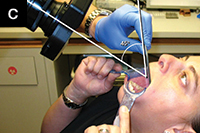
Shot No. 7: Maxillary Occlusal View
For many practitioners the maxillary and mandibular occlusal shots present the most difficulty (Figures 9a and 9b). This shot is always taken with both retractors and an occlusal mirror. Camera settings are identical to the anterior retracted shot, although patient and operator positioning are different and ultimately critical to success. The patient should be reclined to approximately 45° and asked to raise his or her chin. The operator should be in front of the patient. Cheek retractors should be placed so that the lips can be pulled upward and outward; in some cases the medial corners of the cheek retractors will touch at the middle of the upper lip. If properly used, the cheek retractors will keep the buccal soft tissue and lips off of the teeth, allowing for proper visualization of not only the posterior teeth but the anterior teeth as well. Standard cheek retractors or “fork” retractors may be used (Figure 3).
The mirror should be inserted so that the edge extends behind the most posterior tooth. It may sometimes rest on the tuberosity as a means of stabilization. Rotate the mirror downward so that the back side is touching the lower incisor teeth. In doing so, the operator can help the patient “open wide” but also attain the 45° angle needed to properly capture the image. Fogging of the mirror can again be a challenge with preventive strategies including warming the mirror, gentle bursts of air, or asking the patient to breathe in and hold his or her breath.
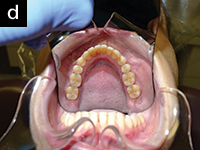
The image captured should ideally include all maxillary teeth and allow visualization of incisal edges and embrasures.1,2 The vertical midline should be the anatomic midline of the patient, and the point of focus should be the premolars. In some cases the operator must allow the camera to focus on the premolars (eg, hold the camera shutter button half-way, locking the focus), and then recompose the image to achieve better framing. If the center of the palate is used as the point of focus, the teeth may appear out of focus because of limited depth of field.
Shot No. 8: Mandibular Occlusal View
The mandibular occlusal shot is accomplished with the same camera settings, and similar positioning of the patient and operator as the maxillary occlusal (Figures 9c to 9e). The patient should be reclined at a minimum of 45°, and should raise the chin as far as possible (neck extended maximally). Standard retractors (or a fork retractor) should always be used to keep soft tissue and lips off of the teeth. If standard cheek retractors are used, they should be positioned to pull the lips downward and outward. Insert the mirror so that the end rests on soft tissue behind the most posterior teeth, making sure that it is not touching the teeth. Rotate the mirror upward so that the back of the mirror is resting against the maxillary incisor teeth; the image should be taken at approximately 45° to the mirror.
 |
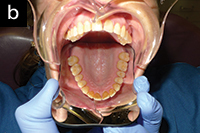 |
| Figure 9a. Positioning of the patient and the operator to capture the maxillary occlusal shot. Note the position of the cheek retractors upward and outward. Optimally, the angle to the mirror should be 45º to fully capture the teeth in the photograph. | Figure 9b. Wide view of positioning to capture the maxillary occlusal shot. Note the position of the cheek retractors upward and outward to pull the lips and soft tissue away from the teeth. The back of the mirror is behind the most posterior maxillary teeth. |
 |
 |
| Figure 9c. Positioning of the patient and the operator to capture the mandibular occlusal shot. Note the position of the cheek retractors pulled downward and outward. Optimally the angle to the mirror should be 45º to fully capture the teeth in the photograph. | Figure 9d. Wide view of positioning to capture the mandibular occlusal shot. Note the position of the cheek retractors downward and outward to pull the lips and soft tissue away from the teeth. The back of the mirror is behind the teeth and resting on soft tissue. |
 |
| Figure 9e. Close-up showing the back of the mirror touching the maxillary teeth when preparing to capture the mandibular occlusal shot. |
Too often, the patient’s tongue may prevent visualizing all of the mandibular teeth. It is sometimes helpful to ask the patient to “lower your tongue,” having the patient practice doing so in a facial mirror. Other times it may be possible for the patient to move the tongue to the posterior, or the mirror could be used to hold the tongue out of the way.
The image should be framed so that the vertical midline is the anatomic midline of the patient. Like the maxillary occlusal shot, ideally all mandibular teeth are visible and the anterior incisal edges and embrasures are discernable. The point of focus for the mandibular occlusal shot are the premolars. Recomposition may be necessary after focusing as described for the maxillary shot.
Common errors for the occlusal shots include: allowing the end of the mirror to rest on the teeth, potentially producing a double image or viewing unreflected teeth; capturing the image at less than 45°, which results in unreflected teeth being seen in the image; fogging of the mirror; inadequate framing; and obscuring of the teeth by the tongue.
CLOSING COMMENTS
Given the easy access to many different digital camera systems, practitioners can now select the setup that best suits their practice needs. By improving the quality of the images captured, patients can visualize the current condition of their teeth as well as appreciate the results of treatment.
Using the strategies for the 8 basic views discussed herein, practitioners can consistently acquire excellent results for before/after photographs as well as for marketing, publishing, or any other purpose needed. There are of course many other views that can be obtained, from lingual views to extreme closeups on a single tooth, and as practitioners learn how to capture the 8 basic images using good technique and positioning, adding additional views becomes much simpler.
References
- American Academy of Cosmetic Dentistry. Photographic Documentation and Evaluation in Cosmetic Dentistry: A Guide to Accreditation Photography. Madison, WI: American Academy of Cosmetic Dentistry; 2009.
- Lowe E. Digital photography—The AACD Series, Part 1. Journal of Cosmetic Dentistry. 2010; 26:25-30.
- Patient photographic records. aligntechinstitute.com/GetHelp/Documents/pdf/PhotographicQSG.pdf. Accessed September 25, 2012.
- Terry DA, Snow SR, McLaren EA. Contemporary dental photography: selection and application. Compend Contin Educ Dent. 2008;29:432-436, 438, 440-442.
- Ho C. Clinical photography: a picture can tell a thousand words. Dent Pract. 2004;Nov-Dec:148-154.
- Shorey R, Moore K. Clinical digital photography: implementation of clinical photography for everyday practice. J Calif Dent Assoc. 2009;37:179-183.
- Fondriest J. Improving your portrait photography. Journal of Cosmetic Dentistry. 2008;24:66-73.
Dr. Goodchild completed his undergraduate training at Dickinson College, and later received his DMD from the University of Pennsylvania School of Dental Medicine. He is clinical associate professor in the department of oral medicine at the University of Pennsylvania School of Dental Medicine. He is also a clinical assistant professor in the division of oral diagnosis in the department of diagnostic sciences at the New Jersey Dental School. Dr. Goodchild has published numerous peer-reviewed articles on the topics of sedation, methamphetamine abuse, and pain control. He serves as a journal reviewer for the Journal of the American Dental Association, General Dentistry, and Quintessence International. He has been an invited speaker for the AGD and American Association for Dental Examiners. He can be reached at (610) 446-4225 or at gojason@dental.upenn.edu.
Dr. Donaldson received his baccalaureate degree from the University of British Columbia, and his doctorate in clinical pharmacy from the University of Washington. He completed a residency at Canada’s largest tertiary care facility, Vancouver General Hospital, and is the current director of pharmaceutical services at the Kalispell Regional Medical Center. Dr. Donaldson is a clinical professor in the department of pharmacy at the University of Montana in Missoula, and clinical associate professor in the School of Dentistry at the Oregon Health & Sciences University in Portland, Ore. He has a special interest in dental pharmacology and has lectured internationally to both dental and medical practitioners. He has spent the last 12 years focusing on dental pharmacology and the art of dental therapeutics, and has become a leader in this field of study. Dr. Donaldson has a number of published works in the peer-reviewed literature, and has spent 3 years in Japan focusing on cross-cultural communication and internationalization. He currently serves on the editorial board for the Journal of the American Dental Association. He can be reached at medworx@bresnan.net.
Disclosure: The authors report no disclosures.