
Having returned from the Chicago Dental Society’s Midwinter Meeting, it’s time to update you on what’s new for 2012 in the dental photography department. Consider this piece to be a buffet, from which I’ll serve up an assortment of tasty bits of info; enough to whet your appetite and compel you to do your own research on whatever interests you.
By now, we are all aware of the importance of digital photography to dentistry. And like every other facet of our profession, nothing is as constant as change. Fortunately, for many of us who have contemporary dental camera systems, change in 2012 comes under the heading of “subtle.” You may already know the drill: more megapixels, better HD video capabilities, more functional “live view” capabilities, a button moved here, and a button moved there. If you’ve purchased a system in the last 3 years, you are not yet obsolete in the pure sense of utility. Your playback display may be smaller and with lower resolution, and you might not have video capability, but undoubtedly you’re still a player. For those with systems that are closer to 5 years old (or beyond), it might be time to hand down your current favorite to a deserving associate and to add a new model to your lineup. Make no mistake—the upgrades, though subtle, create a more enjoyable picture-taking experience both in ease of use and speed of operation. Case in point: just the other day I handed down a Canon T2i system to my associate who had been using my old Canon 20D outfit that featured the postage stamp-sized playback screen and a chunky body. Suddenly she’s taking pictures like it’s going out of style. There’s something to be said for ease of use! Ease of use translates into faster and more accurate focusing, brighter high-resolution playback screens that make it easier to determine image quality, buttons that are more conveniently accessible on the camera body, lighter weight bodies that are easier to hold, wireless flash units that reduce bulk and cables, the list goes on. That being said, let’s first head over to this year’s camera recommendations.
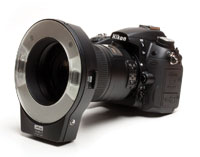 |
| Figure 1. The PhotoMed-configured Nikon D7000: equipped with a 85-mm Nikkor lens and Metz MS-1 flash unit. |
MARTY’S SLR SKEWERS
The 2 models covered here had just made it to market for my 2011 Dentistry Today photography update article (available online at dentistrytoday.com). As of today, they have established themselves as full-featured examples of today’s prosumer digital single-lens reflex (SLR) characterized by all of the bells and whistles that a dentist could need. They are Canon’s Rebel T3i and Nikon’s D7000 (Figure 1). I present them here in a side-by-side comparison but encourage you to take a look at them at your favorite dental camera Web site (such as photomed.net). In this way, you can research the varieties of configurations in which dental camera systems are now available. I would recommend the Nikon be purchased with the 85-mm Nikkor lens (AF-S DX Micro-Nikkor 85mm f/3.5G ED VR) and Metz MS-1 flash unit; while the Canon is best equipped with the 100-mm Canon lens and Metz MS-1 flash unit. In general, camera bodies perform best when coupled with the same manufacturer’s lens. Better performance, in this instance, means faster and more accurate focusing; particularly if you prefer autofocus when capturing your images. The Canon model may be thought of as the best “bang for the buck” as it comes in at several hundred dollars less than the Nikon (when configured as I am suggesting). However, the Nikon possesses 2 user presets that PhotoMed configures for dental imaging and portrait imaging; this is done so that no matter who plays with the camera buttons, everyday settings can always be recovered by turning the main dial to the user preset modes; the T3i is lacking this feature. In a multiuser office, this feature can be a lifesaver.
The specs for both systems can be seen in the Table.
| Table. Features and Specifications Comparison | |||||||||||||||||||||||||||||||||||||||
Source: Comparison courtesy of Mike McKenna at PhotoMed International. |
Also of Note in the SLR Department
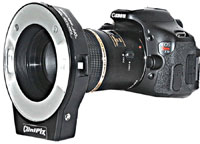
I would also like to mention 2 other popular vendors in the SLR department, Dine Corp (dinecorp.com) and CliniPix (clinipixinc.com), which had previously configured many of their Canon and Nikon systems with Sigma’s 105-mm macro lens and have now switched to Tamron’s 90-mm macro lens. (The Sigma lens has been discontinued.) This lens change has worked out for the best on 2 counts. The Tamron lens is less bulky and, most importantly, it allows for the use of autofocus on Nikon systems. This luxury was unavailable when using the Sigma lens with the Nikon bodies to which they were coupled (Figure 2).
Point-and-Shoot Pick-Me-Ups
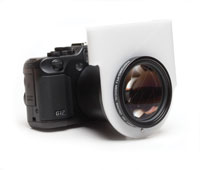
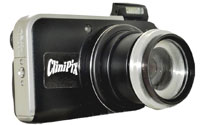
Only a little change in this department as compared to last year. PhotoMed’s and Dental Learning Center’s Canon G12 based point-and-shoot solutions still represent the high end in this category and are available in kit form. The Canon G12 remains the SLR wannabe, offering high-resolution images in a very easy-to-hold package. Keep in mind that these systems, the more costly of the point-and-shoot approaches (in the $1,500 range), are manually focused with an “autofocus assist.” This feature creates a slight learning curve for the user who is new to this method of photography. The reward is getting images that are indistinguishable from images taken with an SLR outfit; all from a camera that is easy to pack and take on vacations due to its compact size (dlcenters.com; photomed.net) (Figures 3 and 4). Dine Corp has replaced the Optio W90 with Pentax’s WG model that is built for even the toughest dental office team members. As an aside, you can even take it snorkeling with you because it is waterproof, dustproof, and shockproof (Figure 5). I have several of these “floating” around my office for my hygienists to use. Finally, CliniPix still offers their 123-EZ kit based on the Canon SX210 IS. This little camera, one of Canon’s more ingenious pocket cameras, is retrofitted with a macro lens that allows the user to take both close-up and portrait shots with the same lens. (The macro lens is not designed to be removed.) The 123-EZ is sold in kit form with a variety of needed accessories, and it competes with Dine Corp’s $695 Pentax WG model in the price-point department (Figure 6). You may ask, “What differentiates the 2 systems?” The Canon SX210 IS ranks higher on the camera sophistication scale since it is a fully-adjustable camera that allows for shooting in an aperture priority mode. In the end, both systems are easy to operate and yield more than adequate images.
 |
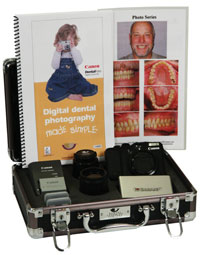 |
| Figure 2. The CliniPix-configured Canon Rebel T3i, with the Tamron 90-mm macro lens and Metz MS-1 flash unit. | Figure 3. DL Learning Centers’ Canon G12-based DentalFoto kit. |
 |
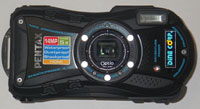 |
| Figure 4. PhotoMed-equipped Canon G12 with macro lens/diffuser attachment. | Figure 5. Pentax WG model; offered by Dine Corp as a low-cost dental photo solution. |
 |
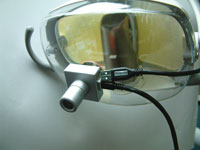 |
| Figure 6. The CliniPix’s 123-EZ point-and-shoot, based on Canon’s SX210 IS camera. | Figure 7. MZK Dental Products’ ThirdEye-Photo; a multipurpose video/still camera that attaches to your dental light. |
 |
 |
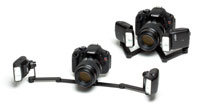
| Figure 8. PhotoMed’s dual-point source flash bracket; shown with Canon’s 270 EX II dual-point wireless flash units. | Figure 9. PhotoMed’s dual-point source flash bracket; shown with Nikon’s R1C1 dual-point wireless flash units. |
NOT CHOPPED LIVER
Now, what do I mean by that? This next item on the buffet is little known to dentistry. It’s called the ThirdEye-Photo and is sold by MZK Dental Products (mzkdental.com). I can tell you from personal use of an earlier video-only model that, indeed, it’s not chopped liver. In fact, it represents the lowest cost video camera device that I’ve run across; capable of high-quality instructional video, as well as high-resolution video-captured still photos (10-megapixel stills, 1280 x 720 HD resolution videos). It attaches to one’s dental light, as seen in Figure 7. Your dental light becomes the light source for your image captures, keeping the price of system well below what comparable systems can cost. A USB 2.0 cable pipes the image directly to your PC for viewing, image capture, and video recording (no sound). A PC-based suite that accompanies the camera allows the user to manipulate and save the images that are gathered. It even features voice-activated controls. Image clarity is exceptional, with considerable depth of field. The ThirdEye-Photo sells for $3,950. Attention dental educators: Heads up on this one!
ASSORTED HORS D’OEUVRES
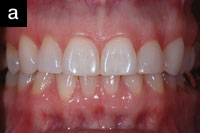
A couple of hardware accessories deserve mentioning. If you happen to be a seasoned dental digital photographer and have always wondered what some of the presenters do to make their images look so special onscreen and in print, I have the answer for you; this is particularly relevant to photographing the anterior dentition. Very simply, these dentists remove their ring flashes and replace them with dual-point source flash units that direct the light at the dentition from obtuse angles as opposed to straight-on ring flash illumination. Ring flashes, while very useful and capable of photographing the posterior dentition, have a tendency to wash out detail/color/shadow subtleties with overly harsh and flat lighting. In fact, if you look closely, you can almost always see the reflection of the ring flash unit on the facial surface of the central incisors. While this might be immaterial for simple show-and-tell photography, it is undesirable when seeking to communicate shade and color to a dental lab team member, an audience, or a readership. This is where PhotoMed’s dual-point source flash brackets are indispensable. They are best used with 2 dual-point wireless flash units, one from either Canon (the 270 EX2), or from Nikon (the R1C1). Canon also features a wired dual-point flash unit, the MT24EX: this one functions similarly with the PhotoMed bracket dubbed the R2-C for Canon flash units (Figure 8) and R2-N for Nikon flash units (Figure 9). The easily collapsible/expandable bracket permits the user an infinite number of directions from which to direct the flash illumination, allowing the photographer to dial in the lighting that best demonstrates case aesthetics. The latest Nikons and Canons have built-in transmitters that will allow wireless use of this system. In older models, it might be necessary to add an external transmitter such as the Canon Speedlite Transmitter ST-E2 or the Nikon SU-800 transmitter. It would be best to check directly with the people at PhotoMed on what would be the best solution for the system that you currently own. Note: The ability to tuck both flashes right next to the lens allows for posterior photography as well, in this instance acting much like a ring flash. This approach increases the cost of illumination, but provides the opportunity for the most lifelike digital renderings. See Figures 10a and 10b for an attempted comparison of lighting methods; I say “attempted” because this is often difficult to demonstrate in print media.
One other item that I encountered in Chicago comes to mind, most notably for the orthodontists out there. This branch of our profession has a penchant for desiring shadowless profile shots and portraits in order to better visualize changes in lip support and facial height. Harsh shadows can obscure accurate viewing. To that end, both Dine Corp and CliniPix offer light boxes to be positioned behind the patient’s upper torso and head, thus eliminating all shadows. Dine Corp’s box, the more expensive of the 2 (approximately $900), is an LED light panel that is 33 inches long and nearly 22 inches wide. It is thin and lightweight, and works with virtually all SLR camera systems. CliniPix’s light box is a “slave” flash unit that is triggered by your camera’s own flash; the box diffuses the light from the slave flash. It is designed to work with most standard flashes; however, I would recommend checking with CliniPix as to how it might best work with your system. It sells for approximately $500.
 |
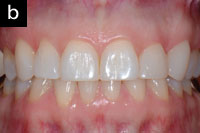 |
| Figures 10a and 10b. Side-by-side lighting comparisons: ring flash versus dual-point source. |
 |
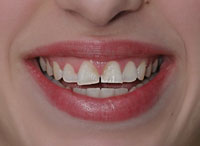 |
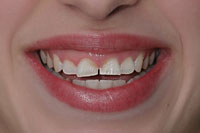
| Figure 11. Predigital gum lift photo. | Figure 12. Completed digital surgery. |
AT LAST, IT IS TIME FOR DESSERT!
And now it’s time to talk about one of my favorite subjects, cosmetic simulation. Favorite because it’s one of those areas that help to make a rapid return on what’s been invested in one’s digital camera outfit. While in Chicago, I stopped by at the SNAP Dental booth where I found their CEO, CFO, and president, Mr. Bob Ash. SNAP (snapdental.com) is a do-it-yourself simulation package that is actually usable right out of the box. What makes it useful is the ability to perform on-the-spot, unrehearsed simulations, while your patient is watching you or your assistant do the handy work. In most instances, the patient might have come in for something entirely different. In any case, most of my SNAP activities had been confined to swapping old smiles for new smiles, while using the “crowns and veneers” module. I was looking for a little bit of tutelage on how to perform a cosmetic gum lift, as well as the removal of unwanted blemishes or skin imperfections. In about 5 minutes, I had the clone tool down (much easier than Photoshop) and, in another 5 minutes, I had the gum lift mastered. (It’s almost the same as swapping smiles [Figures 11 and 12].) At that point, Bob mentioned the practice of “stacking”; that is, if a patient comes in seeking to have a Class IV on tooth No. 8 replaced, and it looks as if he or she might be a candidate for a more comprehensive rehab with perhaps a gum lift as well (remember that digital ink is cheap); show the patient the Class IV and the full-smile rehab as well as the gum lift, if it makes sense. In this manner, you can heighten the patient’s awareness of what the possibilities are and, in the long run, increase your case load. SNAP is simple enough and fast enough that, with a little practice, you can perform most simulations in as little as 5 minutes. Helpful hints are available in their built-in video help tutorials, and via their toll-free technical support line.
Of course you need to have the portrait first! That’s where your camera comes in….
For those seeking involvement in the simulation arena but not ready to purchase software, do not forget about Smile-Vision (smile-vision.net). For years, they have been a go-to imaging and ceramics laboratory, specializing in making their cases match what is seen in their simulations. Upload a portrait with your requests for improvement and, in 2 to 3 days, your simulations are ready for download or printing (or both). In our office, we actually use both approaches. I use SNAP for spontaneous patient demonstrations, and often following up with Smile-Vision to provide a tooth-by-tooth anatomically accurate simulation that will provide a blueprint for completing my cases. The 2 systems complement one another nicely.
SATIATED YET?
Well, by now you’ve surely had enough to chew on. Right? I hope I’ve provided some areas for you to look into further. Thank goodness for the Internet! Researching products is so easy these days, so long as you’re pointed in the right direction. I encourage you to broaden your digital photography horizons, and to try to take advantage of what’s out there. It’ll make the entire practice experience more satisfying.
Feel comfortable in dropping me an e-mail if you’re stumped on what camera to purchase. This has been fun! Over and out!
Dr. Goldstein, a Fellow of the International Academy of Dento-Facial Esthetics and the AGD, practices general dentistry in Wolcott, Conn. Recognized as one of Dentistry Today‘s Leaders in Continuing Education and for his expertise in the field of dental digital photography, he lectures and writes extensively concerning cosmetics and the integration of digital photography into the general practice. He has authored numerous articles for multiple dental journals internationally. He can be contacted at [email protected], and his current speaking schedule can be found at the Web site drgoldsteinspeaks.com.
Disclosure: Dr. Goldstein is a consultant to PhotoMed, SNAP Dental, and Smile-Vision.

