The growing popularity of cosmetic dentistry (or aesthetic dentistry), which often involves the preparation of multiple teeth, has emphasized the importance and necessity of provisional restorations. In order to fabricate high-quality provisional restorations, the clinician and technician should be familiar with different techniques and materials that are available. The evolution and introduction of improved products have significantly reduced the shortcomings of traditional provisional materials. This article provides an overview of different approaches to provisionalization, including an analysis of the advantages and disadvantages of the most commonly used techniques.
In the past, many clinicians did not emphasize the temporization phase of prosthetic dentistry, since provisional restorations were regarded as interim prostheses and both doctor and patient had low expectations. In spite of significant literature discussing the subject of provisional fabrication, the temporization step in the prosthetic treatment phase is often hastily performed.1
The primary objective of the provisional or transitional restoration is to provide protection for the prepared tooth and promote soft- tissue healing following trauma arising from tooth preparation and taking of the impression. In addition, it has been proposed that if a good periodontal state of health is established interproximally before the final restoration is constructed, and if this state of health is not disturbed during the construction of the restoration and exists on the day the restoration (transitional and/or final) is delivered to the patient, healthy soft-tissue interproximal papillae may be anticipated without loss of crestal bone.2-3
In terms of function, the provisional prosthesis should be carefully fabricated to protect the teeth from fracture; protect the pulp from thermal sensitivity and bacterial invasion; create proper embrasures, contacts, marginal extensions, and buccal and lingual contours; and maintain and stabilize maxillary and mandibular relationships by preventing tooth extrusion and drifting. While occlusal relationships should not be arbitrarily altered, the provisional restoration provides clinicians with a reversible opportunity to change vertical dimension and/or balance the occlusion to achieve a more appropriate result.4 In fact, the transitional prosthesis not only plays a crucial role serving as a guideline for the fabrication of the final restoration, it also offers a trial period to properly evaluate function, aesthetics, and phonetics in order to ensure that the final restoration satisfies the patient’s expectations as well as prosthetic and biological guidelines. In order to achieve an ideal final restoration, the clinician should take utmost care when approaching all steps of the procedure – diagnostic model, photography, wax-up, tooth preparation, shade selection, impression taking, material selection, provisionalization, final cementation, and post-delivery follow-up.
DIRECT PROVISIONALIZATION
The direct technique involves fabrication of the provisional restoration on the tooth preparation in the mouth. Within this context, there are many ways provisionals can be made by using the following materials/techniques: a commercially available clear tooth-form matrix, a prefabricated silicone stent based on the diagnostic wax-up, a polyvinyl siloxane (PVS) impression of the pre-preparation dentition, and provisional self-curing acrylic material, composite, or newer materials such as BIS-GMA composite. The various ways to make direct provisional restorations all involve different fabrication techniques and time, and provide different aesthetic results.
The simplest method is the one-step, single-mix technique, which requires the shortest time since only one material is used to fill the silicone stent before seating it over the preparations. Another method involves the use of a small amount of translucent/transparent material (flowable composite) in the incisal area only, and loading the rest of the stent with BIS-GMA composite before seating it over the preparation. A 2-step technique can also be used, which involves first loading the silicone index with a dentin-like material, pressing it onto the preparation, and letting it set before removal. The rough-stage provisional is then cut back to allow room for a second layer of transparent/translucent material such as flowable composite. If desired, custom stains can also be brushed onto the first layer to create a more aesthetic appearance before loading the incisal portion of the index with the second layer of material and seating again over the preparations.5
It is important at this step to give the patient a trial period to ensure his or her comfort during the intermediate phase of treatment. Whatever technique is chosen, the clinician must take care to create a smooth finish to all margins of the provisional restorations, achieve appropriate embrasures and interproximal contacts, and check all functional occlusal contacts and excursive guidance/disclusion. Once the provisional restorations are ready for cementation or spot bonding, the preparations should then be thoroughly cleaned with Tubulicid Red (Global Dental Products), spot-etched, then brushed with an unfilled adhesive (but not light-cured until the provisionals are seated). Before the provisionals are cemented, they should be coated with a glazing agent to impart a natural luster as well as smoothness.
It is advisable to have the patient return in about 7 days to perform any necessary occlusal adjustment and refinement of the provisionals to the satisfaction of both the clinician and the patient. At this point, additional photographs should be taken of the provisionals at all angles – full-face, full-smile, retracted, lateral, and occlusal views. In addition, any necessary length and width measurements (eg, central incisors) and impressions of the provisionals should be taken so that accurate stone models of them can be made and sent along with the case to the ceramist. Indeed, the fabrication of accurate restorations depends upon the clinician’s ability to communicate clearly the specific biological parameters via impressions, photographs, wax-ups, models, and other forms of documentation.6 Not only do the resin provisionals represent the clinician’s attention to quality, they also provide a sense of security to the patient while waiting for the final restorations.7
Taking into account patients’ aesthetic demands, time concerns, and properties and cost of materials, the one-step technique using a transparent flowable composite in the incisal portion and a dentin-like material in the body offers advantages for cases involving multiple preparations (see next paragraph). With the availability of provisional materials such as Luxatemp (Zenith/DMG) in different shades (A1, A2, A3, A3.5, B1, and BL) and with improved physical and optical properties, a careful clinician should be able to fabricate excellent chairside provisionals that are both functional and aesthetic.
Advantages of Direct Provisionalization
• Protects the teeth from fracture.
• Protects the pulp from thermal sensitivity.
• Protects the pulp from bacterial invasion.
• Maintains gingival health through the design of abutments and pontics.
• Creates proper embrasures, contacts, marginal extension, and buccal and lingual contours.
• Maintains and stabilizes maxillary and mandibular relationship by preventing tooth extrusion and drifting.
• No laboratory fee.
• Interproximal access not necessary because multiple units are splinted together.
Disadvantages of Direct Provisionalization
• Possible pulpal irritation or damage if using self-curing acrylics.
• Requires greater clinical training and experience.
• Less flexural strength than indirect provisional restorations.
INDIRECT PROVISIONALIZATION
In the past, without the availability of new direct provisional materials with enhanced physical properties, many clinicians preferred the indirect technique in cases involving multiple teeth and/or complex and lengthy treatment. However, with today’s technology and the availability of state-of-the-art direct provisional materials, the longstanding advantages of the indirect techniques no longer outweigh the disadvantages.
The indirect technique mainly involves laboratory- fabricated provisionals based on pre-preparation models or wax-ups. However, since the marginal fit of the provisional restorations are based on simulated preparations on study models, the restorations must be relined and adjusted at chairside. In addition, custom staining and recontouring may still be necessary.
Advantages of Indirect Provisionalization
• High flexural strength.
• Excellent aesthetics.
• Minimal risk of pulpal irritation or damage.
• Longer functional use.
• Less demanding on the clinician.
Disadvantages of Indirect Provisionalization
• Additional laboratory cost.
• Special equipment required (an oven is needed if belleGlass indirect [KerrLab], Tescera [Bisco], or Gradia Micro Ceramic Indirect System [GC America] is used).
• Second appointments needed.
• Time constraints.
CAD/CAM PROVISIONALIZATION
Another method to fabricate a long-term provisional restoration involves CAD/CAM technology. One such approach is the CEREC system (Sirona). The latest version, the CEREC 3D, has enabled clinicians to fabricate aesthetic and durable restorations from machinable ceramic (Vita [Vident] or ProCad [Ivoclar Vivadent]) or composite (3M ESPE) blocks.8 In cases involving one central incisor (either vital or nonvital), the ability to custom stain a porcelain provisional restoration allows the clinician to provide an excellent provisional restoration that not only pleases the patient, but also offers the ceramist and clinician important information regarding value, chroma, and degree of translucency in order to be able to produce a mirror image of the contralateral central incisor.
Advantages of CAD/CAM Provisionalization
• High strength.
• Very long-lasting.
• Choice of composite or porcelain materials.
• No pulpal irritation.
• Excellent aesthetics.
• Provides more information to clinician and ceramist.
Disadvantages of CAD/CAM Provisionalization
• High cost of equipment.
• Additional training required (to operate manufacturing machine).
• Not practical for multi-unit restorations.
CASE PRESENTATIONS
Case 1
 |
 |
|
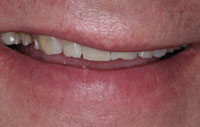
Figure 1. Preoperative view demonstrates anterior incisal fractures. |
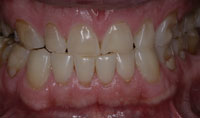
Figure 2. Anterior view of the preparation of tooth No. 9. |
 |
|
Figure 3. Provisional was fabricated with Luxatemp Fluorescence. |
The patient, a 50-year-old Caucasian in good health, presented with a major complaint of a compromised appearance of his maxillary central incisors (Figure 1).
History revealed nocturnal grinding and a previous habit of chewing on pencils. Different treatment modalities, inherent costs, advantages, and disadvantages were presented to the patient, and he elected to have an indirect porcelain veneer placed on tooth No. 9 and composite restoration on tooth No. 8. Alginate impressions and bite registration were then taken for a diagnostic model and wax-up, a silicone stent (for provisional fabrication), and custom tray (for taking an impression). Digital photos were also taken for shade mapping, since it is challenging to fabricate a single veneer on a central incisor.
On the day of tooth preparation, Citanest Plain and Xylocaine (both DENTSPLY Pharmaceutical) with 1:100,000 epinephrine were used for local anesthesia. The teeth were then conservatively prepared for a composite restoration on tooth No. 8 and a porcelain veneer on tooth No. 9 (Figure 2). Once the composite on tooth No. 8 was completed, retraction cords immersed in Hemodent (Premier Dental) were placed, and a PVS impression was made. Photos of the stump shade were taken as well as a bite registration with Blu-Mousse (Parkell). The silicone stent was then loaded with Luxatemp Fluorescence (Figure 3) and seated in the mouth. After recontouring and polishing, Kolor + Plus color modifier (Kerr Dental) was applied and light-cured, and a final layer of Premise Super Clear composite (Kerr Dental) was added and light-cured. Normally, unless the case involves an aesthetically challenging area, the use of Luxatemp Fluorescence alone can yield excellent provisional restorations.
After final polishing, the preparation was then cleaned with Tubulicid Red and spot-etched with 37.5% phosphoric acid (Gel Etchant [Kerr Dental]) for 15 seconds. Following rinse, Prime & Bond NT (DENTSPLY Caulk) was applied on both the preparation and the internal surface of the provisional, and the provisional was then seated and light-cured for 60 seconds. After routine cleanup and adjustment, more photos were taken with and without a custom-fabricated shade tab (made during previous visit). Alginate impressions were then taken for reference as well as for the fabrication of a maxillary splint to address the grinding habit and protect the dentition and restorations. The patient was then given home care instructions, including emphasis on meticulous care of the gingival tissue in the area of tooth No. 9 to prevent possible changes in the soft-tissue architecture, which would then compromise the result.
CASE 2
The patient, a 30-year-old African American, sought improvement in the appearance of her teeth and smile. Her health was very good, and she had no known allergies. Because of the severity of the overbite, the misalignment of her anterior teeth, and the multiple diastemas, orthodontic treatment was recommended. However, since the patient was soon to be married, she decided against orthodontic treatment. Taking into account all diagnostic data, an osseous crown lengthening procedure was recommended before fabrication of the anterior veneers. Impressions were taken for a surgical stent, diagnostic wax-up, silicone provisional stent, custom trays, and case presentation. Once healing was complete (approximately 6 weeks after periodontal surgery), the patient was ready for the prosthetic phase, which included 8 porcelain veneers from teeth Nos. 5 to 12.
The procedure was reviewed and consent forms were signed, then the patient was anesthetized with Cita-nest Plain and Xylocaine with 1:100,000 epinephrine. The tooth preparations were completed with subgingival interproximal margins to allow for proper emergence profile of the veneers. The silicone stent was then loaded with Luxatemp Fluorescence and was seated in the mouth. The provisionals were then contoured and checked for appearance and fit. Using the provisionals for guidance, the interproximal gingiva was shaped with a diode laser. Retraction cords were then placed, the preparations refined, and an impression was taken with a PVS material (Aquasil Ultra [DENTSPLY Caulk]).
A face-bow transfer was then made, and a stick bite and posterior bite were taken with Blu-Mousse. Photos of stump shades and the stick bite were also made. The provisionals were finished, polished, silanated with silane primer (Kerr Dental), and coated with Prime & Bond NT. The preparations were then cleaned with Tubulicid Red, spot-etched with 37.5% phosphoric acid Gel Etchant for 15 seconds, rinsed, and dried. The same adhesive was also applied onto the preparations. A thin layer of Filtek Supreme Plus Flowable Restorative (3M ESPE) was applied onto the internal surface of the provisionals before luting. Following tack-curing with a curing light, excess composite was removed with a scaler and a Bard-Parker blade No. 15C. Following final adjustment and shaping with finshing burs, Kolor + Plus color modifiers were selectively applied with a sable brush and light-cured before a final layer of glaze was applied and light-cured. The occlusion and all excursive movements were checked, home care instructions for the provisionals as well as gingival tissue were given, and photos were taken.
The patient was then rescheduled for a follow-up visit during which any necessary modifications are made to ensure that the patient will be happy with the final shape, contour, and shade of the veneers. Once the approval form was signed and dated, alginate impressions of both arches were taken for the fabrication of the veneers. When the veneers were delivered, a maxillary splint was fabricated to protect them.
CONCLUSION
 |
 |
|
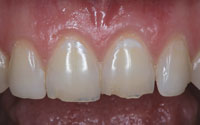
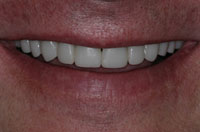
Figure 4. Smile – before. |
Figure 5. Retracted view – before. |
 |
|
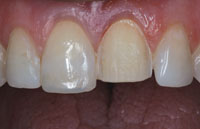
Figure 6. Smile with provisional restorations. |
Depending on the complexity of the case, the clinician should choose the proper technique to provisionalize the tooth preparations. Selection of provisional materials is based on such factors as the time the provisionals will be in the mouth, aesthetic concerns, and patient expectations. In the majority of cases that involve a major change in appearance, provisional restorations should be made to reflect accurately the form, contour, color, and transparency of the final restorations. The only difference between the provisionals and the final restorations should be the material from which they are fabricated. With currently available materials and techniques, there is no need to compromise the appearance and fit of the provisional restorations (Figures 4 to 6).
Considering the enhanced physical and aesthetic properties of many direct provisional restorative materials currently available, once a treatment plan has been developed, in most cases provisionalization can be executed at chairside using direct techniques.
References
1. Liebenberg WH. Direct pressure provisionalization technique: a new open-tray technique for complete-arch rehabilitations. Quintessence Int. 2000;31:83-93.
2. Liebenberg WH. Reducing marginal flash in the fabrication of direct provisional restorations: a new technique using light-cured resin and transparent silicone. J Can Dent Assoc. 1995;61:708-713.
3. Nevins M. Interproximal periodontal disease: the embrasure as an etiologic factor. Int J Periodontics Restorative Dent. 1982;2:8-27.
4. Rossein K. Provisionalization: the key to cosmetic & restorative success. Compend Contin Educ Dent. 1995;16:684-688.
5. Magne P, Belser U. Bonded Porcelain Restorations in the Anterior Dentition: A Biomimetic Approach. Carol Stream, Ill: Quintessence; 2002; 280-289.
6. Massironi D, Romeo G. Provisionalization as a communication parameter for definitive restoration. Pract Proced Aesthet Dent. 2002;14:301-305.
7. Rufenacht CR. Fundamentals of Esthetics. Chicago, Ill: Quintessence; 1990; 189-210.
8. Hehn S. The evolution of a chairside CAD/CAM system for dental restorations. Compend Contin Educ Dent. 2001;22(suppl 6):4-6.
Dr. Le maintains a private practice in Port Arthur, Tex, with an emphasis on aesthetic dentistry and implant dentistry. He is a Fellow of the Inter-national Congress of Oral Implantologists. Dr. Le can be reached at (409) 982-7827 or tmldds@gt.rr.com.
|
Continuing Education Test No. 82.1
|
After reading this article, the individual will learn:
• advantages and disadvantages of direct and indirect provisionalization, and
• clinical technique for provisionalization.
1. What is the main objective of the provisional restoration?
a. to provide an aesthetic appearance for the patient
b. to provide protection for the prepared tooth or teeth
c. to promote soft-tissue healing
d. b and c
2. With provisional restorations, the clinician should ____.
a. always change occlusal relationships according to his or her philosophy and training
b. never alter the patient’s existing occlusal relationships
c. rely on the laboratory technician to determine the final occlusal scheme
d. consider altering the patient’s occlusal relationships to achieve a more balanced occlusion
3. In a multi-unit case, a clinician should only proceed to the delivery of the final restorations ____.
a. after the patient has made full payment for the services
b. as soon as possible after the preparation and provisionalization appointment
c. after seeing the patient again to evaluate the provisionals in terms of aesthetics, function, and phonetics
d. after having discussed the case with the laboratory technician
4. The direct provisionalization technique may involve ____.
a. the use of a single layer of material
b. the use of a multilayered mix of materials including custom stains
c. cutting back the first layer of material to allow room for a second layer of more translucent material
d. all the above
5. Before sending a multi-unit case to the lab for final fabrication, the clinician should ___.
a. take photos of the provisionals and the patient
b. enclose the diagnostic wax-up with the case
c. have photographs and a model made from provisional restorations in the patient’s mouth, accurate measurements of length and width of the involved teeth, and a detailed laboratory prescription
d. not do anything else since the provisionals look good to both the clinician and the patient
6. What is NOT an advantage of direct provisionalization?
a. creating proper buccal and lingual contour
b. no laboratory fee
c. maintaining and stabilizing occlusal relationship
d. requiring greater clinical ability and training
7. What is a disadvantage of indirect provisionalization?
a. It is less demanding on clinician’s skills and training.
b. There is minimal risk of pulpal irritation.
c. It may require special equipment.
d. The aesthetic result.
8. The clinician should take this/these factor(s) into account when considering a provisionalization technique:
a. material properties
b. cost of material
c. length of time the provisionals will be in the mouth
d. a and c
To submit Continuing Education answers, download the answer sheet in PDF format (click Download Now button below). Print the answer sheet, identify the article (this one is Test 82.1), place an X in the box corresponding to the answer you believe is correct, and mail to Dentistry Today Department of Continuing Education (complete address is on the answer sheet).