Stress is an internal resistance to an externally applied load.1 When a load is applied, the structure undergoes strain or deformation as bonds are compressed, stretched, or sheared. Increased loading can result in irreversible deformation (strain) referred to as plastic strain, which causes permanent deformation, and this continued strain can lead to fracture.2,3
In dentistry, the restorative-tooth interface is constantly subjected to stress and strain imposed by polymerization shrinkage forces, thermal stimuli, and functional occlusal loads. These stresses may account for the clinical problems observed with adhesive restorations used in clinical dentistry. These include microleakage, marginal breakdown, fractures, secondary caries, postoperative sensitivity, inadequate marginal adaptation, staining, and potential pulpal irritation.4-7
This 2-part article will describe the stresses at the restorative-tooth interface, provide methods for management, and illustrate these methods through clinical application.
Stresses At The Restorative-Tooth Interface
The integrity of the bond and marginal adaptation to the tooth structure are critical for clinical success of composite restorations.8 The tooth-restorative interface is constantly subjected to forces during placement of composite resins and during normal function. Before a restoration is subjected to functional loading and thermal strain there is an initial interfacial stress during polymerization of the restorative material and adhesion to tooth structure.9 During a restorative procedure using composite resin, the polymerization reaction of the resin matrix phase could compromise dimensional stability.4 Therefore, a thorough understanding of the complex interplay between polymerization shrinkage and adhesion is necessary. The conversion of the monomer molecules into a polymer network is accompanied by a close packing of the molecules, leading to bulk contraction.10 Alternatively, when a curing material is bonded on all sides to a rigid structure, bulk contraction cannot occur, and shrinkage must be compensated for by increased stress, flexure, or gap formation at the adhesive interface.4
Polymerization shrinkage or curing contraction is the volumetric decrease a composite system undergoes because of the curing process.11 The cross-linking of resin monomers into polymers is responsible for an unconstrained volumetric shrinkage of 2% to 5%.12 During the polymerization reaction, the visco-elastic behavior of the composite changes from viscous to viscous-elastic to elastic. While stress does not exist in the viscous stage, in the visco-elastic stage stresses can partly be relieved by flow and elastic strain.13
 |
|
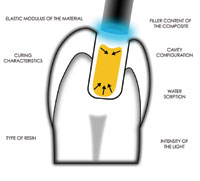
Figure 1. The factors influencing polymerization shrinkage. |
The moment at which the material can no longer provide viscous flow to keep pace with the curing contraction is referred to as the gel point.4 When the composite material develops an elastic modulus, a volumetric polymerization contraction results in shrinkage stress. Shrinkage stresses are transferred to the surrounding tooth structure, because it serves to restrict the volumetric changes.13 The uncompensated forces may exceed the bond strength of the tooth-restoration interface, resulting in gap formation from loss of adhesion.14 The factors that influence polymerization shrinkage include the following: type of resin,11 filler content of the composite,11,15,16 elastic modulus of the material,16 curing characteristics,17 water sorption,18-20 cavity configuration,5 and the intensity of the light used to polymerize the composite13,21,22 (Figure 1). By un-derstanding this complex relationship between polymerization shrinkage and adhesion, the clinician can select application techniques and restorative materials that prevent gap formation at the time of placement of each restoration.
In addition, the restorative interface is constantly subjected to functional loading after placement of the composite restoration. The cervical region of teeth may experience excessive eccentric loading from parafunctional habits such as clenching and bruxism.23,24 These repeated flexural forces can cause adhesive failure of cervical composite restorations at the dentin-resin interface, which can result in microleakage or partial or complete debonding of the restoration.25 Interceptive occlusal equilibration and fabrication of an occlusal guard prior to restorative treatment, in conjunction with specific incremental placement techniques, can provide restorative solutions.
Managing Stress On Composite Resin Restorations
Methods for preventing the undesirable effects of polymerization shrinkage include the use of a lower modulus composite resin to compensate for curing contraction stress, controlling polymerization contraction forces by the cavity design, using internal cavity liners, controlling the intensity of curing, and layering of small increments of a low-shrinking composite resin.17,26,27 Preoperative solutions for controlling excessive eccentric loading include interceptive occlusal equilibration and occlusal guard therapy prior to restorative treatment. The following sequence will illustrate the methods for managing and reducing polymerization shrinkage in a class I composite restoration.
Developing A Class I Composite Restoration
 |
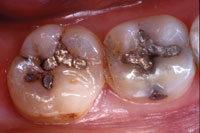 |
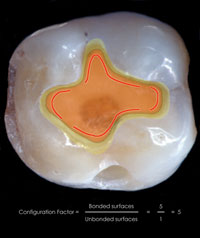
| Figure 2. A class I cavity preparation has the highest C-factor and the greatest internal stress. | Figure 3. Preoperative occlusal view of defective amalgam restorations with recurrent caries on the mandibular right first and second molars. |
The cavity configuration (C-factor) has a significant effect on the magnitude of shrinkage stresses that results from polymerization. The C-factor is defined as the ratio between the bonded and free surfaces of the restoration.5 The class I cavity has the highest C-factor (ie, class I is 5:1, class II is 4:2) and the greatest internal stress (Figure 2).
In this case, a 63-year-old male dentist presented with defective amalgam restorations on the mandibular right first and second molars. The existing restorations had open margins with recurrent caries (Figure 3). After thorough examination and assessment, the patient expressed interest in replacement of the existing restorations with tooth-colored restorations.
Restorative Procedure
Preoperative Considerations
Preoperative considerations during the diagnostic and treatment planning phase are essential for the development of functional and aesthetic restorations. Three preoperative clinical protocols should be considered before any restorative treatment is initiated.
The first protocol is to select the appropriate restorative material for the procedure. Traditionally, the dilemma associated with conventional hybrid materials for these large restorations has focused on polymerization shrinkage. As mentioned, the class I restoration exhibits the highest C-factor and the greatest internal stress, and therefore a low-shrinkage nanoparticle hy brid composite resin (Synergy D6 [Coltène/Whaledent]) was selected. In addition, this material provides radiopacity, increased filler loading compared to older formulations of composite resins, and ease of placement without slumping.
The second protocol is to define the desired color by selecting composite resins for the “artificial dentin” and “artificial enamel” shades and orientation. A new shade system developed by Coltène/Whaledent was utilized in this case. This custom fabricated shade system is synchronized with the same polymerized restorative material as the composite system that is being matched, which allows the clinician to compare the actual polymerized composite to the natural tooth color for a more predictable and accurate color match. Most composite resin shade systems are designed to yield tooth color and translucency with a single material (ie, p orcelain or composite). This system is based on the concept that most of the tooth color is due to the dentin, and thus by gr ouping Vita shades of similar hue, chroma, and value, the artificial dentin can realistically replicate the optical properties of the natural tooth. The simplicity of 5 duo dentin shades (ie, A1/B1, A2/B2, A3/D3) with the combination of only 2 e namel shades (ie, Enamel Universal and Enam el White Opalescent) facilitates shade determination yet provides a wid e variety of hues, translucencies, fluorescences, and opalescents.
Shade selection should b e accomplished prior to placement of the dental dam to prevent improper color matching as a result of tooth dehydration, which causes elevated values.28 When teeth dehydrate, air replaces water between the enamel rods and changes the refractive index, which makes the enamel appear opaque and white.29
The third protocol is to establish the occlusal confines, where the preoperative contacts and excursive guiding movements are recorded with articulation paper. This information is then transferred to a hand-drawn diagram of the occlusal surface, recorded via an intraoral or digital camera, or marked on a stone model. The initial registration is valuable for preparation design, when de termining placement of centric stops beyond or within the confines of the restoration, and to minimize finishing procedures.30 In addition, since anatomical
Isolation and Preparation Design
 |
 |
|
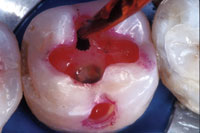
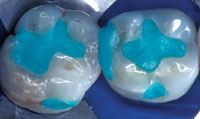
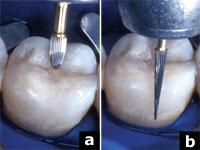
Figure 4. A caries-disclosing solution was applied to facilitate detection and identification of the carious tissue. |
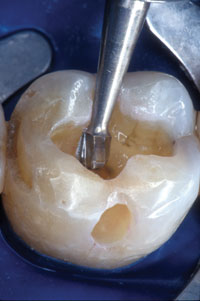
Figure 5. The carious tooth structure was removed with a No. 6 round bur. |
 |
 |
|
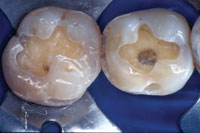
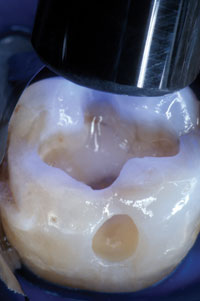
Figure 6. Occlusal view of completed preparations. |
Figure 7. The preparations are cleansed with 2% chlorhexidine solution. |
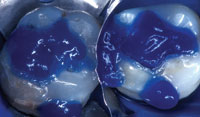 |
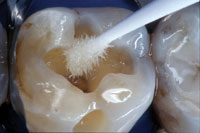 |
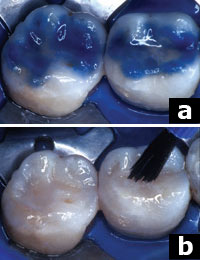
| Figure 8. The total-etch technique minimizes the potential for microleakage and enhances bond strength to dentin and enamel. | Figure 9. Following surface preparation, a single-component adhesive was applied to the preparations. |
Once anesthesia is administered, the treatment site is isolated with a dental dam to achieve adequate field control and protect against contamination.31,32 Upon removal of the existing amalgam restoration a caries-disclosing solution (Seek/Sable Seek [Ultradent Products]) aids in the detection and identification of carious tissue and serves as a guide for its removal33 (Figure 4). The carious dentin was removed with a slow-speed carbide round bur No. 6 (Midwest) and spoon excavators (Figure 5). The occlusal outline is then extended to include carious enamel, provide access to carious dentin, remove any residual amalgam staining, and provide access for the application of restorative materials (Figure 6). Healthy tooth structure should only be removed when the occlusal outline requires extension to a point within or beyond the functional stops. The adhesive preparation design requires maximum preservation of remaining tooth structure, and there is no extension for prevention. The preparation is limited to what is needed for access to the lesion or defect, since composite requires less volume to resist clinical fracture than does amalgam.34,35 To allow for a better resin adaptation, all internal line angles should be rounded and cavity walls should be smooth.36 The occlusal cavosurface margin should not be beveled; this increases the width of the preparation and may infringe on the centric holding area, increasing the wear rate of the restoration.37 Beveling should be restricted to the gingival and proximal margins where enamel is present. This increases the potential for bonding as well as fracture resistance by increasing the bulk of the restoration. This approach also increases the bonding surface area and decreases microleakage by exposing the enamel rods for etching.38
The preparations are completed with a finishing diamond and cleaned with a 2% chlorhexidine solution (Consepsis [Ultradent Products]), rinsed, and lightly air-dried (Figure 7). The total-etch technique is used to minimize the potential for microleakage and enhance bond strength to dentin and enamel.39-41 The preparation is etched for 15 seconds with 35% phosphoric acid (Etchant Gel S [Coltène/Whaledent]; Figure 8), rinsed for 5 seconds, and gently air-dried for 5 seconds. A single-component adhesive (One Coat Bond [Coltène/Whaledent]) is then applied with a disposable applicator for 20 seconds with a continuous motion, reapplying every 5 seconds (Figure 9). Any excess was removed with the applicator, and the adhesive was light-cured for 30 seconds. Although a small amount of excess adhesive can be applied over the margins to improve sealing, this excess should be removed during finishing procedures.
The Cavity Liner
 |
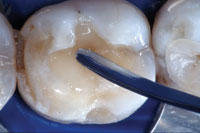
| Figure 10. To ensure optimal internal adaptation, a small increment of flowable composite is applied to the pulpal floor and light-cured for 40 seconds. |
The use of a flowable composite as a stress-absorbing lining material between the adhesive system and the restorative composite resin has been suggested for large restorations.42 The combination of flowables and viscous composite ensures a more intimate contact with the dentin bonding agent because of the lower viscosity, and it has resulted in enhanced internal adaptation.43 Because of a low modulus of elasticity, these composites act as an elastomer and buffer the stress associated with polymerization shrinkage. Theoretically, this eliminates cuspal deformation or gap formation and reduces microleakage.44 Therefore, if the elastic modulus is low, the composite will stretch to accommodate the inherent modulus of the tooth, and the internal layer may absorb the stress of resin composite polymerization shrinkage by elastic elongation.45,46
Also, these lower viscosity flowables may enhance the wetting capacity43 of the restoration, resulting in a more complete internal adaptation, and thereby reduce the formation of voids, which can contribute to a weakened surface and microleakage. An A2/B2 shaded flowable composite (Synergy Flow [Coltène/Whaledent]) is injected as the syringe tip is slowly retracted, and it is uniformly distributed with a ball-tipped instrument (M-1 [American Eagle]). This technique reduces the possibility of entrapping bubbles and ensures optimal adaptation of the resin material to the adhesive interface. A small increment, 1 to 2 mm in thickness, is applied to the pulpal floor of the class I cavity, and the increment is light-cured for 40 seconds (Figure 10).
The Incremental Layering Technique
Incremental layering has been advocated for use in large composite restorations to avoid the limitation of depth of cure, to reduce the effects of polymerization shrinkage, and to enhance the aesthetic results from the multilayering of color.47,48 However, the anatomy of the tooth should guide the clinician in developing the correct interpretation of form and color. Incremental layering with successive layers of dentin and enamel composite creates high diffusion layers that allow optimal light transmission within the restoration, providing a more realistic depth of color as well as natural surface and optical characteristics. The polychromatic effect is achieved by stratifying variations in shades and opacities of the restorative composite.
 |
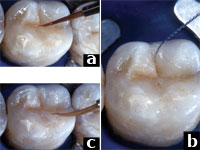
| Figures 11a and 11b. An A1/B1 shaded composite was applied in increments and condensed using an oblique layering technique (a), and light-cured through the cusp (b). |
Due to the variations in natural teeth, the combinations of different composite shades must be applied in relationship to the anatomy of the tooth, and are specifically adapted to different clinical situations. The following technique utilizes both the incremental layering of composite and the stratification of color to create a natural chromatic integration.
The cavity preparation is filled incrementally, utilizing an A1/B1 shaded hybrid composite (Synergy D6) from the preoperative shade-mapping diagram. Each increment is gently condensed with a clean, nonsticking composite condenser (TNCFIS/M [Hu-Friedy]) to ensure complete adaptation to the underlying resin and tooth structure. Each increment is light-cured for 40 seconds using a ramp curing mode (Figures 11a and 11b). The ramp curing mode is a means by which the restoration is initially cured with low-intensity radiation followed by a higher level of power. Sequential use of low-intensity curing light reduces shrinkage stress by controlling the plasticity (flow capacity) of the restoration during curing. The final mechanical stability of the restoration remains unaffected.13,22 When composites are polymerized with high curing light intensities, larger gaps between the cavity walls and the restorative material are created than are found with the use of low-intensity power. Considerable stress reduction occurs during the first 10 seconds of polymerization. Thus, employing lower intensity light during the first 10 seconds extends the visco-elastic stage of setting—an interval in which stress can be partly relieved by flow and elastic strain.49 The correlation between the rate of conversion and the rate of shrinkage stress development requires slower stiffness development, which may result in overall stress reduction.13 Therefore, this reduces the influence of the C-factor at the restorative interface. The reduced initial conversion rate of the resin material allows for better marginal adaptation at the interface of the cavity and restoration,22 which tends to cause less damage at this interface.4,7,13,21,50,51
 |
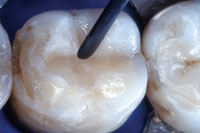
| Figure 12. The internal dentin core was developed with successive increments of composite following the anatomical contours of each cusp. |
To reduce the possibility of cuspal flexure, a composite hybrid with a low volumetric polymerization shrinkage should be used.52 Further, this problem may be reduced by a diagonal layering of the hybrid in increments of 1 mm and feathering the material up the cavity wall in a “V” shape.53,54 Opposing enamel walls should not be contacted by the same increment;55 this will minimize the wall-to-wall shrinkage and thus reduce intercuspal stress.56 The application of the composite in oblique layers results in fewer contraction gaps at the margins. It is important to continue to condense and shape the composite resin to correspond to cusp development and replacement of dentin (Figure 12).
 |
| Figure 13. An invagination of the final dentin layer was made with an interproximal instrument while the material was still soft to create a developmental groove. |
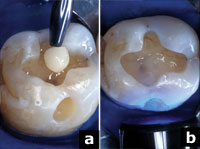
Once the artificial dentin layer is developed, a final preocclusal layer is invaginated with a long-bladed instrument (TNCVIPCL [Hu-Friedy]) while the material is still soft (Figure 13). It is important to anticipate the final result and not overbuild into the artificial enamel zone. In this way space will be allowed for the overlying translucent enamel shade. The internal characteristics (creation of pits and fissures, staining of grooves, and/or the creation of internal color within the restoration) are achieved using a No. 8 endodontic file and a fine sable brush. If the chroma is too high it can be diluted with an untinted resin and a small brush or removed with a clean applicator tip. Each tint is polymerized for 40 seconds and should be polymerized before placement of additional materials to stabilize the characterization and prevent color mixing. In this case, an ochre-tinted resin was applied in the previously formed invagination to correspond to the preoperative shade diagram (Figure 14a).
 |
| Figures 14a to 14c. For internal depth, an ochre-tinted resin was applied in the previously formed invagination and light-cured for 40 seconds (a). To create the illusion of an occlusal fissure, a small amount of brown tint was used (b). To achieve a natural transition, a diluted white tint was applied to specific regions along the occlusal planes and faded to the adjacent enamel surface (c). |
To create the illusion of occlusal fissure staining, in this case a very small amount of brown tint was applied according to the shade diagram (Figure 14b). Also, a diluted white wash was applied along the occlusal planes to create a smooth, natural transition between the restoration and the higher-valued tooth structure (Figure 14c). This color variation allows the development of a 3-dimensional appearance, providing depth within the restoration.
The enamel or the artificial enamel layer is the principal determinant of the value of the tooth or restoration,57 and this can be varied by the thickness of this layer. The enamel layer can have a white or gray appearance. Modern enamel shades contribute significantly to the total aesthetics of a restoration because they possess many of the optical properties that contribute to the vitality of the tooth—translucency, fluorescence, opalescence, and gloss.58 These characteristics are exemplified on the cusp tips and marginal ridges of posterior teeth as well as on the incisal edges and proximal incisal surfaces of anterior teeth. The nano-composite system used in developing these restorations (Synergy D6) has 2 enamel shades: a higher value white opalescent shade that corresponds to a younger, thicker enamel, and a lower value universal shade that corresponds to mature, thinning enamel. A universal enamel shaded hybrid composite was selected for this 63-year-old patient. To reproduce the optical effects of the enamel, small increments were applied, sculpted with a curved metal instrument, smoothed with a sable brush to the functional and anatomical occlusal morphology, and light-cured for 40 seconds (Figure 15). It is important to re-member that the shade of the restoration ultimately depends on the dentin shades; enamel shades should be used sparingly and cannot be used to anatomically replace human enamel.58
 |
| Figure 15. The enamel layer was applied, sculpted with a curved metal instrument, and smoothed with a sable brush. |
After placing the last layer of composite and prior to final cure, an oxygen inhibitor, either glycerin (Insure [Cosmedent]) or DeOx (Ultradent Products), is applied to the surface of the restoration in a thin layer with a brush and is then light-cured for 2 minutes to improve the degree of conversion and ensure surface hardness.
Finishing and Polishing Procedure
 |
 |
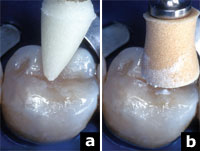
| Figures 16a and 16b. The occlusal anatomy was refined using a No. 30 fluted egg-shaped finishing bur (a). The buccal surface was contoured and finished with a No. 30 fluted needle-shaped bur (b). | Figures 17a and 17b. The margins were etched with a 35% phosphoric acid (a). A composite surface sealant was applied and cured to seal any cracks or microscopic porosities (b). |
Developing the restoration in increments and considering the occlusal morphology and occlusal stops allows the clinician to minimize finishing procedures.30 This results in a restoration with improved physical and mechanical characteristics and less potential for microfracture. At least one study has revealed that a reduction in finishing results in less damage to the composite as well as improved wear and clinical performance.54 However, a proper, meticulous finishing protocol can also increase the longevity of the restoration,59,60 since a smooth surface can reduce plaque retention, thus minimizing the potential for gingival inflammation, surface staining, and secondary caries.61-63
 |
| Figures 18a and 18b. The final polish was performed with light-cured, resin-impregnated points (a), and a synthetic foam cup, aluminum oxide paste, and the incremental use of water (b). |
To reproduce the shape, color, and luster of the natural dentition while enhancing the aesthetics and longevity of the restoration, the following protocol is used. To replicate the natural anatomical form and texture, the initial contouring is performed with a series of finishing burs. In this case the occlusal refinement was achieved with a No. 30 fluted egg-shaped finishing bur (Specialty Carbide Burs, No. 9406 [Midwest]), closely observing the tooth-resin interface and using a dry protocol (Figure 16a). The buccal surface was finished with a No. 30 fluted needle-shaped finishing bur (Specialty Carbide Burs, No. 9714 [Midwest]; Figure 16b). After the initial finishing procedure, the margins and surface defects were sealed. All accessible margins were etched with 35% phosphoric acid, rinsed, and dried. A composite surface sealant (Fortify Plus [Bisco]) was applied and cured to seal any cracks or microscopic porosities that may have formed during the finishing procedures (Figures 17a and 17b). The use of a surface sealant has been shown to reduce the wear rate of posterior composite resin restorations.64 The dental dam was removed, and the patient was asked to perform closure without force, and then centric, protrusive, and lateral excursions. Any necessary occlusal equilibration was accomplished with a No. 8/12 fluted flame-shaped finishing bur (H274 Neumeyer bur [Brasseler USA]). The final polish was initiated with a light-cured resin-impregnated point (Enhance Polishing Point [DENTSPLY Caulk]), which effectively eliminates surface defects. The definitive polish was accomplished with a synthetic foam cup (Enhance Finishing and Polishing System) and aluminum oxide polishing paste (Figures 18a and 18b) at low speed with light pressure and with intermittent use of water. The contact was tested with unwaxed floss to ensure the absence of sealant in the contact zone, and the margins were inspected.
The surface quality of the composite is not only influenced by the polishing instruments and polishing pastes but also by the composition and the filler characteristics of the composite.65 The newer formulations of composites with smaller particle size, shape, and orientation can be polished so as to be comparable to porcelain and enamel. Although the ability to polish these new, small-particle hybrids appears promising, long-term durability of the polished surface will need to be evaluated in clinical trials
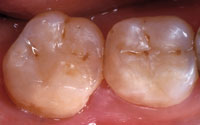 |
| Figure 19. The postoperative result reflects what can be achieved with newer biomaterials utilizing appropriate restorative techniques. |
The success of posterior composite restorations requires consideration of function, aesthetics, biocompatibility, and longevity. Achieving success begins with consideration of the adhesive interface. By understanding the relationship between adhesion and polymerization shrinkage, and utilizing the aforementioned stress-reduction techniques, these 4 criteria can be achieved. A restorative material properly bonded to enamel and dentin will reduce marginal contraction gaps, microleakage, marginal staining, and caries recurrence, and will improve retention, reinforce tooth structure, and dissipate and reduce functional stresses. All of this can be accomplished while improving aesthetics and wear resistance.66
The postoperative result in this case reflects the degree of integration that can be achieved between biomaterials and tooth structure utilizing appropriate restorative techniques (Figure 19).
Conclusion
The success of a composite restoration begins at the adhesive interface. Therefore, a successful procedure relies on the selection of restorative materials, preparation design, isolation, adhesive protocol, placement and finishing technique, occlusion, and patient compliance. This article provides the clinician with a defined protocol for achieving a relatively stress-free tooth-composite resin restoration interface by reducing the internal component of stress (shrinkage stress).
Part 2 of this report will describe the external component of stress (occlusal stress) that must be considered with composite resin restorations. Methods for reducing stress during the development of class V composite restorations will be discussed.
References
1. Guy AG. Elements of Physical Metallurgy. 2nd ed. San Francisco, Calif: Addison-Wesley; 1959:107.
2. Roberson TM, Heymann HO, Swift EJ. Sturdevant’s Art and Science of Operative Dentistry. 4th ed. St Louis, Mo: Mosby; 2002:141-148.
3. Craig RG, Powers JM, Wataha JC. Dental Materials: Properties and Manipulation. 8th ed. St Louis, Mo: Mosby; 2004:23-24, 28.
4. Davidson CL, Feilzer AJ. Polymerization shrinkage and polymerization shrinkage stress in polymer-based restoratives. J Dent. 1997;25:435-440.
5. Feilzer AJ, de Gee AJ, Davidson CL. Setting stress in composite resin in relation to configuration of the restoration. J Dent Res. 1987;66:1636-1639.
6. Kemp-Scholte CM, Davidson CL. Marginal sealing of curing contraction gaps in class V composite resin restorations. J Dent Res. 1988;67:841-845.
7. Bausch JR, de Lange K, Davidson CL, et al. Clinical significance of polymerization shrinkage of composite resins. J Prosthet Dent. 1982;48:59-67.
8. Bouschlicher MR, Cobb DS, Boyer DB. Radiopacity of compomers, flowable and conventional resin composites for posterior restorations. Oper Dent. 1999;24:20-25.
9. Labella R, Lambrechts P, Van Meerbeek B, et al. Polymerization shrinkage and elasticity of flowable composites and filled adhesives. Dent Mater. 1999;15:128-137.
10. Loshaek S, Fox TG. Cross-linked polymers. I. Factors influencing the efficiency of cross-linking in copolymers of methyl methacrylates and glycol methacrylates. J Am Chem Soc. 1953;75:3544-3550.
11. Quellet D. Considerations and techniques for multiple bulk-fill direct posterior composites [published correction appears in Compend Contin Educ Dent. 1996;17:146]. Compend Contin Educ Dent. 1995;16:1212-1224.
12. Ferracane JL. Using posterior composites appropriately. J Am Dent Assoc. 1992;123:53-58.
13. Feilzer AJ, Dooren LH, de Gee AJ, et al. Influence of light intensity on polymerization shrinkage and integrity of restoration-cavity interface. Eur J Oral Sci. 1995;103:322-326.
14. Davidson CL, de Gee AJ, Feilzer A. The competition between the composite-dentin bond strength and the polymerization contraction stress. J Dent Res. 1984;63:1396-1399.
15. Munksgaard EC, Hansen EK, Kato H. Wall-to-wall polymerization contraction of composite resins versus filler content. Scand J Dent Res. 1987;95:526-531.
16. Iga M, Takeshige F, Ui T, et al. The relationship between polymerization shrinkage measured by a modified dilatometer and the inorganic filler content in light-cured composites. Dent Mater. 1991;10:38-45.
17. Krejci I, Lutz F. Marginal adaptation of class V restorations using different restorative techniques. J Dent. 1991;19:24-32.
18. Alster D, Feilzer AJ, de Gee AJ, et al. The dependence of shrinkage stress reduction on porosity concentration in thin resin layers. J Dent Res. 1992;71:1619-1622.
19. Fan PL, Edahl A, Leung RL, et al. Alternative interpretations of water sorption values of composite resins. J Dent Res. 1985;64:78-80.
20. Soltesz U, Bath P, Klaiber B. Dimensional behavior of dental composites due to polymerization shrinkage and water sorption. In: Christel P, Meunier A, Lee AJC, eds. Biological and Biomechanical Performance of Biomaterials. Amsterdam: Elsevier; 1986:123-128.
21. Unterbrink GL, Muessner R. Influence of light intensity on two restorative systems. J Dent. 1995;23:183-189.
22. Uno S, Asmussen E. Marginal adaptation of a restorative resin polymerized at reduced rate. Scand J Dent Res. 1991;99:440-444.
23. Grippo JO. Abfractions: a new classification of hard tissue lesions of teeth. J Esthet Dent. 1991;3:14-19.
24. Heymann HO, Sturdevant JR, Brunson WD, et al. Twelve-month clinical study of dentinal adhesives in class V cervical lesions. J Am Dent Assoc. 1988;116:179-183.
25. Lee WC, Eakle WS. Possible role of tensile stress in the etiology of cervical erosive lesions of teeth. J Prosthet Dent. 1984;52:374-380.
26. Leinfelder KF. Restoration of abfracted lesions. Compendium. 1994;15:1396-1400.
27. Kemp-Scholte CM, Davidson CL. Complete marginal seal of class V resin composite restorations effected by increased flexibility. J Dent Res. 1990;69:1240-1243.
28. Fahl N Jr, Denehy GE, Jackson RD. Protocol for predictable restoration of anterior teeth with composite resins. Pract Periodontics Aesthet Dent. 1995;7:13-21.
29. Winter R. Visualizing the natural dentition. J Esthet Dent. 1993;5:102-117.
30. Liebenberg WH. Successive cusp build-up: an improved placement technique for posterior direct resin restorations. J Can Dent Assoc. 1996;62:501-507.
31. Croll TP. Alternative methods for use of the rubber dam. Quintessence Int. 1985;16:387-392.
32. Liebenberg WH. General field isolation and the cementation of indirect restorations: part 1. J Dent Assoc S Afr. 1994;49:349-353.
33. Kidd EA, Joyston-Bechal S, Beighton D. The use of a caries detector dye during cavity preparation: a microbiological assessment. Br Dent J. 1993;174:245-248.
34. Sturdevant CM, Roberson TM, Heymann HO, et al. The Art and Science of Operative Dentistry. 3rd ed. St Louis, Mo: Mosby-Year Book; 1995.
35. Leinfelder KF. A conservative approach to placing posterior composite resin restorations. J Am Dent Assoc. 1996;127:743-748.
36. Small BW. Direct posterior composite restorations – state of the art 1998. Gen Dent. 1998;46:26-32.
37. Leinfelder KF. Using composite resin as a posterior restorative material. J Am Dent Assoc. 1991;122:65-70.
38. Strassler HE. Esthetic posterior restorations: direct composite resins. J Esthet Dent. 1992;4:216-220.
39. Kanca J III. Improving bond strength through acid etching of dentin and bonding to wet dentin surfaces. J Am Dent Assoc. 1992;123:35-43.
40. Nakabayashi N, Nakamura M, Yasuda N. Hybrid layer as a dentin-bonding mechanism. J Esthet Dent. 1991;3:133-138.
41. Kanca J III. Resin bonding to wet substrate. II. Bonding to enamel. Quintessence Int. 1992;23:625-627.
42. Estafan AM, Estafan D. Microleakage study of flowable composite resin systems. Compend Contin Educ Dent. 2000;21:705-712.
43. Frankenberger R, Krämer N, Pelka M, et al. Internal adaptation and overhang formation of direct class II resin composite restorations. Clin Oral Investig. 1999;3:208-215.
44. Prager MC. Using flowable composites in direct posterior restorations. Dent Today. 1997;16:62-69.
45. Van Meerbeek B, Perdigao J, Lambrechts P, et al. The clinical performance of adhesives. J Dent. 1998;26:1-20.
46. Lindberg A, van Dijken JW, Hörstedt P. Interfacial adaptation of a class II polyacid-modified resin composite/resin composite laminate restoration in vivo. Acta Odontol Scand. 2000;58:77-84.
47. Tjan AH, Glancy JF. Effects of four lubricants used during incremental insertion of two types of visible light-activated composites. J Prosthet Dent. 1988;60:189-194.
48. Kovarik RE, Ergle JW. Fracture toughness of posterior composite resins fabricated by incremental layering. J Prosthet Dent. 1993;69:557-560.
49. Dennison JB, Yaman P, Seir R, et al. Effect of variable light intensity on composite shrinkage. J Prosthet Dent. 2000;84:499-505.
50. Reinhardt RJ. Effect of the light source on the marginal adaption of composite fillings [in German]. Dtsch Zahnarztl Z. 1991;46:132-134.
51. Goracci G, Mori G, Casa de’ Martinis L. Polimerizzazione di materiali compositi: valutazione di due metodi. Dental Cadmos. 1993;7:50-63.
52. Rees JS, Jacobsen PH. Restoration of posterior teeth with composite resin. 1: Direct-placement composite. Dent Update.
Dr. Terry received his DDS from the University of Texas Health Science Center Dental Branch at Houston in 1978. He has published more than 230 articles on various topics in aesthetic dentistry in numerous languages and authored the textbook Natural Aesthetics with Composite Resin. He is an assistant professor, Department of Restorative Dentistry and Biomaterials, at the University of Texas Health Science Center Dental Branch at Houston and is a Fellow in the AGD and the International Academy for Dental-Facial Esthetics. Dr. Terry maintains a private practice in Houston emphasizing aesthetic and restorative dentistry. He can be reached at (281) 481-3483.
Dr. Leinfelder earned his doctor of dental surgery and master of science (dental materials) degrees from Marquette University. After serving for 8 years on the faculty at Marquette, he joined the faculty at the University of North Carolina School of Dentistry, where he attained the rank of professor and director of biomaterials clinical research in the Dental Research Center. In 1983, he joined the School of Dentistry at the University of Alabama and held the Joseph Volker Chair. He also served as chairman of the Department of Biomaterials until 1994. Presently he holds positions at both universities: adjunct professor at the University of North Carolina and professor emeritus at the University of Alabama. He is the recipient of the Dr. George Hollenbeck award (1995) as well as the Norton N. Ross award for outstanding clinical research (1997), and the American College of Prosthodontists Distinguished Lecturer Award (1998). He has served as associate editor of the Journal of the American Dental Association. He can be reached at (919) 370-9168.