Part 1 of this article presented information regarding the composite restorative-tooth interface. This interface is constantly subject to internal stress and strain caused by polymerization shrinkage forces during placement of composite resins. Another stress that can compromise the dimensional stability of the interface after placement of the composite restoration is occlusal force. The second part of this article describes this external stress (occlusal stress) that affects composite resin restorations, and provides methods of managing and reducing both types of stress during the development of class V composite restorations.
EXTERNAL COMPONENT OF STRESS
Normal function generates considerable stress on teeth and their supporting tissues.1 Since teeth are not rigid structures, they undergo deformation (strain) when a functional load is applied,2,3 and this strain is proportional to the amount of stress. The functional load is influenced by the number of teeth, the type of occlusion, and the occlusal behavior of the patient (ie, premature contacts, parafunctional habits).3 During occlusal loading, the tooth undergoes a lateral or an axial bending called tooth flexure.1,4-11
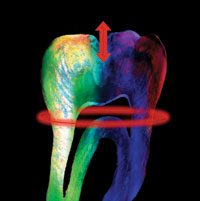 |
| Figure 1. Occlusal forces are transmitted through the cusp and can become concentrated in the cervical region of the tooth. |
The tooth flexure theory states that occlusal forces are transmitted through the cusp(s) and can become concentrated in the cervical region of the tooth4,12 (Figure 1). This theory has been supported by engineering studies7-11 that report that these horizontal loading forces cause a microscopic flexing of the anatomical crown of the tooth. Subsequently, this physiologic bending generates maximal strain in the cervical region of the tooth, with resulting tensile stress concentrations in the cervical region on the side of the tooth from which the force is directed. At the same time, the opposite region of the tooth is under compressive stress. When the direction of the force changes (ie, bruxism), the tooth flexes in the opposite direction, and the stress correspondingly reverses at the cervical region.13
The cyclic tension and compressive stresses that occur in the mouth during chewing or parafunctional habits can reach a fatigue limit and can result in loss of tooth structure or displacement of an adhesive restoration.14-16 In the unrestored tooth the pathological wear (attrition) of tooth substance by these biomechanical loading forces has different morphological characteristics. If the cusp is placed into a state of tension, the resultant cervical defect is wedge shaped; conversely, if the cervical region is subjected to compressive stresses, the defect is more concave or saucer shaped.17-20 In the restored tooth (ie, when a cervical restoration is present), lateral flexure resulting from eccentric forces produces tensile stress at the marginal interface of the restoration, whereas heavy centric forces generate compressive stresses along the marginal interface of the cervical restoration. These repeated flexural forces can cause adhesive failure of cervical composite restorations at the dentin-resin interface, which can result in microleakage or partial or complete debonding of the restoration.21
PREOPERATIVE CONSIDERATIONS
A successful aesthetic restorative procedure using composite resins for carious and noncarious cervical lesions depends upon a number of preoperative considerations: diagnosis and management, occlusal evaluation, the type of restorative material, shade selection, cavity design, isolation, and gingival health.
Diagnosis and Management
Prior to placement of any cervical restoration, a consideration of all the factors related to loss of tooth structure or displacement of the cervical restoration should be reviewed. This differential diagnosis should help determine the etiology, and information such as age, diet, oral hygiene routine, medical considerations, abnormal oral habits, and occlusal idiosyncrasies should be considered. The information acquired during establishment of the differential diagnosis allows for a methodical approach to preventive and restorative therapy.
The management of carious and noncarious surface lesions begins with identification of the etiology. The objectives of modern management and prevention of tooth surface lesions should be prevention, preservation of hard and soft tissues, and increased longevity of the restoration.22,23 Controlling the advancement of hardtissue destruction can begin with dietary instructions, oral hygiene instructions, home fluoride therapy, brushing with desensitizing dentifrices, discontinuation of poor oral habits, and elimination of the etiology. Management of these lesions may include remineralization through in-office application of fluorides, calcium, and potassium phosphate. Desensitization of these hard surface lesions can be achieved through professional application of potassium oxalate or other tubule-occluding agents, iontophoresis, or application of dentin adhesives. Other management methods include occlusal evaluation and equilibration with occlusal guard fabrication if needed, coronoplasty, or orthodontic treatment.18,19,24
Occlusal Evaluation
Occlusal considerations should be addressed at the treatment planning stage. Prior to administering any restorative treatment, the preoperative occlusal stops and excursive guiding planes should be recorded with articulation paper and transferred to a hand-drawn diagram, then recorded using an intraoral or digital camera, or indicated and reviewed on an articulated diagnostic model. Elimination of interferences in the static and dynamic occlusion to achieve an ideal occlusion with maximum distribution of occlusal load should be performed only after splint therapy. For patients with parafunctional habits (ie, bruxism), the intermittent use of an occlusal splint (a stabilization splint or a localized occlusal interference splint) can be employed to discourage the habit. For other clinical conditions (ie, clenching habits) a period of splint therapy is necessary to reduce or eliminate the effect of compressing the periodontal ligament prior to assessment or equilibration.25 Furthermore, interceptive occlusal equilibration should initially be performed on accurately mounted diagnostic models. Intraoral modifications of the occlusal pattern before any operative procedure can reduce cuspal flexure and cervical stresses that can cause adhesive failure of cervical composite restorations. These preventive measures include equilibration with occlusal guard fabrication, coronoplasty, or orthodontic treatment.18,19,24,25
Restorative Material Selection
Many aesthetic restorative materials are available for the replacement of tooth structure (ie, cervical lesions). These include direct placement of glass ionomers, resin ionomers, compomers, flowable composites, microfill composites, and hybrid composites, or indirect placement of porcelain inlays and laboratory-processed composite resin inlays.19,24,26,27 This discussion will address the selection of restorative materials for direct placement of restorations to treat carious and noncarious cervical lesions.
The initial clinical consideration in the selection of a direct restorative material is the type of cervical lesion, ie, carious or noncarious. The choice of restorative materials for the carious lesion could include a fluoride-releasing material such as glass ionomer, resin ionomer, or compomer. However, when fluoride is not a consideration, composite resin provides an optimal aesthetic result for the carious and noncarious cervical lesion because of the acid-etch technique and the chemical attachment to tooth structure through dentinal bonding.24 Hybrids, micro-fills, and flowable composites are among the options for use in cervical lesions.
Investigations by Heymann, et al on occlusal factors that influence the retention of restorations and the tooth flexure theory indicate that forces are transmitted through the cusp and are concentrated in the cervical region of the tooth.4,12 These data influence the type of restorative material that is selected for such lesions. Composite resins with a low modulus of elasticity can absorb this energy that is transferred from the occlusal surface, reducing transmission to the dentin-restorative interface.28 The microfill and flowable composite resins have a lower modulus of elasticity than do hybrid or conventional composite resins.24 Additionally, some dentin adhesives can provide an elastic intermediate layer between the restorative material and the cavosurface to absorb this flexural deformation of the tooth.29
Shade Selection
Shade selection should be accomplished prior to placement of the dental dam to prevent improper selection as a result of dehydration and resultant elevated color value.30 The use of color-corrected daylight source illumination (5,500ºK) is necessary for proper color registration.31,32 However, to obtain an acceptable shade interpretation it is advisable for the viewers (technician, clinician, and assistant) to observe the color-matching under various lighting conditions—daylight, color-corrected, fluorescent light, and dim light.31-34 A shade map or restorative recipe can be used to diagram the existing colors of composite resin and modifiers used when making the mock-up. The composite mock-up is a preoperative diagnostic and evaluation tool. Composite resin is applied directly to the tooth surface without an adhesive or anesthesia to simulate the final result. This technique establishes the parameters for contours, texture, and orientation of composite shades. It provides the patient and clinician with immediate visualization of the final dimensions and color-matching before the procedure, which can result in immediate treatment decisions.
Because of the variety of colors and their orientation within natural teeth, appropriate shade selection for composite restorations remains a challenge. As mentioned in Part 1 of this article, a custom-fabricated shade system was utilized that is synchronized with the same polymerized restorative material as the composite system that is being matched, which allows the clinician to compare the actual polymerized composite to the natural tooth color for a more predictable and accurate aesthetic color match.
Cavity Design
Composite resin systems depend upon the use of adhesive preparation designs that are conservative, and require meticulous adherence to proper adhesive techniques.35-38 Consideration should be given to the following: tooth type, location in the arch, size and type of the carious lesion, whether treatment involves a carious or noncarious unrestored tooth or replacement of a restoration, and the relationship between occlusal function and preparation boundaries. Also, the type of restorative technique, the amount and status of the remaining tooth structure, resistance to microleakage through groove placement, mechanical forces, presence of defects, and the parameters for extension of the preparation to the aesthetic zone should be re-viewed.3,37,39
Isolation
Fundamental restorative principles require maintaining sound tooth structure, achieving a sterile, gap-free hybrid layer, and eliminating micro-leakage by securing a relatively stress-free tooth-restoration interface.23 Adhesive biomaterials are technique-sensitive and require moisture control and meticulous attention to the adhesive protocol. For optimal bonded composite restorations, moisture control should be performed throughout the adhesive procedure, which requires adequate isolation of the operating field with use of a dental dam.40
A restorative material properly bonded to the enamel and dentin substrate will reduce marginal contraction gaps, microleakage, marginal staining, and caries recurrence, and improve retention, reinforce tooth structure, and dissipate and reduce functional stresses across its interface throughout the entire tooth while improving aesthetics and resistance to wear.41-45
Gingival Health
Mucogingival health is also a critical component of a successful restorative result. Gingival inflammation due to plaque retention can result in alterations in gingival form and contour. Consequently, inaccurate assessment of the margin relationship of the restorations to the gingival architecture can result in a compromised restorative outcome. Therefore, periodontal health should be present prior to the initiation of any restorative procedure that requires the restoration to be in contact with the periodontium or that influences plaque control. Since gingival health is established prior to any operative procedure, it is possible to manipulate soft tissues for adequate preparation design and material placement without causing bleed-
ing or traumatic injury.46
The preoperative evaluation for the patient treated in the following case report included all of the aforementioned considerations. This case will illustrate the methods for managing and reducing the internal and external components of stress in class V composite restorations using a low-shrinkage nano-particle hybrid composite resin (Synergy D6 [Coltène/Whaledent]).
A CLASS V COMPOSITE RESTORATION
Clinical Procedure
 |
 |
| Figure 2. Preoperative view of saucer-shaped noncarious cervical lesions on the maxillary left cuspid and first bicuspid teeth. |
Figure 3. An equilibration was performed to eliminate the premature occlusal contacts. |
This case presentation illustrates cervical lesions that were noncarious and caused by deflective occlusal contacts.19,47 As mentioned previously, these biomechanical loading forces cause stress concentrations in the cervical region of the tooth during tooth contact, which can result in loss of tooth structure. Many patients with these lesions present to the dentist because of sensitivity to brushing and temperature changes, and may require an anesthetic prior to the procedure.
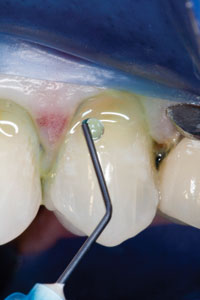
The patient, a 42-year-old male, presented with sensitivity of the maxillary left cuspid and first bicuspid teeth. Clinical examination revealed saucer-shaped cervical defects with no caries, plaque, gingival recession, or inflammation (Figure 2). Wear patterns were present on the occlusal surfaces of these teeth. After review of the patient’s medical and dental history and considering the examination findings, the diagnosis was abrasive-abfraction lesions caused by compressive stress and toothbrush abrasion.13
Upon stabilization with occlusal splint therapy and a careful mock equilibration on accurately mounted diagnostic models, an occlusal equilibration was performed to eliminate interferences in the static and dynamic occlusion and provide maximal distribution of the occlusal load25 (Figure 3). A preoperative selection of composite resins, tints, and modifiers with shade and orientation was recorded.
 |
|
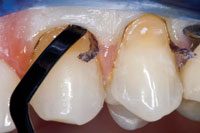
Figure 4. A retraction cord was placed to gain adequate access to the gingival margin. |
 |
 |
| Figure 5. A chamfer was placed along the occlusal margin (a); a scalloped 0.5-mm bevel was placed to interrupt the straight line of the chamfer and to reduce the potential for microleakage (b). |
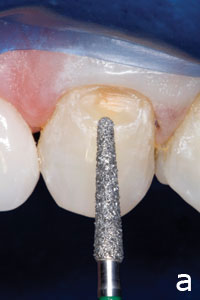
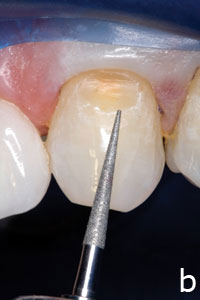
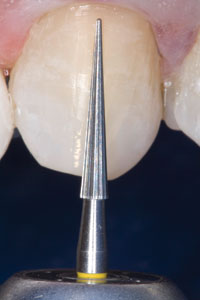
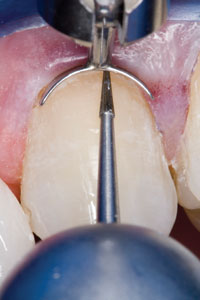
Once anesthesia was administered, the teeth were isolated with a dental dam to achieve adequate field control and to protect against contamination. A modified technique was used to create an elongated opening that allowed placement of the dam over the retainer.48,49 To gain adequate access to the gingival margin, a plain, knitted retraction cord (Ultrapak No. 00 [Ultradent Products]) was placed using a Fischer’s Ultra-pak Packer No. 170 (Ultra-dent Products; Figure 4). To effect an aesthetic result, a chamfer 0.3 mm in depth was placed along the occlusal margin with a long tapered diamond (No. 6850 [Brasseler USA]). A scalloped bevel was developed 0.5 mm in the enamel to interrupt the straight line of the chamfer (Figure 5). The bevel was placed on enamel to reduce the potential for microleakage. Several methods can be used to increase mechanical retention of adhesive restorations in certain clinical situations (ie, sclerotic dentin), including using a slow-speed bur or air abrasion to roughen the dentin surface. This allows better resin penetration of the sclerotic dentin. Placement of grooves will also improve retention. Although not required for successful adhesion, grooves provide resistance to the internal and external components of stress—polymerization shrinkage and tooth flexure.50
 |
 |
| Figure 6. The preparation was scrubbed with a slurry mixture of disinfectant and pumice. | Figure 7. The preparations were etched with a 35% phosphoric acid, rinsed, and gently air-dried. |
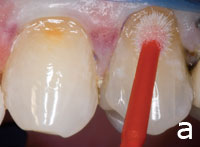
The preparation was scrubbed with a slurry mixture of disinfectant and pumice (Consepsis [Ultradent Products]; Figure 6). The total-etch technique was used to minimize the potential for microleakage and enhance bond strength to dentin and enamel.51-53 The preparation was etched for 15 seconds with 35% phosphoric acid (Etchant Gel S [Coltène/Whaledent]; Figure 7), rinsed for 5 seconds, and gently air-dried for 5 seconds. A single-component adhesive (One Coat Bond [Coltène/Whaledent]) was applied with a disposable applicator for 20 seconds with a continuous motion, reapplying every 5 seconds. Any excess was removed with the applicator, and the agent was air-thinned and then light-cured for 30 seconds (Figure 8). Although a small amount of excess adhesive can be applied over the margins to improve sealing, this excess should be removed during finishing procedures. Furthermore, the use of an adhesive bonding system as a stress-breaking liner between the restorative composite resin and tooth cavosurface has been mentioned previously.29
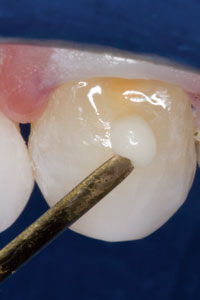
The preparation was filled incrementally using an A1/B1 shaded hybrid composite (Synergy D6) based on the preoperative shade map. Because the microhybrid composite resins have refractive properties and a variety of color selections that are similar to that of dentin, they imitate the natural tooth structure extremely well.
 |
 |
 |
| Figure 8. A single-component adhesive was applied with an applicator tip for 20 seconds (a); air-thinned with an A-dec warm air dryer (b); and light-cured for 30 seconds (c). |
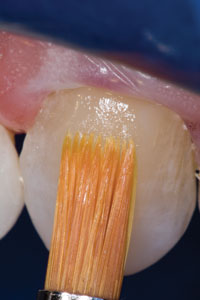
The initial layer, consisting of 1 mm of dentin-shaded composite resin, was applied to the occlusal one half of the preparation and contoured with a long bladed composite instrument (TNCVIPC [Hu-Friedy]) to ensure complete adaptation to the underlying resin and tooth structure (Figure 9). Each layer was smoothed with an artist’s brush to prevent surface ir-regularities (Figure 10); a thin layer of resin was applied to that layer and cured for the purpose of creating a “light diffusion layer,” which yields an illusion of depth for restorations of limited thickness. This layer of high translucency causes an internal diffusion of light and controls the luminosity within the internal aspects of the restoration. A similar proteinaceous layer (a highly concentrated protein matrix), which separates the dentin and enamel, exists in natural teeth;54 ceramists call this the “glass layer.”
 |
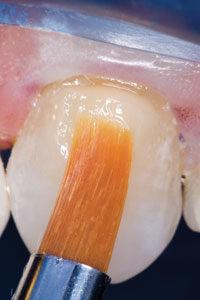 |
| Figure 9. The dentin layer, an A1/B1 shaded hybrid composite, was applied to the occlusal half of the preparation and contoured with a long bladed composite instrument. | Figure 10. Each incremental layer was smoothed with a sable brush to prevent surface irregularities. |
 |
 |
| Figure 11. A second layer of hybrid composite was placed in the gingival half of the preparation and contoured. | Figure 12. A universal enamel shaded hybrid composite was placed on the cervical region of the tooth and smoothed with a sable brush to encase the underlying dentin matrix. |
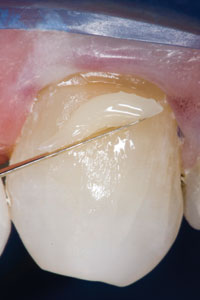
Each increment was polymerized with a low-intensity light-curing unit for 20 seconds, which allows placement of subsequent increments without deforming the underlying composite layer. The second dentin-shaded layer was placed in the gingival half of the preparation, and the process was repeated (Figure 11). Incrementally filling the cavity preparation in sequence, first the occlusal segment and then the gingival segment, promotes stress reduction by reducing the influence of the C-factor at the restorative interface. In addition, first placing the occlusal segment with higher bond strength to enamel may reduce the potential for microgaping at the gingival margin. To prevent overbuilding of the artificial dentin layer, it is imperative to monitor the composite from the incisal aspect to provide adequate space for the final artificial enamel layer and allow for ideal anatomical contour.
To recreate the natural translucency of enamel, a universal enamel shaded hybrid composite (Synergy D6) was used to achieve proper color value. The resin was rolled into a ball and placed on the cervical region of the tooth, sculpted with a long bladed composite instrument, and smoothed with a sable brush to obtain an anatomically correct emergence profile that encased the underlying matrix cervicoincisally and mesio-distally (Figure 12). The process of carefully shaping the composite resin to those confines before curing facilitates the establishment of anatomical morphology and minimizes the finishing protocol. One study has determined that a reduction in finishing results in less damage to the composite and improved wear and clinical performance.55 A thin coating of glycerin was applied to the surface and polymerized for a 2-minute post-cure, ensuring complete polymerization of the composite resin at the margins.
Finishing and Polishing
Ensuring gingival health through proper anatomic contours, marginal integrity, and surface texture is an important consideration for restoration of both carious and noncarious lesions. An optimally finished aesthetic restoration should provide a smooth surface that will prevent plaque accumulation and resist stain, and possess ideal contours and emergence profile for improved tissue compatibility. Additionally, it should be in harmony with the gingival tissues, have proper anatomical form for ideal occlusion, shade coordination to the surrounding dentition, symmetrical surface texture to adjacent or opposing natural teeth, ideal marginal adaptation and integrity, longevity, and aesthetics.56-58
Removal or trimming of composite resin can be achieved in 3 sequential steps: contouring, fine finishing, and polishing. Contouring involves the gross reduction of the composite restoration to obtain the desired form and shape as determined by the parameters of function and aesthetics.59 Fine finishing comprises the delicate and precise finishing of the margins, removing surface defects and scratches, and developing a smoother surface.57 Polishing consists of reducing the roughness and scratches produced during the finishing procedure.60
The objective of polishing is to reduce the surface irregularities so that the distance between the scratches is less than the wavelength of visible light (approximately 0.5 µm). This will make the surface as reflective as enamel.61 A surface appears smooth when its roughness is significantly less than 1 µm.62,63 These steps should be performed in sequence using abrasives and various polishing devices. The principle is similar to metal polishing, in which the sequence of abrasives progresses from the coarsest to the finest.64 The abrasiveness of one particle or material depends on its hardness.65 Hardness is defined as the resistance to permanent indentation or penetration.60 In order for a composite finishing and polishing system to be effective, the cutting particles (abrasives) must be harder than the filler component of the composite.66 Accordingly, the effectiveness of the finishing and polishing process depends upon the type of composite resin utilized.67-73
Newer formulations of small-particle hybrids and microhybrids have altered filler components, specifically finer filler size, shape, orientation, and concentration, which improve their physical and mechanical characteristics and allow the resin composite to be polished to a high degree.62 The variation in hardness between the inorganic filler and the matrix can result in surface roughness, since these 2 components do not abrade uniformly.62,74 Accordingly, it is imperative that the surface gloss between the restorative material and tooth interface is similar, because the gloss can influence color perception and shade-matching of the restoration and tooth
surface.62,75
 |
 |
| Figure 13. The anatomic contour was achieved with a No. 30 fluted, needle-shaped finishing bur. | Figure 14. The gingival margin was retracted with a Zekrya instrument, and the margin was finished using a No. 30 fluted, short, tapered finishing bur. |
The initial contouring was performed with a series of finishing burs to replicate the natural form of the tooth. For finishing the labial surface, a long, needle-shaped finishing bur was used to develop the proper anatomical contours of the facial aspect of the anterior tooth. To replicate natural form and texture, Nos. 16 and 30 fluted, needle-shaped finishing burs (ET6 [Brasseler USA]) were used dry with light pressure to prevent heat buildup (Figure 13). This dry finishing allows the clinician to visualize the margins and contours relative to the adjacent tooth. A smooth surface can be achieved by sequentially increasing the number of flutes (Nos. 16 and 30). The gingival contouring was accomplished with a short, tapered, straight-edge finishing bur (ET3 [Brasseler USA]), which conforms to the straight emergence profile as the tooth emerges from the gingival sulcus (Figure 14). It is important to use a dry protocol and retract the gingiva with an 8A instrument or Zekrya (Zenith Dental/DMG), closely observing tooth structure and the gingival margin. It is important not to overheat the resin by using excessive pressure. It is also imperative not to ditch or scar the cementum at the gingival margin.
After the initial finishing procedure, the margins and surface defects were sealed. The restoration and all margins were re-etched for 15 seconds with a 35% orthophosphoric acid (Etchant Gel S), rinsed for 5 seconds, and dried. A layer of composite surface sealant (Fortify Plus [Bisco]) was applied over the margins and the restoration. This will prevent leakage and seal any microfractures or microscopic porosities in the material that may have formed during finishing. The use of surface sealant has been shown to reduce the wear rate of posterior composite resins,76 improve resistance to interfacial staining,77 and decrease micro-leakage around class V composite resins.77-79 Any excess resin can be removed with a No. 12 scalpel, and the retraction cord is removed to inspect for overhangs.
 |
 |
| Figure 15. Initial polishing was accomplished with rubber hollow cups, which eliminate any surface defects or rough areas. | Figure 16. To impart a high luster, a loose abrasive aluminum oxide polishing paste was applied with a synthetic foam cup and a small amount of water. |
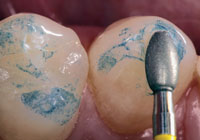
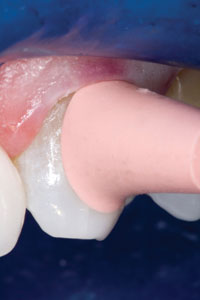
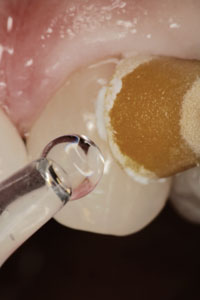
Fine finishing of the facial and gingival region was performed with pre-polish and high-shine rubber points and rubber hollow cups (Flexi-Points/FlexiCups [Cosmedent]), which are composed of aluminum oxide particles and silicone that eliminate surface defects (Figure 15 ). The impregnated cup follows the contour of the gingival neck and reaches into the sulcus to smooth any rough areas. To impart a high luster or surface reflectivity on the tooth and restoration while maintaining the existing texture and surface anatomy, the final polishing was accomplished with loose abrasive polishing paste and a synthetic foam cup (Enhance cup [DENTSPLY]) applied at conventional speed (Figure 16). This type of loose abrasive paste contains aluminum oxide or diamond particles dispersed in a water-soluble vehicle such as glycerin, and allows the anatomical details to be maintained while imparting an enamel-like appearance to the restored tooth. The incremental use of water with these loose, aluminum oxide abrasives enhances their effectiveness. Loose abrasives with aluminum oxide particles include Prisma Gloss/Prisma Gloss ExtraFine (DENTSPLY/Caulk), CompoSite (Shofu), and Enamelize (Cosmedent).
If diamond abrasive pastes are used, they should be kept as dry as possible because their effectiveness decreases when diluted with saliva. Loose abrasives with diamond particles include Diamond Polish Paste (Ultradent Products) and Ceroshine diamond paste (Brasseler USA).
 |
 |
 |
| Figure 17. The postoperative result reflects a harmonious integration of composite resin, tooth structure, and soft tissue (a and b); and a relatively stress-free dento-gingival interface (c). |
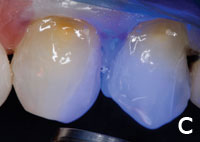
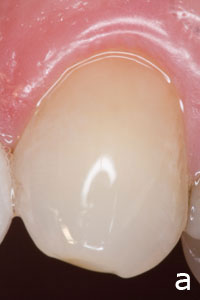
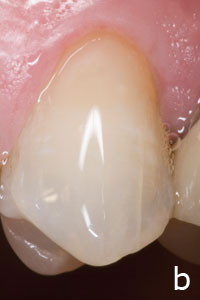
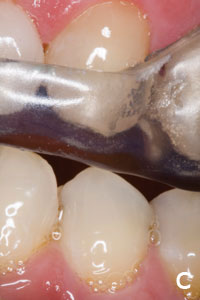
The postoperative result achieved reflects the result of meticulous use of restorative adhesive concepts (adhesive preparation design and selective bonding protocol) with a small-particle hybrid composite, and proper occlusal considerations and management for the successful rehabilitation of the dento-gingival complex (Figure 17). The completed restoration harmoniously integrated with the surrounding tissues, and the patient no longer experienced sensitivity.
Conclusion
The tooth-restorative interface is constantly subjected to polymerization shrinkage and occlusal stresses. Identifying the source of stress and understanding its manifestations in regard to composite resin restorations have led to clinical techniques that prevent and/or manage these stresses. Achieving success with composite resin restorations requires a relatively stress-free tooth-restoration in-terface. This 2-part article has defined the necessary considerations, stress reduction methods, and operative techniques to attain predictable clinical success with composite resins.
References
1. Yettram AL, Wright KW, Pickard HM. Finite element stress analysis of the crowns of normal and restored teeth. J Dent Res. 1976;55:1004-1011.
2. Ross GK, et al. Measurement of deformation of teeth in vivo. J Dent Res. 1992;71A:569. Abstract 432.
3. Roberson TM, Heymann HO, Swift EJ. Sturdevant’s Art and Science of Operative Dentistry. 4th ed. St Louis, Mo: Mosby; 2002:146.
4. Heymann HO, Sturdevant JR, Bayne S, et al. Examining tooth flexure effects on cervical restorations: a two-year clinical study. J Am Dent Assoc. 1991;122:41-47.
5. Grippo JO. Tooth flexure. J Am Dent Assoc. 1991;122:13.
6. Gordon JE. Science of structures and materials. New York, NY: Times Books; 1988.
7. Selna LG, Shillingburg HT Jr, Kerr PA. Finite element analysis of dental structures: axisymmetric and plane stress idealizations. J Biomed Mater Res. 1975;9:237-252.
8. Rubin C, Krishnamurthy N, Capilouto E, et al. Stress analysis of the human tooth using a three-dimensional finite element model. J Dent Res. 1983;62:82-86.
9. Goel VK, Khera SC, Ralston JL, et al. Stresses at the dentinoenamel junction of human teeth – a finite element investigation. J Prosthet Dent. 1991;
66:451-459.
10. Rees JS. The role of cuspal flexure in the development of abfraction lesions: a finite element study. Eur J Oral Sci. 1998;106:1028-1032.
11. Rees JS, Jacobsen PH. The effect of cuspal flexure on a buccal class V restoration: a finite element study. J Dent. 1998;26:361-367.
12. Tyas MJ. The Class V lesion: aetiology and restoration. Aust Dent J. 1995;
40:167-170.
13. Grippo JO, Simring M. Dental ‘erosion’ revisited. J Am Dent Assoc. 1995;
126:619-630.
14. Thresher RW, Saito GE. The stress analysis of human teeth. J Biomech. 1973;6:443-449.
15. Hood JA. Experimental studies on tooth deformation: stress distribution in class V restorations. N Z Dent J. 1972;68:116-131.
16. Powers JM, Craig RG, Ludema KC. Frictional behavior and surface failure of human enamel. J Dent Res. 1973;52:1327-1331.
17. Grippo JO. Abfractions: a new classification of hard tissue lesions of teeth. J Esthet Dent. 1991;3:14-19.
18. Eccles JD. Tooth surface loss from abrasion, attrition and erosion. Dent Update. 1982:9:373-381.
19. Grippo JO. Noncarious cervical lesions: the decision to ignore or restore. J Esthet Dent. 1992;4(suppl):55-64.
20. Terry DA, McGuire MK, McLaren E, et al. Perioesthetic approach to the diagnosis and treatment of carious and noncarious cervical lesions: Part 1. J Esthet Restor Dent. 2003;15:217-232.
21. Lee WC, Eakle WS. Possible role of tensile stress in the etiology of cervical erosive lesions of teeth. J Prosthet Dent. 1984;52:374-380.
22. Mount GJ, Hume WR. A new cavity classification. Aust Dent J. 1998;
43:153-159.
23. Terry DA. Natural Aesthetics With Composite Resin. Mahwah, NJ: Montage Media; 2004.
24. Lambrechts P, Van Meerbeek B, Perdigão J, et al. Restorative therapy for erosive lesions. Eur J Oral Sci. 1996;104:229-240.
25. Davies SJ, Gray RJ, Qualtrough AJ. Management of tooth surface loss. Br Dent J. 2002;192:11-23.
26. Mount GJ. Restorations of eroded areas. J Am Dent Assoc. 1990;120:31-35.
27. Miller MB. Restoring Class V lesions, Part 1: carious lesions. Pract Periodontics Aesthet Dent. 1997;9:441-442.
28. Leinfelder KF. Restoration of abfracted lesions. Compendium. 1994;15:1396-1400.
29. Cardoso PE, Placido E, Francci CE, et al. Microleakage of Class V resin-based composite restorations using five simplified adhesive systems. Am J Dent. 1999;12:291-294.
30. Fahl N Jr, Denehy GE, Jackson RD. Protocol for predictable restoration of anterior teeth with composite resins. Pract Periodontics Aesthet Dent. 1995;7:13-21.
31. Dietschi D. Free-hand composite resin restorations: a key to anterior aesthetics. Pract Periodontics Aesthet Dent. 1995;7:15-25.
32. Touati B, Miara P, Nathanson D. Color and light transmission. In: Esthetic Dentistry and Ceramic Restorations. London, UK: Martin Dunitz; 1999:39-60.
33. O’Keefe KL, Strickler ER, Kerrin HK. Color and shade matching: the weak link in esthetic dentistry. Compendium. 1990;11:116-120.
34. Springstead MC, Rogers WA, Cline NV. The preliminary prosthetic consultation form. Trends Tech Contemp Dent Lab. 1992;9:59-63.
35.Lutz F. State of the art of tooth-colored restoratives. Oper Dent. 1996;21:237-248.
36. Lutz FU, Krejci I, Oddera M. Advanced adhesive restorations: the post-amalgam age. Pract Periodontics Aesthet Dent. 1996;8:385-394.
37. Dietschi D, Spreafico R. Adhesive Metal-Free Restorations: Current Concepts for the Esthetic Treatment of Posterior Teeth. Berlin, Germany: Quintessence Publishing; 1999.
38. Quellet D. Considerations and techniques for multiple bulk-fill direct posterior composites. Compend Contin Educ Dent. 1995;16:1212-1224.
39. Wilson NH, Dunne SM, Gainsford ID. Current materials and techniques for direct restorations in posterior teeth. Part 2: resin composite systems. Int Dent J. 1997;47:185-193.
40. Magne P, Dietschi D, Holz J. Esthetic restorations for posterior teeth: practical and clinical considerations. Int J Periodontics Restorative Dent. 1996;16:104-119.
41. Goracci G, Mori G. Esthetic and functional reproduction of occlusal morphology with composite resins. Compend Contin Educ Dent. 1999;20:643-648.
42. Touati B. Bonded ceramic restorations: achieving predictability. Pract Periodontics Aesthet Dent. 1995;7:33-37.
43. Santos J, Bianchi J. Restoration of severely damaged teeth with resin bonding systems: case reports. Quintessence Int. 1991;22:611-615.
44. Van Meerbeek B, Vanherle G, Lambrechts P, et al. Dentin- and enamel-bonding agents. Curr Opin Dent. 1992;2:117-127.
45. Eakle WS. Fracture resistance of teeth restored with class II bonded composite resin. J Dent Res. 1986;65:149-153.
46. Ramfjord SP. Aesthetics, periodontology, and restorative dentistry. Quintessence Int. 1985;16:581-588.
47. Brackett WW. The etiology and treatment of cervical erosion. J Tenn Dent Assoc. 1994;74:14-18.
48. Croll TP. Alternative methods for use of the rubber dam. Quintessence Int. 1985;16:387-392.
49. Liebenberg WH. General field isolation and the cementation of indirect restorations: part I. J Dent Assoc S Afr. 1994;49:349-353.
50. Montiero S Jr, Sigurjons H, Swartz ML, et al. Evaluation of materials and techniques for restoration of erosion areas. J Prosthet Dent. 1986;55:434-442.
51. Nakabayashi N, Nakamura M, Yasuda N. Hybrid layer as a dentin-bonding mechanism. J Esthet Dent. 1991;
3:133-138.
52. Kanca J III. Improving bond strength through acid etching of dentin and bonding to wet dentin surfaces. J Am Dent Assoc. 1992;123:35-43.
53. Kanca J III. Resin bonding to wet substrate. II. Bonding to enamel. Quintessence Int. 1992;23:625-627.
54. Vanini L. Light and color in anterior composite restorations. Pract Periodontics Aesthet Dent. 1996;8:673-682.
55. Duke ES. Direct posterior composites. J Indiana Dent Assoc. 1993;72:35-39.
56. Yap AU, Ang HQ, Chong KC. Influence of finishing time on marginal sealing ability of new generation composite bonding systems. J Oral Rehabil. 1998;25:871-876.
57. Jefferies SR. The art and science of abrasive finishing and polishing in restorative dentistry. Dent Clin North Am. 1998;42:613-627.
58. Ward MT, Tate WH, Powers JM. Surface roughness of opalescent porcelains after polishing. Oper Dent. 1995;20:106-110.
59. Lutz F, Setcos JC, Phillips RW. New finishing instruments for composite resins. J Am Dent Assoc. 1983;107:575-580.
60. Yap AU, Sau CW, Lye KW. Effects of finishing/polishing time on surface characteristics of tooth-coloured restoratives. J Oral Rehabil. 1998;
25:456-461.
61. Van Noort R. Controversial aspects of composite resin restorative materials. Br Dent J. 1983;155:380-385.
62. Chung KH. Effects of finishing and polishing procedures on the surface texture of resin composites. Dent Mater. 1994;10:325-330.
63. Jung M. Finishing and polishing of a hybrid composite and a heat-pressed glass ceramic. Oper Dent. 2002;27:175-183.
64. Hondrum SO, Fernandez R Jr. Contouring, finishing, and polishing class 5 restorative materials. Oper Dent. 1997;22(1):30-36.
65. Mitchell CA, Pintado MR, Douglas WH. Iatrogenic tooth abrasion comparisons among composite materials and finishing techniques. J Prosthet Dent. 2002;88:320-328.
66. Chandler HH, Bowen RL, Paffenbarg-er GC. Method for finishing composite restorative materials. J Am Dent Assoc. 1971;83:344-348.
67. Tjan AH, Chan CA. The polishability of posterior composites. J Prosthet Dent. 1989;61:138-146.
68. Boghosian AA, Randolph RG, Jekkals VJ. Rotary instrument finishing of microfilled and small-particle hybrid composite resins. J Am Dent Assoc. 1987;115:299-301.
69. Reis AF, Giannini M, Lovadino JR, et al. Effects of various finishing systems on the surface roughness and staining susceptibility of packable composite resins. Dent Mater. 2003;19:12-18.
70. Schmidseder J. Color Atlas of Dental Medicine: Aesthetic Dentistry. New York, NY: Thieme Medical Publishers; 2000.
71. Dietschi D, Campanile G, Holz J, et al. Comparison of the color stability of ten new-generation composites: an in vitro study. Dent Mater. 1994;10:353-362.
72. Christensen RP, Christensen GJ. Comparison of instruments and commercial pastes used for finishing and polishing composite resin. Gen Dent. 1981;29:40-45.
73. Duke ES. Finishing and polishing techniques for composite resins. Compend Contin Educ Dent. 2001;22:392-396.
74. Chen RC, Chan DC, Chan KC. A quantitative study of finishing and polishing techniques for a composite. J Prosthet Dent. 1988;59:292-297.
75. Stanford WB, Fan PL, Wozniak WT, et al. Effect of finishing on color and gloss of composites with different fillers. J Am Dent Assoc. 1985;110:211-213.
76. Dickinson GL, Leinfelder KF. Assessing the long-term effect of a surface penetrating sealant. J Am Dent Assoc. 1993;124:68-72.
77. Kemp-Scholte CM, Davidson CL. Marginal sealing of curing contraction gaps in class V composite resin restorations. J Dent Res. 1988;67:841-845.
78. Estafan D, Dussetschleger FL, Miuo LE, et al. Class V lesions restored with flowable composite and added surface sealing resin. Gen Dent. 2000;48:78-80.
79. Barone-Smith CE, Dickens SH. Effect of surface sealing on the microleakage of bonded restorations. J Dent Res. 1999;155:Abstract 394.
Dr. Terry received his DDS from the University of Texas Health Science Center Dental Branch at Houston in 1978. He has published more than 230 articles on various topics in aesthetic dentistry in numerous languages and authored the textbook Natural Aesthetics with Composite Resin. He is an assistant professor, Department of Restorative Dentistry and Biomaterials, at the University of Texas Health Science Center Dental Branch at Houston. Dr. Terry maintains a private practice in Houston emphasizing aesthetic and restorative dentistry. He can be reached at (281) 481-3483.
Dr. Leinfelder earned his doctor of dental surgery and master of science (dental materials) degrees from Marquette University. After serving for 8 years on the faculty at Marquette, he joined the faculty at the University of North Carolina School of Dentistry, where he attained the rank of professor and director of biomaterials clinical research in the Dental Research Center. In 1983, he joined the School of Dentistry at the University of Alabama and held the Joseph Volker Chair. He also served as chairman of the Department of Biomaterials until 1994. Presently he holds positions at both universities: adjunct professor at the University of North Carolina and professor emeritus at the University of Alabama. He is the recipient of the Dr. George Hollenbeck award (1995) as well as the Norton N. Ross award for outstanding clinical research (1997), and the American College of Prosthodontists Distinguished Lecturer Award (1998). He has served as associate editor of the Journal of the American Dental Association. He can be reached at (919) 370-9168.
Continuing Education Test No. 85.2
After reading this article, the individual will learn:
• tooth flexure theory and clinical manifestations of occlusal forces at the cervical
region of the tooth, and
• methods for prevention, management, and treatment of carious and noncarious
class V lesions.
1. During occlusal loading, the tooth under-goes a lateral or an axial bending called tooth flexure. This generates minimal strain in the cervical region, resulting in tensile stress concentrations in the cervical region on the opposite side of the tooth from which the force is directed.
a. The first statement is correct and the second statement is incorrect.
b. Both statements are correct.
c. The first statement is incorrect and the second statement is correct.
d. Both statements are incorrect.
2. Repeated flexural forces can cause adhesive failure of cervical composite restorations at the dentin-resin interface, which can result in ____.
a. complete debonding of the restoration
b. microleakage at the restorative interface
c. partial debonding of the restoration
d. all of the above
3. The objectives of modern management and prevention of tooth surface lesions include ____.
a. a shorter time between replacement of restorations
b. preservation of hard and soft tissues
c. prevention of hard- and soft-tissue destruction
d. both b and c
4.Composite resins with a high modulus of elasticity can absorb energy transferred from the occlusal surface, increasing transmission to the dentin-restorative interface. Microfill and flowable resins have a higher modulus of elasticity than do hybrid or conventional resins.
a. The first statement is correct and the second statement is incorrect.
b. Both statements are correct.
c. The first statement is incorrect and the second statement is correct.
d. Both statements are incorrect.
5. Restorative principles require maintaining sound tooth structure, a sterile, gap-free hybrid layer, and eliminating microleakage by securing a relatively stress-free tooth-restoration interface. Adhesive biomaterials are technique sensitive and require moisture control and meticulous attention to adhesive protocol.
a. The first statement is correct and the second statement is incorrect.
b. Both statements are correct.
c. The first statement is incorrect and the second statement is correct.
d. Both statements are incorrect.
6.Which method does NOT increase mechanical retention of adhesive restorations when clinical conditions such as sclerotic dentin exist?
a. placement of grooves
b. roughening the dentin surface with a slow-speed bur
c. use of additional coats of adhesive resin
d. roughening the dentin surface with air abrasion
7. An optimally finished aesthetic restoration should provide ____.
a. proper anatomical form for ideal occlusion
b. ideal contours and emergence profile for improved tissue compatibility
c. a smooth surface that will prevent plaque accumulation and resist stain
d. all of the above
8. Hardness is defined as the resistance to permanent indentation or penetration. Effective composite finishing/polishing requires the cutting particles (abrasives) to be softer than the filler component of the composite.
a. The first statement is correct and the second statement is incorrect.
b. Both statements are correct.
c. The first statement is incorrect and the second statement is correct.
d. Both statements are incorrect.
To submit Continuing Education answers, download the answer sheet in PDF format (click Download Now button below). Print the answer sheet, identify the article (this one is Test 85.2), place an X in the box corresponding to the answer you believe is correct, and mail to Dentistry Today Department of Continuing Education (complete address is on the answer sheet).