When patients ask for white and only white teeth, most of the time we think they want that old bathroom ceramic white, and we wonder why, for crying out loud, would they want something like that in their mouths? They probably don’t. They don’t know the terminology. So they probably will not tell their dentists, “I want translucency with light mammelons and gentle halo, and a vital, luminescent restoration.” Sometimes we even blame patients for wearing those dead-white crowns or veneers. We say, “It looks so fake, how can she think that looks good? She paid for that?”…and so on.
But the patient didn’t fabricate them, or accept them from the lab, which is where the restoration comes from. Patients ask for white, but what they really mean is bright. To understand this in terms of appearance we should dig deeply into the meaning of the 2 words.
The Merriam-Webster dictionary defines white as follows: free of color; lustrous, pale, gray; pale: not bright or brilliant; deficient in chroma. The Oxford English Dictionary defines white as very pale; pale: unimpressive or inferior; seem or become less important.
Bright, as defined by the Merriam-Webster dictionary, means radiating or reflecting light; shining, sparkling, radiant; illustrious, glorious; beautiful; of high saturation or lightness; lively, luminous, lustrous, brilliant, glowing. The Oxford English Dictionary defines bright as giving out much light, or filled with light; (of color) vivid and bold; cheerfully lively; vivid: (of a color) intensely deep or bright. In addition, white is opaque looking; the whiter you go the more opacious it will be.
As a dental professional if you repeat to yourself the meaning of bright, and put it into the essence of what you are looking for in your restoration, you will know if what you see is what you are looking for. That’s why when we see patients walking around with these dead-white veneers we call Chiclets, it makes us wonder why. But the patients were not presented with the option of bright, natural-looking, luminous, youthful-looking teeth, or something close to that.
People notice right away that the teeth are “fake.” As a result, many people are reluctant to change their smiles with restorations, even if their own teeth don’t look good, because they don’t want to change from “not-so-good-looking teeth” to “ridiculous-looking teeth” (as they have seen in others’ mouths).
Of course, it’s not always like that. There is excellent aesthetic restorative treatment that brings more patients to the dental office. Unfortunately, though, the number of patients seeking treatment represents a low percentage compared to the number of patients who need to change their smiles, who want a change, and have the funds to go for it.
What I’m trying to convey is the idea that continuous referrals from patients probably come not from the patient for whom the work was done, but as a result of others who have seen that patient and want the same thing done for their own mouths/smiles. It’s like the phrase, “You are judged by your last performance.” Keep it bright! Strive for the best.
HOW TO COMMUNICATE BRIGHT
 |
 |
|
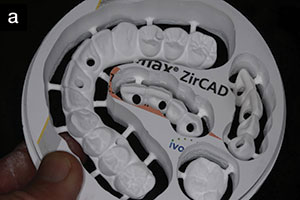
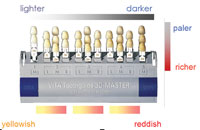
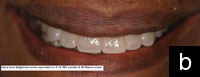
Figures 1a and 1b. Value level (brightness level) equivalent to A1 (VITA Lumin Shade Guide [Vident]) and 1M1 (VITA 3D-Master Shade Guide [Vident] mixed). |
 |
 |
 |
 |
|
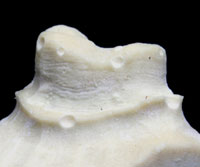
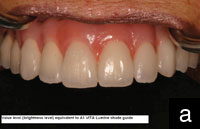
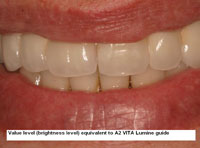
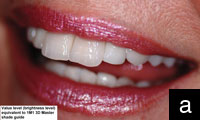
Figures 2a to 2d. Value level (brightness level) equivalent to A1 (VITA Lumin Shade Guide). |
So, how do we communicate bright? First, let’s look at how the laboratory works with porcelain. We get porcelain in a powder form, mix it with liquid, and we’re good to go. Unlike zircon blocks that are carved from outside in, where you cannot affect the internal color, porcelain is being built up incrementally (well..when it’s done right). This way you can layer, segment, and embed different color effects. Many commercial laboratories use a method of building based on body porcelain, which should represent the dentin, and incisal porcelain at the incisal third, which should represent the enamel. But this method is similar to the zircon block that is made with one color and simply carved; in other words, it is monochromatic and thick looking, does not allow light penetration, and does not reveal any depth. As a result, our eyes see only the outside material, like looking at white plastic. Even if the ceramic is not that opaque, because of it’s uniformity of color from the internal mass to the outside surface, it is not giving the appearance of depth.
So, let’s look at what we’ve seen so far: no depth, uniformity of color, no light penetration. This is just the opposite of a tooth, which is described as follows: filled with light, iridescent, radiant, luminous, brilliant, glowing.
 |
|
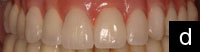
Figure 3. Value level (brightness level) equivalent to A2 (VITA Lumin Shade Guide [Vident]). |
A monochromatic, dull appearance can be enough to destroy a smile, even if the white level is not that exaggerated. However, some dental professionals use the whitest opacious dentin they can find, and it really does look fake. We have some good porcelain companies available to us, providing a good variety of porcelain shade effects and appearances. It is up to us as laboratory technicians and dentists to understand which effects can be achieved and how to use these porcelains properly.
I have noted that restorations can be too opaque, and therefore appear fake. But what about translucency and transparency? These can provide depth and are surely penetrable by light, but the oral cavity is dark, and a translucent material with a dark background shows darkness and an appearance that is too gray. So, what is the answer? If one is too opaque, and the other is too gray/translucent, should we mix the two?
 |
 |
 |
|
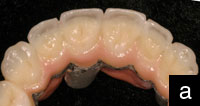
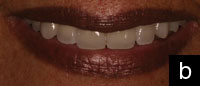
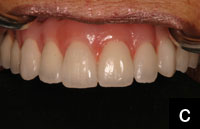
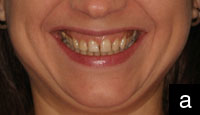
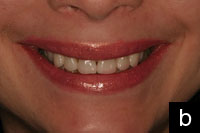
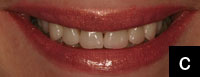
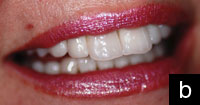
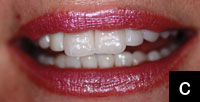
Figures 4a to 4c. Before (a) and after (b and c) views; value level (brightness level) equivalent to A1 and A2 (VITA Lumin Shade Guide). |
No. We need the opacious porcelain in some areas, and the translucent one in others. It’s a combination, and the magic word really is layering. If you look at dissected teeth you will see layers, and of course the tooth color is coming from the inside, showing through the enamel. When a restoration is being fabricated we use the opacious dentin porcelain to give the layer underneath a masking effect, whether masking the opaque on a metal-ceramic restoration or masking a very white zirconium coping. In addition, a slightly stronger color than the one that was originally chosen is used, because the bright incisal layers on top, which result in color, diminish.
The dentin body porcelain, which is neither translucent nor opacious, does not have the ability to mask the underlying layer. Not having translucency, it produces no beneficial effect without the opacious dentin underneath it and a layer of translucent porcelain covering it on top. Incisal porcelain (which provides the higher value) by itself is too pale looking and colorless, and does not appear translucent.
 |
 |
 |
|
Figures 5a to 5c. Value level (brightness level) equivalent to 1M1 (VITA 3D-Master Shade Guide). |
So, let’s review. Translucent porcelain by itself is too gray in the oral cavity. Dentin body porcelain by itself is too opaque looking compared to natural teeth, but not opaque enough to mask a substructure. Opaque dentin porcelain by itself is too opacious to resemble a natural tooth, but has good masking ability. Incisal porcelain by itself is too opacious and pale looking and has no color (at least not visible color), but appears as high value.
The essence of bright is a layered combination of these abilities. The opacious dentin is masking the substructure and providing stronger basic chroma; the dentin body is giving the resemblance of natural tooth dentin; the incisal porcelain is providing the value; the translucent porcelain is covering the structure, allowing the understructure to be visible, and at the same time projecting its appearance of translucent mass without resulting gray, having a nontranslucent structure layered underneath. These are the basics.
There are a lot more porcelains and more involved build-up techniques, but what I’ve described is the A-B-C of porcelain build-up technique. The natural tooth is layered, and so must a porcelain restoration be if it is to appear natural and bright.
After understanding all of this, the best tool to communicate with your technician is to tell him to read this article. Or, you could definitely ask for masking the substructure enough so no reflection of opaque is appearing, and you could definitely ask for translucent porcelain to be the overall covering for the restoration. You can ask for depth in the restoration by asking that the strength of the color be inside, not stained on the outer surface as it would be on a carved block.
To resemble the patient’s natural teeth translucency, on my lab prescription I have at least 3 levels of translucency: low, medium, and high.
Understanding basic layering is understanding how bright can be achieved. (See Figures 1 to 5 for examples of brightness level.)
Acknowledgment
The author thanks the dentists who worked with him on these cases: Dr. Barry Goldman, director of the prosthetic department at Nova Southeastern University (Florida), Dr. Elizabeth Piela (New Jersey), Dr. Derrick Bullock (New Jersey), Dr. Elo Adibe (Pennsylvania/NewYork), Dr. Robert Berg (New York), and Dr. Richard Kraut, chairman of the dentistry department and director of oral and maxillofacial surgery at Montefiore (New York).
Mr. Davidashvilly graduated dental technology school in Israel (1987), followed by a 3-year apprenticeship. After leading European Ceramic Masters, throughout the years he developed techniques and ways of his own. He graduated from New York University, (American Society of Master Dental Technologists) in 2000, and since 2004 has been working closely with Mr. Vincent Alleluia, MDT, TFNGS (Technical Fellow Northeastern Gnathological Society), as an instructor in this program. He has worked at labs in Israel and New York and managed Monte-fiore Hospital’s lab (New York) in the prosthodontic department. Today, he gives lectures, presentations, hands-on courses, and writes articles. Mastering gnathology, morphology, aesthetics, and ceramics has enabled Mr. Davidashvilly to perform with superior excellence. He owns Art & Science Dental Lab in Farmingville, NY, and can be reached at (631) 285-1112, mmdt100@gmail.com, or BennyDavidashvilly.com.