Teeth, unlike shade tabs, have variations in coloration across the coronal aspect of the tooth, and communication of these nuances to the lab can be challenging.
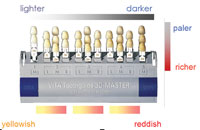
When we speak about tooth shading we are actually talking about 3 different aspects that, together, are color. These are value, chroma, and hue. Value can be described as the brightness, and is de-scribed as lighter to darker and is independent of the tone (hue). Chroma is the amount of saturation of the color, and can be described as paler (less chroma) to richer (more chroma). Hue is the tone, and with respect to tooth shade we are describing yellow to reddish.
We perceive the world around us via the rods and cones in our eyes, and are capable of classifying the 3 aspects of shade: value, chroma, and hue. The rods are able to determine the value of what we view, whereas the cones allow the perception and differentiation of color (chroma and hue). As we have more rods than cones, the human eye is more sensitive to changes in value than changes in chroma and hue. Therefore, we will be more sensitive to a restoration that is too light or dark than one that is “off” in saturation or tone.
HOW TO COMMUNICATE SHADE TO THE LABORATORY
 |
 |
|
Figure 1. VITA 3D shade guide (Vident) demonstrating color orientation of the guide. |
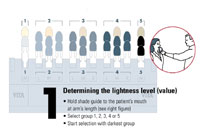
Figure 2. Step 1: selecting the appropriate value on the VITA 3D shade guide. |
 |
 |
|
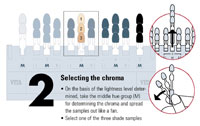
Figure 3. Step 2: selecting the appropriate chroma on the VITA 3D shade guide. |
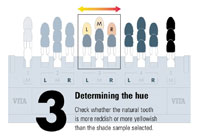
Figure 4. Step 3: selecting the appropriate hue on the VITA 3D shade guide. |
Shade selection can be simplified with a shade guide that is arranged based on value, chroma, and hue, allowing the dentist to quickly determine the base shade for the tooth. The VITA 3D shade guide (Vident) (Figure 1), with groupings based on hue and then value and chroma, has been developed to replace the popular original VITA shade guide and other shade guides that are arranged in a more traditional manner.
It is important that shade selection be performed before the tooth dries, as a dry tooth will appear lighter in value than a moist tooth. First, we need to determine the value of the patient’s teeth. How light or dark are the teeth? Holding the shade guide at arm’s length next to the patient’s mouth determines which group on the shade guide has the correct value. Starting with the right side of the shade guide, the darker value groups determine which of the 5 groups on the shade guide is closest to the tooth to be matched. For example, the value of the tooth best matches group 3 (Figure 2).
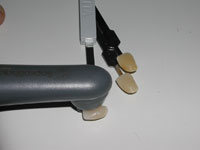
Next, we need to determine the tooth’s chroma. Each of the 5 shade groups on the guide has a middle (M) group. Take the M group for the group you selected previously based on the value, and spread the 3 tabs apart and select which saturation level matches the saturation of the tooth being matched. In our example, we determine that the chroma best matches the middle tab of the 3M group (3M2) (Figure 3).
The final step is determining what hue best matches the tooth being matched. Groups 2, 3, and 4 consist of 3 groups each. Groups 1 and 5 only consist of an M group. The group to the left of the M group—the L group—is more yellow than the M group, and the group to the right—the R group—is more red than the M group. Determine if the tooth looks more yellow or red than the M group. The tab that is selected is the base color for the restoration to be done, which in our example we determine that the 3L1.5 is the best match based on the value, hue, and chroma (Figure 4).
COMMUNICATING WITH THE LABORATORY
Selecting a shade tab that meets the criteria of value, hue, and chroma does not mean that the restoration will blend with the surrounding teeth. We need to have a way to communicate the nuances of the tooth to be matched, such as incisal translucency, craze lines, surface texture, and maverick colors. Maverick colors refer to spots of intense color in the tooth that stand out from the surrounding enamel.
Unfortunately, how one person would interpret a written description of what the tooth looks like often is not how another will interpret the same information. As it has been said, “a picture is worth a thousand words.” Photographs assist in communicating what we are seeing chairside to the lab, but the human eye is much more precise in interpreting the information than a camera. The value, hue, and chroma shown in the photographic image are not only affected by the particular camera and its settings, but also by the ambient light present when the image was taken. Additional factors that will affect these color factors are the printer and the monitor. Different printers will render colors differently, so printing the photographic image to send to the lab may not provide accurate value, hue, and chroma of what was seen clinically. This is also an issue when images are emailed to the lab, as different monitors will render different degrees of color for the same image. What you see in your office on your monitor will not be the same value, hue, and chroma that the lab sees on their monitor.
 |
 |
|
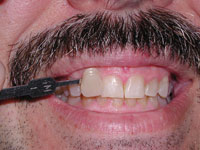
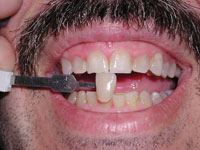
Figure 5. Photograph of the shade tab selected as matching the patient’s native shade shown adjacent to the patient’s tooth. |
Figure 6. Photograph of the shade tab selected as matching the patient’s native shade shown with the incisal of the tab contacting the tooth’s incisal edge to help communicate incisal-to-cervical shading. |
Digital images are an effective method of communicating with the lab. When photographing a shade tab intraorally, it is best to take 2 views of that tab to aid the lab in how it coordinates with the patient’s tooth color. Typically an image is taken with the shade tab adjacent to the tooth being matched. It has also been recommended that a photograph be taken with the shade tab’s incisal portion contacting the incisal of the tooth being matched, to help communicate gradations from the incisal to the cervical as they relate to the shade tab. These photographs aid the lab in seeing shade comparisons but can be deceptive in communicating the nuances in the tooth (Figures 5 and 6).
SIMPLIFYING SHADE COMMUNICATION
 |
 |
|
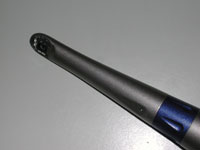
Figure 7. Sopro 717 intraoral camera (Acteon). |
Figure 8. SoproShade on the Sopro 717 camera (Acteon). |
 |
 |
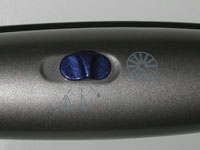
| Figure 9. Sopro 717 control switch with the 3 image positions; full image, left half, and right half. |
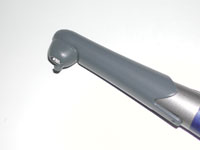
Figure 10. SoproShade adaptor on a Sopro 717 camera capturing image intraorally. |
 |
 |
|
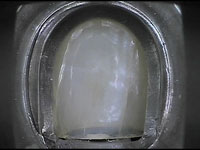
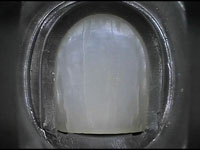
Figure 11. A patient’s tooth demonstrating incisal translucency and a halo effect in the enamel; craze lines are also evident. |
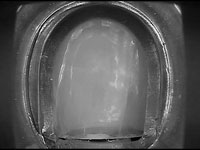
Figure 12. Conversion of the full-tooth image to gray scale assists the lab in seeing texture and light reflection on the tooth’s surface. |
 |
 |
|
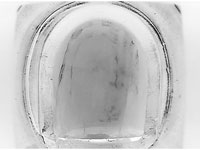
Figure 13. Inversion of the full-tooth image gray scale assists the lab in seeing texture and light reflection on the tooth’s surface. |
Figure 14. Patient’s tooth captured on left half of image. |
 |
 |
|
Figure 15. SoproShade on the Sopro 717 camera capturing the shade tab. |
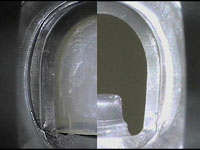
Figure 16. A patient’s natural tooth depicted on left half and Vita 3D shade tab on right half demonstrating shade comparisons. |
 |
|
Figure 17. A patient’s tooth showing enamel craze lines and a more uniform color variance from cervical-to-incisal. |
The SoproShade and Sopro 717 (Acteon) are intraoral camera aids in this communication by providing detailed images quickly and easily. The SoproShade allows the room’s ambient light to be blocked from the image of the tooth being matched while controlling the illumination of the tooth (Figures 7 and 8). The Sopro 717 camera is set with the control switch in the top position to capture a full-tooth image, the SoproShade guide is placed on the tooth with the incisal edge in the holder, and an image is taken (Figure 9). This image will communicate incisal translucency, maverick colors, texture, imperfections within the enamel and gradations across the tooth surface. To aid in communication of areas of light reflection and surface texture, this image can also be converted to a gray scale im-age which will aid the lab in developing a more natural blending restoration. It may be of additional benefit to the lab to also send an inverted image of the gray scale of the full tooth, as this provides more information on surface texture and areas of light reflection than a 2-D image of the 3-D object can provide. The conversion to gray scale and the inverted image can be accomplished with Adobe Photoshop, ACDSee, Paint Shop, or any image editing program (Figures 10 to 13).
Next, the control switch is clicked to the middle position and another image is taken of the same tooth. This will capture the left half of the tooth. The control switch is then moved into the bottom position, the shade tab selected previously is placed in the Sopro-Shade, and the right half of the shade tab is captured adjacent to the left half of the tooth. This will communicate how the base shade relates to different areas of the tooth (Figures 14 and 15).
Additionally, by capturing different shade tabs around the one that was selected intraorally we can confirm which tab best matches the value, hue, and chroma of the tooth. In the example illustrated in Figure 16 we see that the 4M1 tab best matches the tooth’s base value, hue, and chroma.
CONCLUSION
Communication is the key for the dentist and lab in developing ceramic restorations that blend with the surrounding dentition. Selecting an appropriate shade is only the first step in getting the restoration to match adjacent teeth. As teeth are not uniform in coloration from cervical to incisal, they have imperfections such as spots of color and craze lines, and translucency gradients vary from patient to patient. It is important to be able to communicate those nu-ances to the lab (Figure 17). The Sopro-Shade and Sopro 717 camera allow transmission of this information in a method different from traditional cameras or other intraoral cameras.
Acknowledgement
The author would like to thank Dr. Mark Murphy for his assistance with imaging accompanying this article.
Dr. Kurtzman is in private general practice in Silver Spring, Maryland. He has lectured both nationally and internationally on the topics of restorative dentistry, endodontics, and dental implant surgery and prosthetics. He can be reached by email dr_kurtzman@maryland-implants.com.