Here’s your 2006 briefing on some of the newer items contributing to the world of dental digital photography. I have good news! While there are several additions to the digital photo armamentarium, you won’t have to toss your existing system. Most likely, it’s still current. Even better, if you have yet to take the plunge for fear of scraping bottom in the checkbook, a few entry-level options have surfaced that ease the pain considerably.
First we’ll take a peek at a few newer camera entries and then we’ll examine some clever accessories that can make your photo tasks less difficult and more effective. The items mentioned below are by no means all that there is they simply represent cameras and gizmos that I have used personally or encountered at dental shows.
THE CAMERAS
 |
|
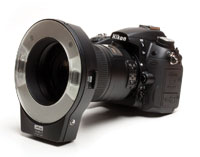
Figure 1. The Canon 5D full-frame sensor SLR camera. |
Those of you who have heard me speak about my favorite subject know that I accomplish the majority of my office photo activities with a Canon 20D SLR, equipped with 100-mm macro-zoom and a matching Canon ring flash, the MR-14EX. This has become a popular system amongst our dental brethren, as has the somewhat smaller Digital Rebel XT (Canon), equipped similarly to the 20D. There is no disputing the fact that these camera systems are dental friendly, producing images that exceed the ability of the human eye to improve upon. If you own one of these systems, you may never need to swap it out that is, unless you covet the newest and latest in digital techno-wizardry.
Enter the Canon 5D (Figure 1). What distinguishes this latest entry is the 5D’s full-frame sensor. That is, the CMOS chip that replaces film for recording images is now the same size as a frame of 35-mm film. Simply put, this means that our standby magnifications of 1:1, 1:2, and 1:10 are now what we had become accustomed to before the days of digital. When the first D-SLR cameras appeared, they used capture chips (sensors) that were smaller than a frame of 35-mm film typically two-thirds the size. This caused everyone to re-learn lens settings to photograph a field that was equivalent to what they were used to. As they say, what goes around, comes around…
The new Canon 5D also improves upon the popular 20D in terms of resolution. The 5D increases the resolution to 12.8 megapixels versus 8.2 with the 20D and Rebel XT. The 5D feels a bit bulkier in my hands than does the 20D, but if you long for the days of the 35-mm format, the 5D will fill the bill so long as you are willing to pay the bill. The camera body alone sells in the $3,000 range, while PhotoMed kits featuring the 5D weigh in at the $4,800 range. The 5D is compatible with Canon EOS 35-mm lenses and flash systems, so if you are already a Canon user, you need only purchase the body.
FOR THE BUDGET MINDED
 |
|
Figure 2. The Canon A620 with PhotoMed attachment. |
For mere mortals wishing for an easier segue into digital photo participation, Canon’s A610 and A620 cameras, when equipped with Photo-Med’s macrolens/flash diffuser, offer an answer (Figure 2). For as little as $1,200 (little in dento-speak, that is) the A610 will provide images of natural color and exceptional clarity. The $1,200 price tag nets a complete system that centers around the A610, a 5-megapixel point-and-shoot camera. (Point-and-shoot cameras require that focusing and composition be handled through the camera’s LCD screen, much like a video camera.) For another $100, the A620 offers a 7-megapixel sensor for greater resolution. Do you need it? In most instances, no! Five megapixels will do the trick for our everyday show-and-tell adventures. As an aside, the A610/620 are wonderful recreational cameras, allowing them to do double duty once the macro attachment is removed, as is easily done with the turn of a single thumb screw that mates with the camera’s tripod socket. Good stuff! Perhaps the most attractive feature of the Photo-Med attachment is that it does not need batteries.
ANOTHER APPROACH
 |
|
Figure 3. Kodak’s DX7590 Dental Digital Camera System. |
Kodak has been trying for years to produce a dental camera system that can compete with the Canons and the Nikons of the world. And, it has been no secret that Kodak embraced digital somewhat late in the game. They have been playing catch up. I am happy to report that considerable headway has been made since the earlier days. Wit-ness Kodak’s DX7590 Dental Digital Camera system. It currently graces the Kodak booth at all regional dental gatherings if you’d like a peek at one (Figure 3).
I enjoy matching camera systems with their prospective buyers. It seems that each system has a niche. Kodak was kind enough to provide me with a DX7590 system that I put to use for several weeks, allowing me to form an opinion on who might benefit from this type of digital camera solution. Before making that match (and, mind you, it’s an opinion only), you should know that Kodak took its Easyshare Z7590 Prosumer model, a 10x zoom, 5-megapixel camera found in consumer electronic stores, and converted it for dental use by installing a silk screen overlay over the camera’s LCD screen to serve as a guide for the popular dental views. They also produced what looks like a ring light attachment that also doubles as a special macro lens. The ring light really isn’t a flash, but it channels the camera’s onboard flash in fiber-optic fashion into a circle of lights that in many respects emulate an LED ring light. The DX7590 is further equipped with a distancing wire that attaches to the ring light, assisting any user in locating the exact distance needed to optimize the subjects framing and illumination. The camera system is sold with a dye sublimation printer/docking station that not only charges the camera’s battery but will produce 4×6 prints of whatever is seen on the camera’s generous LCD screen, via the press of a button. The DX7590 ships with a set of dental settings stored under the C mode. Its price range is $1,700 to $1,800, elevating it to a purchase point somewhere in between the systems already described.
While the 5D might sell to the experienced camera buff wanting the next great thing in “affordable” digital SLRs, and the A610/620 might appeal to those wanting high quality at low cost (as well as a recreational camera), the DX7590 might attract those wishing for a small, self-contained, staff-friendly package that really doesn’t require a PC to reach its full potential. (Yes, you can connect it to a PC if you wish.) From my experience, the DX7590s strong suit would be imaging of the anterior dentition, where images were found to be properly exposed and reasonably true in color. Posterior photography presented more of a challenge, as the distancing wire is less user-friendly when attempting mirrored shots and direct molar shots. It was apparent that with some practice, these too could be produced, but certainly with less ease than if photographed with a higher end SLR. Suffice it to say that the convenience factor afforded by the DX7590 system is its strong suit, making it a suitable choice for the more casual dental digital photographer seeking to delegate the majority of such tasks to auxiliary staff. If, however, maximum versatility is your quest, the DX7590 system may not be the appropriate choice.
LET THERE BE LIGHT
 |
|
Figure 4. DoctorEyes ring light adaptation. |
So as not to leave anyone in the dark, let it be known that if you happen to have an off-the-shelf digital camera, it may be called into service if you outfit it with some sort of macro/flash attachment. Many are already aware that PhotoMed manufactures and sells such attachments (as the one shown on the A610/620 in Figure 2) that will outfit Olympus Camedia series cameras as well as Canon A and G series point-and-shoot cameras. They sell for just under $700. But what if you don’t have one of these cameras? There is another possible solution called DoctorEyes LED Ring-lights (Figure 4). This gizmo consists of an LED ring light, macro lens, and rechargeable power base that can be retrofitted to almost any of the major manufacturers cameras of the past and present, including the venerable Ni-kon 995. This lighting device is manufactured by a German company and is just making its way (as of this writing) to our market. At present, PhotoMed ([800] 998-7765 or photomed.net) is reported to be a vendor for this item.
THOSE TROUBLESOME OCCLUSAL SHOTS
 |
 |
|
Figure 5. The Occlusal Contraster in place. |
Figure 6. The shot resulting from use of the Occlusal Contraster. |
 |
|
Figure 7. Closeup of the Occlusal Contraster. |
 |
 |
|
Figure 8. Anterior Contraster going to place. |
Figure 9. The shot resulting from use of the Anterior Contraster. |
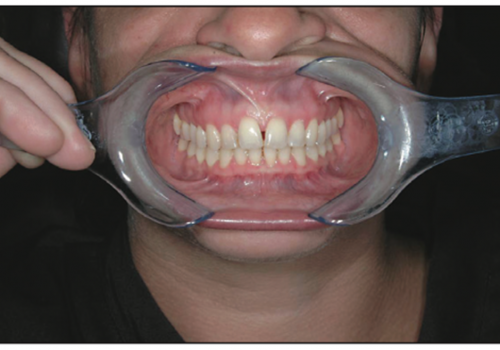
We’ve all struggled with the mirrored occlusal shots. Either we missed the second molars or the cheek covered up a crucial part of our shot. And when we did get the right view, the hairy nostril didn’t exactly enhance the shot. Again, PhotoMed has developed a retractor-contraster called the Occlusal Contraster, which not only assists in retracting the cheeks for better visibility and mirror placement, but it also obscures the nasal lining with aplomb (Figures 5 and 6). The only trick to comfortable use is to let the patient hold it once it’s in place. They are less apt to impinge on the delicate at-tached gingivae than we are. Oh, it also doubles as a buccal contraster, both retracting and masking the cheek mucosa when taking buccal views of the dentition (Figure 7). Very clever! They come in adult and pedo sizes and sell for $45 each or $85 per set. Yet another type of contraster is available that lends itself to isolating the maxillary anterior teeth, the Anterior Contraster set. It can be had for $40 per set, inclusive of adult and pedo sizes (Figures 8 and 9).
Bonus Occlusal Shot Tip
 |
|
|
|
|
|
Figure 10. Alternative retraction technique for occlusal shot taking. |
|
|
Even the teacher can learn. At a recent hands-on digital photo seminar that I was conducting in Boston, a participant pointed out to me what resulted in a better way of taking occlusal images with the retractors we already had on hand. First, realize that it’s important to retract the cheeks when taking occlusal views with a mirror. It has been commonly taught that simply pulling the cheeks laterally will handle this task. From experience we know that this is not always the case. Try this. Use the small end of your cheek retractors and rotate so that they are pointing up and away, thus pulling the cheeks vertically and out. The retractors will appear to be at 45 angles to the dentitions horizontal line as opposed to parallel to it. Doing so will expose the posterior dentition like never before, ensuring more encom-passing views (Figure 10). Of course, you’ll still see the nasal lining, but at least you’ll see the second molars as well. This same approach is repeated for the lower arch, with the retractors simply turned down and away, 45 to the horizontal. Make sure to place the wide end of your occlusal mirror in first, and don’t be bashful about positioning it properly just be quick!
YET ANOTHER PEARL
Those familiar with Windows XP may already know that it possesses many built-in digital photo features that require no help from extra software. For example, you can conduct slide shows, print and e-mail images, as well as catalog images for easy location. These features are all available simply by clicking on the image as it resides in a Windows XP folder. You need only explore the left-hand tool bar to see what is available to you. What you can’t do is easily edit those images. The Windows included program of Paint is not the answer.
Following another students suggestion, I downloaded a free program from google.com called Picasa. It’s primarily an organizational program for keeping track of digital images, but it is also a very capable editor, making the basic operations of cropping, brightness, and contrast correction a breeze. Also included are several special effects often found on packages that cost a lot more than free! Picasa will organize your image folders according to when they were taken and provide very easy viewing and access. At one time it was sold commercially as a stand-alone program, but Google acquired it apparently for purposes of getting into the mail-order photo printing business. Don’t worry, there are no obligations or sacrifices when downloading Picasa. You’ll be amazed at how good it is even though it’s a freebie. To find it, go to google.com, click on more, and locate it under the heading Communicate, show share.
DIGITAL RADIOGRAPHY SYSTEM $129!!!
 |
 |
|
Figure 11. PhotoMeds Xray Copy Stand. |
Figure 12. Canons iP6600D ink jet printer. |
Of course it’s too good to be true, but if you own one of the Olympus Camedia or Canon G and A series point-and-shoots equipped with PhotoMeds macro/diffuser, you can easily image up to 4 bite-wings at a time or zoom in for a single film. The x-rays simply become JPEG images that can be cataloged with other patient images as well as shown to the patient on your PC monitor (Figure 11).
AND WHAT ABOUT PRINTERS?
Although I’m running out of space, I’ve at least time to tell you about my current printer favorite. Talking strict-ly about ink jet printers (the kind they sell in Staples and the like), I can’t help but marvel at Canon’s ip6600D ink jet printer (Figure 12). Still under $200, this printer has it all as far as dentistry is concerned. What’s more, a recent consumer report found the Canon printer line to be exceptionally trouble-free compared to many of its competitors. As one who currently owns and operates 6 different PC printers, I can vouch for this.
AND IN CONCLUSION…
The digital photography market is unfolding fast and furious. In this article I attempted to share some of the items that I’ve experienced and found to be of interest to our profession. By no means do I hold them to be the only solutions available. My only advice to you if you are considering purchasing a new system for dental use is that you look first to a dealer who knows dental. This will prevent you from having to jury-rig an inappropriate camera system down the line and will keep your dental digital photography experience a rewarding one.
If I can be of some help, feel free to contact me.
Dr. Goldstein practices general dentistry in a group setting in Wolcott, Conn. Dr. Goldstein serves on the staff of Contributing Editors at Dentistry Today and contributes regularly to multiple dental periodicals. He can be contacted at martyg924@ cox.net. He lectures on both digital photography in dentistry and its use to further the cosmetic and restorative practice, as well as the Comfort Zone Cosmetics ap-proach to anterior dentistry. Information on his lecture schedule and other articles can be found at drgoldsteinspeaks.com.
Disclosure: Dr. Goldstein is a consultant for PhotoMed.