For the past 3 years, I’ve had the privilege of updating readers on the whys, the hows, and the wherefores of digital photography in dentistry. I’ve done so with a fairly standard approach in hopes of summarizing the key information necessary for a dentist to get started in this exciting area. This year I’ve decided to take a slightly different approach.
Having co-moderated an online digital dental photography forum as well as having received countless e-mails from dentists with very good questions, I’ve developed a basis for knowing whats foremost on the minds of dentists in this arena. Over the past 4 to 5 years, it has become apparent that dental digital photography (DDP) has its own list of frequently asked questions (FAQs). In this article, I’ll concentrate on what I consider to be the top 5 most frequently asked questions. In doing so, I’ll bet that I cover what dentists most want to know about DDP. If you’re already practicing DDP, then you might still pick up a couple of tips. If you haven’t pulled the trigger yet, the top 5 FAQs are a must read before venturing into the digital danger zone, an area where digital dollars can be unwisely spent.
Let’s cut to the chase and explore, in no particular order, DDP’s top 5 FAQs.
FAQ NO. 1
“I’m ready to do some spending on digital imaging for both marketing and practical use. Will I be better served by an intraoral video camera (IOC), a digital still camera (DSC), or both, and how can I keep the cost down?“
 |
 |
| Figure 1. Video out jack and a digital SLR. | Figure 2. Digital still displayed on video screen via video out cable. |
This question has spawned much debate over the years. I usually answer like this: while both technologies can have a place in dentistry, the DSC offers versatility and start-up ease as its strong suit. Moreover, the video out jack found in those digicams most suited to dentistry enable them to emulate an IOC (Figures 1 and 2). While it is true that posterior imaging will often require the use of a mirror to capture an image, this can be quickly learned. The properly equipped digital still camera, owing to superior imaging capabilities (read: higher resolution images), will allow for unlimited shot possibilities: full arches, quadrants, single-tooth images, smiles, full portraits, etc. This all happens with a perspective and color rendition that is seen as true to life by our patients. Contrast this with typical IOC views that are often mildly distorted and lacking in deeply saturated color.
While IOC emulation is an easy way to get the ball rolling, nothing increases marketing power more than a chairside PC, monitor, and digital card reader able to bring your DSC images to life quickly. The co-diagnosis that takes place as a result of operatory-PC enabling results in treatment acceptance that will take a practice to a new level of production. Other advantages of the DSC include easy operatory portability, easier saving and printing of images (ie, doesn’t require an integrated PC capture device), less start-up cost, and the option of recreational use.
Don’t mistake these re-marks as discounting the use of an IOC in ones practice. In fact, I operate both systems in practice, finding my RFsystems Lab wireless SS24 IOC a fast way to capture the likes of a fractured maxillary second molar. It doesn’t require mirrors and produces enough image accuracy for my patient to recognize. When it comes to treatment planning and presentation, however, the IOC simply doesn’t hold up to a digital still camera for the reasons outlined above. In the evolution of techno-acquisition, proper use and early implementation of a DSC may likely create revenues that will allow the addition of a complementary IOC system farther down the road.
FAQ NO. 2
“I just received a Nikofujiama digital camera for Christmas. Can I use this camera for dental photography?“
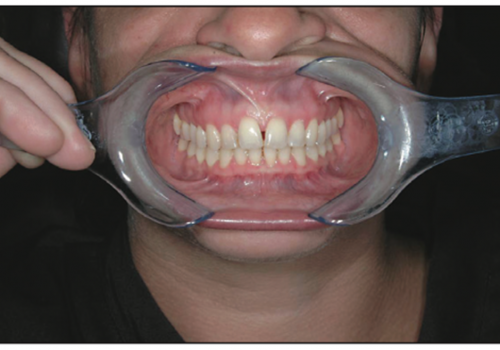
Heres the answer in a nutshell: in most instances, ineffectively. While a nondental-equipped digital may easily capture an effective portrait and possibly a serviceable anterior retracted or smile image, it will do so inconsistently and will likely fail altogether when attempting to photograph the posterior recesses of the mouth. Any camera system to be used for dentistry, whether film or digital, requires a light source in very close proximity to the working surface of the lens (visualize a ring flash). This is needed to prevent shadows from destroying an attempted image of, say, a first molar hidden deep in the recesses of the mouth. Additionally, the camera needs to be able to attenuate the flash so that close-up imaging isn’t washed out and devoid of detail. This dictates a light-sensing system that knows when just enough light has exposed the subject. And, of course, macro-optics are a must. Putting all these requirements together, and thus attaining a shot at consistent and predictable photo imaging, is a must. Off-the-shelf, general consumption, digital cameras rarely put all of these requirements in place. The solution is to byte the bullet and obtain a system reputed to be up to the task of dental photography, of which there are several that I can recommend.
FAQ NO. 3
“Then what kind of camera should I get and where should I get it?”
 |
 |
| Figure 3. Digital single-lens reflex camera. | Figure 4. Digital point-and-shoot camera. |
I’m happy to report that the answer to this question has evolved into making a relatively simple decision. Do you want the digital version of the classic single-lens reflex camera (SLR) that enables you to look through an optical viewfinder and see exactly what the lens is seeing? Or would you prefer a point-and-shoot camera that dictates image composition via an LCD display on the back of the camera (Figures 3 and 4)? Both types are capable of rendering images that are indiscernible from one another when properly exposed.
 |
 |
| Figure 5. The Photomed macro-diffuser add-on for converting a point-and-shoot to a digital dental camera. | Figure 6. The picture-in-picture focusing aid on the Canon G6. |
The point-and-shoot camera (PAS) is lightweight (usually in the 3-lb range) and diminutive in size, lends itself to recreational use, and is a lower cost even when equipped with the necessary lighting and magnification accessories. A prototypical example of such a camera is the Canon G6, a 7.1-megapixel PAS. When equipped with a Photomed macrodiffuser device (Figure 5), it offers beautiful images but will rely upon manual focus to produce a sharp image. This need is assisted by an ingenious picture-in-picture (PIP) view that magnifies the center portion of your subject for a close-up view (Figure 6). After a brief learning curve, excellent images can be obtained on a consistent basis. The Photomed device combines the needed macro lens and lighting control surfaces to en-sure consistently exposed images.
 |
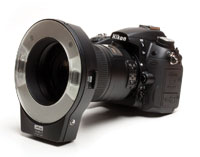
| Figure 7. The Canon 20D digital SLR. |
The digital SLR is heavier (8 lb and up), larger, more expensive, less appealing for recreational use due to its form factor, and to a certain degree is more likely to intimidate the new user. However, it is generally faster to use due to easier focusing and built-in microprocessors that accelerate image capture and processing. The Canon Digital Rebel and 20D (8.1 megapixels) are such cameras. When equipped with a Canon 100-mm macro zoom lens and an MR-14EX ring flash, they will provide beautifully exposed dental images faster than you could have ever thought possible (Figure 7). There is a reason for this. This same reason is why the Canon family of digitals has been so widely embraced by the dental community. When all parts of the system are Canon, the flash automatically knows how much light to shed on the subject, regardless of the distance from the subject. The through-the-lens (TTL) light-sensing feature enables the photographer, if he or she so chooses, to use the camera lens auto-focus setting, making the SLR system nothing more than a compose, point, and shoot camera. In dentistry, the only changes necessary are between 2 f-stops one for close-ups and one for portraits. The camera will do the rest. Manual focus is still an option and will be needed in certain instances to produce consistent image size and perspective as is required, for example, for American Academy of Cosmetic Dentistry-accreditation photography.
Suffice it to say that I am aware of countless dentists who employ either kind of camera system with great success. Both are tried and true. It just boils down to what feature or form factor appeals to you more.
As to where to buy, I always recommend that such purchases be made from a dealer that specializes in dental packages. Doing so will ensure properly matched components, complete systems, and cameras arriving set up and ready to go. Some of the better known vendors are photomed.net, lesterdine.com, calumetphoto.com, and normancameras.com. They have been serving the dental profession for many years.
Price should not be the only determining factor in making a purchase. Be sure to ask about loaners if your camera needs servicing. Find out who offers technical assistance and at what times it is available from your vendor. Ask how long after your purchase the dealer will remain your friend. Know what specifically is included in the kits offered. If possible, attend a regional meeting where these vendors are exhibiting so that you can meet who you are buying from and handle the varied models offered.
FAQ NO. 4
“What kind of printer should I get?“
This one goes hand-in-hand with FAQ No. 3. To be truly useful, hard copies (prints) are a must. Again, this, too, has gotten easy. Two classes of printer exist: the ubiquitous ink jet printer and the increasingly popular dye-sublimation printer.
Very capable ink jet printers are now available for under $200. This is simply astonishing given the quality of which they are capable. When you are willing to accept that your new printer is also an ink vending machine and designed to make you a steady ink customer (think soda machines), you will be treated to photo lab-quality prints generated on glossy stock that will make you look very photo savvy. I will also advise that the manufacturers inks generally work best with their own papers. (This is all part of the plan.) This will be manifested in prints that come out bone dry and colors that don’t bleed into one another. You can sneak in other brands of paper, but results will not be as predictable for the less experienced user.
 |
| Figure 8. Prototypical stand-alone ink jet, the Canon ip6000D. |
Two types of ink jet printers exist. Stand alones can be operated independent of a PC due to their built-in film ports, LCD, and control panels. An excellent example of such a printer is the Canon Pixma ip6000d (Figure 8). This printer also can be operated through a PC and is suited to both photo and text applications. Those ink jet printers not incorporating the stand-alone features must be connected to a PC to become functional. Hewlett Packard, Epson, and Lexmark are among the other manufacturers that offer similar ink jet printers. The ubiquitous availability of the inks and papers necessary to keep printing makes the ink jet family convenient to keep supplied. Your local Staples or OfficeMax will almost always have what you need.
 |
| Figure 9. Hi-Touchs 640PS dye-sublimation printer. |
Dye-sub printers, such as the Canon CP and Hi-Touch lines, rely on proprietary ink cassettes and matching papers to produce their images. They, too, can operate independently of a PC, in stand-alone mode, or can be connected to a PC via a USB connection. They are suited to photos only, generally produce 4 x 6 prints of photo laboratory quality, and offer speed and small form factor as their chief advantages. They, too, are inexpensive, once again intended for ink/paper vending purposes (Figure 9). Unlike ink jet supplies, you will most likely need to re-supply your dye-sub from an authorized dealer, usually where you bought it.
I prefer dye-subs in the operatory and ink jets in the business or private offices of the dental setting. This is a good combination of functionality and convenience.
FAQ NO. 5
“Now that I’ve got it, what should I do with it?“
In answer to this question, keep in mind the age-old statement. The picture overwhelms the argument, or more customarily put. A picture is worth a thousand words. The incredible convenience and speed offered to us by implementation of a chairside digital photography system makes co-diagnosis the only way to fly. Do not present a complex treatment plan without first digitally recording the status quo and having it ready for doctor-to-patient show and tell. Even newbies, fresh out of dental school, can take a shortcut to establishing trust when their patients can see for themselves what the doctor is proposing to remedy. The impact on case acceptance is enormous.
 |
| Figure 10. The cosmetic simulation as a powerful cosmetic marketing tool. |
Taking that a step further, I’ve found that for those dentists interested in delving into cosmetic rehabilitation, anatomically based, realistic simulations, such as those rendered by Smile Vision (smilevision.com), will keep the doctors foot in the door. His or her proposed treatment will be positioned on the patients stack of elective spending items long after he or she has left the chair. Case acceptance can come to fruition as far along as 2 years after the presentation, so long as the digital before-and-after goes home with the patient (Figure 10).
CONCLUSION
I could go on, but space is limited. To find out the other 20 things that you can do with a digital camera, not to mention lots of tips on techniques and implementation, I’d suggest you look for a dental digital photo course given by yours truly or by a host of my colleagues in different parts of the country. Other events are often found in the pages of Dentistry Today in the, Seminars section of the magazine. If we cross paths, be sure to step forward and say hello. Above all, be patient with this new technology; once mastered, new doors will open to you. Have fun!
Dr. Goldstein practices general dentistry in a group setting in Wolcott, Conn. He enjoys promoting the cosmetic side of his practice and has found it helpful to incorporate high-tech methodology into his daily routine to accomplish this. Dr. Goldstein serves on the staff of contributing editors at Dentistry Today and contributes regularly to multiple dental periodicals. He lectures on both digital photography in dentistry and on the use of such high-tech methodology to further the cosmetic and restorative practice. Information on his lecture schedule can be found in the Leaders section of dentistrytoday.net or drgoldsteinspeaks.com. Information on the Comfort Zone Cosmetics seminar series can be found at smilevision.net. He can be reached at martyg924@cox.net.