
INTRODUCTION
With the widespread availability of Internet searches, our patients have become aware of the benefits provided by modern implant dentistry. Realizing that there may be other options available other than conventional removable appliances, our patients often present to our practices with a desire for fixed restorations. Innovations in implant dentistry and prosthetic techniques/materials have created predictable, long-term solutions to missing teeth.
Proper diagnosis and treatment planning is surely the most critical aspect of dental implant therapy. As will be shown here, the surgical protocol has become less complicated with the advent of improved technologies. Surgical armamentaria and implant design have increased the clinician’s ability to plan and place implants. To maximize the success of any treatment outcome, one must consider prosthetic design matters prior to any invasion of the patient’s edentulous spaces. Bone contour needs to be understood and tissue health monitored around ideally placed implants. Our advanced diagnostic tools, such as CBCT analysis, help in this process.
The Hahn Tapered Implant System
The Hahn tapered implant system (Glidewell Laboratories), showcased in this clinical case report article, provides a predictable retentive mechanism for screw-retained prostheses. The design of the buttress threads permits exceptional primary stability. In addition, the microthreads encompassing the coronal portion of the implant assist in the preservation of crestal bone. A resorbable blast media surface preparation provides exceptional osseointegration to the titanium surface. A machined collar incorporated into the design helps in soft-tissue maintenance. The internal connection of the implant is a conical hex which creates a sure, complete prosthetic seal.1,2 The surgical techniques for this system is uncomplicated with the use of several premeasured lengths in the pilot drill and the subsequent widening osteotomy drills.
CASE REPORT
Diagnosis and Treatment Planning
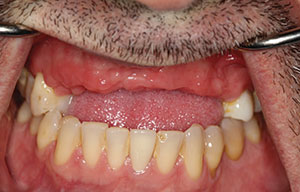
A 44-year-old male presented to our office with no significant medical findings that would limit our ability to place implants. He had a severe motorcycle accident 19 years previously. When a patient like this presents with missing teeth, an oral examination and radiographs help determine whether implants are an option. Figure 1 shows an edentulous area that was a result of trauma. A removable partial denture was fabricated for aesthetics and limited function, but was no longer acceptable to the patient as a solution to replace his missing teeth.
 |
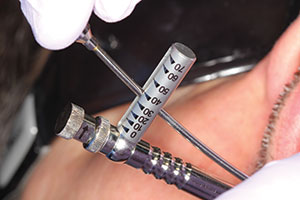
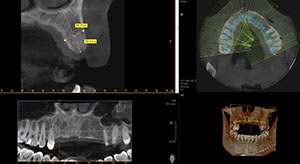 |
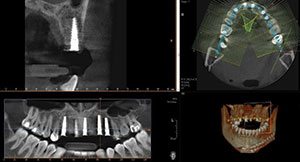
| Figure 1. Edentulous maxillary ridge due to trauma. | Figure 2. CBCT analysis helped determine the amount of available bone in the maxillary anterior region. Both horizontal and vertical bone dimensions were measured. |
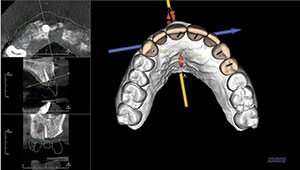 |
| Figure 3. Planning software allows for virtual placement of dental implants prior to any surgical intervention and virtual design of the final prosthesis. |
Conventional digital radiographs have revolutionized our ability to quickly evaluate the availability of bone as well as the angulation required when using implant osteotomy burs. However, conventional digital radiographs provide the clinician with only a 2-dimensional view. Preoperative CBCT scans (Vatech America) are used to help visualize the possibility and/or options for the use of implants in 3 dimensions. Significant anatomy and available bone and contours can be easily viewed. The CBCT taken using the PaX-i3D Green CT (Vatech America) allows us to see and assess the height and width of available bone in the anterior maxilla area. Significant anatomy can be visualized in detail, including the mandibular canal and maxillary sinuses.
In this case, it was noted that no significant anatomical contraindications were present upon examination of the CBCT, and adequate bone and proper contours were clearly available, making this an ideal situation for implant reconstruction (Figure 2). CT diagnosis was then completed with the aid of imaging software (Invivo5 [Anatomage Dental]). Ideal positioning of 5 implants was done virtually, prior to any surgical intervention. Implant angulation and the emergence of screw holes were idealized to maximize the final functional and aesthetic outcomes (Figure 3). Tooth position, mould, and form were created using the computer software. Figure 4 shows the surgical guide that was created to achieve the proper angulation and depth placement of all the implants. The guide was precisely fabricated with spaces allowing for various diameter keys to be inserted. This allowed the use of specialized burs that promoted the correct angulation and depth into the bone. Figure 5 shows the use of a 2-mm diameter key, which was inserted into the guide, and a 2.0-mm pilot drill that created the initial osteotomy site. This surgical guide was designed to be tooth-supported. In all cases, it is essential to fabricate a stable surgical guide, allowing for precise accuracy in the placement of the implant(s). Following the depth and angle determination using a pilot drill, a tissue punch was used to remove the keratinized tissue from the crest of the ridge. This removal prevents potential invagination of soft tissue into the osteotomy site prior to implant placement (Figure 6).
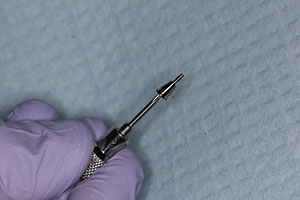
 |
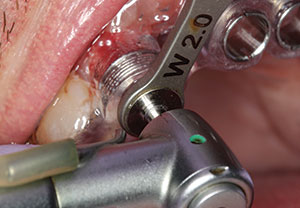 |
| Figure 4. From the CBCT planning software, a surgical guide was created allowing for precise placement of the implants. | Figure 5. Keys were inserted into the surgical guide allowing for precise osteotomies to be created. A 2.0-mm diameter key allowed for proper angulation and depth to be determined. |
 |
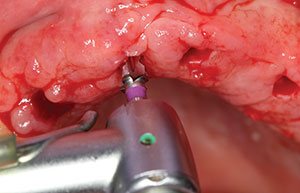 |
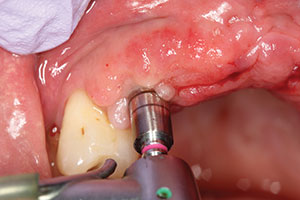
| Figure 6. Following the osteotomy, a tissue punch was used to remove the keratinized tissue from the surgical site prior to implant placement. | Figure 7. A 3.5-mm diameter osteotomy bur was used to create the final osteotomy preparation. |
 |
 |
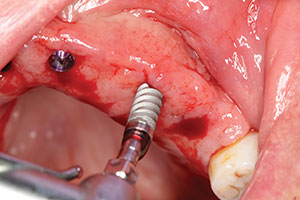
| Figure 8. The implants were threaded into the osteotomy site. | Figure 9. Radiographs were used to determine the final position of the implants to the crest of the edentulous ridge, and the implants were torqued to nearly 40 Ncm. |
 |
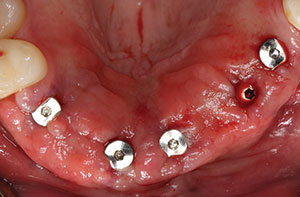 |
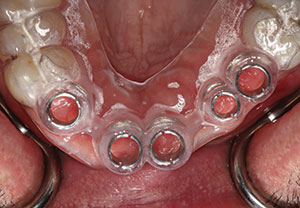
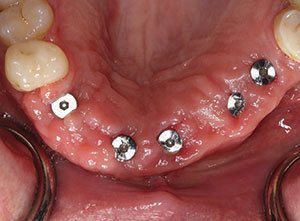
| Figure 10. Because the implants have excellent initial stability, 5.0-mm tall healing abutments were placed. This allowed for the tissue to contour around the abutments and eliminated the need for a secondary incision to expose the implants. | Figure 11. Immediate post-op photo of the healing abutments torqued to 20 Ncm into the implants. Note the proper positioning in the implants. |
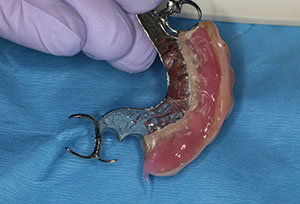 |
 |
| Figure 12. The patient’s existing conventional removable partial denture was relined with a soft-tissue conditioner liner. The implants will be allowed to integrate for 4 months prior to impressions for the final implant-retained bridge. | Figure 13. Panoramic radiograph illustrates the positioning of the implants to support a bridge from the maxillary right cuspid to the maxillary left first bicuspid. |
 |
 |
| Figure 14. Final CBCT evaluation indicates good positioning of the implants in the available bone. | Figure 15. After approximately 4 months of integration, the tissue response around the implant abutments was excellent. |
It was predetermined that 3.5-mm diameter Hahn implants would be used in this case. A 3.5-mm diameter osteotomy bur was used to widen the site to allow placement of the coronal portion of the implant to the crest of the available ridge (Figure 7). Figure 8 shows the use of the surgical motor handpiece initially placing the implant into the prepared socket site. Initially, the motor was set to 25 Ncm of torque, and the implant was placed to the top of the soft tissue. To determine the final position of the implant to the crest of the ridge, a torque wrench was then used and digital radiographs were taken to verify correct placement. In this case, the implants were torqued into position at the crest at nearly 40 Ncm (Figure 9). Because of the ideal stability created by the thread design of this implant system, 5.0-mm tall healing abutments were torqued into the implants at 20 Ncm.3 This allowed for tissue healing around the abutments and eliminated the need for a secondary surgical procedure to expose the implants following integration (Figure 10). Figure 11 illustrates the immediate postoperative placement of the implants and abutments. Note the procedure is relatively noninvasive, with little bleeding. Because the procedure is quick and precise using the surgical guide and expertly designed surgical tools, very little discomfort is reported by the patient. Any minor pain is easily controlled with the use of 600 mg ibuprofen several times a day.
To make the transition from removable to fixed prosthesis easier on the patient during the 4-month integration period, a soft-liner material (Mucopren [Kettenbach LP]) was used to reline his existing removable partial denture. The patient had worn this appliance for several years and had no issues with continuing to function with it during the healing period (Figure 12). A postoperative radiograph demonstrated the ideal positioning of 5 implants, which would be used to support a 7-unit screw-retained implant bridge (Figure 13). The postoperative CBCT indicates adequate bone and ideal positioning of the implant precisely following the preoperative virtual design (Figure 14). The implants were left to integrate for 4 months. Figure 15 illustrates the soft-tissue health around the selected healing abutments created by the long-lasting soft lining material.
Conventional prosthetic techniques were then used in the creation of the final implant-retained bridge using the preoperative virtual design.
CLOSING COMMENTS
Our patients have become very attuned to determining the kind of dentistry they want. Options are always available, including removable or fixed appliances. Implant dentistry provides the practitioner the ability to create outstanding aesthetic and functional prostheses. The use of CBCT analysis to determine bone quantity and quality and the use of CAD/CAM design helps us visualize the case finished before any surgical intervention. As implant dentistry is now prosthetically driven, the use of innovative technology makes us more efficient, competent, and confident in providing beautiful and functional restorations.
References
- Piattelli M, Scarano A, Paolantonio M, et al. Bone response to machined and resorbable blast material titanium implants: an experimental study in rabbits. J Oral Implantol. 2002;28:2-8.
- Nishimoto SK, Nishimoto M, Park SW, et al. The effect of titanium surface roughening on protein absorption, cell attachment, and cell spreading. Int J Oral Maxillofac Implants. 2008;23:675-680.
- Degidi M, Daprile G, Piattelli A, et al. Influence of underpreparation on primary stability of implants inserted in poor quality bone sites: an in vitro study. J Oral Maxillofac Surg. 2015;73:1084-1088.
Dr. Kosinski received his DDS from the University of Detroit Mercy Dental School (Detroit Mercy Dental) and his mastership in biochemistry from Wayne State University School of Medicine. He is an affiliated adjunct clinical professor at Detroit Mercy Dental, an associate editor of the AGD Journals, and a past president of the Michigan AGD. He is a Diplomate of the American Board of Oral Implantology/Implant Dentistry, the International Congress of Oral Implantologists, and the American Society of Osseointegration. He is a Fellow of the American Academy of Implant Dentistry, the American and Internat
ional Colleges of Dentists, and the Academy of Dentistry International. He received his Mastership in the AGD and is a member of Omicron Kappa Upsilon and the Pierre Fauchard Academy. He was the Detroit Mercy Dental Alumni Association’s “Alumnus of the Year,” and in 2009 and in 2014, he received the AGD’s “Lifelong Learning and Service” Recognition. He has published more than 180 articles on the surgical and prosthetic phases of implant dentistry. He can be reached at (248) 646-8651, via email at [email protected], or via smilecreator.net.
Disclosure: Dr. Kosinski reports no disclosures.
Related Articles

