
INTRODUCTION
The First European Workshop on Periodontology in 1994 defined peri-implantitis as the inflammatory reactions in the hard and soft tissues with loss of supporting bone surrounding a dental implant exposed to the oral environment. A successful dental implant is defined as immobile when tested clinically. In addition, vertical bone loss is less than 0.2 mm annually following the first year of service as well as the absence of pain, infection, neuropathies, and paresthesia.1
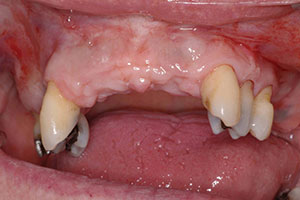
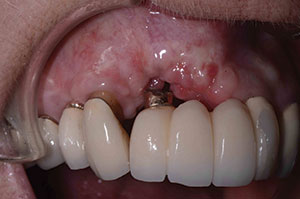
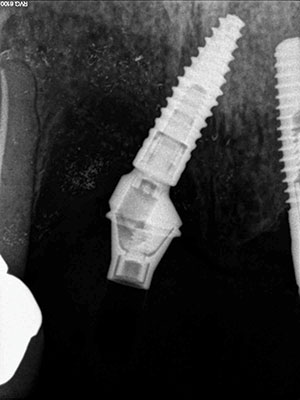
Studies have shown that between 15% and 30% of all implants will have peri-implantitis.2 This is alarming. There are cases that demonstrate poor clinical judgement in the surgical and/or restorative phase, perhaps due to clinicians who were early in their learning or maybe operating without proper training (Figures 1 and 2). As a clinician, one knows that there are times that, even when everything was done correctly, an implant may still fail. This case study was written to show that despite treatment that was done correctly, for some reason the work had partially failed. When there are cases that fail, it is still our obligation to give an alternative treatment, even when a case looks hopeless in certain circumstances. This article will discuss a nontraditional approach that ultimately gave our patient a successful outcome when all looked bleak.
CASE REPORT
The story begins 10 years ago when the patient came to my office for a consult to get rid of her maxillary anterior removable partial denture. A CBCT was done and the case was treatment planned.
 |
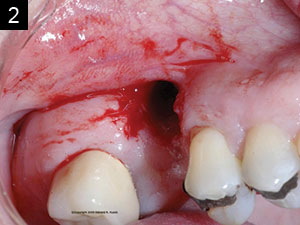 |
| Figures 1 and 2. Poor clinical judgment was used when implant placement was done by another clinician. |
The patient was missing teeth Nos. 5, 7, 8, 9, 10, and 11. The bone was not adequate for placement of implants in the anterior maxilla, as the ridge had only 2.0 to 3.0 mm of space in the No. 7 and 10 positions. As a result, an autogenous block graft was done in these areas and allowed to heal for 4 months (Figure 3). Bone block was taken from the anterior symphysis using an Er;Cr:YSGG laser (BIOLASE) to make the initial cut into bone, followed by a surgical handpiece. The autogenous block was then positioned into the sites of Nos. 7 and 10.3 The area healed uneventfully.
The second phase of treatment would include the placement of implants in the No. 5, 7, and 10 positions. The implants (Replace Select Tapered [Nobel Biocare]) were placed per manufacturer instructions using a surgical guide tooth-borne guide (SIMPLANT [Dentsply Sirona]) and without laying a flap. Placement was done using selected internally irrigated drills of 1.5, 2.0, 2.5, 3.0, and a final drill for the placement of 4.3 x 13 mm implants into position Nos. 5, 7, and 10. Before implant placement, an Er;Cr:YSGG laser was used to do decortification and detoxification of the osteotomy site.4 (This procedure has been shown to increase bone-to-implant contact while significantly reducing the amount of bacteria present in osteotomy site.) The implants were seated and closed with the replacement of the tissue plugs using the Er;Cr:YSGG laser and an oral tissue adhesive (Periacryl 90 Oral Tissue Adhesive [GluStitch]), then allowed to heal for 3 months (Figure 4). After the healing period, the case was ready to go to the restorative phase. The patient had already approved the aesthetic wax-up done prior to surgical placement, but she wanted shade lighter than her current VITA shade A-3 to a VITA shade A-1 (VITA North America). The patient wore her existing partial in the healing phase again, as it was adjusted to not interfere with soft tissue of implant placements.
Impression abutments were seated, as verified with the use of radiographs. A vinyl polysiloxane (VPS) impression (Aquasil by Dentsply Sirona was used at that time) was taken using a custom tray made from Hydroplastic (Tak Systems). A face-bow (Panadent) and bite registration were taken. A temporary fixed bridge was made at this appointment utilizing a putty stint, Nobel select temporary abutments, and a strong bis-acryl provisional material (Luxatemp Ultra [DMG America]). C&B Metabond (Parkell) was applied on the temporary titanium abutment to allow the bis-acryl provisional material to bond to the temporary metal abutment. Fiber reinforcement (Ribbond [Ribbond]) was used to further strengthen the provisional restoration.5 The occlusion and interproximal contacts were examined and adjusted as needed. Upon completion of the temporary bridge, the patient was delighted with the aesthetics and stated that she was anxious to receive the final prosthesis.
Three weeks after the provisional restoration was completed and delivered, the final abutments utilizing custom UCLA abutments were tightened into place (torqued to 35 Ncm) per the manufacturer’s instructions. Periotest M (CeraRoot) values were taken on the final abutments and the readings were as follows—position 5: -4, position 7: -4, and position 10: -2. The final bridge was tried in (Figure 5) and it did not seat correctly. Thus, a new VPS impression was taken and the patient was retemporized. Once again, the occlusion and interproximal contacts were checked and adjusted as needed. The patient made another appointment 3 weeks later to seat the new pro
sthesis.
 |
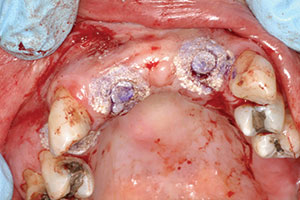 |
| Figure 3. Postoperative site shows healing at 4 months after autogenous block graft done. | Figure 4. Immediate post-surgical photo (after implant placement). |
 |
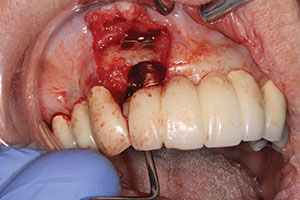 |
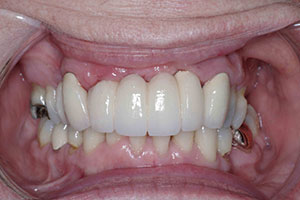
| Figure 5. Prosthetic bridge completed in anterior maxilla. | Figure 6. Surgical site after removal of granulation tissue and detoxification using the WaterLase iPlus (BIOLASE). |
 |
 |
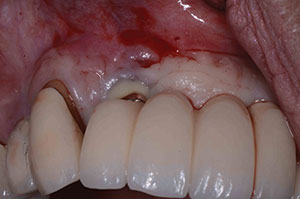
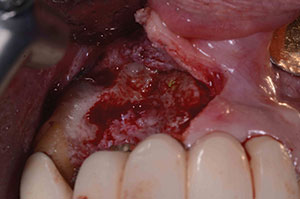
| Figure 7. Postoperative healing, showing recession of tissues around surgical site. | Figure 8. Second surgery, showing a 2-wall defect. |
 |
 |
| Figure 9. Recurrence of purulent exudate at 4 months postoperatively. | Figure 10. Granulation tissue removal. |
 |
 |
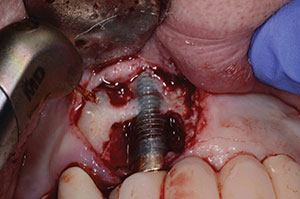
| Figure 11. Postoperative healing at 2 months after removal of granulation tissue. | Figure 12. Abutment placed with new implant to verify correct seating of the abutment. |
At what was now the second delivery attempt for the prosthesis, the prosthesis fit correctly and was delivered. The occlusion and contacts were evaluated and adjusted, and the patient was pleased with the results. The case was cemented (Improv [Alvelogro]) and care was taken to remove all excess cement. At this appointment, the patient stated that she had been experiencing pain associated with tooth No. 6. The tooth was sensitive to percussion and had a thickening of the periodontal ligament space, so root canal therapy was completed during this same appointment.
Two months later, our patient returned to the office for her hygiene recall appointment and to do a postoperative check on the prosthesis. Probings, radiograph (Panorex), occlusal check, and the prophylaxis were completed. At this appointment, different types of home-care adjuncts were stressed, including the daily use of a cleaning device for patients with implants (ProxySoft Bridge & Implant Floss [ProxySoft World Wide]).
The patient was also on a 4-month recall with a local periodontist (originally referred to by her previous general dentist). The periodontal office called to inform us that there was bleeding around the abutments at position Nos. 7 and 10. As a result, the patient was seen in our office one week later. The probing completed showed a 4.0-mm pocket around implant No. 10. The patient was instructed on the use of Hydrofloss (Oral Care Technologies) to help keep bacterial levels lower.6 She was scheduled for an appointment in 2 months to check the health around the implant.
At the next appointment, 2 months after the patient was instructed to use Hydrofloss, probing demonstrated no pockets deeper than 3.0 mm and no bleeding was evident when probed. The patient had a maintenance appointment with the periodontist in 3 months, so she was scheduled to see us again in one year. At one year, her tissue health was normal and the radiograph showed no bone loss, no changes in occlusion, and no pocket depths more than 3.0 mm.
At the annual recall (now 2 years after the delivery of the final prosthesis), the anterior bridge had come loose and needed to be re-cemented. At this yearly recall, no changes were noted in radiographic bone height, tissue health, and occlusion. In addition, there was no bleeding upon probing. At the 3-year postoperative appointment, there were no changes on radiographic bone height, soft tissue, and occlusion and no bleeding upon probing. At 4 years, the patient had no changes; however, the patient continued to exhibit a heavy calculus accumulation involving the lower anterior teeth.
At the 5-year appointment, some changes were noted, including bleeding upon probing, and biofilm was noted upon placing pressure on the facial area of Nos. 7 and 10. An Oral DNA Test (Henry Schein) was completed7 and chlorhexidine (CHX) was added to the Hydrofloss protocol. The patient was reappointed to utilize the Er;Cr:YSGG laser to clean the bacteria from the sulcus.7 The site was treated for about one minute (1.0 W, 20 Hz, 21/31 water/air setting) to detoxify the site. The Oral DNA Test report suggested that metronidazole 500 mg be prescribed (16 tablets, twice daily until completed) and recommended the continued use of Hydrofloss with CHX. During this time, the patient continued to have issues. The site at position No. 7 began producing a purulent exudate when pressure was placed on the implant. It was decided that the peri-implantitis would be treated surgically.
The surgical procedure would include the use of plasma-rich fibrin (PRF), BioMend Extend membrane (Zimmer Dental), PepGen Flow (Dentsply Sirona), and the WaterLase iPlus (BIOLASE) Er;Cr:YSGG laser to detoxify and decorticate the bone.4 The procedure was done under moderate sedation. Flap reflection was completed from mesial of tooth No. 6 to the distal of No. 8 using the Er;Cr:YSGG laser (1.25 W, 7/11 water/air setting) along with the use of micro-elevators to reflect the tissue. Decortification was done with the WaterLase iPlus Er;Cr:YSGG laser (1.0 W, 20 Hz, 21/31 water/air setting) after all granulation tissue was removed, as shown in Figure 6. The site had a 3-wall defect (normally a good prognosis).8 PRF was placed into the base of the voids, then PepGen Flow with Biomend Extend membrane was placed to prevent tissue invagination, and then a final layer of PRF membrane was placed. The area was closed using 4.0 vicryl sutures (Ethicon [J&J]). Postoperative instructions (both written and verbal) were given to the patient’s driver.
The surgical site healed well and patient was checked during the next few months. There was some recession noted (Figure 7). The patient was back on her oral irrigator with CHX after 6 weeks and her regular maintenance was scheduled with a periodontist in addition to yearly at our office.
 |
 |
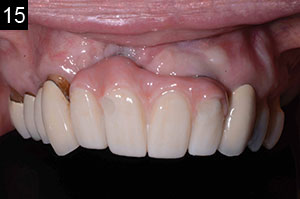 |
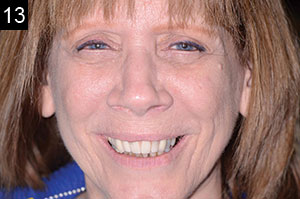
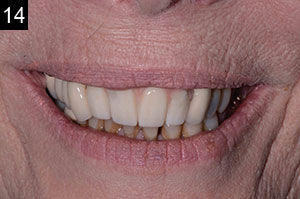
| Figures 13 to 15. The completed final prosthesis. (Note patient’s low lip-line.) |
At the next yearly recall appointment, a 7.0-mm pocket was found at the facial aspect of the implant in position No. 7. All other areas were within normal limits. It was decided that we would need to surgically clean this area using the previously discussed materials. This time we were dealing with a 2-wall defect (Figure 8). Healing was fine, but after 4 months, the exudate was back once again (Figure 9). At this point, the decision was made to remove the implant. The implant came out very easy with just an elevator (Figure 10). Upon removal, it was noted that granulation tissue surrounded the incisal two thirds of the implant. A PRF fibrin plug mixed with PepGen Flow was placed into the failed implant site, then a PRF membrane was placed over this and the site closed using 4.0 vicryl sutures. The site healed uneventfully with no exudate present. After the patient healed for 2 months (Figure 11), a CBCT was taken to determine where a new implant could be placed (Figure 12).
The new treatment plan would involve the following: (1) the use of rhBMP Infuse (Medtronic) to grow more bone in the area, then wait 6 to 7 months for implant placement and to place a new fixed bridge; (2) place a fixed bridge from teeth Nos. 5 to 12, which would create an anterior cantilever with a possible long-term failure of the first bicuspid and cuspid that would leave the patient dentally impaired; (3) find an area that an implant could be placed, even if it needed to be angled and restored with zirconium sectional hybrid type bridge; and (4) place a removable partial denture again.
The patient had now retired, and funds to pay for this further needed care were sparse. She originally had a partial, but did not want this treatment again. She had already paid for the 2 surgeries to save the implant. This can be a very difficult and challenging time between the patient and the doctor with multiple ways to address the situation at hand. After discussion, it was decided that the patient would not pay anything further until the final bridge was completed. The CBCT was used to determine the surgical placement of implant in No. 7 and 8 position areas; the implant would need to be tipped about 30° to gain enough bone without grafting.9 The patient agreed to this new treatment proposal.
The surgical placement was done under intravenous sedation using Midazolam Versed, Nubain, and diphenhydramine hydrochloride (Benadryl) to gain ASA (American Society of Anesthesiologists) sedation Level III. Other drugs used were dexamethasone sodium phosphate, cefazolin (ANCEF), and Depo-Medrol. The first order of business was to remove the bridge without destroying it. Previous photos showed the access to the screw hole in position was on the facial of No. 10. Access was gained without destroying the bridge and the abutment was unscrewed off the implant. The area had an extremely resorbed ridge into which to place the implant. Round drills (1.2, 2.2, and 3.1) were used, followed by Densah (Versah) burs (2.0, 2.3, 2.5, and 3.0) run in reverse motion (per manufacturer’s protocol) to place a 3.3- x 12-mm bone-level tapered implant from Straumann USA. Densah burs provide osseodensification, which expands the ridge without creating any fractures or heat.10 PRF was utilized to coat the implant before seating it into the osteotomy site, then a PRF membrane was used to cover the surgical site. The site was closed, and the old bridge was replaced and patched at the access site using Teflon tape and a flowable composite.
The surgical site healed uneventfully. After 3 months, the implant in the No. 7 site was uncovered utilizing the CO2 Solea laser (Convergent Dental) (20 pulses, no water, 0.25 mm spot size for about 20 seconds). Impression abutments were placed in the areas around the No. 7 and 10 positions. A VPS impression was taken. Next, the old bridge was reattached into implant No. 10, and the access opening was patched with Teflon tape and a flowable composite. At site No. 7, a healing abutment was placed.
The second step was to get a wax try-in that was screwed into the multilevel abutments to establish correct vertical dimension and lip placement, and to take a bite registration and verification jig. The old bridge was again replaced as discussed earlier.
The third step was to seat a polymethylmethacrylate (PMMA) provisional appliance to gain patient approval and to verify the aesthetics, bite, function, and comfort. Once our patient accepted the PMMA provisional restoration, the final restoration was seated (Figures 13 to 15). The aesthetic outcome is far from perfect; however, in the end, this patient, who presented with a set of very difficult clinical challenges, was provided a fixed solution with minimal cost.
CLOSING COMMENTS
In this case, the patient was successfully treated in a manner that was outside the box from traditional methods.
The advent of All-on-4 (Nobel Biocare), utilizing angled implants, has changed the status quo of how implants are placed and restored. The implant failure of position No. 7 left the patient with significant bone and tissue loss in the area. The ability to restore the area in a fixed mode led to patient satisfaction with the completed case. Whether this patient will have further problems with peri-implantitis remains to be seen, but from all indications, it appears that all is healthy. It should be noted that there was a possibility that this was a case of implant failure due to infection from the adjacent tooth.
References
- Albrektsson T, Isidor F. Consensus report of Session IV. In: Lang NP, Karring T, eds. Proceedings of the 1st European Workshop on Periodontology. London, England: Quintessence Publishing; 1994.
- Sanz M, Lang NP, Kinane DF, et al. Seventh European Workshop on Periodontology of the European Academy of Periodontology at the Parador at La Granja, Segovia, Spain. J Clin Periodontol. 2011;38(suppl 11):1-2.
- Kusek ER. High technology in implant dentistry: part 2. Dent Today. 2007;26:96-98.
- Kusek ER. Immediate implant placement into infected sites: bacterial studies of the hydroacoustic effect of the YSGG laser. J Oral Implantol. 2011;37(special issue):205-211.
- Belli S, Cobankara FK, Eraslan O, et al. The effect of fiber insertion on fracture resistance of endodontically treated molars with MOD cavity and reattached fractured lingual cusps. J Biomed Mater Res B Appl Biomater. 2006;79:35-41.
- Watt DL, Rosenfelder C, Sutton CD. The effect of oral irrigation with a magnetic water treatment device on plaque and calculus. J Clin Periodontol. 1993;20:314-317.
- Beikler T, Flemmig TF. Oral biofilm-associated diseases: trends and implications for quality of life, systemic health and expenditures. Periodontol 2000. 2011;55:87-103.
- Treatments. In: Renvert S, Giovannoli J-L. Peri-implantitis. Chicago, IL: Quintessence Publishing; 2012:132-187.
- Maló P, de Araújo Nobre M, Lopes A, et al. Axial implants in immediate function for partial rehabilitation in the maxilla and mandible: a retrospective clinical study evaluating the long-term outcome (up to 10 years). Implant Dent. 2015;24:557-564.
- Meyer EG, Greenshields D, Huwais S. Osseodensification is a novel implant osteotomy preparation technique that increases implant primary stability by compaction and auto-grafting bone. Presented at: 100th Annual Meeting of the American Academy of Periodontology; September 19-22, 2014; San Francisco, CA.
Dr. Kusek, a 1984 graduate of the University of Nebraska School of Dentistry, has been a general dentist for more than 25 years in Sioux Falls, SD. He is a Diplomate of (1) the American Board of Oral Implantology/Implant Dentistry and (2) the International Congress of Oral Implantologists, a Fellow of the American Academy of Implant Dentistry, and he has earned Mastership in the World Clinical Laser Institute and the AGD. He is an adjunct professor at the University of South Dakota and lectures nationally on YSGG lasers. He can be reached at (605) 371-3443 or via email at [email protected].
Disclosure: Dr. Kusek lectures for Ultradent Products and Straumann USA. He is a consultant for Convergent Dental and Biolase.
Related Articles
Removable Prosthetics: Bad Attachments or Bad Design?
Lasers Expand the Procedural Scope for General Dentists
Implant Fixture and Abutment Considerations

