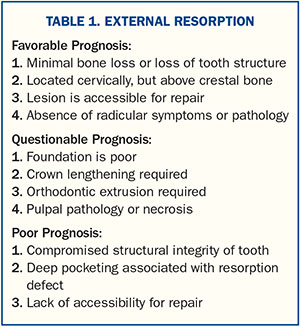
When patients present with lesions, which may be of carious, immune-compromised, or traumatic etiology, many variables must be assessed before a definitive treatment can be rendered. The options for teeth that have questionable long-term prognosis due to internal or external resorption1 include restorative dentistry, fixed partial dentures, removable prostheses, implants with immediate extraction and implant placement, or implants with a staged protocol.
With the plethora of options available, it is incumbent on each practitioner to educate the patient as to the prognosis of each treatment option, as well as the limitations of treatment, and to satisfy requisite patient goals.
This case study will highlight an evidence-based treatment solution to an aesthetically challenging external resorptive defect.
CASE REPORT
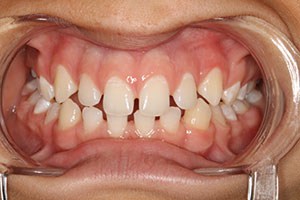
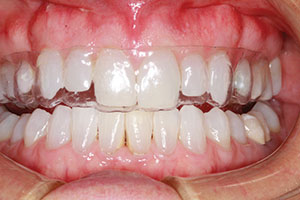
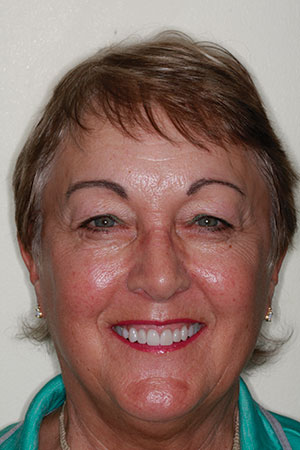
A 56-year-old woman presented with a Class II, Division 2, orthodontic classification. She had diastemas distal to her canines and a retroclined anterior maxillary segment (Figure 1). She had been bleaching weekly for more than 20 years. She reported feeling a ledge on the lingual surfaces of her maxillary anterior teeth, and then one day the ledge was gone and she felt “something weird” at the gumline. The etiology of her resorption could have been due to the long-term bleaching activity, as she reported no history of trauma, orthodontics, or any other incident involving her anterior teeth.
 |
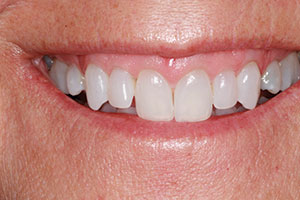 |
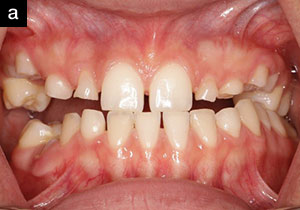
| Figure 1. A full-face, preoperative photo of the patient (Class II, Division 2). | Figure 2. The pre-op retracted view. |
 |
 |
| Figure 3. A pre-op photo of tooth No. 9, showing internal resorption. | Figure 4. A profile view of the smile, displaying retro-inclined incisors. |
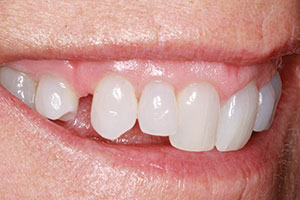 |
| Figure 5. The right profile view, highlighting a large diastema distal to tooth No. 6. |
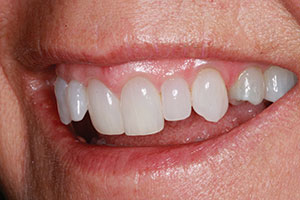
She presented with an external resorptive lesion on the lingual of tooth No. 9, which was assessed as having a fair-to-poor long-term prognosis (see Inset on page 108). A work-up was done to assess her available bone for an implant, abutment, and crown restoration. The patient’s retroclined incisors—coupled with a thin gingival biotype and gummy smile, along with a near translucent enamel shade—necessitated evaluating orthodontics with (or without) a cosmetic rehabilitation of the anterior teeth to restore her teeth and smile to a more ideal level of aesthetics while protecting a severely compromised tooth No. 9 (Figures 2 to 5).
This patient had an orthodontic and orthopedic discrepancy as well as a failing anterior tooth secondary to external resorption. Orthodontic correction would have taken at least 1.5 years, and the forces placed on the teeth could have led to further resorptive changes and the loss of an anterior tooth.2
 |
 |
 |
 |
| Figures 6a to 6d. Shade tab photos for the lab. |
 |
| Figure 7. A clear pull-down matrix was made from the diagnostic wax-up and is shown here over the teeth. |
Extract the Anterior Tooth, or Not?
Complications from the Acute Implant/Abutment Angle
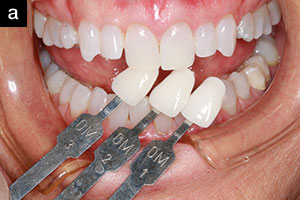
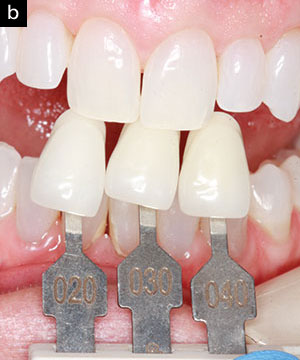
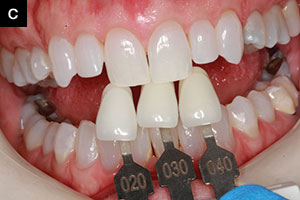
Implant replacement of tooth No. 9, with the resulting abutment/implant angle due to a Class II, Division 2 orthodontic classification, would have made implant placement and prosthetic rehabilitation difficult. Furthermore, if implant placement was to be considered, the thin gingival biotype, quality and quantity of bone, and high smile line would have made this aesthetic rehabilitation challenging. Lastly, the patient’s frequent bleaching and the difficulty in shade matching made the comprehensive aesthetic rehabilitation a more predictable solution to these myriad problems. The use of multiple shade guides could not approximate a close match if a one-tooth solution was chosen (Figure 6).
 |
 |
| Figure 8a. The stick bite (Blu-Mousse [Parkell]). | Figure 8b. The sequential bite registration (Blu-Mousse). |
 |
 |
| Figure 9. The stumpf (stump) shade of preparations. | Figure 10. A tissue retractor guard is used to protect the margination of the preparations. |
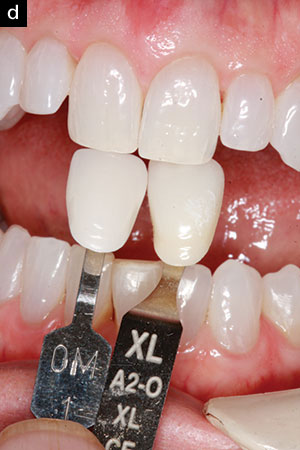
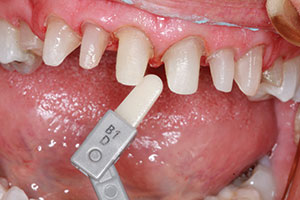
An endodontic consultation was sought, external resorption was diagnosed, and the patient decided to attempt to save the tooth with endodontic therapy and cosmetic rehabilitation. At the conclusion of the aforementioned treatments, a nocturnal splint would then be made and delivered to help prevent any damage from bruxism or parafunction. Selection of the enamel shades, as a part of the preoperative workup, was completed prior to preparation so the enamel would not be dehydrated. Several shade guides were used to assess a natural hue, chroma, and value for the whitened teeth she presented with. After taking photos with the standard shade guide tabs and reviewing them (Figure 6), the laboratory team fabricated several custom shade tabs that were also used for assessing and finalizing the final tooth shades and translucency.
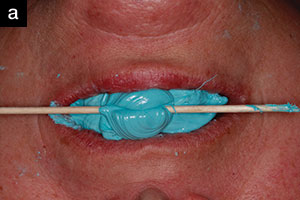
After a facebow transfer and alginate impressions were taken, a diagnostic wax-up (Glidewell Laboratories) was fabricated. A clear pull-down matrix was made over a stone model of the wax-up and was used to assess the teeth and to create a preparation guide prior to initial tooth reduction (Figure 7). This clear template was filled with bis-acryl temporary material (Integrity Multi-Cure [Dentsply Sirona Restorative]) and seated gently on the teeth. A stick bite, utilizing bite registration material (Blu-Mousse [Parkell]), ensured that the incisal plane would be parallel to the floor and parallel to the interpupillary lines, as well as marking the midlines to provide a means to begin our check-bite process. This was accomplished by squirting Blu-Mousse on the occlusal surfaces and placing an extra bolus anterior to the front teeth. Then, a cotton tip applicator was twirled into the Blu-Mousse and leveled while the patient stared directly at the doctor so it could be parallel to the interpupillary line. A secondary master bite was also made that was altered after every 2 to 3 preparations.
|
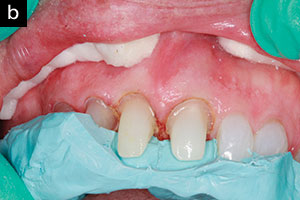
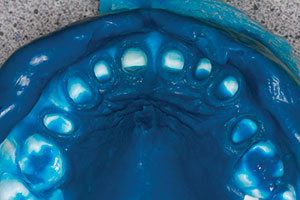
The preparations were completed on the patient’s right side, leaving teeth Nos. 8 and 9 unprepared to ensure a positive anterior stop. Then the master bite was trimmed, Blu-Mousse was injected, and the bite was seated to record the newly prepared teeth. The Blu-Mousse bite registration was carefully trimmed, and the procedure was repeated on the patient’s left side. Next, teeth Nos. 8 and 9 were prepared and (again) the bite was relined so that there was a segmental bite as well as an untouched stick-bite for the lab team to use for verification of the bite registration (Figure 8). The dentin shades were then captured with photos that included the shade guide tabs (Figure 9). Note the respect that has been paid to the tissues by careful retraction via the use of gingival retraction instruments. Not only were gingival zeniths preserved, but the interproximal anatomy of the papillae was maintained with gingival retracta-guards (Tanaka Dental) (Figure 10).
The provisionals were made by injecting a bis-acryl provisional material (Integrity Multi-Cure) into a putty matrix (Sil-Tech [Ivoclar Vivadent]) (Figure 11) made from the approved diagnostic wax-up.
The ability to perform predictable aesthetic rehabilitation requires that the soft tissues be given time to heal and mature. Giving provisional restorations a “test drive” allows patients to evaluate aesthetics, phonetics, and function prior to seating the definitive restorations and, in addition, allows for an intraorally confirmed template for the prototypic restoration (Figure 12). This light-cured or dual-cured bis-acryl material is strong, taking on a high shine once polished. Figure 13 shows the contouring of the restorations prior to glazing and polishing.
 |
 |
| Figure 11. The Sil-Tech Putty Matrix (Ivoclar Vivadent) with Integrity Multi-Cure provisional material (Dentsply Sirona Restorative). | Figure 12. Healed tissue, after one month in the provisionals. |
 |
 |
| Figure 13. The provisionals, prior to staining and glazing. | Figure 14. A vinyl polysiloxane (VPS) impression (Aquasil Ultra Xtra [Dentsply Sirona Restorative]) was taken of the preparations. |
 |
 |
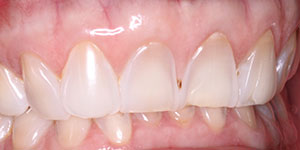
| Figure 15. Lithium disilicate (IPS e.max [Ivoclar Vivadent]) crowns on the day of cementation. | Figure 16. A 3-year postoperative photo of the lithium disilicate (IPS e.max) restorations. |
 |
| Figure 17. The occlusal view of the 3-year-old restorations. |
Carefully fabricated provisionals allowed for custom anterior guide tables to recreate proper lingual contours in the approved provisionals and the final restorations. The use of a double-cord technique, a quality vinyl polysiloxane (VPS) material (Aquasil Ultra Xtra [Dentsply Sirona Restorative]) that exhibits hydrophilicity and high tear strength, and a working time that gives the operator a full 5 minutes to carefully inject the material in a wash/tray application provided an excellent master impression (Figure 14). In addition, a stick bite, a master bite, and stumpf (stump) and enamel shade photos provided the dental laboratory team with everything needed to create the ideal restorations.
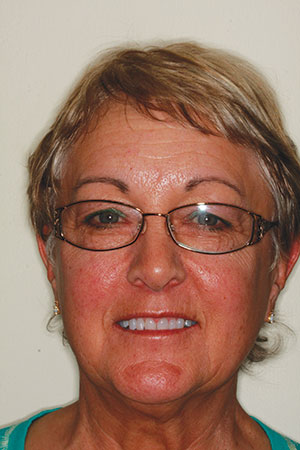
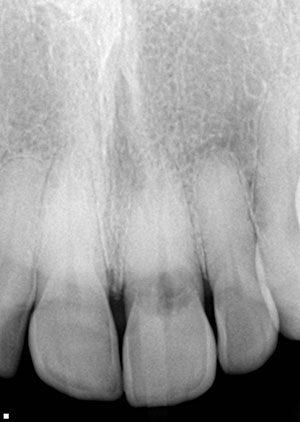
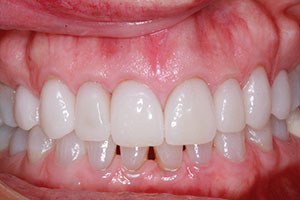
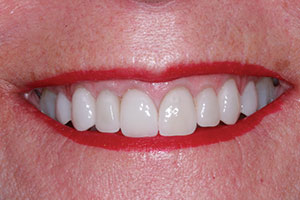
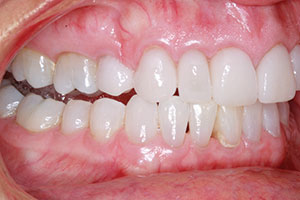
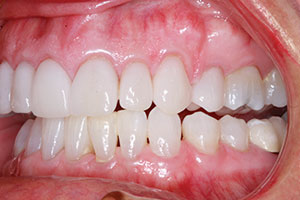
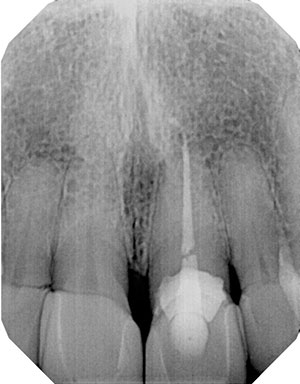
Immediately after cementation, the layered lithium disilicate (IPS e.max [Ivoclar Vivadent]) restorations displayed symmetry of form and function with no bleeding and well-healed gingival tissues (Figures 15 to 18). However, since this case cannot be stated as a successful resolution of this patient’s problem without demonstrating longevity of the work accomplished, the 3-year postoperative photos are shared here to document the morphologic balance, bilateral canine guidance (as designed and tested in provisional restoration), and anterior guidance achieved for the patient (Figures 19 and 20). The patient’s soft-tissue contours have remained stable, and the occlusal view displays normalized contours and maintenance of cuspal integrity. The patient was as pleased with the aesthetics of her rehabilitation at 3 years post-op as she was when it was first cemented (Figures 16 to 20). The periapical radiograph and CBCT, taken 3 years post-op, demonstrate the lack of spread of the ECR as well as intimate coverage by the all-ceramic (IPS e.max) crowns (Figures 21 to 22). The 3-year post-op photos shared here demonstrate the well-maintained cosmetic rehabilitation of this complex and aesthetically compromised case (Figure 23).
 |
 |
| Figure 18. The smile view at 3 years post-op. | Figure 19. The canine guidance right at 3 years post-op. |
 |
| Figure 20. The canine guidance left at 3 years post-op. |
 |
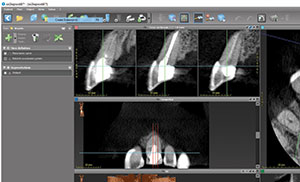 |
| Figure 21. The 3-year post-op periapical radiograph, taken after repair of resorption and restoration. | Figure 22. A CBCT showing the extent of the Class II external cervical resorption. |
|
 |
| Figure 23. Pre- and post-op photos of the cosmetic rehabilitation. |
CLOSING COMMENTS
Some patients have aesthetic problems that are not easily amenable to implant therapy due to unfavorable tooth position. Creative mindsets can often offer solutions that will mask orthodontic or orthopedic malpositions while facilitating desired aesthetic outcomes.
Whether this case would have been restored with a single tooth implant or the way it was restored with endodontic treatment, an external cervical resorption (ECR) restoration and traditional crowns depend on training, skill, philosophy, and judgment. However, when also considering the patient’s aesthetic desires, the solutions become more patient centered. Now, if the central incisor fails, the shade of the teeth has already been documented and recorded, and a custom porcelain shade tab was fabricated and preserved to mimic her most difficult porcelain shade. The emergence angle and profile of tooth No. 9 is a positive emergence angle and profile, so it will make implant rehabilitation easier without having to create an acute angle between the implant and the abutment in the future.
Lastly, and perhaps most importantly, protective canine guidance has been created that will pave the way for a successful implant restoration without traumatic occlusion or parafunction as she had presented with initially. So the stage has been set for success, and, in the event of future failure, we are still set up for success should an implant rehabilitation be required. Remember, if one fails to plan, a case may fail. This article demonstrates how upgradeable dentistry15 can be built into a current treatment plan to help the patient achieve predictable results now and into the future, should the initial design fail.
The evaluation of the literature on ECR provided a cogent etiology of this patient’s lesion as well as an evidence-based analysis of prosthetic treatment options. This patient was instructed to stop bleaching her teeth and to wear her mouthguard to prevent parafunction that could compromise the success of her aesthetic and functional rehabilitation.
References
- Hamilton RS, Gutmann JL. Endodontic-orthodontic relationships: a review of integrated treatment planning challenges. Int Endod J. 1999;32:343-360.
- Heithersay GS. Clinical, radiologic, and histopathologic features of invasive cervical resorption. Quintessence Int. 1999;30:27-37.
- Heithersay GS. Invasive cervical resorption: an analysis of potential predisposing factors. Quintessence Int. 1999;30:83-95.
- Heithersay GS. Invasive cervical resorption following trauma. Aust Endod J. 1999;25:79-85.
- Heithersay GS. Treatment of invasive cervical resorption: an analysis of results using topical application of trichloroacetic acid, curettage, and restoration. Quintessence Int. 1999;30:96-110.
- Tronstad L. Endodontic aspects of root resorption. In: Tronstad L. Clinical Endodontics: A Textbook. 2nd ed. Stuttgart, Germany: Thieme; 2002:146-156.
- Rotstein I, Torek Y, Misgav R. Effect of cementum defects on radicular penetration of 30% H2O2 during intracoronal bleaching. J Endod. 1991;17:230-233.
- Andreasen FM, Sewerin I, Mandel U, et al. Radiographic assessment of simulated root resorption cavities. Endod Dent Traumatol. 1987;3:21-27.
- Gulabivala K, Searson LJ. Clinical diagnosis of internal resorption: an exception to the rule. Int Endod J. 1995;28:255-260.
- Gartner AH, Mack T, Somerlott RG, et al. Differential diagnosis of internal and external root resorption. J Endod. 1976;2:329-334.
- Schwartz RS, Robbins JW, Rindler E. Management of invasive cervical resorption: observations from three private practices and a report of three cases. J Endod. 2010;36:1721-1730.
- Heithersay GS. Invasive cervical resorption. Endod Topics. 2004;7:73-92.
- Patel S, Dawood A. The use of cone beam computed tomography in the management of external cervical resorption lesions. Int Endod J. 2007;40:730-737.
- Patel S, Ford TP. Is the resorption external or internal? Dent Update. 2007;34:218-229.
- Winter R. Upgradeable dentistry: part 1. Dent Today. 2009;28:82-87.
Suggested Reading
Brosh T, Pilo R, Sudai D. The influence of abutment angulation on strains and stresses along the implant/bone interface: comparison between two experimental techniques. J Prosthet Dent. 1998;79:328-334.
Lewis S, Avera S, Engleman M, et al. The restoration of improperly inclined osseointegrated implants. Int J Oral Maxillofac Implants. 1989;4:147-152.
Cavallaro J Jr, Greenstein G. Angled implant abutments: a practical application of available knowledge. J Am Dent Assoc. 2011;142:150-158.
Clelland NL, Gilat A, McGlumphy EA, et al. A photoelastic and strain gauge analysis of angled abutments for an implant system. Int J Oral Maxillofac Implants. 1993;8:541-548.
Eger DE, Gunsolley JC, Feldman S. Comparison of angled and standard abutments and their effect on clinical outcomes: a preliminary report. Int J Oral Maxillofac Implants. 2000;15:819-823.
Dr. Winter, a 1988 graduate of the University of Minnesota School of Dentistry, maintains a private practice in Milwaukee. He is a Master in the AGD, a Diplomate in the American Board of Oral Implantology/Implant Dentistry and the International Congress of Oral Implantologists, and a Fellow in the American Academy of Implant Dentistry. He lectures on the topics of upgradeable dentistry, advanced treatment planning, and general dentistry as a specialty. He can be reached by visiting hamptondentalassociates.com or via email at rick@winterdental.com.
Ms. Winter is a third-year dental student at Marquette University School of Dentistry in Milwaukee. She can be reached via email at ariel.winter@marquette.edu.
Disclosure: The authors report no disclosures.
Related Articles
Bulimia: Complex Etiology, Challenging Treatment
Practical Laser Applications in General Practice
Complex Problems Solved With Biological Mindsets