


INTRODUCTION
Since the last decade, there have been several improvements in the materials and techniques used for full-mouth implant rehabilitations.1 Implant planning using the CBCT scans, in combination with advanced implant planning software, and implant placement with 3-D surgical guides have facilitated placement of restoratively driven implants.2-4 There have been several technological advances in prosthesis fabrication methods, such as milling (CAD/CAM), 3-D printing, selective laser sintering, and melting and stereolithography.5-7 New and improved materials (including titanium, zirconia, and PEEK) are being constantly innovated for fabrication of strong, biocompatible, aesthetic, and functional restorations.8-10 In addition, novel retention systems have been developed for removable and fixed implant prostheses.11-13
Implant-retained overdentures offer improved patient satisfaction, comfort, prosthesis stability, and masticatory function compared to conventional dentures.14,15 The success of a removable implant prosthesis primarily depends on the retentive capacity of its attachment to sustain its long-term functionality.16 Various attachment systems have been effectively used to retain these implant overdentures (bars, LOCATORS, balls, magnets, and ERA), and each system has its own advantages and disadvantages.16-20 The LOCATOR attachment (Zest Dental Solutions) is the most widely used attachment system due to its low-profile (3.17 mm for external hexagon implant, 2.5 mm for internal connection) and excellent retention, making it the attachment of choice when there is reduced vertical restorative space.21-23 It is not indicated when the implants have non-parallel trajectories (greater than 20°).16,24 Difficulty in aligning the parts and placement (especially for dependent elders),25 wear, rapid loss of retention, and the need for periodic maintenance are some of the disadvantages of LOCATOR attachment systems.19,26-28 Recently, Zest Dental Solutions has introduced the LOCATOR R-Tx attachment system to circumvent the limitations associated with conventional locator attachments. Improved features include angle correction capability (30° angle correction per implant); an improved surface coating; an industry-standard 0.050-in/1.25-mm hex drive mechanism (precluding the need for special drivers) with a smaller central cavity; dual-retentive features on the external surface of the abutment (absence of internal engagement), preventing debris and plaque accumulation from impacting proper seating; and a narrow coronal dimension, making it easier for the patient to align and seat the prosthesis. LOCATOR R-Tx abutments are restored with the same restorative technique used for conventional locator attachment systems. Several clinical reports have documented the successful use of R-Tx LOCATOR abutments for the retention of implant overdentures.11,12,16,22
Fixed dental implant-supported prostheses can be retained by cement or screws.29 The problem with cement-retained restorations is that the extrusion of the excess cement into the peri-implant sulcus is difficult to recognize and remove, especially when the sulcus depth is more than 3 mm.30,31 Screw loosening;29,31 the requirement of sectioning and soldering procedures;30 increased costs; greater complexity of components and laboratory procedures; increased chairside time; and compromised aesthetics, occlusion, and porcelain strength are disadvantages associated with screw-retained prostheses.29,31-33 In addition, placement of screw-retained restorations may be challenging when there is insufficient space for the insertion of a screwdriver due to limited mouth opening.34 A novel fixed attachment system (LOCATOR F-Tx) has been introduced by Zest Dental Solutions to evade the problems associated with screw and cement retention. Snap-in fixation; retrievability; the absence of screws, screw access holes, and cement; elimination of several intraoral prosthodontic procedures; angulation correction up to 20° from the vertical; stress-free passive fit; decreased requirement of vertical restorative space (9 to 12 mm); improved aesthetics; and higher patient comfort and patient satisfaction are some of the advantages of the F-Tx attachment system. Several studies and clinical reports have concluded that utilization of the LOCATOR F-Tx attachments was time efficient, achieved aesthetically pleasing results, and was less technically complex due to the elimination of the need for cement, screw-access channels, and prosthetic screws.13,29,35 The F-Tx attachment is not indicated for single-tooth restorations, unilateral partial fixed dental prostheses, implants with divergence greater than 20°, or where a resilient connection is required. The purpose of this article is to discuss a clinical report (and the workflow) utilizing LOCATOR R-Tx abutments for fabrication of a maxillary implant-supported removable prosthesis and the F-Tx attachment system for fabrication of a mandibular implant-retained, 3-D printed zirconia prosthesis.
CASE REPORT
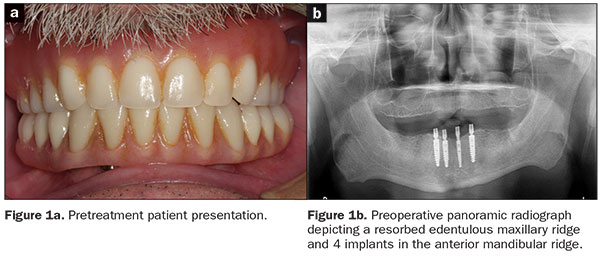
A 57-year-old white male patient with a high dental awareness presented to the author’s practice with a chief complaint of poor retention of the maxillary denture and a desire to receive a fixed mandibular prosthesis. The patient did not have any significant medical history. His oral hygiene was good. The patient had an ill-fitting maxillary complete denture and a mandibular implant-supported and retained overdenture (SynCone attachments [Dentsply Sirona]) (retained by 4 mandibular anterior implants in tooth position Nos. 22, 23, 25, and 27), which were fabricated 13 years ago (Figure 1).
 |
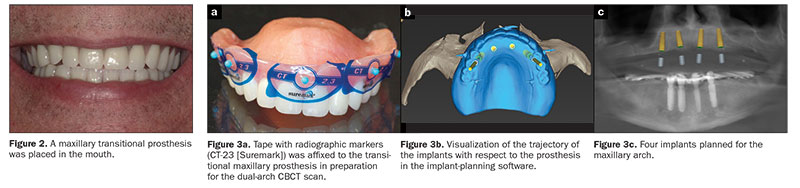
A comprehensive diagnostic work-up was initiated for the patient, which included taking photographs and radiographs and performing an intraoral examination. The existing maxillary denture was ill-fitting and had suboptimal aesthetics and occlusal wear; hence, a maxillary transitional complete denture with optimal aesthetics, retention, stability, and occlusion was planned and fabricated according to standard prosthodontic procedures. The maxillary transitional denture was adjusted, finished, polished, and placed in the patient’s mouth (Figure 2). The transitional prosthesis was worn for 3 to 4 weeks, permitting modifications to be made and allowing time for the patient to adapt to the new prosthesis.
CBCT Scan and Implant Planning
A 3-D cone beam computed tomography (CBCT) scan (Carestream Dental) was acquired using the dual-scan protocol (Figure 3a) (one scan was made of the patient with the prostheses placed in the patient’s mouth, and another scan was made of the prostheses themselves). An online collaborative implant planning meeting permitted the formulation of a virtual prosthetic-driven treatment plan (Implant Concierge).
 |
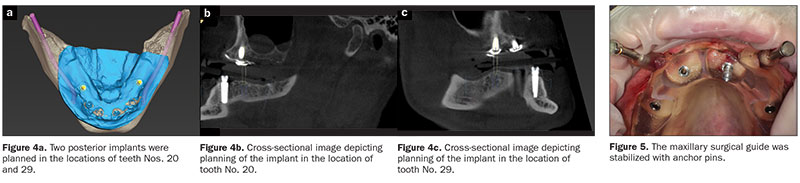 |
Considering the patient’s anatomy, aesthetics, and lip support; the emergence of the prosthesis; the available restorative space; and the patient’s desire for a quick and minimally invasive treatment, a maxillary overdenture with an open-plate design and a metal framework retained by 4 implants (in tooth position Nos. 5, 7, 9, and 12) was planned for the maxillary arch (Figures 3b and 3c). An implant-supported, fixed, complete prosthesis (supported by the 4 existing healthy implants and 2 additional implants to provide the desired antero-posterior spread in tooth position Nos. 20 and 29) was planned for the mandibular arch (Figure 4). The patient was pleased with the treatment plan and provided his consent.
Implant Placement
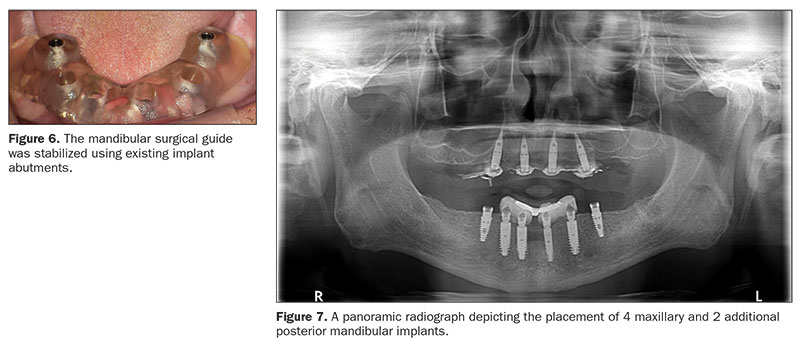
Maxillary and mandibular pilot surgical guides with depth control (Implant Concierge) were generated from the implant planning software (Implant Concierge). On the day of surgery, anesthesia was administered, and the surgical guides were placed in the mouth and checked for proper fit and adjusted as needed. The maxillary surgical guide was stabilized using the anchor pins (Figure 5) and the mandibular surgical guide was stabilized using existing implant abutments (Figure 6). A tissue punch and CO2 laser (SmartXide DOT CO2 Laser [DEKA]) were used to remove the soft tissues at the osteotomy sites. Pilot osteotomies were performed for the maxillary implants (in tooth position Nos. 5, 7, 9, and 12) and mandibular implants (in tooth position Nos. 20 and 29). The surgical guides were removed, and the final osteotomies were accomplished for the maxillary implants using multiple drills (Marc Nevins drills [Little Implant Co]) in a systematic sequence, as per the manufacturer’s recommendations. A full-thickness mucoperiosteal flap was reflected in the lower arch for improved access. The final osteotomies were accomplished using multiple drills (Marc Nevins drills) in a systematic sequence, as per the manufacturer’s recommendations. Four maxillary and 2 mandibular implants were placed (4.2- × 10-mm Marc Nevins implants [Little Implant Co]) in the planned locations (Figure 7). Post implant placement, an activated chlorine dioxide gel (Implant gel, Implant Post Op Care System [OraCare]) was applied to the peri-implant tissues to help prevent peri-implantitis. The patient was also prescribed an oral rinse (Implant Post-Op Care System) during the healing period.
 |
Healing abutments were attached to the implants. The existing maxillary and mandibular prostheses were relieved, adjusted, and relined with a soft reline material (CHAIRSIDE Soft Reline Material [Zest Dental Solutions]). The patient was given home care instructions and advised to come to the clinic the next day for a postoperative assessment and was recalled periodically afterward for evaluations. The implants were allowed to heal for 4 months.
Fabrication of the Definitive Prostheses First Clinical Appointment: Abutment Selection and Impressions
A. Maxillary master impression. The maxillary implants were divergent, making it challenging to use conventional stud attachments. The newly introduced LOCATOR abutments (LOCATOR R-Tx), were chosen to help manage the divergence between the implants and also support and retain the maxillary complete dental prosthesis. The healing abutments (Figure 8a) were removed, and LOCATOR R-Tx abutments (with heights chosen based on mucosal thicknesses) were attached to the implants (Figure 8b). Processing spacers (LOCATOR R-Tx [Zest Dental Solutions]) were snapped onto the R-Tx abutments (Figure 8c). The use of processing spacers while making the impression aided in creating optimally sized recesses in the definitive prosthesis, thereby facilitating the easy chairside pickup of Denture Attachment Housings (DAHs) (LOCATOR R-Tx [Zest Dental Solutions]). A maxillary closed tray impression was made using a vinyl polysiloxane (VPS) impression material (Honigum [DMG America]) in thermoplastic trays (Strong-Massad Denplant tray [Nobilium]) (Figure 8d). The processing spacers and the abutments were removed from the mouth, and healing abutments were reattached to the implants. The LOCATOR R-Tx Analogs, the processing spacers, and the impression were sent to the laboratory to generate a master cast.
 |
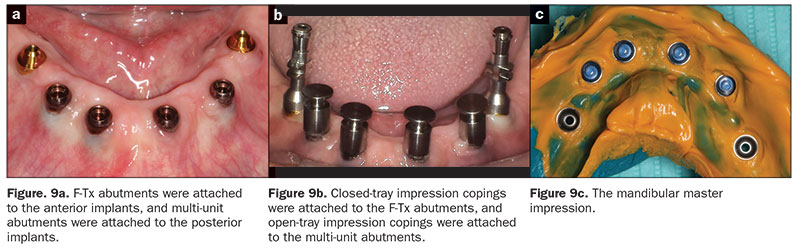
B. Mandibular master impression. A combination of F-Tx abutments (for the 4 anterior implants) (LOCATOR F-Tx) and multi-unit abutments (for the 2 posterior implants) (Little Implant Co) were planned to retain the mandibular prosthesis. The F-Tx abutments were chosen due to their low vertical profile and angle correction up to 20° (from the vertical) and the absence of prosthetic screws, screw access channels, and cement. For the 2 posterior implants, 3.0-mm straight multi-unit abutments were used. The retentive attachments previously attached to the anterior implants and the healing abutments attached to the posterior implants were removed and replaced with F-Tx abutments (heights chosen based on mucosal thicknesses) and multi-unit abutments, respectively (Figure 9a), and torqued as per the manufacturer’s specifications. Closed-tray (LOCATOR F-Tx) and open-tray impression copings (Little Implant Co) were attached to the F-Tx abutments and the multi-unit abutments, respectively (Figure 9b). The black processing inserts in the F-Tx impression copings were replaced with the blue retention inserts to enhance the retention and stability of the impression copings. A master impression (Honigum) was made using a VPS impression material in a thermoplastic tray (Strong-Massad Denplant tray) (Figure 9c). Healing caps were snapped on the F-Tx and multi-unit abutments, and the existing prosthesis was relieved, adjusted, and relined with a soft reline material (CHAIRSIDE Soft Reline Material). The impression copings, F-Tx abutment analogs, multi-unit abutment analogs, and impression were sent to the laboratory to generate a master cast.
 |
 |
The data from the scanned master casts was used to print 2 sets of maxillary and mandibular trial record bases (cara Print 4.0 [Kulzer]). Access holes were created in the printed record base with e-cutters in the locations of the implants. The access holes aided with retention, prevented interference with abutments, and ensured complete seating of the trial record bases in the mouth.
Second Clinical Appointment
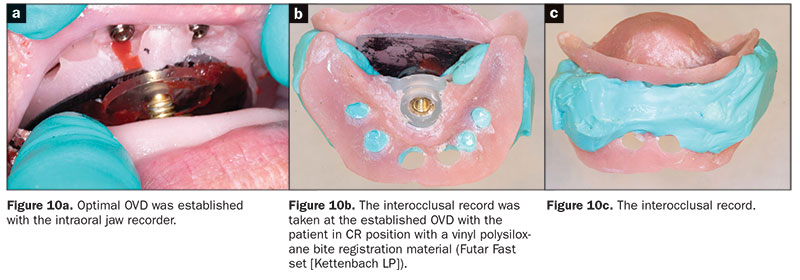
A. Interocclusal records. One set of the maxillary and mandibular trial record base was used for recording the interocclusal records using an intraoral Gothic arch tracer (Nobilium). An interocclusal record was taken at the established OVD with the patient in CR position with a VPS bite registration material (Futar Fast set [Kettenbach LP]) (Figure 10). Next, a face-bow record and a protrusive record (for setting the articulator’s condylar elements to achieve balanced occlusion) were made, and the master casts were mounted on a semi-adjustable articulator.
B. Contouring the maxillary wax occlusal rim. A wax occlusal rim was attached to the second maxillary trial denture base. Using standard complete denture clinical methods for assessing aesthetics, phonetics, and biomechanical dictates of appropriate denture tooth position, the wax occlusion rim was appropriately adjusted. The adjusted wax occlusal rim served as a guide for setting the prosthetic teeth accurately. Preview shell teeth were set chairside and evaluated for aesthetics and phonetics at the same appointment.
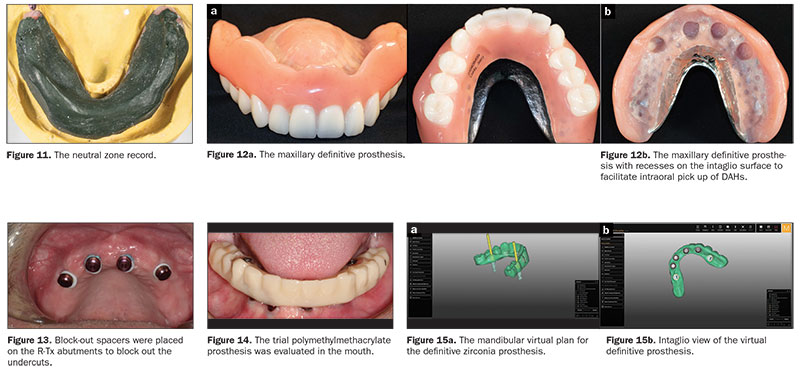
C. Neutral zone determination. A softened impression compound rim (similar to a wax rim) was attached to the second mandibular trial denture base. The rim was placed in a heated water bath, and when the compound was softened throughout, it was inserted in the patient’s mouth. The patient was asked to swallow while drinking warm water for 1 minute, then given cool water. This procedure helped the muscles to shape the softened compound rim and identify the neutral zone. It aided in developing appropriate tooth locations and setting the mandibular teeth in a neutral space. The record base with the neutral zone record (Figure 11) was removed from the oral cavity and evaluated.
Prosthetic teeth were selected and arranged on the maxillary and mandibular wax rims based on the aesthetic and functional information provided by the adjusted maxillary wax occlusal rim and mandibular compound occlusal rim.
 |
 |
Third Clinical Appointment
A. Try-in procedure. The wax trial dentures were used to clinically assess the fit, form, occlusion, and aesthetics.
B. Cameogram record. A cameogram record was made with the trial denture. Baseplate wax apical to the prosthetic teeth on the wax trial denture was carefully removed, a VPS tray adhesive (Dentsply Sirona Restorative) was painted on the area where the wax was removed, and low viscosity VPS impression material (Aquasil Ultra LV fast set [Dentsply Sirona Restorative]) was applied to the same area. The wax trial denture with the impression material was inserted in the patient’s mouth. The patient was instructed to make orofacial movements, such as pucker his lips, smile, cough, suck, open and close the mouth, and move the jaw from side to side to record the maxillary cameogram. For recording the mandibular cameogram, the patient was also asked to pucker his lips, smile, suck, swallow, move the jaw from side to side, and perform various tongue movements. The wax trial dentures were removed from the mouth following the complete polymerization of the impression material and evaluated. Excess impression material was trimmed with scissors.
The cameogram record and the trial denture were sent to the laboratory, along with detailed instructions for fabrication of the maxillary implant-supported overdenture with a metal framework (Figure 12) and a trial polymethylmethacrylate mandibular prosthesis. Both the maxillary and mandibular DAHs were planned to be picked up intraorally.
Fourth Clinical Appointment
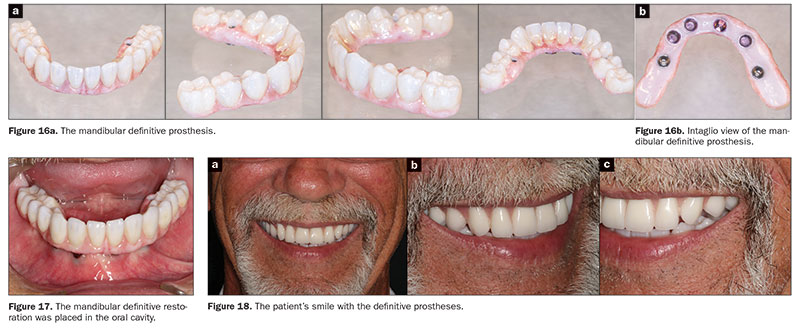
A. Intraoral pick-up of DAHs and placement of the maxillary prosthesis. On the day of denture placement, the healing abutments were removed, and the R-Tx abutments were attached to the implants and torqued as per the manufacturer’s recommendations. The DAHs were seated over the abutments. The prosthesis was tried in the patient’s mouth to reverify the retention, fit, occlusion, stability, and aesthetics to ensure that there was no contact of the DAHs with the recesses of the prosthesis. Block-out spacers were placed on the R-Tx abutments to block out the undercuts (Figure 13), thereby preventing the locking of the prosthesis during the pick-up procedure. The recesses were roughened, and the DAHs were cleaned and dried. The DAHs were picked up directly utilizing a dual-polymerizing resin material (CHAIRSIDE Attachment Processing Material [Zest Dental Solutions]) as per the manufacturer’s recommendations. The prosthesis was adjusted, finished, and polished as needed. The black processing inserts were removed and replaced with pink retention inserts with the LOCATOR R-Tx tool, and the prosthesis was placed in the mouth.
B. Try-in of the polymethylmethacrylate mandibular trial prosthesis and the intraoral pick-up of the DAHs. The mandibular master cast was scanned (cara Scan 4.0 [Kulzer]), and the data from the scanned master cast, the cameogram record, and the wax trial denture were used to print a polymethylmethacrylate trial prosthesis. The healing caps were removed, and the F-Tx attachment housings (LOCATOR F-Tx) were placed on the F-Tx abutments. Block out rings (LOCATOR F-Tx) were placed to block out undercuts of the LOCATOR F-Tx abutments. The DAHs were rotated by hand to ensure parallelism between them. Multi-unit titanium temporary copings (Little Implant Co) were attached to the multi-unit abutments. The trial prosthesis was tried in the mouth and relieved appropriately to ensure complete seating and absence of contact with the DAHs and the titanium temporary copings (Figure 14). The DAHs and the temporary copings were picked up directly utilizing a dual-polymerizing resin material (CHAIRSIDE Attachment Processing Material) as per the manufacturer’s recommendations. The trial prosthesis was finished and polished, and the black processing inserts were replaced with new ones. The trial prosthesis was tried again in the oral cavity to re-verify its proper placement, occlusion, and contours. The healing caps were snapped back onto the abutments. The trial prosthesis was sent to the laboratory, along with detailed instructions for 3-D printing (cara Print 4.0) of the definitive zirconia prosthesis (Figures 15 and 16a). The prosthesis was designed to have F-Tx processing caps (LOCATOR F-Tx) incorporated in it, which would act as receptacles for the intraoral pick up of the DAHs (Figure 16b).
Fifth Clinical Appointment: Placement of the Definitive Mandibular Prosthesis
On the day of prosthesis placement, the healing caps were removed, and a new set of DAHs were placed on the F-TX abutments. Block-out rings were placed to block out undercuts, and the DAHs were rotated by hand to ensure parallelism. The definitive prosthesis was tried in the mouth and adjusted as necessary. It was relieved appropriately to ensure the absence of contact between the DAHs with the recesses in the prosthesis. It was attached to the 2 posterior multi-unit abutments with screws, and the DAHs were picked up directly utilizing a dual-polymerizing resin material (CHAIRSIDE Attachment Processing Material) as per the manufacturer’s recommendations. Following the polymerization of the pick-up material, the prosthesis was removed by loosening the screws. The black processing inserts in the DAHs were removed and replaced with polishing caps to protect the DAHs during the finishing and polishing procedures. The excess material was removed, and the prosthesis was finished and polished as necessary. The black processing inserts were replaced with retention (blue) inserts using the hexed screwdriver. The restoration was then carefully seated, lining up the retention inserts with the F-Tx abutments (Figure 17), and the unique F-Tx seating and removal tool (LOCATOR F-Tx) was used to engage the abutments. The protected seating insert of the F-Tx seating and removal tool was placed over the prosthesis in line with each implant, and the F-Tx seating and removal tool was activated twice (the same tool is also used for quick removal of the prosthesis). The screws of the multi-unit abutments were tightened and torqued as per the manufacturer’s recommendations, and the access holes were plugged with Teflon tape and composite resin. The patient was very pleased with his prostheses (Figure 18). The patient was educated regarding daily oral hygiene maintenance, given written home care instructions and cleaning aids, and placed on a regular maintenance program.
CLOSING COMMENTS
Both the R-Tx and the F-Tx LOCATOR abutments are designed to circumvent the limitations of existing retention systems. Both abutments have a low vertical profile and, hence, are extremely valuable in situations in which the available restorative space is suboptimal. R-Tx abutments are restored with the same restorative technique used for conventional locator attachment systems. Also, most of the procedural steps used to fabricate a fixed prosthesis with LOCATOR F-Tx abutments are similar to the ones used for conventional locator attachment systems. In addition, the placement and removal of fixed implant-supported prostheses are easier and faster when compared to screw- and cement-retained prostheses.
Acknowledgments:
The authors thank Ken Waldo, CDT, for the maxillary prosthesis and Yesenia Monarres, CDT, for mandibular zirconia prosthesis laboratory support.
References
- Gowd MS, Shankar T, Ranjan R, et al. Prosthetic consideration in implant-supported prosthesis: a review of literature. J Int Soc Prev Community Dent. 2017;7(suppl 1):S1-S7.
- Gulati M, Anand V, Salaria SK, et al. Computerized implant-dentistry: advances toward automation. J Indian Soc Periodontol. 2015;19:5-10.
- Schubert O, Schweiger J, Stimmelmayr M, et al. Digital implant planning and guided implant surgery—workflow and reliability. Br Dent J. 2019;226:101-108.
- Vercruyssen M, Laleman I, Jacobs R, et al. Computer-supported implant planning and guided surgery: a narrative review. Clin Oral Implants Res. 2015;26(suppl 11):69-76.
- Torabi K, Farjood E, Hamedani S. Rapid prototyping technologies and their applications in prosthodontics, a review of literature. J Dent (Shiraz). 2015;16:1-9.
- Azari A, Nikzad S. The evolution of rapid prototyping in dentistry: a review. Rapid Prototyp J. 2009;15:216-225.
- Sun J, Zhang FQ. The application of rapid prototyping in prosthodontics. J Prosthodont. 2012;21:641-644.
- Parmigiani-Izquierdo JM, Cabaña-Muñoz ME, Merino JJ, et al. Zirconia implants and PEEK restorations for the replacement of upper molars. Int J Implant Dent. 2017;3:5.
- Guess PC, Att W, Strub JR. Zirconia in fixed implant prosthodontics. Clin Implant Dent Relat Res. 2012;14:633-645.
- Ortorp A, Jemt T. Clinical experiences of implant-supported prostheses with laser-welded titanium frameworks in the partially edentulous jaw: a 5-year follow-up study. Clin Implant Dent Relat Res. 1999;1:84-91.
- Baba NZ, Al-Harbi FA, AlRumaih HS, et al. A novel extended range attachment system to retain implant overdentures: a clinical report. J Prosthodont. 2019;28:3-9.
- Shah K, Yilmaz B, McGlumphy E. Fabrication of a mandibular implant-supported overdenture with a new attachment system: a review of current attachment systems. Int J Prosthodont. 2017;30:245-247.
- Östman P-O. Case series: 3-year follow-up of immediately loaded full-arch implant restorations using a novel fixed attachment system. Compend Contin Educ Dent. 2018;39(suppl):4-9.
- Bhat S, Chowdhary R, Mahoorkar S. Comparison of masticatory efficiency, patient satisfaction for single, two, and three implants supported overdenture in the same patient: a pilot study. J Indian Prosthodont Soc. 2016;16:182-186.
- Sharma AJ, Nagrath R, Lahori M. A comparative evaluation of chewing efficiency, masticatory bite force, and patient satisfaction between conventional denture and implant-supported mandibular overdenture: an in vivo study. J Indian Prosthodont Soc. 2017;17:361-372.
- Massad JJ, Ahuja S, Wicks R, et al. The next generation attachment system. Dent Today. 2018;37:48-61.
- Trakas T, Michalakis K, Kang K, et al. Attachment systems for implant retained overdentures: a literature review. Implant Dent. 2006;15:24-34.
- Gotfredsen K, Holm B. Implant-supported mandibular overdentures retained with ball or bar attachments: a randomized prospective 5-year study. Int J Prosthodont. 2000;13:125-130.
- Alsabeeha NH, Payne AG, Swain MV. Attachment systems for mandibular two-implant overdentures: a review of in vitro investigations on retention and wear features. Int J Prosthodont. 2009;22:429-440.
- Massad JJ, Ahuja S, Cagna D. Implant overdentures: selections for attachment systems. Dent Today. 2013;32:128-132.
- Kronstrom M, Carlsson GE. An international survey among prosthodontists of the use of mandibular implant-supported dental prostheses. J Prosthodont. 2019;28:e622-e626.
- Srinivasan M, Kalberer N, Maniewicz S, et al. Implant overdentures retained by self-aligning stud-type attachments: a clinical report. J Prosthet Dent. 2019 May 18.[Epub ahead of print]
- Ahuja S, Cagna DR. Classification and management of restorative space in edentulous implant overdenture patients. J Prosthet Dent. 2011;105:332-337.
- Uludag B, Polat S, Sahin V, et al. Effects of implant angulations and attachment configurations on the retentive forces of locator attachment-retained overdentures. Int J Oral Maxillofac Implants. 2014;29:1053-1057.
- Mackie A, Lyons K, Thomson WM, et al. Mandibular two-implant overdentures: three-year prosthodontic maintenance using the LOCATOR attachment system. Int J Prosthodont. 2011;24:328-331.
- Kleis WK, Kämmerer PW, Hartmann S, et al. A comparison of three different attachment systems for mandibular two-implant overdentures: one-year report. Clin Implant Dent Relat Res. 2010;12:209-218.
- Abi Nader S, de Souza RF, Fortin D, et al. Effect of simulated masticatory loading on the retention of stud attachments for implant overdentures. J Oral Rehabil. 2011;38:157-164.
- Guédat C, Nagy U, Schimmel M, et al. Clinical performance of LOCATOR attachments: a retrospective study with 1-8 years of follow-up. Clin Exp Dent Res. 2018;4:132-145.
- Massad J, Wicks R, Ahuja A. A prosthesis retention system for full-arch, fixed, implant-supported prosthesis. J Prosthodont. 2019;28:e912-e916.
- Yuzbasioglu E. A modified technique for extraoral cementation of implant retained restorations for preventing excess cement around the margins. J Adv Prosthodont. 2014;6:146-149.
- Principles of fixed implant prosthodontics: cement-retained restorations. In: Misch CE, ed. Dental Implant Prosthetics. 2nd ed. St. Louis, MO: Elsevier; 2015:650-699.
- Pjetursson BE, Thoma D, Jung R, et al. A systematic review of the survival and complication rates of implant-supported fixed dental prostheses (FDPs) after a mean observation period of at least 5 years. Clin Oral Implants Res. 2012;23(suppl 6):22-38.
- Lewis MB, Klineberg I. Prosthodontic considerations designed to optimize outcomes for single-tooth implants. A review of the literature. Aust Dent J. 2011;56:181-192.
- Guichet DL, Caputo AA, Choi H, et al. Passivity of fit and marginal opening in screw- or cement-retained implant fixed partial denture designs. Int J Oral Maxillofac Implants. 2000;15:239-246.
- Amato F, Polara G. Research clinical application of the new LOCATOR F-Tx fixed attachment system for immediate rehabilitation of complete edentulous cases: 1-year prospective clinical study. Compend Contin Educ Dent. 2018;39(suppl):10-21.
Dr. Little received his dental training at the University of Texas Health Science Center at San Antonio (UT Health San Antonio) School of Dentistry. He maintains a multidiscipline, state-of-the-art practice in San Antonio to provide patients with dramatic restorative treatment results. An accomplished national and international speaker, professor, and author, he is also a respected clinical researcher, focusing on implants, laser surgery, and dental materials, as well as a consultant on emerging restorative techniques and materials. He can be reached via email at dlittledds@professionalsindentistry.com.
Disclosure: Dr. Little is clinical director of Little Implant Co.
Dr. Massad is an associate professor in the department of graduate prosthodontics at the University of Tennessee Health Science Center College of Dentistry in Memphis; an associate faculty at the Tufts University School of Dental Medicine in Boston; an adjunct associate faculty of the department of comprehensive dentistry at the UT Health San Antonio School of Dentistry; and an adjunct professor in the department of restorative dentistry at Loma Linda University in Loma Linda, Calif. He has a private practice in Tulsa. He can be reached at joe@joemassad.com.
Disclosure: Dr. Massad consults for Zest Dental Solutions on specific studies on quality control issues and is paid for his services.
Related Articles
Treating a Patient With Inadequate Restorative Space
The Impact of Aesthetics in Restorative Treatment Planning
Improving Implant Survival by Implementing the Use of an Electric Toothbrush


