
CASE REPORT
Diagnosis and Treatment Planning
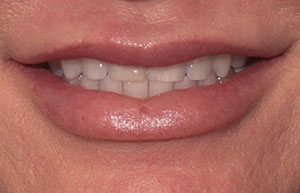
A young woman presented with the desire to improve her smile. Figure 1 shows her smile from the frontal view, and, in Figure 2, her smile can be seen from the right lateral view. The retracted facial view with the patient in centric occlusion is shown in Figure 3. The occlusal view of the maxillary arch is illustrated in Figure 4, and the mandibular occlusal view can be seen in Figure 5.
Her dental health was excellent, with no dental caries or periodontal disease. Except for a small composite repair on the incisal edge of her right central incisor, she had no dental restorations. When she was younger, 4 premolars had been extracted as a part of her orthodontic treatment. As a result, she was in Class I occlusion with very little incisal overjet and no protrusive guidance on her anterior teeth.
 |
 |
| Figure 1. The patient’s smile before treatment. | Figure 2. Right lateral view of the smile before treatment. |
 |
 |
| Figure 3. Pretreatment retracted facial view. | Figure 4. Pretreatment maxillary incisal view. |
 |
| Figure 5. Pretreatment mandibular incisal view. |
She stated a desire to have more fullness in her upper arch and to show more of her anterior teeth when smiling. She was asked whether or not she would be open to more orthodontic treatment, and she stated it was not an option she wanted to consider.
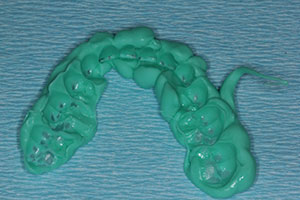
The patient was then advised that her teeth were so healthy that it would be best not to do preparations on them and, that she might be instead a candidate for no-prep veneers. To evaluate that option, an accurate impression of her maxillary arch was taken using a final impression technique with a light-body, addition-curing (vinyl polysiloxane) precision impression material (Panasil initial contact X-Light [Kettenbach LP]) injected around the maxillary gingival areas and a heavy-body putty (Panasil Putty Soft [Kettenbach LP]) in the tray. The impression is shown in Figure 6. An impression of the lower arch was taken using an alginate substitute material (Silginat [Kettenbach LP]) and an occlusal registration was also taken (Futar D [Kettenbach LP]) (Figure 7). These were sent to the dental laboratory team to pour the models. A wax-up was done by the lab to simulate no-preparation veneers with more facial and incisal contours. Figure 8 shows the wax-up from the facial view, and Figure 9 shows the wax-up from the incisal view. Over the wax-up, the lab team then fabricated a stint using lab putty (Kettenbach LP) relined with a light-body impression material (Figure 10).
Developing a Prototype
When the patient returned, a prototype smile was created in the dental office by injecting a bis-acryl provisional material (Luxatemp [DMG America]) into the stint and placing it over the maxillary teeth. The bis-acryl material was allowed to completely set before the stint was removed. The resulting mock-up was used to demonstrate to the patient how her smile would appear with veneers added to the unprepared teeth. She was able to evaluate how her lips would drape over the veneers and to better evaluate if the extra fullness and length would provide the appearance that she was looking for while allowing for good function and speech.
Figure 11 shows the prototype in place and in occlusion. The maxillary incisal view is shown in Figure 12, and the prototype smile is shown in Figure 13.
The patient was very pleased and wanted to proceed. A shade was chosen and shared with the patient to match her lower teeth, but she wanted a lighter color. Her choice was OM2 (3-D shade guide [VITA]) (Figure 14). She also requested that the teeth have no incisal translucency. In cases like this one, it is the lead author’s opinion that it is best to use monolithic lithium disilicate. No layering porcelain is applied in order to take advantage of the high bending and compressive strength of lithium disilicate, which is stronger than layering porcelains. There would be some functional contact on the incisal edges of the veneers, so these areas would be polished (not glazed) because properly polished lithium disilicate has been shown to be very kind to opposing structures. (See sidebar, “Lab Considerations for No-Prep Veneer Cases,” below).
 |
 |
| Figure 6. Impression of the maxillary arch. | Figure 7. Occlusal registration. |
 |
 |
| Figure 8. Facial view of the wax-up. | Figure 9. Incisal view of the wax-up. |
 |
 |
| Figure 10. Stint used for creating the prototype. | Figure 11. Facial retracted view of the maxillary prototype in place. |
 |
 |
| Figure 12. Incisal view of prototype in place. | Figure 13. Lateral view of the smile with the prototype in place. |
Delivery of the Final No-Prep Veneers
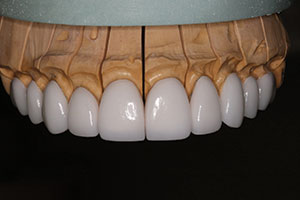
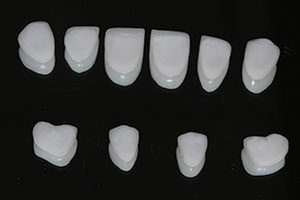
The veneers, as delivered from the lab team, are shown on the working model from the facial view in Figure 15. Figure 16 shows the incisal view. The etched intaglio surfaces can be seen in Figure 17 on a mirror surface.
When the patient returned, the 10 veneers were tried in using water. The restorations were fully evaluated by the clinician, and the patient approved the shapes and color. After evaluation, the veneers were thoroughly cleansed and dried.
Silane (Porcelain Primer/Bis-Silane [BISCO Dental Products]) was applied to the internal surfaces of the veneers, allowed to dwell for 20 seconds, and then air dried. Next, the teeth were etched for 10 seconds using phosphoric acid gel, rinsed thoroughly with water, and air dried. A universal bonding agent (All-Bond Universal [BISCO Dental Products]) was liberally applied and air thinned, then light cured with an LED curing light (S.P.E.C. II [COLTENE]) for 10 seconds. A layer of the All-Bond Universal bonding agent was applied to the internal surface of each veneer and air thinned before adding the light-cured resin luting composite. Each veneer was then seated to place, and the excess luting cement (Choice 2 [BISCO Dental Products]) was removed from the margins with a brush. The luting agent was cured for 20 seconds on the facial and lingual surfaces. Excess luting agent at the margins was removed using a small carbide finishing bur (Brasseler USA). Excess cement in the interproximal areas was removed using an interproximal saw (Ceri-Saw [DenMat]).
The occlusion was evaluated using articulating paper (Bausch 200 micron Articulating Paper). Only slight adjustments to a few incisal edges were required to establish a balanced occlusion. The adjustments were made using a fine diamond, followed by smoothing with a finer diamond and then a 30-fluted carbide finishing bur (Brasseler USA). The adjusted areas were then polished with 3 grits of porcelain polishing points (K0202 [Brasseler USA]).
 |
 |
| Figure 14. The shade the patient desired was OM1 (3D Shade Guide [VITA]). | Figure 15. Facial view of the no-prep veneers on the working model. |
 |
 |
| Figure 16. Incisal view of the no-prep veneers on the working model. | Figure 17. No-prep veneers, as photographed on a mirror surface. |
 |
 |
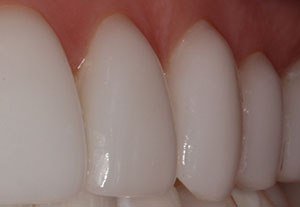
| Figure 18. Retracted facial view of the final result. | Figure 19. Incisal view of the final result. |
 |
 |
| Figure 20. Close-up left lateral view, showing the emergence profile of the veneers. | Figure 21. Right lateral view of the smile after treatment. |
 |
| Figure 22. The patient’s new smile. |
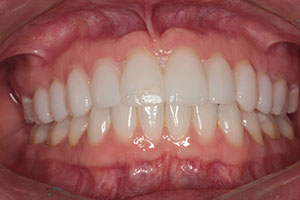
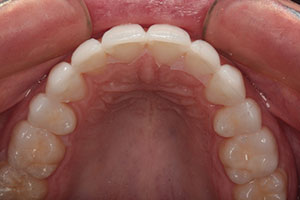
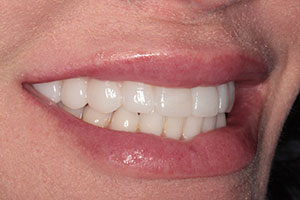
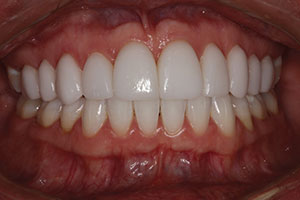
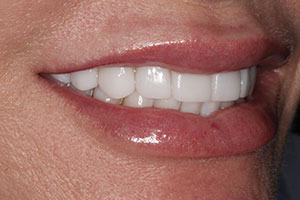
The final result is shown from the facial retracted view with the teeth in centric occlusion in Figure 18. The incisal view after treatment can be seen in Figure 19. In Figure 20, please observe the emergence profile that was created with the veneers, allowing for the facial surfaces to be moved forward without looking slanted. The patient’s new smile can be seen from the right lateral view in Figure 21. The patient had been used to wearing a night guard, so a new one was fabricated to fit her new restorations. The new fuller and whiter smile can be seen in Figure 22.
|
Laboratory Considerations for No-Prep Veneer Cases Brent West Based on the accepted prototypes, the thin veneers were hand-waxed and pressed in lithium disilicate (IPS e.max [Ivoclar Vivadent]). Because the patient wanted no incisal translucency, we fabricated monolithic lithium disilicate veneers. With the final shade being OM2 and the underlying color of the teeth being desirable, a high-translucency ingot (HTBL1) was used to prevent the monolithic e.max from being too opaque while maintaining the lighter color (high-value) that was requested by the patient. Since final no-prep veneer restorations are delicate, outstanding fit is paramount. Before finalizing the case, extra solid models were utilized to ensure that each restoration fit perfectly, both individually and with the adjacent restorations. If no-prep veneers do not fit perfectly, this can cause serious errors when being bonded into place. Upon completion of the case, the veneers were etched using hydrofluoric acid, rinsed, dried, and then packaged for delivery back to the dental office. |
CLOSING COMMENTS
By using no-prep porcelain veneers, we were able to give this patient the smile that she d
esired in a minimally invasive way. We were also able give her better occlusion and anterior guidance in the process of improving her smile.
Dr. Nash maintains a private practice in Huntersville, NC, where he focuses on aesthetic and cosmetic dental treatment. An accredited Fellow in the American Academy of Cosmetic Dentistry and a Diplomate for the American Board of Dental Aesthetics, he lectures internationally on subjects in aesthetic dentistry and has authored chapters in 2 dental textbooks. He is co-founder of the Nash Institute for Dental Learning in Huntersville and a consultant for numerous dental product manufacturers. He can be reached at (704) 895-7660, via email at [email protected], or via the website thenashinstitute.com.
Mr. West is the vice president and general manager of Frontier Dental Laboratory in El Dorado Hills, Calif, where he has been employed for 24 years. He has been fortunate to work with the likes of Dr. David Hornbrook at PAC-live and Dr. Larry Rosenthal at Aesthetic Advantage, while learning the art of smile design. In addition, he has lectured and taught at the California Center for Advanced Dental Studies and the Frontier Institute, teaching smile design and material applications. He can be reached at (800) 790-3999, via email at [email protected], or via the Instagram handle @brent_frontierdental.
Disclosures: The authors report no disclosures.
Related Articles
Porcelain Veneers in a Single Appointment
Conventional Impressions: Still a Viable Option for Aesthetic Cases
Smile Enhancement Using Multiple Modalities

