INTRODUCTION
Aesthetics and occlusion play an important role together in any restorative dentistry case, regardless of whether the preparation is for a small Class I composite resin restoration, a single crown, multiple crowns, or veneers. Based on occlusal stresses, the strength of materials used, and adhesion or cementation techniques, a number of variables are associated with how to restore one or many teeth in every mouth, as well as the success one is able to achieve. This is not a simple task, as every case requires something different for each patient’s unique tooth-jaw relationship and each specific situation. As dentists, whenever possible, we tend to prefer a simple outline that we can follow for successfully treating everyone and anyone, yet this is not always possible. However, this article will offer some guidelines that might be of some assistance on your next big case.
For any patient who comes in for a complex or simple cosmetic alteration, the dentist should think about the big picture of how he or she got to where he or she is currently. What is bothering the patient about his or her appearance and why? Did the person endure some sort of trauma? Did he or she struggle with developmental issues? Has time and wear been a factor? Is it functionally driven?
Looking deeper, the dentist should consider whether the patient has undergone orthodontic treatment, such as with braces or aligners. If so, what was the result? Does he or she still wear retainers? Other jaw-related questions must be considered as well. Are there any airway issues? Does the person sleep well, or does he or she snore? Has he or she ever dealt with any jaw-related discomfort, pain, popping, locking, or noises? Does the patient’s jaw get tired easily when it’s open for a cleaning appointment or eating a large sandwich? Does he or she suffer from frequent headaches?
A number of signs in the mouth can be helpful in determining the root of a patient’s problem, including recession, occlusal wear, abfraction lesions, fremitus or mobility in anterior teeth, and a scalloped tongue/crenations. All of this helps identify a possible cause and effect explaining why a patient is in his or her current state of oral health.
The patient’s personal beliefs may not always align with reality; people often want just a quick fix. The dentist must treat the underlying cause as opposed to just fixing a tooth or teeth without addressing the issues, which could set him or her up for failure. Building on a solid foundation allows for your dental work to last longer. Patients need to understand the underlying causes of their problems and the treatment options available based on their conditions, as well as any potential future issues based on the extent of damage that they already have had in their dentition.
CASE REPORT
Diagnosis and Treatment Planning
A 42-year-old female patient presented with a history of orthodontic care as a teenager. The patient now had edge-to-edge bite and substantial wear on the anterior teeth. The functional demands of an edge-to-edge bite, as well as other compounding issues, created the wear and flaring of the anterior teeth. Regardless of how her bite had been built during her previous orthodontic treatment, she had grown and changed since then, causing the bite to change significantly and leading to her current situation. Her teeth had been worn down and were not aesthetically appealing, primarily from edge-to-edge contact, but the situation might have been exacerbated due to bruxism from poor occlusion, nocturnal issues, jaw positioning, or airway issues.
The first step, as with any patient, was a comprehensive exam that included listening to joints; checking the neck, lips, and tongue; screening for oral cancer; completing a periodontal examination; and evaluating the teeth, occlusion, and aesthetics. Next, additional technology was utilized to further evaluate the patient: The Canary System (Quantum Dental Technologies), DEXIS CariVu (KaVo Dental), cone beam computed tomography (CBCT) for TMJ issues, digital radiographs, shimstock for bite evaluation, and photographic documentation, as well as a sleep apnea questionnaire. The current jaw position was considered in centric occlusion (CO) and via CBCT to determine if any joint damage was present or if jaw position problems existed. In addition, based on discussions and a questionnaire related to sleep, it was determined that the patient should also undergo a sleep study.
 |
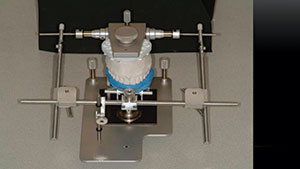 |
| Figure 1. Wax bite registrations of varying thicknesses to help prove the accuracy of the hinge axis that was captured. | Figure 2. Mounting the maxillary cast utilizing a split cast and hinge axis locator. |
 |
 |
| Figure 3. The patient underwent pre-restorative orthodontic treatment to manage tooth position as well as jaw joint position. | Figure 4. The patient at completion of the orthodontic phase, showing intrusion of the maxillary anterior teeth to align gingival tissues and to create ideal space for restorations by putting them into a more favorable position. |
 |
 |
| Figure 5. Smile view of the patient with a more favorable tooth position and jaw position. | Figure 6. Retracted view of the new tooth and jaw positions. |
 |
 |
| Figure 7. The diagnostic stone model derived from duplication of the wax-up model. | Figure 8. The bead line over impression was made from a fast-setting VPS material (Template [CLINICIAN’S CHOICE Dental Products]) that was fabricated from scribing the duplicated diagnostic stone model. |
Once all of that information had been compiled for the patient in this case, it became clearly apparent that her current bite, tooth position, and jaw position were not ideal for long-term function. Her jaw position was problematic for functiona
l health as well as for teeth or restoration longevity. However, the sleep study came back with no issues noted.
Impressions were taken of the patient’s teeth using a vinyl polysiloxane (VPS) alginate substitute (Silginat [Kettenbach LP]), which allowed for multiple pours to create as many models as necessary. After the models were created, the jaw position was the next situation to be addressed because the CBCT scan showed the jaw was not in a good position. It was determined that space might be created in the anterior dentition to help the overall situation if the jaw position was managed utilizing a repositioning appliance. So, a functional guard was fabricated to fit on the upper teeth; it could be modified as often as desired, which would allow for reversible changes to be made to the bite. This appliance was worn every day, all day, except for while brushing and flossing. Every 3 to 4 weeks, the appliance was modified via reduction of the occlusal table of the appliance and addition of new acrylic to capture the new bite position that had been functionally derived. If the jaw position had not changed, then no adjustments would have been necessary.
After several weeks, the patient’s bite was no longer repositioning. Upon reaching a point of no change or movement in the jaw position/bite with the superior repositioning appliance, a hinge axis recording was taken along with centric relation (CR) bites at different vertical dimensions. The bite records would be used later with the maxillary split cast model to prove whether a true hinge axis had been correctly recorded.
Mounting casts onto an articulator using the hinge axis locator with a split cast technique allows for different bite records to be inserted; this is done to determine if the casts come together accurately at different vertical dimensions. If all of the bite records (Figures 1 and 2) allow for complete seating of the split cast, then the case is proven to be on a hinge axis; if they do not, then the patient’s situation has not been resolved into a repeatable and measurable CR position. Mounting the casts into CR allows for the evaluation of the new jaw and tooth positions. Here, the models can be altered and manipulated to see potential outcomes, avoiding the need to attempt treatments in a patient’s mouth that are not reversible. It was determined in this case that the jaw position could be altered to gain better function and that, if the teeth were moved into a better position, greater potential existed for a more pleasing appearance and better function.
Orthodontic Phase of Treatment
The patient was sent to a Roth-trained orthodontist (Roth Williams International Society of Orthodontics) to manage jaw and tooth position1 (Figure 3). Her teeth were moved to create better occlusion while maintaining the proper jaw position. Her anterior maxillary teeth, which had extruded as they had worn over time, were now being intruded to align the gingiva, as well as position the cervical aspect of the teeth into a more favorable apical position2,3 (Figure 4).
After the braces were removed (Figures 5 and 6), an obvious change in occlusion had occurred, and the patient had the space needed to create a beautiful new smile. Next, new impressions were taken to create models to evaluate the new jaw and tooth positions.
New CR records were taken, along with a new hinge axis, to mount the case again. A wax-up was performed to create a more aesthetically pleasing smile. The patient was shown the new wax-up in order to learn her opinion and to confirm the commitment to move forward with her new smile.
The next step was to duplicate the wax-up into a stone model to create a bead line over impression to be used to fabricate the provisional restorations on the day of the procedure, as well as create a tooth-reduction template4 (Figure 7). To fabricate the bead line over impression, a small, 0.5- to 1.0-mm line was scribed into the stone model on both the facial and lingual aspects of teeth Nos. 7 through 10 as they would be having crowns done on them. A scalpel was utilized interproximally to clean and refine the interproximal area. On teeth Nos. 6 and 11, for which veneers were going to be utilized (rather than crowns), only the facial side of the tooth was scribed at the gingiva for the bead line technique. An accurate, fast-setting VPS material (Template [CLINICIAN’S CHOICE Dental Products]) was syringed around the anterior teeth that would be worked on as well as one tooth beyond on both sides of the arch. A stock anterior tray was then filled with Template and seated on the model. Upon hardening, it was removed, and the excess material was trimmed away (Figure 8).
 |
 |
| Figure 9. The prepared case, along with shade tabs to document the stump shade for the master ceramist. | Figure 10. The final impression, utilizing a Heatwave thermoplastic tray (CLINICIAN’S CHOICE Dental Products) and a VPS impression material (Thermo Clone VPS [Ultradent Products]). |
 |
 |
| Figure 11. The bead line over impression was loaded with a bleach shade provisional material and was allowed to set on the teeth to create the temporaries. | Figure 12. The smile photo immediately after removing the bead line over impression, showing the incredible shape and color of the new smile. |
 |
 |
| Figure 13. The retracted smile photograph showing the new provisionals with ideal shape and contours with no excess provisional material requiring cleanup or adjustment. | Figure 14. The lingual view of the provisional, showing the contours and adaptation. |
 |
 |
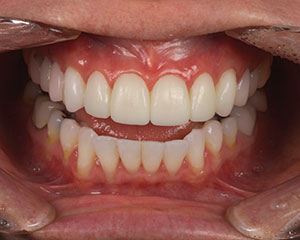
| Figure 15. The final smile, which was approved and cemented, clearly mimics and maintains the appearance of both the provisionals and the diagnostic wax-up. | Figure 16. Retracted view of the final restorations replacing the damaged, old teeth with better function and aesthetics. |
Preparation Appointment
On the preparation day, the patient was anesthetized with a total of 1 carpule of carbocaine and 1 carpule of 2% lidocaine (1:100,000 epi) for each of the maxillary quadrants. Her teeth were first prepared using coarse grit diamond chamfer burs (Brasseler USA) and then finished up with a fine diamond chamfer bur from the Aesthetic Dental Designs Preparation Kit (Brasseler USA). A clear reduction guide was implemented, with holes strategically placed to enable measurement of depth reduction with a periodontal probe. Using an electric handpiece at 4,000 rpm allows for high torque with great precision to modify the gingival margin without damaging gingival tissues, so a SANAO electric handpiece (SciCan) was moved counterclockwise to reduce tooth structure quickly and clockwise to achieve refinement of the margins (Figure 9). A periodontal probe was then used to measure the distance from bone to the margin interproximally so that the laboratory team could create the ideal placement for the interproximal contacts.5 After the tooth structure had been reduced, the gingival sulcus was troughed slightly with a diode laser (Picasso [AMD Lasers]), rather than having traditional retraction cords packed. The ability to minimize any bleeding or sulcular fluids and tissues impacting the impression and creating a small space around the tooth is critical to obtaining a successful impression. The teeth were then photographed so that the laboratory technician could interpret the shades of the preparations. A bite record was taken along with a VPS impression using Panasil (Kettenbach LP) in a Heatwave thermoplastic tray (CLINICIAN’S CHOICE Dental Products) (Figure 10).
Next, the teeth were dried, and the bead line impression was filled with bleach shade acrylic and seated under pressure onto the teeth (Figure 11). Excess acrylic was wiped away with a microbrush. After the provisional material had set, the bead line impression was removed to show a beautiful new smile with no excess material to be removed. No temporary cement was used, and no modifications were made to the new provisionals (Figures 12 to 14). The patient was given postoperative instructions, including diet and hygiene, and was scheduled to report back in 2 weeks to try in the final restorations.
Delivery Appointment
At the next appointment, the provisionals were sectioned off, and the teeth were cleaned. The restorations were tried in for fit and also to allow the patient to see and approve the appearance prior to cementation. After gaining approval for cementation, the restorations were steam cleaned in the office laboratory, and a ceramic primer was placed inside the restorations according to the manufacturer’s protocols for resin adhesion to ceramics.
A total-etch technique was implemented using All-Bond Universal (BISCO Dental Products), and a light-cured translucent shade of resin cement (Choice 2 [BISCO Dental Products]) was placed on the restorations. The restorations were seated, and the gross excess material was removed. Then the restorations were light cured with a curing light (VALO [Ultradent Products]). Next, the remaining excess cement material on the margins was removed with rotary and hand instruments. Any excess resin cement was removed interproximally by using a separating saw (ContacEZ). The occlusion was then checked using 8-μm articulating paper (TrollFoil Articulating Foil [TrollDental]). The patient was very pleased with her new smile, and, more importantly, she was also happy that her bite felt good (Figures 15 and 16).
CLOSING COMMENTS
The patient in this case spent more time in the diagnostic and planning phases so that the clinician could create a known and predictable outcome while ensuring that all therapy was reversible prior to the actual dental work being performed. This strategy provided a reliable blueprint for this patient, which allowed the dentist to easily sequence the case from the pre-restorative work to the preparations and provisional phase and then to the delivery of the definitive restorations. It is important for the clinicians to consider the possibility that more in-depth planning can lead to better case sequencing, more successful results, fewer frustrations, and decreased stress for all involved.
References
- Spear FM, Kokich VG, Mathews DP. Interdisciplinary management of anterior dental esthetics. J Am Dent Assoc. 2006;137:160-169.
- Robbins JW. Differential diagnosis and treatment of excess gingival display. Pract Periodontics Aesthet Dent. 1999;11:265-272.
- Albino JE, Tedesco LA, Conny DJ. Patient perceptions of dental-facial esthetics: shared concerns in orthodontics and prosthodontics. J Prosthet Dent. 1984;52:9-13.
- Snyder TC. Beadline provisionals. Pract Proced Aesthet Dent. 2009;21:E1-E7.
- Tarnow DP, Magner AW, Fletcher P. The effect of the distance from the contact point to the crest of bone on the presence or absence of the interproximal dental papilla. J Periodontol. 1992;63:995-996.
Dr. Snyder received his doctorate in dental surgery at the University of California, Los Angeles (UCLA) School of Dentistry and has trained at the F.A.C.E. institute. He is an Accredited Fellow of the American Academy of Cosmetic Dentistry and is a member of Catapult Education. Dr. Snyder was on the faculty at UCLA, where he created and co-directed the first 2-year graduate program in aesthetic and cosmetic restorative dentistry. In addition to lecturing internationally, he has co-authored 3 books and written numerous articles in publications around the world. He is the owner of Aesthetic Dental Designs in Laguna Niguel, Calif, and also has an online dental education program at legionpride.com. He can be reached at drtoddsnyder.com.
Disclosure: Dr. Snyder reports no disclosures.
Related Articles
Modern Composites for Minimally Invasive Cosmetics
Easier and Faster Aesthetic Bonding: The Keys to Success
The Modern Aesthetic Mixed Restorative Case