


Today, we are starting to see a big increase in patients needing full-mouth extractions, whether they are due to decay, periodontal disease, or infection. Also, as people mature and age, their peridontia are exposed to many more variables that may contribute to the loss of their teeth. For these patients, the biggest concerns are the availability of various treatment options that fall within their budgets, the duration of the surgical and prosthetic processes, and restoring the ability to function as they once did when they had their own teeth. For clinicians, the most common goals are to do the necessary treatments efficiently, effectively, and predictably, all within their comfort zones.
CASE REPORT
Diagnosis and Treatment Planning
In this particular case, the patient was referred to me by her dentist. According to her previous dentist, she had undergone quite a bit of dental work in the maxillary arch, with a combination of porcelain veneers and bridgework several years prior. However, she failed to maintain regular hygiene appointments and proper oral home care. When she finally presented back to her dentist with a concern about the spacing and mobility in her upper and lower teeth, he referred her to me for comprehensive treatment with an all-inclusive approach using IV sedation.
 |
 |
| Figure 1. The retracted, preoperative view. | Figure 2. A CBCT scan using the CS 8100 3D (Carestream Dental). |
During the initial evaluation, all the necessary diagnostic information was obtained, including a review of her medical history, a smile questionnaire, digital photographs, and all necessary radiographs. The clinical examination revealed that this patient had generalized advanced periodontal disease (Figure 1). Most of her teeth had Class II to III mobility with accompanying extensive cervical decay.
Upon reviewing the diagnostic information, it was understood that all of the teeth in this patient’s upper and lower arches needed to be removed. Because of this, the patient was very interested in getting dental implants. In order to identify if this patient was a good candidate, a CBCT scan was taken (CS 8100 3D [Carestream Dental]) to accurately capture the volume of bone required for optimal dental implant placement (Figure 2). The information from the CBCT scan allowed an assessment of the bone height and width, and also the ridge orientation and relationship to anatomical landmarks. After interpreting the CBCT information, it was clear that there was no adequate bone on either side in the posterior maxilla for dental implant placement. If the most distal implants in the premaxilla were placed at angles according to the All-on-4 protocols, the anterior posterior spread would still not be sufficient for a fixed restoration. The patient did not want to undergo any type of sinus augmentation or zygomatic implants due to the extent of those treatments and the additional recovery time required. Using CS 3D imaging software (Carestream Dental), 4 dental implants were virtually planned in the premaxilla region to support a palate-free, metal-reinforced overdenture. In the mandibular arch, there was sufficient bone to plan the placement of 7 dental implants without compromise (Figure 3).
 |
 |
| Figure 3. The CS 3D (Carestream Dental) imaging of the proposed treatment. | Figure 4. The 3DDX (3D Diagnostix) maxillary implant plan. |
 |
 |
| Figure 5. The 3DDX mandibular implant plan. | Figure 6. Atraumatic extractions were done in the maxillary arch using Physics Forceps (GoldenDent). |
Discussion with the patient included the desired treatment plan (surgical and prosthetic phases), identifying the pros and cons as well as providing information about the consequences of a surgical failure in terms of risks, time, and cost. Once the patient confirmed the treatment plan, diagnostic impressions were taken (Silginat [Kettenbach LP]) as well as a bite registration (Futar [Kettenbach LP]). It should be noted that Silginat may be poured up in dental stone multiple times without concern about distortion. The laboratory team would need clear instructions for the proposed position of the teeth for the immediate dentures; digital photographs were forwarded to the dental laboratory team to assist in the positioning of the maxillary and mandibular incisal edges, midlines, occlusion, restorative space, and lip supports.
Since the dental implant placement would be implemented using surgical guides, the information on the CS 3D software was forwarded to 3DDX (3D Diagnostix) for surgical guide fabrication. Once the position of the implants, number of retention pins, and design of the guides were confirmed from both parties (the dentist and 3DDX) through a secure videoconference, fabrication was initiated by 3DDX (Figures 4 and 5).
The next appointment would be for the planned surgery once the patient had obtained a medical clearance from her physician. Our goal was to extract all her teeth, level the bone where needed, place the dental implants with adjunct grafting, and provide provisionals to the patient in one appointment.
Surgical Phase
The patient was appropriately sedated using IV medications, and local anesthetic was administered in both arches. Starting with the maxillary teeth, extractions were done using a pair of Physics Forceps (GoldenDent). These specially designed forceps implement a modified Class I lever movement for the atraumatic extraction of teeth (Figure 6). Once the teeth were extracted, a full-thickness flap was reflected on both the facial and palatal aspects of the ridge using the Reflector (GoldenDent) so that the surgical guide would fully seat without any interference from underlying tissue. Once positioned, sites for the 3 retention pins were prepared on the facial portion of the guide with the AEU 7000 (Aseptico) surgical motor and corresponding handpiece. Once the surgical guide was fully secured (Figure 7), initiation of the drilling sequence using the Guided Implant Kit (OCO Biomedical) at a speed of 800 to 1,200 rpm with copious amounts of sterile saline was begun, followed by the insertion of four 3.25- × 12-mm dental implants (Engage [OCO Biomedical]) (Figure 8) at a speed of 20 rpm until increased torque was necessary. At that point, the ratchet wrench was connected, and the implants were torqued to their final depths, reaching a torque level of about 40 to 50 Ncm. Next, using the Osseous Contouring and Shaping Bur Kit (GoldenDent), any irregular areas of the ridge as well as unwanted remnant tissue were removed. Extended healing caps were placed into the dental implants (Figure 9), followed by a cortical mineralized/demineralized bone grafting material (OCO Biomedical) in areas around the implants and within the sockets. Primary closure was achieved using 4.0 chromic gut sutures (Salvin).
 |
 |
| Figure 7. The CBCT-based maxillary surgical guide. | Figure 8. An Engage (OCO Biomedical) dental implant. |
 |
 |
| Figure 9. The implants were placed for the upper overdenture. | Figure 10. Atraumatic extractions (using Physics Forceps) were done in the mandibular arch. |
 |
 |
| Figure 11. The CBCT-based mandibular surgical guide. | Figure 12. The placement of the implants, abutments, and grafting. |
 |
 |
| Figure 13. The upper and lower provisionals. | Figure 14. The bite registration (Futar [Kettenbach LP]). |
In the lower arch, any remaining teeth were extracted (Physics Forceps) (Figure 10), followed by full-thickness flap retraction using the Reflector. The CBCT-based surgical guide was positioned and secured in the same fashion as the upper guide (Figure 11). Using the OCO Biomedical Guided Implant Kit, the preparations for the osteotomies were performed, followed by the placement of 7 Engage dental implants. Since a fixed provisional restoration was planned, an objective reading, in addition to a high insertion torque, was preferred. Using the Penguin RFA (Aseptico) unit, a baseline ISQ reading was taken, with all averaging over 70 (an indication for adequate immediate loading). Since the ISQ values were favorable, slim stock abutments were tightened to 25 Ncm into the Engage dental implants (Figure 12). The access openings were filled with Teflon tape, followed by Temposil (COLTENE). The lower immediate denture that had already been relieved in the areas of the dental implants was tried in to verify a passive fit. Once confirmed, a plastic cap spacer was placed on each abutment to avoid the restoration locking during the relining procedure with Rebase II Fast (Tokuyama Dental America), a hard reline material. Within 2 to 3 minutes, the material polymerized, so the immediate denture was removed and shaped like a fixed bridge (Figure 13) using the Torque Plus (Aseptico) lab handpiece and an acrylic bur (Komet USA).
 |
 |
| Figure 15. The final prostheses on the models. | Figure 16. The final prostheses in place. |
 |
 |
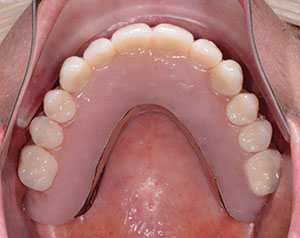
| Figure 17. The maxillary overdenture. | Figure 18. The mandibular porcelain-fused-to-metal bridge. |
Prosthetic Phase
Four months later, the patient presented for impressions for the definitive restorations. The upper restoration would be a palate-free, metal-reinforced overdenture, whereas the lower restoration would be a sectioned bridge. The healing caps in the upper arch were removed, and LOCATOR (Zest Dental Solutions) abutments were placed and tightened to 25 Ncm. Impression posts were then snapped into the overdenture attachments. An impression was taken of each arch using a heavy and light vinyl polysiloxane material (Panasil [Kettenbach LP]) in custom trays. From these impressions, the laboratory team fabricated a wax rim on an overdenture framework for the upper arch and a wax-up of teeth on a porcelain-fused-to-metal (PFM) bridge framework for the lower arch (Figure 14).
Once tried in, marks were made on the upper wax rim for the midline, incisal edge, and smile line. Bite relations were accomplished using Futar Fast Bite (Kettenbach LP) registration material. The dental laboratory team was instructed to place denture teeth in the following wax-up so that the patient could view everything and approve the prosthesis for final fabrication.
Within a couple weeks, the definitive prostheses were completed and delivered to the dental practice (Figure 15). The lower PFM bridge was cemented (Premier Implant Cement [Premier Dental Products]), taking care not to overfill the recesses. The processing inserts in the LOCATOR attachments of the overdenture were changed to the blue attachments (1.5 lbs of retention per cap). The patient was instructed on how to clean and maintain her dental restorations (Figures 16 to 18). In addition, we reviewed the importance of scheduled professional cleanings, the effects of continued tobacco use, and overall oral health habits. With this new, enhanced look, the patient was motivated to care for her investment.
CLOSING COMMENTS
Providing an all-inclusive approach to oral rehabilitation means the patient may benefit from the convenience and savings of staying with one provider from start to finish. With proper training and education, clinicians who seek to deliver this type of treatment may assist more patients in getting on the path to more aesthetic and functional smiles.
Dr. Nazarian maintains a private practice in Troy, Mich, with an emphasis on comprehensive and restorative care. He is a Diplomate in the International Congress of Oral Implantologists and the director of the Ascend Dental Academy. He has conducted lectures and hands-on workshops on aesthetic materials, grafting, and dental implants throughout the United States, Europe, New Zealand, and Australia. He can be reached at (248) 457-0500 or at the website aranazariandds.com.
Disclosure: Dr. Nazarian reports no disclosures.
Related Articles
Focus On: Treatment Planning for Success
Custom Abutment and Monolithic Zirconia: Aesthetic, Cementable Solutions for Complete Edentulism
Implementing a Systematic Digital Workflow


