


INTRODUCTION
The fixed full-arch implant restoration is among the most rewarding types of treatments in dentistry. The clinician is able to provide patients who present with terminal dentition or unstable dentures a fixed solution with the same function, stability, and aesthetics of natural dentition.1 In addition to replacing the patient’s teeth, this implant solution dramatically improves patient comfort, self-confidence, and quality of life.2
Clinicians who provide this service for their patients have commonly encountered a complex clinical procedure requiring numerous appointments and considerable chair time in order to produce the optimal prosthetic design. This clinical inefficiency is caused by many factors, including difficulties in capturing an accurate impression, visualizing where the teeth should be positioned within the restorative space, and correctly recording the jaw relationship of the patient. However, by making full use of the traditional tools and methods and taking advantage of modern innovations like the CAD/CAM provisional implant prosthesis, we can simplify the process, save valuable chair time, and produce a more predictable outcome. Investing more time in properly completing the steps at the beginning of the restorative process can save substantial time in subsequent appointments and result in a more accurate and efficient clinical workflow. There are several key elements of restoration fabrication that can help streamline the process:
- Place multi-unit abutments to correct angulation issues and establish a level restorative platform around the arch. This eases the seating and removal of try-in appliances as well as the restoration.
- Capture the precise position of the implants and how they relate to the positioning of the other implants around the arch. This can be accomplished through the use of an implant verification jig and custom impression tray.
- Determine the correct positioning of the prosthetic teeth in space. This places special importance on taking the time to make all necessary adjustments to the wax rim.
- During the wax rim appointment, accurately record the relationship of the upper arch and the lower arch.
- Provide a provisional implant prosthesis so the patient has a chance to confirm his or her satisfaction with the function, phonetics, and aesthetics of the prosthesis during his or her daily activities before the final restoration is produced.
The following case example illustrates a streamlined clinical workflow for producing a full-arch implant restoration, including the tools, steps, and techniques that can be used at each appointment to achieve a predictable final result. While this process was used to produce a monolithic zirconia implant prosthesis, it can be followed to achieve optimal results for any screw-retained full-arch restoration.
CASE REPORT
Appointment 1: Preliminary Impressions
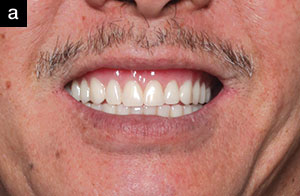
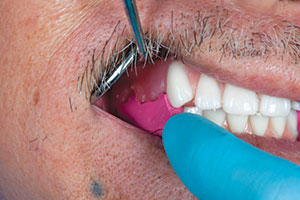
The patient presented with an immediate healing denture over implants placed by another clinician (Figure 1). Desiring maximum function and stability, he had requested a fixed prosthesis for the implant restoration. An assessment of the restorative space determined that there was sufficient room for a fixed full-arch monolithic zirconia implant restoration, which requires a minimum of 8.0 mm of vertical height. A BruxZir Implant Prosthesis (Glidewell) was selected due the strength and durability of solid zirconia, which has been shown to be remarkably durable in full-arch indications.3,4 Note that zirconia is also an optimal material to use in situations of limited restorative space since less vertical height is required in comparison to the screw-retained hybrid denture. Furthermore, with the use of aesthetic zirconia in full-arch indications, we can achieve a beautiful outcome that compares favorably to layered or hybrid prostheses, with a far lower risk of chipping and fractures.
 |
 |
| Figure 1. The patient presented for the restoration of 5 maxillary implants and requested a fixed prosthesis. The implants were correctly positioned around the arch to support a full-ach implant restoration, and intraoral examination revealed that there was adequate restorative space. A BruxZir Implant Prosthesis (Glidewell) was selected for the restoration for its long-term durability and lifelike appearance. |
 |
 |
| Figure 2. A preliminary open-tray impression was made to begin the restorative process. Shown here, the impression tray was tried in to ensure the transfer copings emerged through the holes that were cut in the tray chairside. | Figure 3. A duplicate of the patient’s existing denture was made using a denture duplicating flask. Providing this to the lab is one of the methods that will help ensure that the prosthetic teeth are correctly positioned in space from the very beginning. Furthermore, this provides the clinician with an opportunity to communicate preferences to the dental lab with regard to the patient’s existing appliance. |
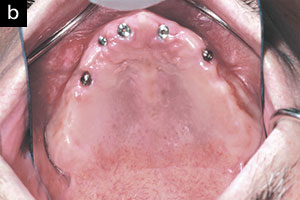
To begin the restorative process, an open-tray, preliminary full-arch impression was taken at the implant level, and an impression of the opposing arch was also taken (Figure 2). Next, a duplicate of the patient’s existing prosthesis was made to aid the lab in the design of the wax rim (Figure 3). This is an underutilized method that can help streamline the restorative process and give the dental lab a better idea of where the teeth should be situated to guide the creation of the wax rim and help determine the positions of the midline and incisal edges.
The preliminary impression and duplicate denture were sent to the lab team along with clinical smile photos. Providing images of the patient’s smile with his or her existing prosthesis in place is invaluable in communicating the desired aesthetics or any changes to the patient’s denture to the lab team and will also help to save time in the appointments that follow.
 |
 |
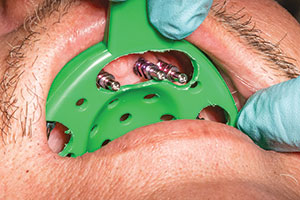
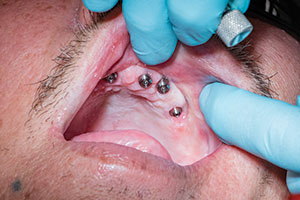
| Figure 4. A combination of straight and angled multi-unit abutments were connected to the implants to create a uniform restorative platform around the arch. The use of multi-unit abutments helps ensure a smooth, efficient restorative process that minimizes patient discomfort, eases the seating of try-ins, and saves time at future appointments. | Figure 5. The individual sections of the implant verification jig (IVJ) provided by the lab were connected to the implants. Then the IVJ was luted together using Camouflage Nanohybrid Composite (Glidewell). By precisely capturing the inter-implant positions in the final impression, the IVJ ensures that an accurate master cast is produced and a passive fit is achieved for the restoration. |
 |
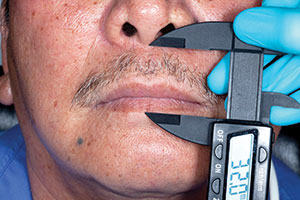 |
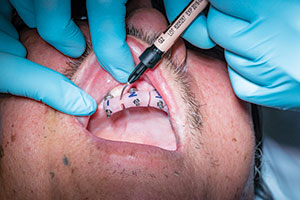
| Figure 6. A custom tray fabricated and provided by the lab team was used, capturing the IVJ and the relative positions of the implants in the final impression. | Figure 7. The wax rim was tried in. After careful evaluation, adjustments were made to fine-tune tooth position, incisal edges, the midline, and other important aspects of the restoration design. Shown here, the vertical dimension of occlusion was taken using a digital caliper, which offers a precise means of recording this measurement. |
Appointment 2: Verified Final Impression, Wax Rim, and Jaw Relationship Records
To begin the second appointment, multi-unit abutments that were selected and provided by the dental laboratory were connected to each implant (Figure 4). This improved the angulation of the posterior implants and brought the restorative platform of each implant equigingival. Multi-unit abutments are essential in ensuring a smooth restorative procedure and predictable outcome. By raising and creating a level restorative platform, multi-unit abutments simplify each subsequent step. It’s easier, less time-consuming, and more comfortable for the patient when seating the wax rim, setup, provisional, and final restoration. In addition, multi-unit abutments help protect the implant-bone junction because the tissue is not disturbed during try-ins and subsequent visits.
Taking a verified final impression is another key step in ensuring a streamlined clinical workflow. Verifying the positions of the implants in relation to one another is crucial in achieving a passive fit of the wax setup try-in as well as the eventual restoration. For this reason, an implant verification jig, fabricated and provided by the lab team, was connected to the multi-unit abutments and splinted together. This ensured a precise representation of the implant positions in the final impression (Figure 5). Then a custom tray, which helps minimize distortion of the impression material, was used to make the final impression (Figure 6). Because the implant verification jig was picked up in the final impression, the lab team was able to create a highly accurate master cast.
 |
| Figure 8. After working with the patient to properly place his jaws in centric relation, care was exercised to record an accurate bite registration. By performing this step correctly, the likelihood of occlusal errors arising later in the process is reduced. |
 |
 |
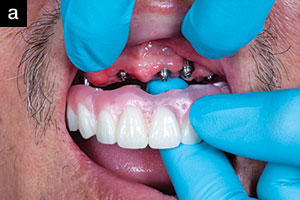
| Figure 9. (a) At the next appointment, the wax setup was seated and connected to the implants with relative ease due to the use of multi-unit abutments. The form, function, and occlusion of the wax setup were confirmed, and a few minor adjustments were made. (b) The midline was verified and found to be accurate. |
 |
| Figure 10. The bite should be confirmed at the wax setup appointment as it’s easier and more efficient to make any occlusal adjustments before the CAD design for the restoration is created. |
When trying in and adjusting the wax rim, it’s important to contour the rim to accurately represent the final positioning of the teeth. In this case, because a duplicate of the patient’s existing denture was made along with the preliminary impressions, the laboratory technician was better able to pre-contour the wax rim and establish the positioning of the teeth. At the chair, adjustments were made to fine-tune the teeth positioning and other aspects of the prosthetic design represented by the wax rim. At this appointment, it’s vital to confirm and make any necessary alterations to the key elements of the restoration design, including midline, incisal edge position, lip support, the smile line/occlusal plane, vertical dimension of occlusion (VDO), and phonetics (Figure 7). Note that engaging fewer of the implants eases the removal and reseating of the wax rim as you evaluate and adjust the wax rim.
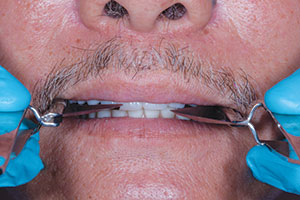
Capturing an accurate bite is essential to eliminate the need for wax reset appointments. After fully contouring the wax rim and measuring the VDO, we practiced putting the patient into centric relation and having him hold that position. Then, with the patient in centric relation, bite registration material was injected (Figure 8). By taking the time to correctly record the jaw relationship, any significant occlusal issues were avoided in subsequent appointments.
 |
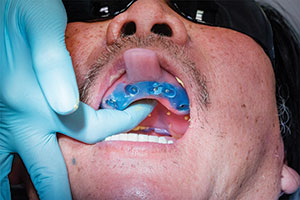
| Figure 11. A provisional implant prosthesis fabricated from the CAD design for the restoration was provided by Glidewell. This afforded an additional opportunity to verify the prosthetic design and to fine-tune the occlusion. |
 |
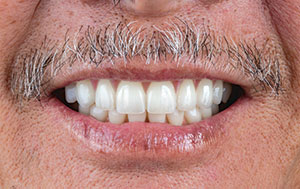 |
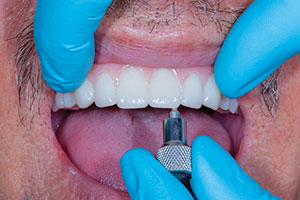
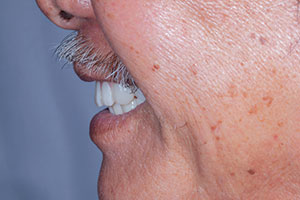
| Figure 12. Profile view of the provisional implant prosthesis in place. Due to the precision of the CAD/CAM process, the aesthetics, function, and phonetics of the provisional perfectly mimicked that of the approved wax setup. The patient wore the provisional for 3 weeks and confirmed that he was satisfied with the restoration design. | Figure 13. The final BruxZir Implant Prosthesis was delivered. It met the expectations of the patient due to the trial period spent with the provisional in place. The patient was thrilled with the lifelike aesthetics of the prosthesis. By taking great care in executing the recommended steps toward the beginning of the restorative process, each subsequent appointment required less chair time, wax resets were avoided, and the restoration was created following a smooth and efficient clinical workflow. |
Appointment 3: Wax Setup Try-In
By following the steps outlined in the previous appointments, the wax setup provided by the lab was accurate and required only simple adjustments. After confirming that the wax setup seated passively, the aesthetics and phonetics were confirmed (Figure 9). Then the patient’s bite was checked (Figure 10). With the midline, occlusal plane, lip support, VDO, and other prosthetic design aspects finalized, the case was returned to the dental laboratory. Upon receipt of the approved wax setup, the lab team scanned the master cast and wax setup and created the CAD design for the monolithic zirconia implant prosthesis. The lab team then fabricated a provisional implant prosthesis that precisely replicated the approved wax try-in, affording the opportunity to confirm the design one last time before the restoration was milled from the BruxZir Esthetic Zirconia (Glidewell).
Appointment 4: CAD/CAM Provisional Implant Prosthesis
The provisional implant prosthesis allowed the patient to “test drive” the restoration. Patients appreciate the opportunity to go home and show their families how the restorations look, test their function, and verify comfort during speaking and eating (Figure 11). In this case, the provisional fit well and required only minor occlusal adjustments (Figure 12). Hygiene instructions were communicated to the patient so he could verify that the restoration could be cleaned properly.
Appointment 5: Delivery of the Final Restoration
After the patient wore the provisional implant prosthesis for 3 weeks, he confirmed that he was happy with the design and ready for the final restoration. The provisional was returned to the dental laboratory so that the minor occlusal adjustments could be implemented in the final CAD design. The final prosthesis was milled from a block of monolithic zirconia, without the need for veneering material, offering maximal resistance to wear, chipping, and fractures. The final restoration was delivered without any complications (Figure 13). Having grown accustomed to the provisional, the patient was extremely happy with the final zirconia restoration.
CLOSING COMMENTS
Although restoring a fixed full-arch implant case can be challenging, by taking the necessary steps, using the proper tools, and investing the necessary amount of time and care during the initial appointments, a smooth, predictable outcome is well within the reach of any dentist who has an understanding of basic denture techniques. Furthermore, with the advent of the digitally fabricated provisional and the monolithic zirconia implant restoration, a beautiful, long-lasting result can be achieved with a great deal of confidence. With growing numbers of edentulous patients requesting the comfort and function of a fixed implant prosthesis, clinicians have every reason to familiarize themselves with a streamlined, reliable clinical workflow for this state-of-the-art restoration.
References
- Brennan M, Houston F, O’Sullivan M, et al. Patient satisfaction and oral health-related quality of life outcomes of implant overdentures and fixed complete dentures. Int J Oral Maxillofac Implants. 2010;25:791-800.
- Preciado A, Del Río J, Lynch CD, et al. Impact of various screwed implant prostheses on oral health-related quality of life as measured with the QoLIP-10 and OHIP-14 scales: a cross-sectional study. J Dent. 2013;41:1196-1207.
- Carames J, Tovar Suinaga L, Yu YC, et al. Clinical advantages and limitations of monolithic zirconia restorations full arch implant supported reconstruction: case series. Int J Dent. 2015;2015:392496.
- Pozzi A, Holst S, Fabbri G, et al. Clinical reliability of CAD/CAM cross-arch zirconia bridges on immediately loaded implants placed with computer-assisted/template-guided surgery: a retrospective study with a follow-up between 3 and 5 years. Clin Implant Dent Relat Res. 2015;17(suppl 1):e86-e96.
Dr. Manalili received her DDS degree from the Stony Brook University School of Dental Medicine, where she won the Hanau Best of the Best: Excellence in Prosthodontic award. She earned an advanced education specialty certificate in postgraduate prosthodontics before joining Glidewell in 2018. As the director of clinical prosthodontics at Glidewell, she conducts clinical research and performs advanced surgical and restorative procedures. She is also a Fellow of the International Congress of Oral Implantologists and has a passion for a restorative-driven approach to implant placement. She can be reached at taylor.manalili@glidewelldental.com.
Disclosure: Dr. Manalili is a member of the clinical R&D team at Glidewell and received compensation for writing this article.
Related Articles
Full-Arch Zirconia Screw-Retained Prosthesis


