|


Today, many practices across the United States are experiencing changes in their practices. There have been increases in no-shows/cancellations and challenges in keeping the treatment schedule full. In today’s economy, more patients than usual are expressing concerns about the status of the economy and how long this recession will last.
During this economical recession, tens of thousands of autoworkers have lost their jobs here in Michigan. The primary concern for most of these patients is not their oral health, but how they will provide for their families and put food on the table. Many of these patients tend to disappear from the practice only to return for emergency dental care.
One population that has been overlooked or avoided by many general dentists is denture wearers. For one reason or another, the denture patient has caused many frustrations for the providing dentist, especially in regards to the mandibular denture. Conventional mandibular dentures for patients with severely atrophic mandibles oftentimes present problems of retention, phonetics, function, and pain due to instability.
Endosseous implants have been successfully used to restore edentulous mandibles with implant-supported fixed bridges, hybrid prosthetic dentures, and removable overdenture prostheses. Many completely edentulous patients desire a fixed restoration rather than a removable prosthesis. “A fixed restoration provides the psychological advantage of acting and feeling similar to natural teeth, whereas an overdenture, even if fully implant supported, remains a removable prosthesis.”1 This article focuses on restoring a patient with a fixed lower bridge supported by implants.
CASE REPORT
Diagnosis and Treatment Planning
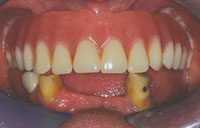
A 67-year-old man presented to our office with a partially edentulous mandible, complaining about the instability of his lower partial denture (Figure 1). The patient was in good health and a nonsmoker. Although some wear facets were noted on the mandibular canines, the patient did not have signs of severe bruxism (Figure 2). In the maxillary arch, he had an existing denture that was approximately 13 years old. On the lower arch, the remaining dentition was comprised of 2 canines (teeth Nos. 22 and 27) and a lower right premolar (tooth No. 28). The patient complained that the right distal portion of the partial had broken off, and that it never really fit very well from the beginning.
Preoperatively, it was important to analyze jaw size, bone volume/density, jaw relations, and interocclusal distance. A panoramic radiograph was also taken to evaluate the positions of the mandibular canal and mental foramina. Upon clinical examination and radiographic interpretation, it was apparent that the patient had sufficient bone in the anterior portion of his mandible for the placement of 5 endosseous dental implants. In fact, by maintaining the remaining anterior teeth for all these years, and not having them all removed and a denture placed, bone was preserved.
The consultation with the patient focused on the advantages of having the ability to restore the lower arch with implants and a fixed bridge. Some of these advantages would include: the psychological effect (“feels like teeth”), less prosthetic maintenance with relines and/or attachment wear, less food entrapment, and maintaining posterior bone. Once the patient was educated in these advantages, he quickly agreed to the proposed treatment plan: fabrication of a new upper complete denture; extraction of teeth Nos. 22, 27, and 28; alveloplasty; bone grafting; and placement of 5 dental implants and a fixed bridge.
Impressions utilizing a polyvinylsiloxane (PVS) material (Take 1 Advanced, Medium Body [Kerr]) were taken of both maxillary and mandibular arches with corresponding bite registration in centric occlusion, so that the lab could fabricate a diagnostic wax-up. In order for the patient to have teeth on the day of surgery, an immediate denture was fabricated for the mandibular arch. Also, a wax trial denture was fabricated to check relations between upper and lower arches. The aesthetic and functional (fit and bite) parameters were then approved by the patient.
Implant Surgery
One hour before the surgery, the patient was premedicated with amoxicillin (2.0 g), dexamethasone (4 mg) and diazepam (5 mg). Local anesthesia (lidocaine [Henry Schein] HCL 2% with 1:100,000 epinephrine) was also administered. Using periotomes and luxators (Dental USA), the remaining lower teeth were extracted. Then, a crestal incision was made, from the position of the right first molar to that of the left first molar. The mandible was exposed, and the mental foramina were identified. The crestal bone in the anterior region was reduced, under profuse irrigation with sterile saline solution, to create a 4- to 5-mm wide bone platform to accommodate the dental implants. A clear duplicate of the immediate lower denture with 3 radiopaque markers (Premise Flow [Kerr]) was seated. Then, a panoramic radiograph was taken to further identify the relationship of the proposed treatment and location of the mental foraminae/mandibular nerve.
The arch form and the position of the mental foraminae are important criteria when placing implants in the anterior segment to replace the entire mandibular arch. “The anterior arch form and foraminae position affects the position of the distalmost implants and the anterior arch form (square, oval, or tapering) is relative to the anteriomost implant position. The distance from the center of the most anterior implant to a line joining the distal aspect of the 2 most distal implants on each side is called the A-P Distance, or the A-P Spread. The greater the A-P Spread, the further the distal cantilever may be extended to replace the missing posterior teeth.1
|


“The most common number of implants used today in the Bränemark treatment option is 5. This number allows as great an A-P Spread as 6 implants, with greater inter-implant distance, so that if bone loss occurs on one implant, the loss would not automatically affect the adjacent implant site.”1 As a general rule, when 5 implants are placed in the anterior mandible between the foramina, the cantilever should not exceed 2.5 times the A-P Spread, with all other force factors being low.
Utilizing the BioHorizons surgical kit, a 2.0 mm starter drill was placed into the central site and advanced to a depth of 10 mm, measuring from the bone surface. A parallel pin gauge was placed in the site of the osteotomy, and then a radiograph was taken to evaluate the osteotomy position and angle. Once verified for angulations, the remaining implant areas were prepared in the same manner (Figure 3). Following the 2.0 mm starter drill, a 2.5 drill (with stop) was used to increase the osteotomy depth and width. Next, in the anterior 3 locations, the length of the osteotomies was extended to 15 mm and the 2 most distal sites were extended to 10.5 mm. After getting to depth with the 2.5 mm drill, larger sized drills (0.5 mm increments) were used to widen the osteotomies, so that 4.0 mm x 15 mm implants were placed in the anterior 3 positions, and 5 mm x 10 mm implants were placed in the most distal sites (Figure 4). This gradual removal of bone reduces heat generation in the surrounding tissue. The cutting flutes of this system extend the length of the drill body and collect bone that may be saved for intraoperative grafting procedures. At this point, one more panoramic radiograph was taken to verify the positions of the implants (Figure 5).
Once the position of the implants was confirmed, the 3inOne Abutments (BioHorizons) used for driving the implants into the osteotomy were removed and replaced with transmucosal healing abutments. Soon afterwards, the remaining extraction sites were grafted with Beta Tri-Calcium Phosphate (Cerasorb [Riemser]) (Figure 6) and covered with a membrane (Epiguide [Riemser]). The soft-tissue flap was then re-adapted over the ridge, allowing the transmucosal abutments to protrude for single-stage surgical protocol. The flap was then closed with 4.0 PGA polyglycolic acid synthetic absorbable sutures (Salvin Dental Specialties).
Following the surgery, the new upper denture and lower immediate denture were tried-in for accuracy and pfit. The lower immediate denture was relieved in the areas of the transmucosal abutments, and then relined with a soft reline material (GC Reline [GC America]). The patient was asked to return the next day for a postoperative visit, and then again in a week for another postoperative visit. At both appointments, the patient stated he felt well, and that he had not experienced any severe pain following the surgery.
Work Begins on the Final Prosthesis
Five to 6 months after the surgery, the patient presented for impressions for the final fixed prosthesis (Figure 7). The transmucosal abutments were removed, and the 3inOne Abutments were placed with ball top impression screws into the implants. A full-arch PVS impression (Take 1 Advanced Super Fast [Kerr]) (Figure 8) was taken using a stock plastic tray (Vista Dental Products). In addition, a full-arch bite registration (using sideless triple-function trays [GC America]), and an AlgiNot (Kerr) impression of the opposing denture, were taken. The dental laboratory team then fabricated the complete upper denture utilizing BlueLine (Ivoclar Vivadent) teeth (Figure 9).
Try-in Appointment
The lower PFM fixed restorations were also fabricated, and returned to our office in a bisque-baked stage for try-in. When the patient returned for a try-in appointment, he was immediately pleased when we placed the new upper denture. Next, the prepared 3inOne Abutments and the PFM bridge were tried-in; as a result of observations made during the try-in, the dental laboratory technician was instructed to shorten the incisal edges of this restoration approximately 1.0 mm, and to then complete the technical work on the restoration.
Final Delivery
At delivery, the abutments were connected to the implants by fastening the titanium retaining screws with the torque wrench to 20 Ncm. Radiographs were taken to ensure that the abutments were fully seated. The fixed partial denture (Figure 10) was then tried-in to verify marginal adaptation and fit. Once a radiograph was taken to verify the complete seating of the restoration, any necessary occlusal adjustments were made and polished.
The exterior portion of the fixed partial denture was coated with a separating medium, and the restoration was cemented with Maxcem Elite (Kerr), a self-etching resin cement. Excess cement was easily removed from the margins (Figure 11) before final curing with the Demi curing light (Kerr) for 20 seconds. No finishing of the cement was necessary along the margins. The overall health and structure of the soft tissue and restorations were very good. The patient was extremely satisfied with the definitive results (Figure 12) and was given oral hygiene instructions to do at home and given a follow-up schedule.
CONCLUSION
No provider wants to convert a patient who is partially to fully edentulous without planning for stability and retention in the final prosthesis. Although overdentures help in alleviating a lot of the problems associated with dentures, they do not always fulfill every patient’s demands for function and comfort. There are numerous prosthetic options to restore the completely edentulous mandible. One of these options involves the use of dental implants and a fixed complete denture. If the remaining bone permits, placing dental implants and restoring with a fixed partial denture allows the patient to function without pain and discomfort. Most of all, implementing this type of treatment option not only satisfies the patient’s aesthetic, functional, and psychological needs, but it also preserves bone.F
Acknowledgement
The author wished to thank Scott Ward (Ward Dental Lab [a DTI Laboratory] in Brighton, Mich) for the fabrication of these restorations, and Dr. Carl Misch for his mentorship in implantology.
Related Study
Dental practitioners interested in implants should consider post-graduate teaching institutions like the Misch Institute (misch.com), and organizations like the International Congress of Oral Implantologists (icoi.org) for more information and training.
Reference
- Misch CE. The completely edentulous mandible: Treatment plans for fixed restorations. In: Misch CE. Contemporary Implant Dentistry. 3rd ed. New York, NY: Mosby (Elsevier); 2007: 327-364.
Dr. Nazarian maintains a private practice in Troy, Mich, with an emphasis on comprehensive and restorative care. He has earned a Fellowship and Mastership in the International Congress of Oral Implantologists, and his articles have been published in many of today’s popular dental publications. He is the director of the Reconstructive Dentistry Institute. He has conducted lectures and hands-on workshops on aesthetic materials and dental implants throughout the Untied States, Europe, New Zealand, and Australia. He is also the creator of the DemoDent patient education model system. He can be reached at (248) 457-0500 or via the Web site aranazariandds.com.
Disclosure: Dr. Nazarian reports no conflicts of interest.