|
INTRODUCTION
In an age where modern restorative composites have embraced nanotechnology, come in a variety of curing modes, and are available in literally dozens of shades and opacities, some limitations remain unchanged. Even with significant improvements, volumetric shrinkage (polymerization shrinkage) and shrinkage stress are still a major clinical consideration for virtually all direct composite resins products.1 Polymerization shrinkage, with the associated stresses that it causes, can directly lead to postoperative discomfort, marginal leakage, and recurrent decay. It also makes bulk filling impractical, slowing down the restorative procedure by requiring incremental placement and the curing of thin layers.2 Though many composite resins are described as fluoride releasing, once fully set, actual free fluoride release is minimal.3 Composites remain highly hydrophobic and ideally should not be placed in areas where moisture control is difficult. And finally, whether you prefer “etch and rinse” or “self-etching” products, composite resin fillings still require the application of a separate bonding adhesive.
Glass ionomers (GIs) were first introduced as a direct restorative material to dentistry in 1972 by Wilson and Kent.4 Though they have claimed the vast majority of the world’s cementation market, the restorative versions have never quite received the popularity and acceptance of direct composites. Indeed, there are some well-known limitations for “conventional” GI restoratives when compared with composite resins. They are somewhat weaker than composites, making them more likely to chip or wear when placed into stress bearing areas. The water trapped within their hydrogel matrix refracts light, making the GIs more opaque than restorative composites.
Yet, even as the popularity of aesthetic restorations grew, manufacturers of GIs have been actively working to address these limitations. The addition of reinforcing fillers and changes in the powder technology has improved handling, wear resistance, and aesthetics.5 One of the most important advances was the incorporation of water soluble acrylic monomers like HEMA and appropriate light-curing initiators to a GI base. This modification became known as “resin modified GIs” (RMGIs). RMGIs are still true GIs and retain GI functionality, but permit “on demand” visible light-curing. This greatly improves the early strength of the restoration and affords greater protection of the maturing hydrogel matrix.
Compomers are often thought of in the same context as RMGIs; however, they are significantly different.6 They start out with a composite base and add some fluoride-releasing GI powder particles. Compomers are really composite resins and cannot generally be used without dental adhesive. However, while the limitations of GI restorative materials are well known, they also bring a number of real clinical benefits to the table and should still be considered a part of every dentist’s restorative armamentarium.
The greatest benefit of GIs is that they are inherently hydrophilic and demonstrate good tooth adhesion in the presence of moisture. This allows them to be utilized in many clinical situations where composites would be likely to fail. True GIs (and most RMGIs) can be used successfully without etching the tooth, and thus can be consistently and reliably placed without inducing postoperative sensitivity.7 Indeed, the fact that they do not require the use of a separate adhesive application can save valuable operative time, reducing possible incompatibilities between the adhesive and restorative composite.
Unlike composite resins, GIs do not experience volumetric shrinkage during setting. As previously mentioned, polymerization shrinkage of composite resin has been recognized as one of the key factors in postoperative sensitivity, marginal staining, and leakage and recurrent decay. By eliminating volumetric shrinkage, GIs can be readily placed with bulk filling techniques that save additional chair time and help reduce or eliminate some of the other complications mentioned above when using composite resin.
Finally, GIs release clinically significant amounts of fluoride. There is a very high early release of fluoride from the hydrogel matrix followed by a slow and extended release of fluoride ions from the fluoro-alumino silicate glass particles. Unlike composite resins, GIs can also be “recharged” with fluoride after the restoration is set.
While they might not be a restorative dentist’s first choice for the anterior restoration with high aesthetic demands, the unique properties of GIs should certainly make them one of the first choices for certain posterior cases. Special needs patients as well as geriatric and pediatric patients can often benefit from the higher fluoride release. All of those classes of patients might also appreciate the shorter treatment times afforded by the possibility of placing the restoration in bulk rather than layers.
|
NEW RESTORATIVE SYSTEM INTRODUCED RECENTLY
Recently a new clinical system called EQUIA (GC America) was introduced, which utilizes a packable, second generation GI restorative material (GC Fuji IX GP EXTRA [GC America]), and a nanofilled, lightcurable resin coating (G-COAT PLUS, [GC America]). These 2 materials appear to behave synergistically. The GI material can be placed in bulk and is packable to ensure good contact and adaptation to cavity margins. Even with a large restoration, it is ready to finish and polish in just 2 minutes, 30 seconds. Recent studies have shown that the application of a thin layer of the light-cured resin coating improves the flexural strength of the GI by as much as 90%.8 The resin coating also improves marginal integrity and reduces polishing time of the restoration. EQUIA is described by the manufacturer as suitable for G.V. Black Class I, II (nonstress bearing), and V posterior restorations.
This article features a case report using the EQUIA, showing how to use the system, and demonstrating the excellent aesthetics that can be achieved.
CASE REPORT
Diagnosis and Treatment Planning
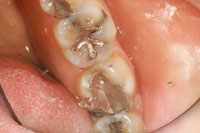
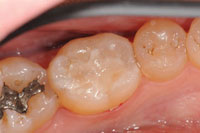
A 58-year-old male patient was seen for a routine replacement of a defective amalgam restoration on the occlusal surface of tooth No. 30 (the mandibular right first molar). A separate amalgam restoration on the buccal surface was not defective; however, it was the patient’s preference to replace both restorations at this clinical intervention. The prior amalgam restorations were both modest in size, and the patient had no history or signs of parafunction or bruxing.
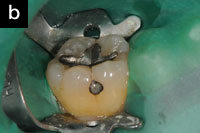
EQUIA restorations were chosen for this case because we wanted the patient exposed to a higher level of fluoride and because he was very anxious about treatment. This bulk fill system allowed us to shorten his treatment time, reduce the possibility of post-treatment sensitivity and make the appointment more pleasant for him. Figure 1 demonstrates the pretreatment view of the defective occlusal amalgam restoration.
Clinical Technique
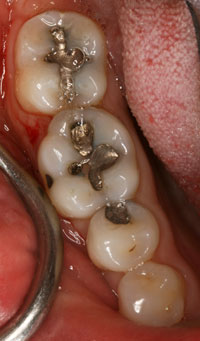
Following local anesthesia, a rubber dam was applied. The use of a rubber dam with EQUIA is optional. However, the author routinely uses one for all amalgam replacement procedures to protect the patient from exposure to amalgam debris and to help control moisture, the tongue, lips, and operative field. Figures 2a and 2b show the isolation achieved with the rubber dam and a better view of the old Class V facial restoration.
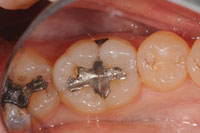
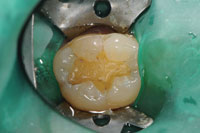
After onset of local anesthesia, the old amalgam restorations were removed and the prep was completed with a No. 330 carbide bur (SS White Burs). A conventional direct adhesive cavity preparation design was utilized. No special undercuts or retentive features were utilized, as they are not required for this GI material. As the cavity preparations did not encroach on the pulp, no pulp protection was required. No recurrent decay or sclerotic dentin was observed under the old restorations. Figure 3 shows the completed Class I cavity preparation.
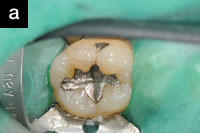
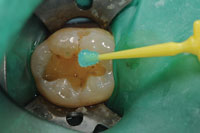
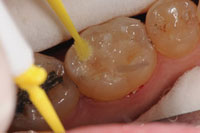
Following cavity preparation, the operator can move directly to placement of the restorative material. However, it has been reported that the use of a mild cavity cleanser or dentin conditioner will facilitate removal of the smear layer and improve the bond between the tooth and the GI restoration.9 This step is described as “optional” by the manufacturer. In this particular case, we did elect to utilize a mild polyacrylic acid solution (Cavity Conditioner [GC America]). The material was applied to the cavity preparations for 10 seconds using a bonding brush (Figure 4) and then rinsed from the cavities with copious water spray. Following rinsing, the tooth was left moist and was then ready to receive the GI restorative.
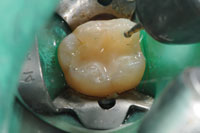
An appropriate shade of GI restorative was selected (GC Fuji IX GP EXTRA is available in 8 VITA classic shades). The unit dose capsule was activated according to the manufacturer’s directions and mixed for 10 seconds. The mixed capsule was placed in the clinical dispenser and syringed directly in the 2 cavities within 10 seconds (Figure 5). Once mixed, the GI material rapidly develops viscosity, is dispensed, and can be briefly shaped and contoured with a suitable plastic instrument. The total working time for the restorative material in EQUIA is a relatively short: one minute and 15 seconds from the start of the mix. It is fully set at 2 minutes, so there is limited opportunity to manipulate it. In the author’s opinion, it is better to develop final contour and anatomy with rotary instrumentation after the material is fully set, thereby allowing it to set undisturbed while forming its initial bond to the margin and cavity preparation.
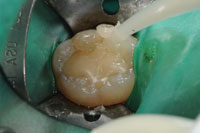
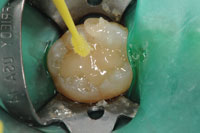
Keeping with this same train of thought, recent research has demonstrated that a resin coating significantly improves the mechanical properties of the final GI restoration. Therefore, the GI restorative should immediately be coated with a self-setting varnish or light-cured resin coating to protect the developing hydrogel matrix from contact with saliva and other contamination (Figure 6) and to improve mechanical properties.10,11 In this case, we utilized a light-cured resin coating material G-COAT PLUS from EQUIA, which is applied with a brush and light-cured for 20 seconds. The final setting time of the restorative material is 2 minutes and it can be equilibrated, finished, and polished 2 minutes and 30 seconds from the start of the mix. Contouring and finishing were accomplished using super fine diamonds under water spray (Figure 7). Occlusion was verified in the standard manner with articulating paper (Figure 8). The final polish was achieved using a light-cured liquid polish, G-COAT PLUS. The adjusted and finished restoration was isolated with standard techniques, dried thoroughly, and the resin coating is painted on with the supplied microtip applicator (Figure 9). The liquid polish coating is light-cured for 20 seconds and should not be air-thinned to avoid oxygen inhibition of the coating.
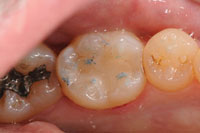
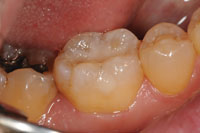
The final Class I and V restorations are shown in Figures 10 and 11. Note the excellent aesthetics, which are certainly comparable to that of a direct composite.
CLOSING COMMENTS
While direct composites have become the preferred aesthetic material for restoring posterior teeth, they are far from perfect for every clinical case. The latest generation of restorative GIs offers unique properties and advantages and should be considered an excellent alternative to composites.
The introduction of EQUIA utilizes a second-generation GI which is infiltrated on the exposed surface by a light-cured resin coating. This extremely rapid system offers the advantages of high fluoride release, tolerance for moisture, bulk placement, absence of postoperative sensitivity, and it does not require the separate application of a dental adhesive. The Class I and Class V restorations demonstrated in this article also demonstrate the excellent aesthetics one can create when using this system. This system should be considered for posterior restorations in the geriatric, pediatric, or special needs patient, where its clinical advantages would be beneficial.
References
- Alomari Q, Ajlouni R, Omar R. Managing the polymerization shrinkage of resin composite restorations: a review. SADJ. 2007;62:12-16.
- Park J, Chang J, Ferracane J, et al. How should composite be layered to reduce shrinkage stress: incremental or bulk filling? Dent Mater. 2008;24:1501-1505.
- Attar N, Onen A. Fluoride release and uptake characteristics of aesthetic restorative materials. J Oral Rehabil. 2002;29:791-798.
- Wilson AD, Kent BE. A new translucent cement for dentistry. The glass ionomer cement. Br Dent J. 1972;132:133-135.
- Mount GJ, Tyas MJ, Ferracane JL, et al. A revised classification for direct tooth-colored restorative materials. Quintessence Int. 2009;40:691-697.
- Ruse ND. What is a “compomer”? J Can Dent Assoc. 1999;65:500-504.
- Sidhu SK. Clinical evaluations of resin-modified glass-ionomer restorations. Dent Mater. 2010;26:7-12.
- Kato K, Yarimizu H, Nakaseko H, et al. Influence of coating materials on conventional glass-ionomer cement. J Dent Res. 2008(spec issue B); Abstract 0487.
- Hajizadeh H, Ghavamnasiri M, Namazikhah MS, et al. Effect of different conditioning protocols on the adhesion of a glass ionomer cement to dentin. J Contemp Dent Pract. 2009;10:9-16.
- Karaoğlanoğlu S, Akgül N, Ozdabak HN, et al. Effectiveness of surface protection for glass-ionomer, resin-modified glass-ionomer and polyacid-modified composite resins. Dent Mater J. 2009;28:96-101.
- Miyazaki M, Moore BK, Onose H. Effect of surface coatings on flexural properties of glass ionomers. Eur J Oral Sci. 1996;104(5-6):600-604.
Dr. Pitel is a 1982 graduate of Temple University College of Dentistry. He is a currently an associate clinical professor at Columbia University College of Dental Medicine and co-director of predoctoral and CDE aesthetic programs. He maintains private practices in Poughkeepsie, and Manhattan, NY. He has published numerous scientific papers and is the author of a textbook on dental impression taking. He has received his fellowship from the American College of Dentists, the AGD, and the International Academy of Dentofacial Esthetics. He holds Level II certification from the Academy of Laser Dentistry and has been recognized by Who’s Who in Dentistry. He can be reached at mlp@drmarkpitel.com.
Disclosure: Dr. Pitel reports no conflicts of interest.