
The “dental domino effect” has progressed past filling the tooth, past root canal, to longitudinal fracture, to extraction (Figure 1).
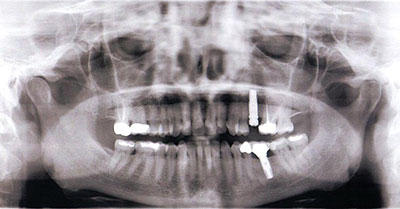
Tooth No. 13 has been replaced with a titanium dental implant. The implant has integrated in the bone (Figure 2).
Six months later, a custom abutment was tightened in and a permanent crown processed and bonded onto the abutment.
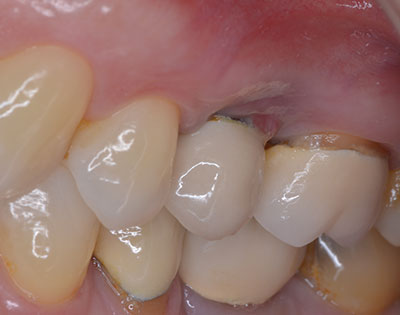
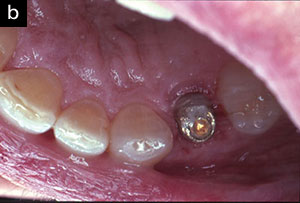
A year later, another domino is ready to crash down on tooth No. 13. Suppuration, 10 mm pockets upon probing, and loss of attachment surround the implant. Peri-implantitis is breaking down the supporting structures of the restored implant replacing No. 13 (Figures 3 and 4).
Laser dentistry has 2 answers to treating peri-implantitis: remove the ceramic implant crown for access for surgery and eliminate occlusal trauma during healing, and the surgical technique Laser Assisted Peri-Implantitis Procedure (LAPIP) Protocol (Millennium Dental Technologies).
If your patient has or develops periodontal disease, progression infects the implants and develops peri-implantitis. This condition can cause failure and loss of the implants. Some progression of periodontal disease is present in 80% of adults with dental implants. We need to define periodontal disease and address these effects and treatment needs necessary to maintain and protect oral health.
Periodontal disease is an infection of the tissues that surround natural teeth. It is caused by the accumulation of bacteria (long-term plaque and microfilm). It’s progressive, causing the structures that support teeth to break down. As supporting tissues are damaged, pockets develop around the teeth. Untreated, more gingiva is destroyed and infection spreads down the roots to infect bone. Even healthy teeth become loose, fall out, or need to be extracted. Periodontitis is the primary cause of adults losing their teeth. Gingivitis is the milder and reversible form of periodontal disease. No bone loss, yet.
Peri-implantitis is periodontitis occurring around a dental implant. This condition results with bone loss; red, inflamed tissue; gingival recession; and eventual loss of the implant itself. Early diagnosis and treatment are important to save the implant and return the whole mouth to health. Peri-implantitis develops from poor oral hygiene and complications from other systemic conditions and diseases.
Treatment for a failing implant is a surgical procedure to remove the infection, suppuration, and endotoxins and then to regenerate the lost tissue and bone supporting the implant. Laser-assisted periodontal surgery has been developed to destroy these periodontal pathogens. The specific therapy is LAPIP (a modification of the Laser Assisted New Attachment Procedure [Millennium Dental Technologies]) using a free running, true-pulsed Nd:YAG laser (PerioLase MVP-7) to target and destroy the toxins, save the healthy tissues, and allow the body to heal the area. All this without damaging the surface properties of the titanium implants.
All periodontal treatment is aimed to kill bacteria, reduce pockets, repair the damage, and regenerate bone and attachment tissues. If left untreated, periodontal disease will progress.
CASE 1
Diagnosis and Treatment Planning
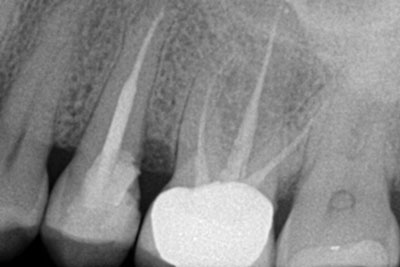
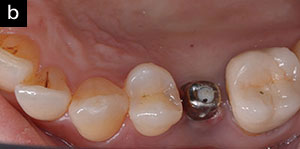
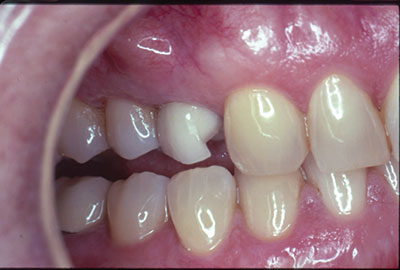
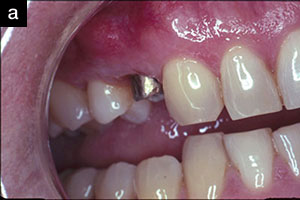
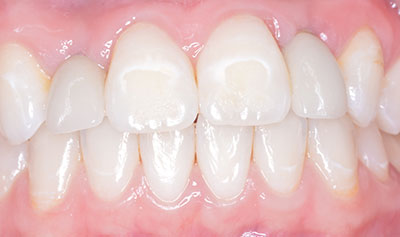
A 57-year-old female presented with pain and swelling in the upper left quadrant (Figure 1). A layered zirconia crown (Prismatik CZ [New Image Dental Laboratory]) had been bonded with a resin cement (RelyX Unicem [3M]) 11 months previously on a custom CAD/CAM titanium abutment to replace tooth No. 13. A Biomet 3i T3 Tapered 5/4 x 15 mm implant had been placed into the receptor site and allowed to osseointegrate. Four months passed before torque testing and beginning the restorative work (Figure 2). Now, LAPIP on tooth No. 13 would be the indicated treatment (Figures 3 and 4).
CASE 1
|

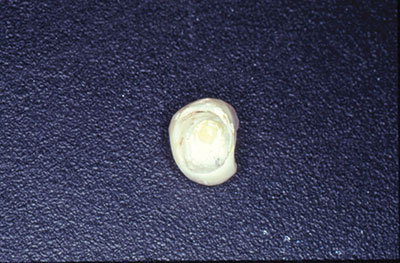
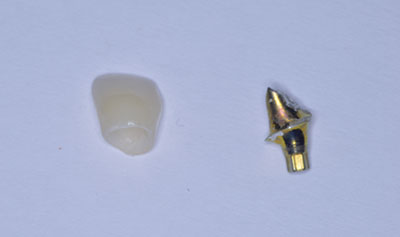
To allow access during periodontal treatment, erbium laser crown removal would detach the crown from the abutment on No. 13 in one piece. The same crown would be recemented after initial healing in 3 to 4 weeks.
The PowerLase (Fotona), now called Lightwalker AT (Technology4Medicine), erbium lasers have the necessary peak power, pulse widths, and variable durations to remove ceramic crowns.
Treatment Protocol
Local anesthetic (one carpule 2% carbocaine [1/20,000 levonordefrin]) was infiltrated for the periodontal surgery (not for the crown removal). With all the required laser safety and regulatory compliances observed, the zirconia (Prismatik) crown was removed using the PowerLase AT laser system with a 90° Optical Handpiece Model R14-C, utilizing an 8 mm/1.0 m cylindrical quartz tip.
Laser Parameters:
- Wavelength = 2,940 nm free running pulsed erbium:YAG laser
- Peak Power = 3.0 W
- Pulse Energy= 200 mJ per pulse
- Repetition rate = 15 H
- Pulse width = Super Short Pulse (SSP) 50 μsec
- Water 4/Air 2 spray
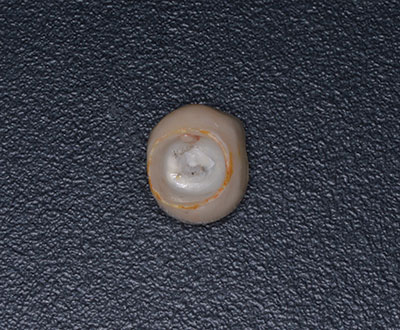
Only the erbium laser was used with the tip in near contact with outer surfaces of the layered zirconia crown. Focal distance from the fiber tip was at 0.7 mm; using the shortest pulse width (50 μsec) to increase the photoacoustic response; slow movement of tip to increase the power density; pulse repetition rate was set at a frequency
of 15 pulses per second; starting on the occlusal surface, slowly painting back and forth over all surfaces; then to the buccal surface, moving back and forth, top to bottom; then to the lingual, starting at occlusal. The crown was popped off with a scaler. In less than 2 minutes, the crown had been removed (Figures 5 and 6).
The one-appointment LAPIP protocol will reduce inflammation, allowing healthy tissue and bone to regenerate.
The upper left quadrant was scaled and root planed; EMS Piezon Master 600 (Electro Medical Systems) with irrigation was utilized. The crown was left off. The site was noted to be healing well at postoperative evaluations at one week and 3 weeks after the surgery. At 3 weeks, the crown was cemented with a resin cement (RelyX Unicem). The patient was placed on a 3-month periodontal maintenance schedule.
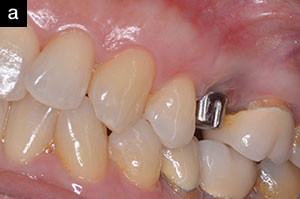
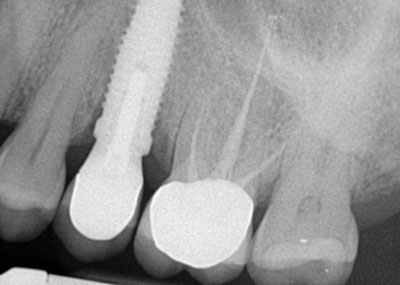
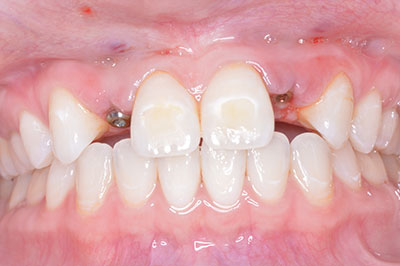
Periodontal maintenance observed no signs of inflammation, no further loss of gingival tissue, and no mobility. The site was asymptomatic. A digital radiograph at 8 months post-op shows bone regeneration. To allow continued healing, no probing or instrumentation of the surgical site was done during the first year (Figure 7).
CASE 2
Diagnosis and Treatment Planning
A patient presented with a layered zirconia crown (Prismatik CZ) that had experienced fracturing of the layering porcelain just 6 weeks after it had been cemented over an implant (in the tooth No. 12 position). The crown had been cemented using a self-etching and self-adhesive resin cement.
Treatment would consist of removing the crown using an erbium laser and returning the original impression/models to the laboratory team to remake a monolithic zirconia crown (BruxZir [Glidewell Laboratories]). Tooth No. 12 was replaced with a Biomet 3i OSSEOTITE Certain implant (4.0 x 11.5 mm) and a UCLA screw-retained cast gold implant abutment (Figure 8).
CASE 2
|
Treatment Protocol
The Prismatik CZ crown was removed using the PowerLase AT laser system with an Optical Handpiece Model R14, 8/1.0 cylindrical quartz tip. (Note: No local anesthetic was administered in this case.)
Laser Parameters:
- Wavelength = 2,940 nm
- Power = 1.6 W 200 mJ
- Repetition rate: 8 H
- Pulse width: SSP 50 μsec
- Water 4/Air 2 spray
The PowerLase AT erbium laser was used with quartz tip in contact with the ceramic, with slow movement of the tip to increase power density; pulse repetition rate was set at a frequency of 8 pulses per second; starting on the occlusal surface, slowly painting back and forth over all surfaces; then to buccal surface, back and forth top to bottom; then to lingual, starting at the occlusal aspect, brushing across the lingual surfaces side to side, moving toward gingival. The crown popped off with a scaler.
Note the cement left on abutment and inside the zirconia coping crown. The abutment was temporized with a composite crown, and the patient returned at a later date for cementation of the replacement crown (Figures 9 and 10).
CASE 3
Diagnosis and Treatment Planning
A 21-year-old female was congenitally missing teeth Nos. 7 and 10. Nobel Biocare 3.0 x 13 mm implants were placed and osseointegrated after orthodontic treatment (Figure 11). The restorative components were leucite-reinforced porcelain crowns (IPS Empress [Ivoclar Vivadent]) cemented onto Gold Hued NobelProcera Titanium Alloy abutments (Nobel Biocare). Clinical Screw Conical Connection 3.0 (Nobel Biocare) was used. A light-cured provisional filling material (Clip [VOCO America]) was placed in the screw access and light cured. The crowns were bonded using RelyX Unicem resin cement (Figure 12). Upon checking the occlusion, both the crowns and abutments fell out and the abutment screws had fractured.
CASE
|


The screw fragments were removed from the implants. Definitive treatment would be laser crown removal of the crowns from the abutments, then replacing the screws and re-cementing the crowns (Figure 13).
Treatment Protocol
The IPS Empress crowns were separat
ed from the abutments using the PowerLase AT laser system with an Optical Handpiece Model R14, 8/1.0 cylindrical quartz tip out of the mouth holding abutment with a crown gripper.
Laser Parameters:
- Wavelength = 2,940 nm
- Power = 1.85 W 235 mJ/pulse
- Repetition rate = 8 H
- Pulse width = SSP 50 μsec
- Water 4/Air 2 spray
The PowerLase AT erbium laser was used with a quartz tip in contact with the ceramic, with slow movement of the tip to increase power density; pulse repetition rate was set at a frequency of 8 pulses per second; starting on the gingival margins and moving up the facial surfaces, slowly painting back and forth over all surfaces; then to the lingual surface, back and forth bottom to top. The crowns popped off with finger pressure (Figure 14).
Note the cement left on the abutment and inside the all-ceramic (IPS Empress) crown. The clip and hub of the screw were removed from the abutment. The internal surfaces of the crowns were prepared with air abrasion, etched, and silanated. With new screws and care to torque below 15 Ncm, the abutments were inserted and the crowns re-bonded.
CLOSING COMMENTS
These case studies serve to demonstrate the author’s erbium laser protocols to remove all-ceramic crowns in one piece in under 2 minutes. This quick and safe method works for leucite-reinforced, zirconia/layered zirconia, and lithium disilicate all-ceramics without damaging the restorations, the underlying abutments, or the implants.
Dr. Cranska practices full-time laser and family dentistry in Severna Park, Md. He has Advanced Proficiency Laser Certification from the Academy of Laser Dentistry and Standard Proficiency and Training Certification from the Institute for Advanced Laser Dentistry. He can be reached at (410) 975-9331 or via the email address [email protected].
Disclosure: Dr. Cranska has no financial interest in any laser company; however, he is compensated as a clinical consultant for presenting, lecturing, and training by the Institute for Advanced Laser Dentistry, Millennium Dental Technologies, and Fotona LLC.

