There are many ways to fabricate removable dentures connected to implants. Although this author and many others have constructed over-dentures with just 2 available implants, having at least 3 or 4 is certainly more desirable. It allows for the potential loss of a structure in the future without complete compromise of the case. Also, the additional structures provide better distribution of forces and stability to the denture in function.
The case presented in this article was re-made after loss of one of the implant structures. We did not have the opportunity to create the original design and position of the implants. The remaining implants did allow us to create a very stable and functional result.
Many different designs are available as well as a host of different types of attachments. In my experience, I have found the bar assembly with Hader clips to be the best. One of the criticisms of the bar-type assembly is the space it takes up in the denture. This can lead to fractures in the denture later on. The case shown in this article suggests a method not only to eliminate this problem but actually to enhance the strength of the denture.
CASE REPORT
The patient presented with the remains of her old Hader bar, which had been sectioned due to the loss of one of her fixtures (Figure 1). The design of this bar created excessive accumulation of plaque and tartar, causing constant inflammation around the implants and in the tissue area below the bar. The inability to properly maintain and cleanse the area around the bar and attachments could easily have been one of the contributing factors in the loss of her lower left implant. Also, the design of the original bar directed all of the attachment forces in the anterior section. This type of retention would lead to the posterior section lifting and placing excessive pressure in the anterior section.
 |
| Figure 1. Old Hader Bar. |
Our design in the new denture created a better distribution of forces (Figure 2).
 |
 |
| Figure 2. New Hader Bar. | Figure 3. Implants as placed |
We removed the original bar and placed new impression copings (Figure 3). As with the construction of any denture, we then went through the standard steps of bite blocks and wax try-in prior to the construction of the bar. This was done to prevent any surprises in terms of not having enough vertical dimension on the lower to allow for the bar and the cast metal housing for the Hader clips (Figure 4). The bar was then tried in for accuracy of fit and verified with radiographs (Figure 5).
 |
 |
| Figure 4. Metal housing with clips. | Figure 5. Radiographs of abutments. |
A final impression was taken with the new bar seated into place but not torqued. As this is a bar, not a single unit, creating torque on the abutment does not change the position of the bar. Note that the metal frame and casting to hold the Hader clips was then constructed and tried in independently of the full lower wax-up (Figure 6). The design of this housing not only provides an extremely stable environment for the clips, but it also adds to the stability of the denture. The housing was then pink-opaqued to mask out the color of the metal (Figure 7). This unit was incorporated into the wax-up, which was then retried to check for fit, centric relation, and appearance.
 |
 |
| Figure 6. Full lower wax-up. | Figure 7. Opaqued frame. |
The dentures were then processed and finished. The upper denture was relieved to allow room for a functional soft impression material (Hydrocast, Sultan and Co, Figure 8). The bar was seated and the screws torqued to 32 NC (Figure 9).
 |
 |
| Figure 8. Hydrocast reline of full upper. | Figure 9. Torque-wrenching abutments. |
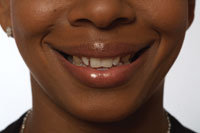
A very stable and comfortable fit was achieved. This provided the patient with improved function, appearance, and ability to maintain the implants and surrounding tissue. The patient needed only one adjustment to the occlusion since the case was finished (Figures 10 and 11).
 |
 |
| Figure 10. Final FU/FL. | Figure 11. Patient final photo. |
CONCLUSION
Much debate could be generated for choices of retention and design on implant-supported denture cases. This article demonstrates a dependable method and design.
Acknowledgment
The prosthetic laboratory in this case was Biggs Dental Laboratory, West Palm Beach, Fla. The construction of the bar shown in Figure 5 was done by Ken Chickey Dental Laboratory in West Palm Beach, Fla.
Dr. Berman practices in West Palm Beach, Fla. He is an instructor who teaches hands-on courses several times a year for both the Rosenthal Institute and the Atlantic Research Group of Palm Beach County. He can be reached at (561) 659-1144.