


In nearly 20 years of dentistry, I have encountered a vast number of situations in which patients were clearly in need of an aesthetically pleasing, noninvasive treatment approach, yet no ideal treatment option was available. As we know, in dentistry we often have to weigh a number of different patient-care options when no single solution exists. We also know that having yet another option available in our armamentarium in support of our war against periodontal disease—especially one that offers aesthetic benefits—can make all the difference in the world to an anxious patient. I am reminded of the old adage “Don’t bring a slingshot to fight an opponent with a shotgun.”
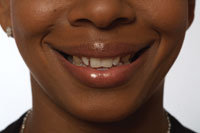
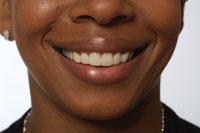
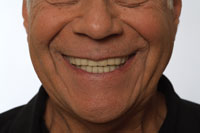
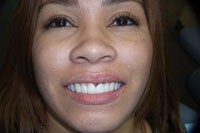
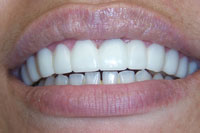
Instead of searching for this missing solution, I created one—a multipurpose restorative appliance, known as Snap-On Smile. This specialized resin appliance can be used in numerous restorative modalities, and its versatility allows it to be used for temporary relief (including the patient’s aesthetic appearance) in advance of further treatment, or as an end product for a cosmetic removable partial denture (RPD). For many patients, this alternative not only replaces missing teeth, but also enhances the aesthetic appearance, as well as the periodontal condition of the remaining teeth on the patient’s arch (Figures 1 and 2). This article will discuss a few of the ways in which this appliance can be used and then present a case report demonstrating a clinical case utilizing the appliance.
 |
 |
|
Figure 1. Picture shows patient with distal drifting, open bite, and multiple missing teeth. |
Figure 2. Removable appliance (Snap-On Smile) in place to stop distal drift, and to improve the patient’s aesthetics and function. |
 |
 |
|
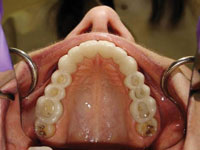
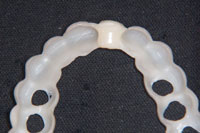
Figure 3. Resin-based appliance inserted. No palatal coverage is needed as the appliance is completely tooth-borne. |
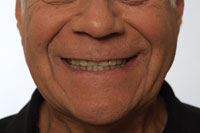
Figure 4. Patient exhibits the effects of severe bruxism, as well as loss of occlusal vertical dimension (OVD). |
 |
|
Figure 5. Appliances in place restores proper OVD and provides the patient with a daytime occusal guard. |
Traditional procedures designed to address vertical dimension can have a high degree of unpredictability for both the patient and the treating dentist. The use of this appliance as a noninvasive interim, or transitional step, can help provide a way to gain a much more accurate sense of the possible aesthetic outcome. Furthermore, it facilitates the ability for the doctor and patient to select the best approach from a number of extensive treatment plans. Many clinicians feel that this minimally invasive appliance is a great aid for these types of reconstructive situations.
Patients and periodontists have also seen great value in the use of this removable appliance when doing implant restorations. Not only does the appliance shape the pontic space, but it also offers the patient immediate and improved aesthetic appearance during what can be a lengthy course of treatment and healing.
 |
 |
|
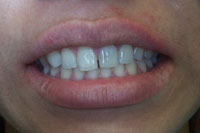
Figure 6. Patient presents with a relatively healthy smile. Note the slight grayness in tooth No. 9. |
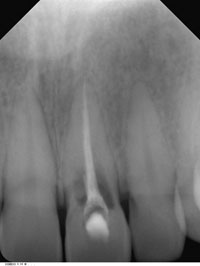
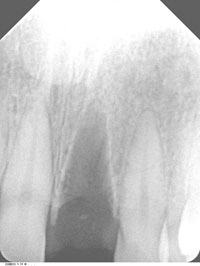
Figure 7. X-ray shows internal root resorption involving tooth No. 9. |
 |
 |
|
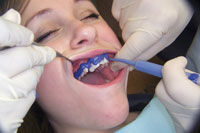
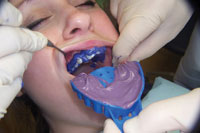
Figure 8. Light body impression material is injected along the facial aspects of the maxillary teeth. |
Figure 9. Inserting the stock tray with heavy body impression material. This creates a custom-tray effect. |
We took an intraoral digital x-ray (Sirona) and observed that severe internal resorption was present in tooth No. 9 (Figure 7). It was clear that neither further root canal therapy nor a crown (the treatment suggested by her previous dentist) would help alleviate Jane’s discomfort. Along with the periodontist in my practice, we told Jane about a treatment plan that we believed would be the most effective for her situation. We recommended that tooth No. 9 be extracted and replaced with a dental implant. Jane would need to wear a temporary appliance while the socket was healing from the extraction, as well as once the implant was placed, as the area would need time to heal before we could place a crown on the abutment.
Prior to starting treatment, Jane expressed some specific concerns. First, she wanted to be certain that the treatment plan would not affect the roof of her mouth like a denture, because she worried that this would be uncomfortable in the long-term. She also wished to maintain a beautiful smile throughout the treatment, and did not want anyone to notice her missing tooth. We assured Jane that the Snap-On Smile appliance would address both of these concerns, not only after the extraction of her tooth, but also throughout the healing process of the implant. Jane then approved the treatment plan.
We began the process by taking a polyether (Impregum/Permadyne [3M ESPE]) impression of Jane’s upper arch. I have found that the most effective technique in fabricating the appliance is to first syringe the light body polyether impression material around the gingival margins of the teeth in the arch for which the appliance is being made (Figure 8). Through this process, we captured both the buccal and lingual aspects of the teeth and then seated a stock tray filled with heavy body material (Figure 9).
 |
 |
|
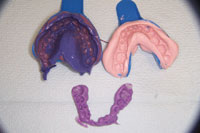
Figure 10. Components needed to fabricate a Snap-On Smile appliance. These, along with a shade selection, were sent to the dental laboratory. |
Figure 11. Occlusal view of the completed appliance. (Note that tooth No. 9 was fabricated utilizing an ovate pontic design). |
 |
 |
|
Figure 12. Radiograph shows extraction site with minimal trauma. |
Figure 13. Appliance inserted with the tissue apically positioned at the extraction site. |
This heavy body material almost acts like a custom tray and helps to make this a very effective method of obtaining an accurate impression. Next, a bite registration was taken (Regisil Rigid [DENTSPLY Caulk]) (Figure 10), and a shade B1 (VITA Classical Shade Guide [Vident]) was recorded. An opposing alginate impression was taken and poured in dental stone. The case was prepared and sent to the dental laboratory for fabrication of the appliance.
We requested that the dental technician score the model around tooth No. 9 and to return the appliance with an ovate pontic. This would guide the tissue to heal around the appliance (Figure 11) and to form the ovate pontic tissue site. This was extremely useful in preparation for the implant, which was to be placed in several weeks. The periodontist used one carpule of Septocaine 1:200000 epinephrine (Septodont) and profound anesthesia was achieved. The tooth was elevated out in one piece, without any fracture to the buccal plate or the interproxal bone. This would allow for optimal placement of the implant (Figure 12). Jane was calm and pain-free throughout the entire procedure. The Snap-On Smile appliance was immediately inserted after the extraction and allowed to “settle” for several minutes (Figure 13). This allows the patient’s tongue, soft tissues, and teeth to acclimate to the new appliance. It also allows the patient to adjust phonetically.
Next, a horseshoe-shaped piece of occlusion paper (Speedy Articulating Paper [Sturgident]) was used to check the occlusion. We used a rounded-diamond cut acrylic bur from the Snap-On Smile bur kit with a very light touch to adjust the occlusion and then used a polishing disc. Our patient found her new appliance to be very comfortable with respect to occlusion, aesthetics, and phonetics.
The tissue was slightly gingival to the socket, resulting in a “black look” that was unaesthetic. The periodontist was able to suture the area in such a way that the tissue would migrate down. During the first check after surgery, the tissue had migrated and Jane was extremely happy with the feel and look of the appliance (Figure 14).
We gave Jane clear instructions on how to properly remove and care for the appliance. As is the case with inserting or removing any dental appliance, we recommend that the patient always uses 2 hands, as that reduces stress on both the patient’s teeth and on the appliance.
 |
 |
|
Figure 14. Photo demonstrates a beautiful smile while the extraction site is healing. |
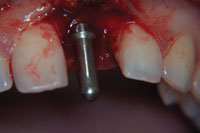
Figure 15. Surgical placement of the implant in the socket site of tooth No. 9. |
 |
 |
|
Figure 16. Radiograph of the implant in place. |
Figure 17. Patient wearing the removable appliance (Snap-on Smile) during healing phase. |
A couple of weeks later, Jane returned to our office so we could monitor the progress of her healing, and make plans for placing the implant. The socket was healing beautifully. There were no signs of impingement in the socket area, which is often the case when the same condition is treated with a conventional acrylic or flexite flipper. The tissue looked perfect and Jane was extremely happy with the aesthetic appearance of her smile. During this visit, she also asked about the possibility of veneers on her other anterior teeth.
On the day of her implant surgery (Figures 15 and 16), the patient’s major concern was that the Snap-On Smile implant temporary would look and feel the same as it did prior to the placement of the implant. The periodontist’s primary concern was that the appliance offer the protection required in order to facilitate healing at the implant site and to aid in proper papilla formation. The appliance completely addressed the concerns of both the patient and the periodontist. The patient was extremely pleased with the resin-based appliance throughout the entire procedure (Figure 17). In this case, this removable aesthetic appliance provided an extremely valuable interim service for the patient.
CLOSING COMMENTS
In most situations the clinician has many options to attain a desired end result. As we develop treatment plans for our patients, occasionally we experience an “Aha!” moment—a moment when we are inspired to come up with a new solution or technique. The case report included in this article demonstrated just one of the many applications for which the aesthetic removable appliance (Snap-On Smile) is indicated—as a temporary appliance used in the process of restoring a patient with an implant-supported prosthesis. Whether the situation calls for a quadrant or a full-arch, the advantages of using this approach are numerous. Most importantly, we have found in our experiences that patients treated with this appliance are extremely happy and comfortable with the entire process.
Dr. Liechtung is a cosmetic and restorative dentist in New York City and the owner of the prestigious dental practice Manhattan Dental Arts (MDA). MDA provides the latest dental techniques and services to its patients. After graduation from the University of Pennsylvania, he received an Advanced Restorative and Implant Fellowship there. He is a member of the New York City Dental Society, American Dental Association, Academy of Cosmetic Dentistry, and the Mid-Manhattan Advanced Dental Study Club. He can be reached at (212) 799-5533 or mliechtung@snaponsmile.com.
Disclosure: Dr. Liechtung is the inventor of the Snap-On Smile. He began offering Snap-On Smile to his patients in New York over 4 years ago, and dentists worldwide are offering this patented appliance to their patients.


