
The transition period between extraction of all remaining teeth and the final definitive prosthesis is extremely difficult for the patient. The loss of all remaining teeth will usually result in progressive and irretrievable loss of alveolar bone.1 Bone loss can lead to atrophy and lack of support for complete dentures.2 Older patients may be physically incapable of coping with complete dentures, or bone support may be inadequate. Changes in muscle attachments may result in loss of patient facial form, impaired function, aesthetics, and phonetics.3 The chewing efficiency with implant-supported overdentures is improved by 20% in patients with a complete denture. The increase in function, aesthetics, and phonetics will elevate a patient’s self esteem and increase confidence level.3 Traditional overdenture techniques may be modified for use with implants. There are a wide variety of retentive devices available, and their selection should be based on the patient’ s needs and ability to insert and remove the denture.4-6 Implant-retained overdentures are mainly tissue supported and retained by attachments. Loading of the implants occurs only with simultaneous tissue loading. If this doesn’t happen, destructive forces may jeopardize the implant components. An implant-supported overdenture is entirely supported and retained by the individual implants or attachment assembly. The extension of the prosthesis to the tissues is to only provide the appropriate aesthetics and phonetics.7 The implant-retained overdenture consists of the implants, the abutment containing the key way or key-way attachment, and the overdenture.8 The introduction of Modular Transitional Implants and Modular Prosthetic System provide the retention needed during the difficult transitional period between extraction, implant placement, and insertion of the overdenture and attachments. A case report will delineate the components in the system and the steps in proper placement.
Case 1
 |
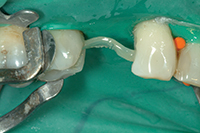 |
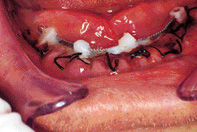
| Figure 1. Preoperative facial view of the patient. | Figure 2. Teeth Nos. 28 and 29 were extracted. |
 |
 |
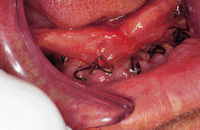
| Figure 3. Panorex demonstrating anterior loop of the inferior alveolar nerve. | Figure 4. Provisional denture was duplicated with irreversible hydrocoloid. |
 |
 |
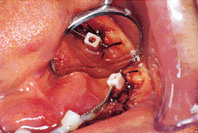
| Figure 5. A clear acrylic template was fabricated to determine implant placement. | Figure 6. A pilot drill was used to make a marking hole through the tissue into the alveolar bone. |
 |
 |
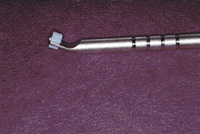
| Figure 7. The transitional implant was initially installed with a right-angle handpiece and a right-angle driver. | Figure 8. The installation of the transitional implant was completed with a winged socket key. |
 |
 |
| Figure 9. Caster healing caps were placed over the implant heads until they can be connected to the transitional denture. | Figure 10. A panorex verified implant position. |
A 66-year-old man presented with a history of severe periodontal disease demonstrating deep pocketing and tooth mobility (Figure 1). A complete intraoral exam, including diagnostic radiographs, periodontal charting, and study models were obtained. It was determined that the remaining mandibular teeth would be extracted. Teeth Nos. 28 and 29 were taken out immediately because of infection (Figure 2). The patient was referred to an oral surgeon for consultation. Examination of the panorex revealed an anterior loop of the inferior alveolar nerve. The inferior alveolar nerve may sometimes extend beyond the mental foramen as an intraosseous loop (Figure 3). Radiography may not accurately determine the incidence or extent of the loop.9 Unfortunately, this precluded placement of an implant in an ideal location. The teeth were cut off a duplicate of the diagnostic model and replaced with denture teeth. A provisional denture was then fabricated. The denture was duplicated with alginate (Figure 4), and a clear acrylic template (Figure 5) was fabricated to determine the ideal position for final placement of the MTI implants. The oral surgeon extracted the remaining teeth; the patient was under local anesthesia. A pilot drill (Dentatus) was used to make marking holes through the tissues into the alveolar bone (Figure 6). The drill site was placed 1 to 3 mm lingual to the interproximal placement of the final implant. The pilot drill holes were placed slightly short of their necessary depth depending on the bone density. A protective spacer on the drill shank was used as a marker for visual observation of the intended depth. The drill was used 1 to 2 mm short of the marked position because the self-threading MTI can penetrate further to the intended depth. The osteotomy was created with the MTI profile drill, using low speed, copious irrigation, and an up-and-down motion. The MTI was initially installed with a right-angle handpiece and the MTI right-angle driver (Figure 7). Moderate downward pressure was applied at low speed. The installation was then completed manually with a winged socket key (Figure 8). This provided greater leverage and tactile control. Caster healing caps can be placed over the implant heads until the implants are connected to the denture (Figure 9). A panorex was taken to verify proper implant placement (Figure 10).
Connection of the Overdenture
 |
 |
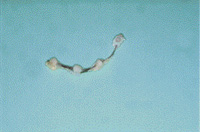
| Figure 11. MTI, titanium bar, and red plastic spacer. | Figure 12. Red protective plastic spacers were placed over the implant heads. |
 |
 |
| Figure 13. The titanium bar was placed into implant-slotted heads with the grooves facing upward. | Figure 14. Modular copings held by placement instrument. |
 |
 |
| Figure 15. Modular copings were placed into position over the implants. | Figure 16. The modular copings were connected to the titanium bar with a light-cured acrylic resin. |
 |
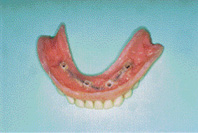 |
| Figure 17. The bar was removed to verify a parallel path of insertion has been obtained. | Figure 18. The titanium bar was incorporated into the transitional denture. |
 |
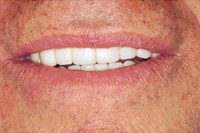 |
| Figure 19. Retracted view of transitional denture. | Figure 20. Facial view demonstrating appropriate occlusion and immediate aesthetic result. |
Protective plastic spacers were placed over the implant heads (Figures 11 and 12). The spacer protects the slimmer neck of the implants by preventing resin from locking onto the assembly. The MPS titanium connecting bar was placed into the implant-slotted heads with the grooves facing upward. The bar can be shortened if necessary (Figure 13). Modular copings were placed over the implant with a placing instrument (Figures 14 and 15). The copings were connected to the bar with a small amount of light-curing acrylic resin (Figure 16). The bar connected to the copings was then removed to verify the parallel path of removal prior to attachment to the denture (Figure 17). The bar was placed back into the proper position, and the denture was inserted to verify complete seating. The denture was relieved, if it didn’t seat into its original position. Kooliner (GC America), a reline material, was then placed into the denture and reinserted. The patient was instructed to close into a previously determined vertical dimension of occlusion until polymerization of the reline material was completed. The bar and copings were then connected to the tissue side of the denture (Figure 18). The result was a retentive immediate aesthetic denture (Figures 19 and 20). Two definitive implants will be placed with ball attachments following several months of healing. The Mini Transitional Implants allow for an immediate aesthetic functional prosthesis and protects the definitive implants during the healing phase. Tarnow and Froum have found excellent adaption/osseointegration at the site of transitional implant placement. There was a dense trabecular bone growth at the fixtures interface with almost no inflammatory response.11 The Mini Transitional Implants were placed lingual to the intended placement of the implants used for the final restoration. Placement of the final implants can proceed without interference. The transitional implants can be unscrewed, and the final restoration can be seated into position over the abutments and ball attachments. A relatively smooth transition can be achieved between extractions and the final placement of the definitive prosthesis. However, the precise path of insertion and removal of the bar (inside the denture) may present a problem with orientation for the patient. This may lead to forcing the denture into position and causing damage and undue stress on the MTI system. A recent modification of the system allows the bar (encased in an acrylic housing) to be cemented by the dentist, and the patient can readily place and remove the denture without distortion of the MTI system. Part 2 will delineate the new components and final denture fabrication.
Acknowledgments are expressed to Dr. Richard Berk for the implant placement.
References
1. DeFranco RL. Overdentures. Dent Clin North Am. 1977;21:379-394.
2. Pavlatos J. Mandibular implant-supported overdentures. CDS Review. 1997; (March issue): 32-39.
3. Brewer AA, Morrow RM. Overdentures. 2nd ed. St. Louis, Mo: CV Mosby;1980.
4. Salinas TJ, Finger IM, Thaler II JJ, et al. Spark erosion implantsupported overdentures: clinical and laboratory techniques. Implant Dent. 1992;1:246-251.
5. Guerra LR, Finger IM, Block MS. Tissue-supported implant overdentures. Implant Dent. 1992;1: 69-77.
6. Naert I, De Clercq M, Theuniers G, et al. Overdentures supported by osseointegrated fixtures for the edentulous mandible: a 25-year report. Int J Oral Maxillofac Implants. 1988;3:191-196.
7. Bouma J, Liesbeth M, Boerrigter LM, et al. Psychosocial effects of implant-retained overdentures. Int J Oral Maxillofac Implants. 1997;12:515-522.
8. Petropoulos VC, Smith Woollcott, Kousvelari E. Int J Oral Maxillofac Implants. 1997;12:176-185.
9. Arzouman MJ, Otis L, Kipnis V, Levine D. Int J Oral Maxillofac Implants. 1993;8:295-300.
10. Trushkowsky RD. Modular-transitional implants and modular prosthetic system. Esthet Dent Up. 1996;7:52-53.
11. Tarnow D, Froum S. A case report and histology of MTI modular transitional implants [abstract]. NYU School of Dentistry, May 1996.
Dr. Trushkowsky is a graduate of New York University College of Dentistry, is director of operative dentistry at Staten Island University Hospital, and runs a private practice emphasizing restorative and cosmetic dentistry. He is a member of the Academy of Cosmetic Dentistry, American Prosthodontic Society, Academy of Osseointegration, and American and International Association of Dental Research. He is also a fellow in the Academy of Dental Materials, Academy of General Dentistry, and American and International College of Dentists. Vice president of the Richmond County Dental Society and faculty of the postgraduate programs in aesthetic dentistry at the Universities of the Pacific, Minnesota, and California at Los Angeles, Dr. Trushkowsky has lectured nationally and published more than 40 articles in numerous journals. He can be reached at (718) 948-5808.

