The finished denture is back from the lab and the questions begin. Do we have adhesion? Did we get the bite (centric relation [CR])? Did we get the plane of occlusion, etc? This is the stage in denture making that is the most frustrating to the majority of dentists.
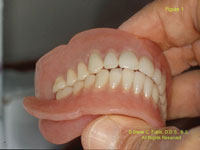
Dentures do not have to be that unpredictable. The only reason I can hold the dentures shown in Figure 1 in my fingers is because they are cusped teeth locked in maximum intercuspation.
Most of the problems with dentures can be attributed to two incorrect assumptions. The first assumption is that the master impressions were accurate enough to produce the desired adhesion. The second assumption is that the models were mounted in true centric relation. These assumptions need to be verified at the bite rim stage, not when delivering the final denture.
In my more than 50 years of fabricating dentures, I have found that a successful denture basically requires four things. The first is adhesion. For adhesion we need accurate stone models, and by accurate I mean that the models should be clones of the patient’s ridges. The second prerequisite is a true centric relation mounting. At the wax try-in stage the occlusion should match what you see in the finished denture shown in Figure 1, ie, maximum intercuspation without a hit and slide. The third prerequisite is lateral and protrusive bites on an articulator so that the fabricated denture will not only capture the desired aesthetics and phonetics, but will have occlusion that will perform like natural teeth. The fourth prerequisite is remounting grooves on the models. For the lab to maintain the occlusion we had at the wax try-in stage, the models will require accurate remounting at various stages in the processing of the finished denture.
 |
 |
|
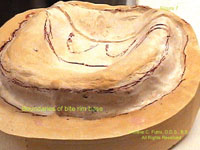
Figure 1. Cusped denture teeth locked in maximum intercuspation. |
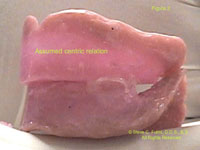
Figure 2. Semi-processed bite rims ready for mounting in assumed centric relation. |
 |
 |
|
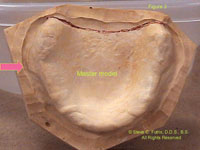
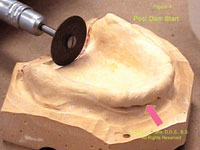
Figure 3. Upper master model with a post dam line drawn. |
Figure 4. First step in fabricating a post dam is cutting along the red line to a depth of 1 to 2 mm. |
My first prerequisite is adhesion, which is the focus of this article. I take mucostatic impressions, which if taken properly result in models that are almost clones of the patient’s ridges. If these models are that accurate, then the final processed denture should have the desired adhesion. Many dentists proceed on this assumption in the fabrication of the denture with conventional bite rims. I have found assumptions to be costly.
Figure 2 represents semi-processed bite rims ready for mounting in assumed centric relation. These bite rims have semi-processed bases that fit the models much more accurately than most conventional bite rims. I have found that these semi-processed bases help me achieve my 4 prerequisites for successful dentures.
As noted, the first prerequisite is adhesion. With these semi-processed bite rims we can check the accuracy of the models to deliver adhesion and retention at the bite rim stage. If corrections are necessary, then we can make them at this stage while we still have working models. Now we can know, not assume, at the bite rim stage that the fully processed denture will or will not have adhesion.
Now that we have explained the need for semi-processed bite rims, let us proceed. Many specialists have advocated a fully processed base for bite rims, but I have found them to be limited for general use and an unnecessary expense. A semi-processed base, however, has all the advantages of a fully processed base but is not limited for general use. The following steps will show you how to make these semi-processed rims.
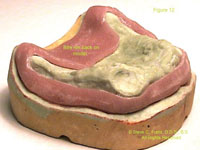
Figure 3 shows an upper master model with a post dam line drawn. You may question why I have a post dam line drawn. Most dentists leave the post damming to the laboratory when they process the dentures. Our first prerequisite was to prove we had adhesion. Without post damming the adhesion of our semi-processed bases would be in question. The pink arrow shows a lesion that the old denture created. This will have to be corrected at the time of seating the bite rim as well as the final denture with pressure paste. If the patient is favoring these areas, then your recordings may be off. I prefer to let the patient wear soft tone in the old denture until these lesions are healed before taking my master impressions.
 |
 |
|
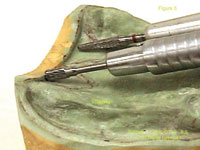
Figure 5. Establishing back edge of the post dam. |
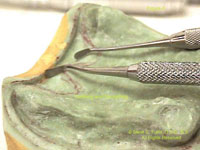
Figure 6. Smoothing out the taper onto the palate. |
The first step in fabricating the post dam is to cut along the red line to a depth of 1 to 2 mm with a Carborundum disc (Englehard; Figure 4). The bite rim stage is a good time to check the post damming in the mouth. If it needs correcting, then we still have a working model. The pink arrow points to an undercut area that will have to be blocked out before making the bite rim.
Using an inverted cone E cutter (Brasseler), establish the back edge of the post dam with the flat end of the E cutter and taper onto the palette with the tapering sides (Figure 5). With the pencil-shaped E cutter finish the tapering to a feather edge on the palate.
With the square end of a hoe we square up the back edge, and with the tapering edges of the hoe we smooth out the taper onto the palate (Figure 6). With the spoon we finish out the concave taper onto the palate.
 |
 |
|
Figure 7. Model after post damming. |
Figure 8. Landing area within the red lines. |
 |
 |
|
Figure 9. Landing areas on lower model on labial and lingual. |
Figure 10. Application of a separating agent. |
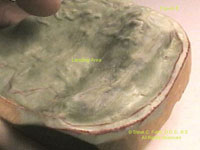
Figure 7 shows the model after the post damming, ready for adding the acrylic putty mixture for the base of the bite rim. Note the red lines around the periphery of the ridges. No acrylic will be added to the crests of the ridges or to the rugae area of the palate. This will leave the crest of the ridges bare of acrylic, aiding in the setting of the teeth. We need all the vertical space we can get to avoid grinding off the retentive areas of the teeth, especially when using cusped porcelain denture teeth. Cusped porcelain denture teeth were made to resemble natural teeth and to function as natural teeth in mastication. However, more and more flat-planed plastic teeth are being used. Why? Too many assumptions at the early and late stages of fabricating dentures can result in chairside grind-ins on the day of delivery. It is difficult to grind-in the occlusion chairside with porcelain teeth.
In Figure 8 note the landing area within the red lines. These landing areas must be trimmed to a level that will give an ideal peripheral roll for the bite rims and the finished denture.
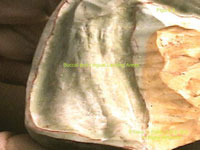
Figure 9 shows the lower model’s landing areas on the labial as well as on the lingual. These were my cases where I used die stone for my first pour and cast stone for my second pour. Die stone has controlled expansion and contraction, which gives more accurate models. Remember, we are looking for clones of the patient’s ridges. The crushing strength of die stones is double that of yellow stones, which will diminish the chance of fractures during the packing process as well as when deflasking the models after processing. If the models are broken in the deflasking process, then they may not be remountable. Without being able to remount your dentures after processing, your chances of spot grinding your occlusion into maximum intercuspation is lost. If the occlusion is not spot ground into maximum intercuspation before breaking the dentures loose from the models after processing, then you will have endless chairside adjustments, or worse, a remake.
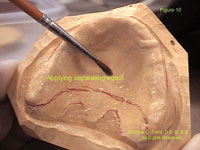
Figure 10 shows the application of a separating agent. Using a good separating agent avoids damaging the models when you remove the semi-cured bite rim bases. Vaseline-like substances have not proven to be satisfactory for me. Using separating mediums will give you an inner surface of the denture and bite rim that is like the surface of glass. We all know the adhesion of 2 wet panes of glass. If the inner surface of the rim is a mirror image of the surface of the model, then you will have the desired adhesion. This is what we are seeking between the inner surfaces of the denture and tissues covering the ridges. A mucostatic relationship is a passive relationship where neither the base nor the tissues are fighting each other. Cold-cure acrylics have been used in the making of the bases for bite rims for some time, but the salt and pepper technique is very messy and results in rims that are easily broken and are difficult to remove without doing damage to the models. By spatulating a mixture of these cold-cure acrylics in a wax cup to the consistency of a soft putty, we have a much denser and stronger product. Now the putty mixture is placed in a Vaseline-gloved hand and applied to the model with plenty of working time to shape and trim before it is inserted in a pressure pot filled with warm water for 5 minutes. This pressure pot technique adds the stability to the bite rim to maintain its shape. This is such a simple procedure that any well-trained assistant can do it after you draw the red lines on the models.
 |
 |
|
Figure 11. Semi-processed base. |
Figure 12. Bite rim on the model after borders are finished. |
 |
 |
|
Figure 13. Lower base back on model. |
Figure 14. Wax added to bite rim for shaping in the mouth. |
 |
 |
|
Figure 15. Another view of upper bite rim. |
Figure 16. Checking for adhesion of the rim with cotton rolls. |
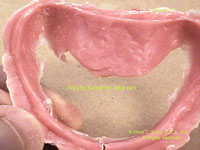
For the price of a soft drink we now have a semi-processed base that will give all the advantages of a fully processed base (Figure 11). Remember the undercut that needed to be blocked out on the previous model? In this case the student forgot to block it out. We had to cut the rim at the anterior frenum to be able to remove the rim without damaging the models. This is one of the main advantages of acrylics over composites in making your bases. Repairability and far, far less warping! You can see that this is an ideal base for a bite rim. You would finish down the periphery like you would a denture. By adding the wax to the ridge and palatal areas we can check in the mouth for the adhesiveness of our bite rims at the bite rim stage. With the old shellac bases, we learned not to expect adhesiveness, so we added adhesive paste and powders for the adhesion we needed to keep the rims steady in the mouth. We were relying on the processing of the bases to the models in the final stages of denture processing to deliver the adhesiveness we desired. Don’t rely on this assumption.
Figure 12 shows the bite rim back on the model after the borders are finished. It will maintain this accuracy of fit during the various stages of adding hot waxes, try-ins, etc.
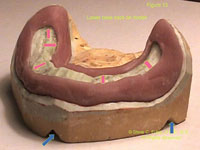
Figure 13 shows a lower base back on the model. Note the accuracy of the fit. We are ready for the addition of the wax rims. The pink arrows point to the sharp undercut areas that were created when cutting away the ridge areas while in the putty stage. These undercut areas create a perfect lock for the wax addition. This avoids those times when, after taking all your bites, the wax rims come loose from the bases. I learned to use extra hard pink wax to make the rims. They hold their shape better at mouth temperature. In fact, keeping a bowl of iced water to dip the rims in before and after being in the mouth keeps the wax hard enough to maintain flat occlusal planes. Look at the model and how it has been trimmed properly for a lower model so that you have access to apply the acrylic putty mixture bucally and lingually for your desired peripheral roll. The base has also been trimmed to where the overall model has the proper thickness for strength and for ease in flasking later. We want the base of the model to be trimmed parallel to the plane of the ridges in all aspects. This parallelism of the model’s bases to the ridges aids in the proper shaping of the waxes in the formation of the bite rims, and later aids the technician in setting the teeth. The remounting grooves indicated by the blue arrows must be applied after the models have been properly trimmed to an ideal thickness for flasking. If a lab has to trim a model to get it into a flask for processing, then you may no longer have remounting grooves or a way of remounting the case for finishing the occlusion while still on the articulator.
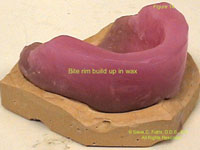
Figure 14 shows that wax has been added to the bite rim for shaping in the mouth. Many aids are available to help shape the bite rim prior to going to the mouth, such as old dentures, old photographs, etc. Anything you can do prior to going to the mouth decreases your chair time and therefore decreases your cost. We can see where the parallelism of the base of the models to the ridges aided us in forming the wax occlusal planes before going to the mouth.
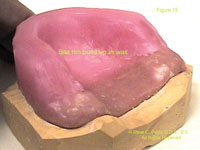
Figure 15 depicts another view of the upper bite rim. You see where there is wax in the rugae area of the palate. In the final wax-up this area is easily removed, and palatal relief can be added prior to adding the rugae pattern. The tongue and its association with the rugae of the palate serve a very important role in establishing the vertical dimension. The tongue pressing against the rugae aids in swallowing, in the act of cuspid disclusion, and certainly aids in the formation of certain letters. No wax rim should be covering the retromolar pads on the upper or lower bite rims, for this causes rotation and tilting of the rims on closure, affecting the accuracy of your bites. The rims are now ready to go to the mouth for customization. However, we want to check for the adhesion of each rim before proceeding.
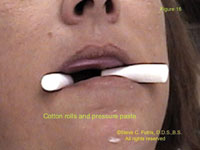
To check for adhesion of each rim, apply pressure paste to the inner surfaces of the upper and lower rims and place them in the mouth with cotton rolls to bite on in the premolar areas (Figure 16). The cotton rolls prevent the occlusion of the wax rims from causing occlusion-related pressure spots. We are looking for inaccuracy-of-fit pressure spots. After the patient bites on the cotton rolls, remove each rim and check for pressure spots that would alter the adhesiveness of the rim. One grain of sand between glass panes can cause all the adhesiveness to disappear. Repeat this pressure paste procedure until all inaccuracy-of-fit pressure spots are removed from both the upper and lower rims. Now you can check the adhesiveness of each rim individually in the mouth. The upper should not fall and the lower should not float up. If you have your desired adhesiveness you can proceed with all your other steps in customizing your rims. We have achieved our first prerequisite—good adhesion—but we still have 3 prerequisites to go…true centric relation (not assumed); lateral and protrusive bites; and remounting grooves and their importance. All topics for future articles.
Dr. Futris received his DDS from the University of Tennessee (UT) and bachelor’s degree in physical chemistry from the University of Memphis. Originally an art major, Dr. Futris has practiced all phases of dentistry, combining science and art while concentrating heavily on prosthodontics and gnathological mountings. He practiced dentistry full time in Memphis from 1957 until retiring in 2002. Since 1967, Dr. Futris has been a part-time assistant professor in the UT Department of Fixed Prosthodontics. A life member of the ADA, Tennessee Dental Association, Memphis Dental Association, Delta Sigma Delta, Omicron Kappa Upsilon, and Dean’s Honorary Dental Societies, Dr. Futris has lectured nationally and internationally, has kept abreast of the latest dental technology, and has received CE awards from 1992 to the present time. He can be reached at (901) 323-2135 or zoeste@bellsouth.net.