Just the other day a company car belonging to a local dentist drove by. It was plastered with advertising from the office, heralding the merits of bleaching, lasers, and minimally invasive dentistry (MID). It was at that moment that I realized that it is high time for the profession to quantify, legitimize, and provide research on the noble but troublesome topic of MID. The term minimally invasive has been embraced by the medical community—hospitals and surgeons are now marketing a wide array of MI medical treatments.
In this article, I will first review the ethics and politics of “naming” and “branding” in dentistry. Next, I will review the hierarchy of tooth needs, presenting a new concept in which not all structures and zones of the tooth have the same value. In turn, that will help to frame 3 cases—types where the dentists performed MID, but, in the end, the patients suffered with poor outcomes. I will conclude with the results of the 2009 Opinion Leaders’ Forum of Minimally Invasive/Minimally Traumatic Dentistry that I hosted. At the forum were some leading experts and forward thinkers, including Drs. Paul Belvedere, Bob Margeas, and Len Boksman.
THE NEW LEXICON OF DENTISTRY—WHAT EXACTLY IS MINIMALLY INVASIVE DENTISTRY?
Pogo once stated “We have met the enemy, and he is us.” Whenever we introduce a sub-“specialty” (or pseudo-“specialty”) such as cosmetic dentistry or a branding term such as laser dentistry or MID, there are serious concerns. Further compounding the problem are the advertising campaigns of the manufacturers that encourage the confusion by introduction of pseudoscience with terms like “nano technology” to describe a composite material that is actually a simple microfill.
Magnification is also an issue. Can a dentist perform MID with the naked eye? Most would argue no. In endodontics, the trend to use microscopes continues. We are now seeing a division of endodontic practitioners into 2 camps: microscope-based-visual endodontics and traditional-tactile endodontics. Tactile endodontics is what most general dentists and many endodontists rely upon—depending mainly on “feel” to find difficult canal systems. Conversely, routine exploration deep inside of the tooth at 20x magnification with perfect coaxial light allows for new possibilities in directed-dentin conservation. Can endodontics be MI without a microscope? Many would argue no.
Once we are able to recognize a definition of MID, which in its purest form is the preservation of tooth structure, it must be framed within a new concept—the Hierarchy of Tooth Needs. During patient treatment, the clinician needs to consider a multitude of factors that will affect the ultimate outcome. In simple terms, these factors can be grouped into 3 categories: operator needs, restoration needs, and tooth needs. These would be described as follows: operator needs being conditions that the clinician needs to treat the tooth; restoration needs being the prep dimensions and tooth conditions for optimal strength and longevity; and tooth needs being the biologic and structural limitations for a treated tooth to remain predictably functional.
THE HIERARCHY OF TOOTH NEEDS
Table 1 represents the hierarchy of needs to maintain optimal strength, fracture resistance, along with several other characteristics needed for long-term full function of the posterior and (Table 2) anterior tooth. This brief article is designed to simply introduce the reader to the reshuffling of the values assigned to different tooth structures and for the nuanced role of the importance of regional tissues. A full explanation of the new hierarchy will be presented in future articles to be published in Dentistry Today.
| Table 1. Hierarchy of Tooth Needs for Posterior Teeth | ||||||||||
|
| Table 2. Hierarchy of Tooth Needs for Anterior Teeth | ||||||||||
|
 |
 |
| Figure 1. (Case 1) Low magnification view of a sealant on the occlusal of an upper second molar (orange arrow). | Figure 2. (Case 1 continued.) Eight times magnification view of sealant. There are no visual clues that the sealant has failed. |
 |
| Figure 3. (Case 1 continued.) The sealant was removed because of patient complaints of severe sweet sensitivity. Gross caries that extended near the pulp was present. This condition was masked by the sealant and even the use of a Diagnodent (KaVo) would have been of no value to diagnose the occult caries. |
Sealants Gone Awry
 |
| Figure 4a. Sectioned molar 4x and 24x magnification revealed a serious enamel defect that extends very near the dentin. This insidious defect is a perfect example of the unpredictable nature of occlusal morphology. The deep groove full of biofilm and caries activity is not part of the central groove and is also at an oblique angle to the long axis of the tooth. Figures 4b and 4c. Initial penetration was achieved with the original fissurotomy bur. The more aggressive taper on the 2.5 mm cutting surface of this bur allows a conical access to the enamel defect. This shape affords proper visualization of the myriad of directions that are possible. The most insidious types are the lateral and cul-de-sac types of defects that are often not discovered when parallel-sided cuts are made, compounded by insufficient magnification. Figure 4d. Once the extent of the defect and/or the lesion is ascertained, the more delicate and less tapered Fissurotomy NTF Bur can be utilized to finish removing stain and bacteria. |
Where does the ADA stand on this issue? Divided! In March of 2008, the Journal of the American Dental Association published the recommendations and findings of the ADA Council on Scientific Affairs in an article promoting the value of traditional “painted on” sealants.1 In the article, it states “No mechanical preparation of the pits and fissures is recommended for noncavitated pits and fissures.” Only a few months later, the ADA Professional Product review2 completely contradicted that statement saying “The grooves and pits cannot be cleaned without mechanical devices. One needs something like a fissurotomy bur (Figures 4a to 4d) or air abrasion to do the job properly. Without mechanical preparation, the average penetration of a sealant is, perhaps, only 17% the depth of the groove on average.”3 It is no wonder that we as a profession are in chaos when it comes down to the 3 fundamental questions; should I cut, how much should I cut and how should I cut? To this end, my good friend Dr. Rella Christensen has made this research part of the mission for her new TRAC Research Foundation in Provo, Utah.
General Solution: Sealants Should Go in the Tooth, not on the Tooth
In my practice I balance patient age, and history of occult occlusal caries in the patient or other family members. Additionally, observation at 16X magnification is performed to evaluate pit and fissure staining, and the telltale enamel “halos” that indicate early dentinal caries. In the absence of a microscope, a laser caries detector (DIAGNOdent [KaVo]) is extremely helpful. An age-based diagnosis must be considered. A stained groove in a 45-year-old is a completely different situation than a stained groove in a 7-year-old. I do not seal over decay or stain in my practice. I use fissurotomy burs to remove all stain and caries. In adults, I monitor stained grooves unless I am restoring the tooth for other reasons.
Outcome
The tooth was retreated with a “Cala Lilly” cusp tip to cusp tip Clark Class I composite (not pictured). (Visit Bioclearmatrix.com or NDN.com [National Dental Network] to view the finished case.)
Discussion and Debate
Sealants (ultra MI) versus fissurotomy and flowable/paste composites (more invasive, requiring removal of enamel): Traditional painted on sealants, often performed by dental auxiliaries are a very cost-effective solution according to many studies.
 |
 |
|
Figure 5. (Case 2) The preoperative bite-wing depicted what appears to be a very shallow and MI Class I composite; yet the periapical radiograph revealed periapical infections indicating that the pulp must have been exposed at time of treatment. |
Figure 6. (Case 2 continued.) Low magnification view of the occlusal surface of tooth No. 30. |
 |
 |
|
Figure 7. (Case 2 continued.) High magnification view (8x) of occlusal surface. The composite restoration appeared to be “MI” and relatively well-sealed. |
Figure 8. (Case 2 continued.) As a saucer shape was cut to explore the composite restoration and to begin endodontic access, the bur was angled at 45º instead of parallel to the long axis of the tooth. Blue arrow on left highlights the carious activity in the untreated fissure adjoining the composite restoration. Green arrows on the right point out the lack of bond and carious invasion along the wall of the composite restoration. Carious invasion was so soft that no red dye uptake occurred in this spot, only the brown color and softness to explorer tip aid the diagnosis. |
 |
 |
|
Figure 9. (Case 2 continued.) Previously exposed mesio-lingual pulp horn highlighted with red arrow. |
Figure 10. (Case 2 continued.) 24x magnification revealing that there is no such thing as a “small” pulp exposure. |
 |
|
Figure 11. (Case 2 continued.) The pulp chamber was now accessed. The magnitude of the tooth loss for endodontic access is side-by-side with the tiny pulp horn exposure. A small sacrifice of additional enamel with a 45º enamel wall would have allowed an ideal restorative seal, and could have aided the clinician to avoid burrowing into and subsequently failing to recognize the pulp horn. |
Minimally Invasive but Poorly Designed Class I (Posterior) Composites
| Table 3. Disadvantages of the Parallel-Sided Preparation |
|
This case now has 2 big strikes against it. First, the pulp is dead. Secondly, and more serious, there is a large periapical lesion on each root apex. Risk of failure of root canal therapy increases with both the presence and size of a periapical infections.11 This is a tragic example of MID creating a maximally traumatic outcome.
General Solutions: Fillings Should Go On The Tooth, Not In The Tooth
Dr. Paul Belvedere says it best: “We cannot be MI in the strict sense if we want to achieve excellence with composite dentistry. That is because enamel driven composites are not adhesive, but cohesive in nature.” The design of the saucer shapes recommended for the occlusal when the fissurotomy reveals significant dentinal caries are shown in case 3.
Outcome
The tooth No. 30 is currently undergoing calcium hydroxide intracanal disinfection for 6 weeks. It will then be obturated with gutta-percha and restored with a buccal-occlusal-lingual composite onlay. (Completed case summaries are available at Bioclearmatrix.com.)
 |
|
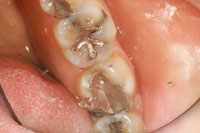
Figure 12. (Case 3) Preoperative views at low and high magnification of an upper molar; the interproximal portion of the composite has broken away and fallen out despite good mechanical undercuts. The neighboring class II amalgams with boxy shapes have served well for decades. |
Dislodged Traditional Box Shaped Class II Composite that was Restored With a Metal Matrix
We can at last break free of the boxy Class II and rely on enamel margins with a true hermetic seal. The long margins of the Clark Class II shape, along with clean, lightly abraded enamel past the margins cannot be fully light-cured with a metal matrix. It relies instead on translucent matrices, separators and wedging systems to fully cure the long infinity edge margins; just like we have done with anterior restorations—with great success!
 |
 |
|
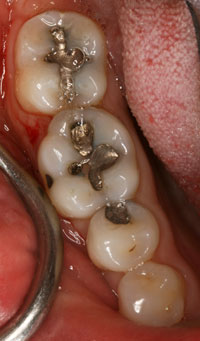
Figure 13. (Case 3 continued.) The case was retreated with a cusp tip-to-cusp tip Calla Lilly occlusal preparation to help splint the tooth—protecting against fracture and minimizing marginal ditching. Note that wedges or “prewedges were present in the interproximal to help control/retract the interproximal tissue and rubber dam. |
Figure 14. (Case 3 continued.) Removal of carious dentin has been completed, followed by 1 min application of full strength sodium hypochlorite to disinfect and lighten the color of the affected but structurally sound dark dentin. |
 |
|
Figure 15a. Unfavorable C-factor and poor enamel rod engagement are typically present when removing old amalgam or composite restorations. Figure 15b. The enamel was cut back with a Cala Lilly shape. This modified preparation then allowed engagement of nearly the entire occlusal surface. |
 |
 |
|
Figure 16. (Case 3 continued.) Although not mandatory for the Clark Class II, the teeth are re-prepared in the interproximal after the occlusal is restored when large occlusal and large interproximal areas are involved. C-factor problems are mitigated and the injection molding of the interproximal is simplified, however, when the interproximal is isolated from the occlusal during composite placement. |
Figure 17. Diagrams of the Clark Class II (left), the slot preparation created by Simonson and others (center), and the original GV Black class II (right). |
 |
 |
|
Figure 18. The Bioclear average curved molar. The Bioclear Matrix, with its translucent and fully anatomic shape, allows single-phase injection molding of the composite material along with long infinity edge margins accessed by full light curing—even past the finish lines. |
Figure 19. (Case 3 continued.) Clear anatomic matrices are present along with soft silicone interproximators, allowing buccal-lingual curing and full and rounded embrasure shapes. |
 |
|
Figure 20. (Case 3 continued.) For the first time in history, a potential long-term hermetic seal of the margins (especially the gingival margin) is possible. That is very unlikely when there is a minimally enamel invasive, parallel-sided preparation present. Inadequate light curing at, and slightly past the margins (because of a metal matrix), is a significant problem. |