The demand for more aesthetic restorations has pushed the dental manufacturers to successive rapid advances in technology. As dentists, we are constantly seeking more conservative, simple, and practical techniques to restore teeth, while being sensitive to our patients’ demands for comfort and aesthetics.1
The advancement of dental materials and a better understanding of their usage has made it possible for a dentist to have a solution to fulfill the above goals easily, as long as that dentist understands with new material will come a requirement in the adjustment of technique.2
Traditionally, dentists have been taught to maximize axial height for full-crown preparation, to increase mechanical retention. This traditional technique is most beneficial for the long-term retention of the restorations, but not necessarily good for the long-term prognosis of the tooth or periodontal ligaments of the patient. Preservation of the healthy tooth structure and healthy periodontal tissue is the most significant factor in the long-term prognosis of a restored tooth. Excessive removal of the healthy tooth structure places undue stress on the pulp and foundation of the tooth. Other disadvantages include severe damage to the periodontal tissue during the full-coverage crown preparation and impression making, and inability to confirm the full-circumferential seal of the subgingival margins.3 Furthermore, the increased possibility of biological width invasion and damage to the attached gingiva will cause irreversible damage to the tooth and surrounding supporting structure. In addition, the ability to maintain emergence profile will subsequently reduce the plaque accumulation and ease oral hygiene. Consequently, all the above will diminish the long-term prognosis of the health of the tooth.
Sadly, many dentists still fear bonded-porcelain onlays, even though they can be an excellent alternative without the above-mentioned disadvantages. In a recent meeting, a dentist told me that he would not be doing porcelain inlays and onlays anymore because he had to deal with a lot of postoperative sensitivity after doing them. In other meetings, I have also heard comments with regards to the fracture rate of the inlays/onlays. The advancement in restorative materials, including the new porcelain systems, as well as the advancement in cement and adhesive systems, further reduces many of the previous obstacles facing dentists today. Literature shows excellent longevity with ceramic onlays, if done correctly.4,5 However, of greater importance is understanding the proper use of such materials, as well as the new paradigm in preparation and cementation, such as supragingival restorative techniques taught at the Los Angeles Institute of Esthetic Dentistry.6,7
This article will outline the supragingival techniques that can be employed to achieve predictable results when using minimally invasive porcelain onlays.
CASE REPORT
Diagnosis and Treatment Planning
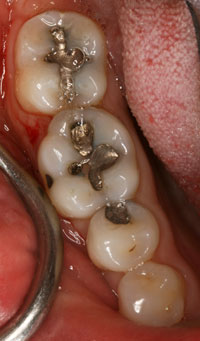
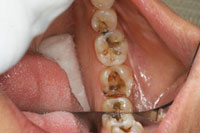
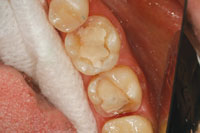
A 38-year-old female patient presented with an amalgam filling that was approximately 18 years old. There was evidence of recurrent caries and hairline cracks (Figure 1). Her primary concern was to restore this and her other teeth with natural-looking restorations. Furthermore, she had experienced cuspal fracture on the opposing arch in the past. However, she was unsatisfied with the amount of tooth reduction required to deliver the PFM crown that was done by her previous dentist (Figure 2). She stated that she desired to have conservative replacements for her silver filling restorations, using tooth-colored materials. It is interesting to note that almost all my patients have the same expectations. In the last year, I placed only one gold onlay, and that was for a retired dentist. However, as part of our informed consent process, all patient options are discussed including the gold onlay, but I always get a quizzical look. Put simply by a 30-year-old patient: “Are you kidding me?”
 |
 |
| Figure 1. Failing amalgam restoration on tooth No. 19. | Figure 2. Opposing PFM restoration. |
 |
 |
| Figure 3. After removal of the amalgam filling. | Figure 4. Long bevel on the buccal for better blending of the margin. |
 |
 |
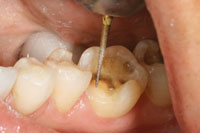
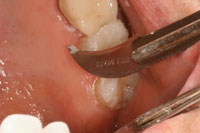
| Figure 5. Opening the proximal contact. | Figure 6. Onlay preparation with valuable enamel left intact. |
The preparation, impression, and temporization of nonmetal bonded restorations using supragingival techniques are more simple and practical procedures. Once the dentist gains confidence in these procedures and has a system in place, he/she will not want to do another PFM (unless it is the only indicated treatment possible). Since the retention comes from the use of a reliable adhesive bonding material, the use of retention grooves, exact preparation design, and axial height requirements are eliminated. Thus, we preserve tooth structure and stay away from the gingiva. By following simple principles and using creative sense, a dentist can satisfy a patient’s cosmetic expectations as it may apply.
Preparation Technique
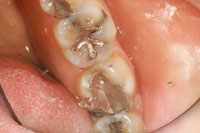
The old restorations were removed and the pulpal floors were examined for the presence of any hairline cracks and decay that would need to be removed (Figure 3). It is important to be conservative in the preparation, yet there is room to make clinical judgements based on the specific conditions present. If the cusp is weak, or thought to be fractured, the cusp should be onlayed with a minimum of 2.0 mm of occlusal reduction, avoiding the creation of any sharp line angles. Since the all-ceramic (nonmetal) materials allow for light transmission, the aesthetic result can be hindered if serious residual stains are not removed.
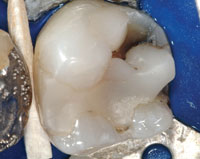
If the tooth is within the aesthetic frame on the facial, a long and rounded bevel will help maximize the contact lens effect and blend into the margin better (Figure 4). Use a round-ended bur (G196-026 [DiaGold]) to finalize the preparation and a thin pointed taper bur (G166-014S [DiaGold]) to open the proximal contacts (Figure 5). To maximize the long-term strength and integrity of the bond, it is ideal to finish the margin on the enamel (Figure 6). Deeper preparation (closer to the pulp) may require addition of resin-modified glass ionomers (such as Riva Light Cure [SDI]) (Figure 7). This technique has drastically reduced long-term postoperative sensitivity problems in our practice. However, one should be aware that sometimes the ion exchange effect associated with this material may cause a transient sensitivity during the first 48 hours. It is a good idea to discuss this with the patient as part of the postoperative instructions.
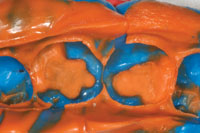
The longer and deeper bevel was performed on the facial surface No. 19 as the mesiofacial cusp was included in the preparation (Figures 4 and 6). Since there was no need for cord placement and all the margins were supragingival, taking the vinyl polysiloxane (VPS) (Take 1 Advanced [Kerr], light body wash fast set and heavy body tray fast set) final impression was much simpler (no tissue/fluid control issues and air-drying is easier) and the outcome was perfect. This is just one of the many advantages of practicing supragingival dentistry, whenever possible. An additional advantage is that the dental laboratory team does not have to play a guessing game with regard to the exact placement of the margin. Furthermore, any VPS impression material is suitable for this technique (Figure 8).
 |
 |
| Figure 7. Application of resin-modified glass ionomer. | Figure 8. An accurate vinyl polysiloxane final impression was taken. |
 |
 |
| Figure 9. Provisional restoration. | Figure 10. The preparation was cleaned prior to try-in. |
 |
 |
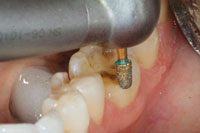
| Figure 11. The enamel was etched and the bonding adhesive was applied. | Figure 12. Resin cement was applied directly into the preparation. |
Placing the Temporaries
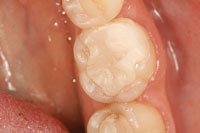
The practical paradigm shift applies to provisionalization when doing supra-gingival dentistry. The preparation design will dictate the use and type of temporary material that is chosen. The first and the simplest material to use (when there is adequate retention form in the preparation design) is a single component, light-cured resin material (such as Fermit [Ivoclar Vivadent]). When using these resin-based inlay/ onlay temporary materials, applying a separating (lubricating agent) to the preparation is highly desirable due to the stickiness of these materials. A second option is a traditional crown and bridge temporary with the use of a conventional temporary cement such as (Tempbond [Kerr]) or plain flour with no fluoride (Figure 9). The final temporization technique used in this case involved the use of resin cement (TNE [Temrex]). The use of resin-based temporary cements are slightly more technique sensitive. However, resin-based cements will provide the adequate adhesion required to keep the temporaries in place prior to the cementation appointment. The use of resin-based temporary cements will be necessary as more complex supragingival restorations are employed (such as an onlay restoration after root canal treatment) instead of the traditional full-coverage crowns.
Final Delivery of the Restorations
 |
 |
| Figure 13. Light-curing. | Figure 14. A No. 12 surgical blade was used to clean away the excess cement. |
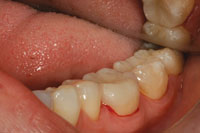 |
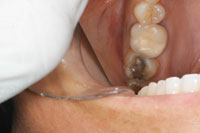
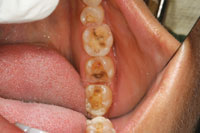
| Figure 15. The final restoration, as it appeared immediately after cementation. |
Supragingival nonmetal dentistry calls for the use of adhesive bonding to keep the restoration in place, instead of relying on axial resistance and retention form. It is important to understand the limitations of your adhesive system and to use the materials exactly as recommended by the manufacturer. After removing the temporary, the preparation was cleaned with Opticlean [Kerr] or flour of pumice with no fluoride. In some cases, such as with a resin modified temporary cement, a diamond bur (G198-014S [DiaGold]) may be used with a very gentle brushing movement to clean the surface of the preparation. (Note: Pay special attention not to change the integrity of the preparation design while doing this.) The resin cements used in the supra-gingival zone are extremely forgiving in microscopic junctions.
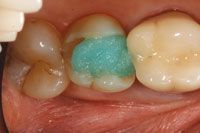
Next, an antimicrobial wash (Consepsis [Ultradent Products]) was used to clean the preparations (Figure 10). The lithium disilicate onlay (IPS e.max [Ivoclar Vivadent] was tried-in to ensure that fit was correct. Then, the enamel was etched for 5 seconds, leaving the internal pulpal floor alone (Figure 11). This step reduces postoperative sensitivity and increases the long-term prognosis of adhesion at the margin. If the internal surfaces of the onlay were modified, be sure to re-etch with HF acid and then silanate the internal aspects for 90 seconds. Next, the preparation was saturated with self-etching dentin-enamel bonding system (Go! [SDI]) for 20 seconds, and then air-dried for 5 seconds. A dual-cured, self-adhering resin cement (seT [SDI]) was then applied to the prep, and the restoration was seated immediately (Figure 12). Excess unset resin cement was cleaned away and the interproximal margins were immediately and carefully flossed (Original Glide [Crest]) to reduce the amount of excess cement that would require attention after being light-cured in these more difficult to clean areas. (Flossing and any needed cleaning with instruments/strips after curing may increase the chances for harming the integrity of restoration-to-cement and cement-to-tooth bonds at the margins.) The restorations were then light-cured for 5 seconds and a new No. 12 Bard Parker Blade was used to remove the excess cement from the margin (Figures 13 and 14). (The use of this sharp blade ensured that the cement was not sheared away from the fragile margins.) An oxygen-inhibiting agent was then applied and the restorations were given their final light-cure for an additional 20 seconds. Finally, the occlusion was checked, and adjusted and polished with polishing cups (as needed) (Dialite porcelain polishing system [Brasseler USA]) (Figure 15).
CONCLUSION
There has been a paradigm shift in dentistry to more comfortable, minimally invasive, and aesthetic options for patients. It is our responsibility as clinicians to master simpler and more conservative supragingival techniques, and to have an in-depth understanding of the how to maximize the benefits of the new materials available to us. In return, our patients will appreciate the minimally invasive treatment, the aesthetic look and feel of their new restorations, and the relative ease of maintaining their dental health, and they will benefit from this paradigm shift.
References
- Ruiz JL, Christensen GJ. Rationale for the utilization of bonded nonmetal onlays as an alternative to PFM crowns. Dent Today. 2006;25:80-83.
- Edelhoff D, Sorensen JA. Tooth structure removal associated with various preparation designs for posterior teeth. Int J Periodontics Restorative Dent. 2002;22:241-249.
- Lareto D. Effects of artificial crown margin extension and tooth brushing frequency on gingival pocket depth. J Prosthetic Dent. 1975;34(6):640-643.
- Krämer N, Frankenberger R. Clinical performance of bonded leucite-reinforced glass ceramic inlays and onlays after eight years. Dent Mater. 2005;21:262-271.
- Posselt A, Kerschbaum T. Longevity of 2328 chairside Cerec inlays and onlays [in English, German]. Int J Comput Dent. 2003;6:231-248.
- Ruiz JL. Supragingival dentistry using metal-free restorations. Dent Today. 2008;27:104-109.
- Kanca J III. Improving bond strength through acid etching of dentin and bonding to wet dentin surfaces. J Am Dent Assoc. 1992;123:35-43.
Dr. Esfandiari is a graduate and faculty member of the University of Southern California. He is also a faculty at Los Angeles Institute of Esthetic Dentistry. He is a sustaining member of American Academy of Cosmetic Dentistry and on the board of the Orange County Dental Association. He has lectured nationally on cosmetic dentistry and has a private practice in Irvine, California, with emphasis in comprehensive cosmetic dentistry. He can be reached at (949) 310-7337 or via e-mail at dramirdds@yahoo.com.
Disclosure: Dr. Esfandiari reports no disclosures.