The Cosmetic Revolution, fueled by 80 million baby boomers who want to remain young and beautiful, has forever changed the relationship between doctors and their laboratory technicians. Times have changed for us all. Smile makeover patients demand perfection and want (1) to be involved in choosing the shape and shade of their new smile, (2) to know what it is they are buying, and (3) to actively participate in approving the final restorations. For this reason, it is imperative that doctors and technicians follow specific communication systems to attain predictable, consistent results (Figure 1).
EFFECTIVE COMMUNICATION STEPS
In the past, communication often consisted of minimally written directives on the prescription (eg, crown No. 13 shade A2), occasional verbal discussions about complex case design or questionable margins, and periodic face-to-face meetings, usually regarding shade issues on challenging cases. For the most part, technicians were attempting to create restorations using stone models without faces.
Here are the steps of communication we have found to be the most effective:
 |
|
Figure 1. Communication tools. |
Step 1
Prior to the patient consultation visit, the doctor consults with the technician to discuss questions regarding product choices, preparation design, and laboratory fee estimate. (This is helpful in determining your fees, which typically begin at 5 times the lab fee.) The technician’s experience with various techniques, products, successes, and failures can be extremely valuable at this stage.
Step 2
 |
 |
|
Figure 2. Smile design tools. |
Figure 3. Stick bite used for mounting. |
 |
 |
|
Figure 4. Lingual finish lines. |
Figure 5. Tissue recontouring. |
The patient and doctor meet to decide on treatment and discuss finances. At this or subsequent appointments, the following information is collected for the laboratory:
(a) A smile design choice from the Las Vegas Institute (LVI) Smile Catalogue, the Lorin Library, the Dorfman Smile Catalogue, or from magazine photographs supplied by the patient (Figure 2).
(b) Preoperative photographs to be e-mailed or sent to the lab, including the following: full-face smile, close-up smile, right and left views of close-up smile, retracted smile.
(c ) If the patient will be imaged (in-office or outsourced), plan to send the photograph to the laboratory.
(d) Stick bite taken with the patient standing to prevent cant during mounting (Figure 3).
(e) Poured study models marked with a thin tip marker to indicate lingual finish lines (Figure 4) and where tissue recontouring, if any, will be done (Figure 5). This information tells the technician where to stop the finish line of the diagnostic wax-up and will significantly decrease the amount of flash to be cleaned up during temporization.
(f) A measurement for the desired length of the central incisors on the finished case, if it is to be different than the study model.
(g) A completed prescription with details for the diagnostic wax-up is then sent to the laboratory along with the above items.
Step 3
Upon arrival at the laboratory of the aforementioned items and information, the technician will again consult with the doctor regarding any additional questions or feedback. We think that technicians have an obligation to honestly inform their doctors of situations that will not produce the best results. This open feedback can prevent a negative experience for doctor, technician, and most of all, the patient.
Step 4
 |
 |
|
Figure 6. Diagnostic wax-up. |
Figure 7. Incisal preparation guide. |
 |
| Figure 8. Impression matrix. |
 |
| Figure 9. Golden Shimbashi spreadsheet. |
Next, the technician will fabricate and send you a diagnostic wax-up, incisal preparation guide, impression matrix, and Golden Shimbashi spreadsheet.
(a) Having a diagnostic wax-up to copy for the temporization ensures that the patient leaves the preparation visit temporized just the way the final restorations will look. Minor desired changes in length or contour can easily be made prior to fabrication of the final pressed ceramic restoration. This drastically reduces the potential for repairs or remakes at insertion, which creates a win-win situation for doctor and technician. We strongly recommend that you not skip this step, even if the patient is anxious to get started, with money in hand. The alternative, doing a chairside mock-up, will not give you the anatomy, contours, and surface texture that can be created by skilled laboratory technicians (Figure 6).
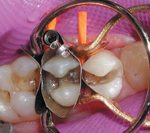
(b) The incisal preparation guide is another insurance policy step to be used at the preparation visit. The guide is made by the technician from the wax-up and is placed over the prepared 6 anterior teeth using the bicuspids as stops to confirm sufficient labial and incisal reduction. This double-checking step will prevent a halo effect in the restoration, which occurs if the incisal third of the prep is not reduced or rolled sufficiently. It also ensures an even thickness in the pressing stage, which maintains continuity of shade (Figure 7).
(c ) An impression matrix made from SilTech (Ivoclar Vivadent) putty with a polyvinyl wash is also created from the diagnostic wax-up. This matrix is used for the temporization, and— because of the wash—it will transfer the detail and surface texture from the wax-up to the temporary. We recommend Luxatemp (Zenith DMG) or Integrity (DENTSPLY Caulk) for the 20-minute, shrink-wrap temporization technique (Figure 8).
(d) Lastly, you will receive a printout of the LVI Golden Shimbashi spreadsheet, created by Dr. Larry Emmott. These dimensions were used to create proper width/length ratios (Figure 9).
Step 5
 |
|
Figure 10. “Crowneer” preparation. |
We recommend a chamfer or shoulder preparation with 2 mm of incisal reduction and 1.5 mm of marginal reduction, breaking all contacts (Figure 10). The preparation is a “crowneer” or three-quarter crown, which provides enough room to press the restoration and then cut it back to layer color and incisal translucency. Gold posts and heavily discolored teeth should be blocked out at the chair with flowable, opaque composite. It is a myth that the technician can correct this during fabrication. In order to block out at the laboratory, an opaque ingot must be pressed, which causes the restoration to lose vitality and look opaque in the mouth.
Step 6
Information for the laboratory should include the following:
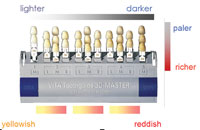
(a) Photographs of situations that will affect shade matching. For example, blocked out gold posts, dark teeth, or variations in color of the prepared dentin. (Photographing a shade guide held up to the preps is also helpful.)
(b) Another stick bite, taken again with the patient standing, will prevent a cant when the case is mounted.
(c) Always spend the extra 5 minutes to take a second impression since dies for the case can be taken from both. This will prevent the “knot-in-your-stomach” phone call from the technician requesting a new impression, especially when it means cutting off and remaking all of the temporaries to get that new impression.
(d) When preparing the final prescription remember to include the following:
• any requested changes from the diagnostic wax-up. (Be sure to send the wax-up back with the case.)
•diagrams or descriptions regarding the amount and location of incisal translucency desired.
•the amount of surface texture desired, using the diagnostic wax-up texture as the median.
•stump and final shades, including diagrams of blends.
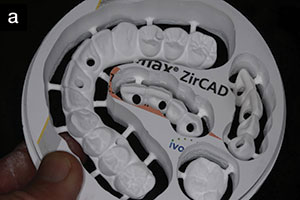
•final restoration product choice (or choices).
Step 7
On the day following preparation, schedule a consultation to verify the patient’s satisfaction with the size, shape, and contours of the temporaries as well as phonetics. If minor in nature, changes can be communicated to the technician via fax, e-mail, or a new study model. If significant changes are needed, it is better to stop now, have the diagnostic wax-up changed or redone, have a new impression matrix made, and retemporize the patient until he or she is completely satisfied. Spending the time now may prevent you from having to cut off permanently bonded restorations—everyone’s nightmare. We had one doctor’s patient temporized 3 times before she was satisfied with the temporaries, but the final restorations went in without a hitch.
Step 8
 |
 |
|
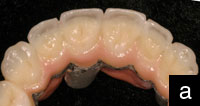
Figure 11. Finished restorations. |
Figure 12. Becden’s cosmetic presentation box. |
When the case arrives at the laboratory, the technician will follow all information from (1) the original prescription, (2) recorded phone conversations, and (3) final prescription. Another SilTech matrix is made to ensure the finished restorations follow the diagnostic wax-up (Figure 11).
Step 9
After the final qualitycontrol inspection, the restorations are placed in a cosmetic presentation box to be used to enhance the “experience” of the patient’s insertion visit. The patient also receives a gift and a congratulatory note from our laboratory that also compliments the talents of his or her doctor (Figure 12).
Step 10
The final step in this system, one that is often neglected, is to send the before- and-after photos and patient testimonials to the laboratory. This is very useful in 2 ways: first, to let technicians see the “fruits of their labor,” and second, for laboratory trainers and management to use the photographs in training sessions in the never-ending quest toward perfection.
CONCLUSION
The system described in this article may seem time-consuming or even a little neurotic. However, those doctors who follow it create “raving fans” out of their patients, who in turn create an internal network of referrals.
Mr. and Ms. Vasquez are the owners of Becden Dental Laboratory, Inc. Together, they have over 70 years of dental experience. An RDH and an expert in dental practice management, Ms. Vasquez’s innovative solutions have made her an authority in dental practice operations. Mr. Vasquez brings years of bench and chairside technical experience to every restoration created by Becden. For more information, including seminar information, visit becdendental.com or e-mail becky@becdendental.com.