Taking a bur to virgin enamel is always serious business and the younger the patient the more serious it becomes. As Mjor has demonstrated, decisions made about a tooths first restoration may trigger a cascade of events that runs throughout the patients life, significantly affecting the lifetime cost of preserving the tooth.1
Despite remarkable advances in cosmetic materials, healthy enamel (even if it’s seriously discolored) provides the best possible protection for the tooth. Thats one reason why the decision to restore the teenage or preteen patient for purely cosmetic reasons requires careful consideration. In addition to the biologic cost, the economic cost may also be a problem. For adult patients, elective dentistry is a choice that can often be postponed or budgeted for. In contrast, parents of a young patient often face simultaneous expenses for several children (future education, clothes, medical bills, piano lessons, etc), some of which cannot be budgeted for.
Young patients (particularly young female patients) below the age of 18 are highly vulnerable to self-image/esteem problems. British social anthropologist Kate Fox observed that human infants begin to recognize themselves in mirrors at about two years old. Female humans begin to dislike what they see only a few years later. 2 In one US survey, 81% of 10-year-old girls (fifth graders!) had dieted at least once.3
It’s sometimes hard to remember just how emotionally difficult your teen and immediate preteen years were. They’re even more difficult for children who are seen as different. Teasers haven’t yet learned the rules of good-natured kidding, and the teasees haven’t developed emotional calluses to deal with it. In fact, teasing in middle school and high school is perceived as such a problem that psychologists have developed the Child-Adolescent Teasing Scale (CATS) to measure and study it.4
That is the dilemma of preadolescent cosmetic dentistry. You must weigh the potential cost of restoration (both economic and biological) against the emotional cost of doing nothing.
CASE REPORT
The preteen patient poses particular problems for elective cosmetic dentistry. Is tooth reduction really justified? Even when the benefits clearly outweigh the costs, you have to do things very differently than you would for your adult patients. The following case illustrates some of the special considerations involved in planning and executing the cosmetic rehabilitation of a young patient I recently saw in my practice.
 |
 |
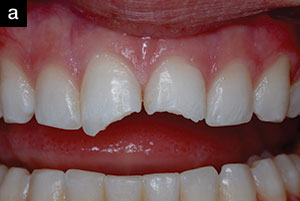
| Figures 1 and 2. This 11-year-olds mottled teeth had received too much negative attention from classmates. |
Danielle (not her real name) was an attractive 11-year-old female with severely mottled teeth. Dark brown striations and frosted opaque white areas marred an otherwise lovely smile (Figures 1 and 2). She reported that because of her teeth, she had been the subject of ridicule at school.
The teeth were healthy and tested normal in a pulp vitality test. The patient had a history of good oral hygiene. Her permanent cuspids had not yet erupted. Unfortunately, the staining was not superficial, so the most conservative options (bleaching or acid-etch bleaching) were not viable.5 Furthermore, bleaching would not reduce the white blotches that were present. Because the patient took excellent care of her teeth, I suggested to the parents that she would be a good candidate for direct composite veneers on teeth Nos. 7 through 10.
Danielle’s parents were apprehensive about the proposed treatment. Her mother was worried about the final appearance of the restored teeth. She thought most people could distinguish fillings from real teeth. Her father was concerned about the high cost of what he suspected would be a temporary fix. He had heard that veneers could be as expensive as crowns. Moreover, he was convinced that a reasonable result could be had by restoring the 2 central incisors only, thus reducing the cost. I explained to him that doing so would most likely result in exchanging one problem for another.
 |
 |
 |
 |
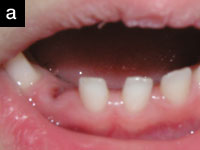
| Figures 3 through 6. The mothers apprehensions were addressed by reviewing a similar case we had restored with direct composite veneers. |
It was relatively easy to address the mothers concerns. Our practice maintains digitized documentation of virtually all our restorative work. We reviewed several direct laminate cases, including one 17-year-old girl with very similar mottled enamel (Figures 3 through 6). The fathers concerns about cost and permanence were a bit more complicated. I explained the difference between porcelain veneers (relatively expensive, virtually impossible to modify, appropriate for mature mouths, etc) and direct veneers (less expensive and easily modified). The ability to add to and repair veneers is important for a young patient like Danielle. As she grows, there will be considerable gingival remodeling. Direct composite allows me to adjust the restorations to compensate for these changes.
Although some authors have described using ceramic veneers for children (even on primary dentition!),6 I much prefer direct composite veneers. They are much less expensive, easier to modify, and frequently involve less tooth reduction. And typically, direct composite doesn’t require a path of insertion as do indirect veneers, reducing the need for excessive removal of tooth structure.
After thoroughly discussing their concerns, Danielle’s parents agreed to treatment. We scheduled Danielle for a 2-hour morning appointment.
TECHNIQUE AND MATERIALS
 |
| Figure 7. For adult veneers, the preparation routinely wraps the incisal with a chamfer or rounded butt margin on the lingual. The facial prep frequently extends into the dentin. For juvenile veneers, the preparation ends short of the incisal edge and the facial reduction is much thinner. |
After administering a single carpule of Septocaine 4% (Septodont) to the anterior maxilla, I prepared teeth Nos. 7 through 10. For my adult patients, tooth preparation for direct veneers is similar to that for lab-processed veneers (Figure 7). I routinely wrap the incisal, creating a chamfer 2 to 3 mm on the lingual, or create a rounded butt joint interface after having shortened the tooth. This allows a substantial bulk of material at the margin without feather edges. With the margin on the lingual, occlusal forces are less apt to pop or chip the veneer.
 |
| Figure 8. One side prepped for comparison. |
 |
 |
| Figures 9 and 10. The completed preparations are very shallow. |
However, I prepared Danielle’s teeth differently. I wanted to preserve as much protective enamel as possible, including the incisal edge, so I ended the preparations on the facial, creating a conservative chamfer just shy of the incisal edge (Figure 8). Notice that the preparations are very shallow (Figures 9 and 10). I could have removed another half mm of tooth structure and still been in enamel.
 |
| Figure 11. Epic-TMPT was selected for this case because of its high translucency and affinity for later add-ons. |
Dentistry has an abundance of good cosmetic composites, with more being introduced every day. For this particular case, I chose an old favorite, Epic-TMPT (Parkell, Figure 11), a microfill with a bonded organic filler. Though I frequently use other composites, I have a long enough history using this material to know what to expect of it. Its high translucency creates excellent vitality without time-consuming layering. And there was another benefit for this particular patient: Epic restorations have proven very easy to add to later. Not only does it adhere well to previous applications, but color consistency from batch to batch is excellent. Even after a restoration has been in the mouth for several years, when polished to the ultra-high gloss that Epic is capable of, demarcations between original and added materials are indiscernible.
I have enough confidence in current bonding technology that when an adult patient has serious discoloration, I frequently reduce the tooth into the dentin to allow sufficient composite thickness to mask it. But for obvious reasons, aggressive tooth preparation was not an option for this patient. I hoped the teeth would not require a layer of opaque resin to prevent show-through. An opaquer might deaden the appearance and likely create the effect that Danielle’s mother was concerned about. Again, Epic has demonstrated the ability to mask a variety of dental discolorations while at the same time retaining a vital, natural appearance.
 |
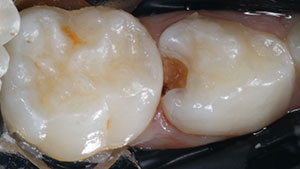
| Figure 12. To ensure that the composite would adequately mask the discoloration and select the best shade, test buttons were cured in place (A1 on the right, B1 on the left). |
As you can see in Figure 10, about 80% of the brown stain was removed during tooth reduction. However, the remaining enamel was still mottled, opaque, and frosty. To determine whether the translucent composite would adequately mask this remaining discoloration, I created test buttons. Before etching the teeth or applying a bonding agent, I layered composite over teeth Nos. 8 and 9 (B1 on one tooth, A1 on the other; Figure 12). After curing, it was clear that either shade would do the job quite nicely without the need of an opaquer. B1 was chosen since this shade better complemented her coloring as well as the underlying shade of her other teeth.
 |
| Figure 13. Self-etch bonding agent was applied to prevent postoperative sensitivity. |
I popped off the test veneers and etched tooth No. 8 with 35% phosphoric acid. When creating direct veneers, I prefer to etch and bond one tooth at a time, always starting with a central incisor. After thoroughly rinsing and lightly drying the enamel, I applied a self-etch dentin bonding agent (Touch Bond, Parkell, Figure 13). As mentioned, I was virtually certain my bur never penetrated the DEJ. If I was wrong, however, the bonding agent would protect any exposed dentin and prevent sensitivity. (Note: Some might suggest that applying a self-etch bonding agent after phosphoric acid may over-etch any exposed dentin. However, research into this particular bonding agent suggests that any increase in the depth of etch is fully filled by the adhesive resin.7)
 |
| Figure 14. Initial buildup with Mylar strip in place. |
Because the cuspids had not yet erupted, I took great care to maintain the natural contours of the teeth. Any improvement on nature might create crowding problems in the future. An initial application of B1 Epic was placed onto tooth No. 8 and spread over the preparation using a stick-free aluminum plastic instrument. Two additional stripes of material were added on either side, keeping the composite shy of the proximal margins. I used my gloved finger to compress and smooth the surface. A Mylar strip was slid between the centrals, and composite was buttered into the proximal area (Figure 14). This procedure was repeated for the distal proximal margin. The material was intentionally overbulked. That way I could finish the surface back to the desired contour.
After the direct composite veneer on tooth No. 8 had been placed and cured, I repeated the procedure for tooth No. 9.
 |
| Figure 15. The central incisors were first roughed out. |
The final contours were established using a Brasseler No. 9 finishing bur (8 and 16 fluted versions). I turned off the water spray during shaping to make it easier to assess the contour (Figure 15). Then I quickly polished the composite using an Enhance polishing cup (DENTSPLY Caulk). Preliminary polishing at this stage allows me to evaluate accurately the shade and contour.
 |
| Figure 16. The completed veneers after polishing (no glaze). |
Once the centrals were judged acceptable, the laterals were quickly veneered. Final polishing consisted of Enhance cups followed by medium and fine Enamelgloss polishing pastes (DENTSPLY Caulk, Figure 16). (Note: Epic has relatively high flow. Unless it is cured within seconds of placement, it will tend to creep subgingivally, particularly in the presence of a light chamfer, as in this case. One modification worth considering would be using a stiffer hybrid or microhybrid composite for the gingival margin. This bead of composite would reduce the need to introduce finishing instruments subgingivally.)
 |
| Figure 17. Both patient and parents were delighted. |
The total time required to veneer these 4 teeth? Two hours. The patient reaction? See Figure 17.
CONCLUSION
Following are my suggested considerations for cosmetic rehabilitation of young patients:
• If the patient doesn’t perceive the cosmetic defect as serious, do nothing. The objective is to make the patient (not you, not the parents) content with his/her appearance.
• If the patient is unhappy with his/her appearance, the least treatment that restores self-esteem is the best treatment.
• Be as conservative as possible when prepping teeth. Take particular care to keep the bur in the enamel.
• Cost will probably be more important for young cosmetic patients than for adults.
• Plan for inevitable modifications. The patient will grow. Tissue will change. Teeth may shift as other teeth erupt. Do not do anything that cannot be modified.
References
1. Mjor IA. Problems and benefits associated with restorative materials: side-effects and long-term cost. Adv Dent Res. 1992;6:7-16.
2. Fox K. Mirror, mirror: a summary of research findings on body image. Oxford, England: Social Issues Research Centre; 1997; Available at: http://www.sirc.org/publik/mirror.html. Accessed. September 24, 2003.
3. Mellin LM, Scully S, Irwin CE. Disordered eating characteristics in preadolescent girls [abstract]. Presented at: Meeting of the American Dietetic Association; 1986; Las Vegas, Nev. Also available in: J Am Diet Assoc. 1992;92:851-853.
4. Vessey JA. Development of the CATS: Child-Adolescent Teasing Scale. Bethesda, Md: National Institute of Nursing Research; 2000; Publication R01 NR04838.
5. Welbury RR, Shaw L. A simple technique for removal of mottling, opacities and pigmentation from enamel. Dent Update. 1990;17(4):161-163.
6. Aron VO. Porcelain veneers for primary incisors: a case report. Quintessence Int. 1995;26(7):455-457.
7. Honda N, et al./Sun Medical Co Ltd. Adhesion of water-based bonding agent to air-dried dentin etched with phosphoric acid. Presented at: 4th International Congress on Dental Materials; Honolulu, Hawaii; October 29 – November 1, 2002.
Dr. Goldstein practices general dentistry in Wolcott, Conn. He lectures and writes extensively concerning cosmetics and the integration of digital photography into the general practice. A contributing editor for Dentistry Today, he has also authored numerous articles for The Compendium, CERP, and other dental publications. He can be contacted at martyg9242@cox.net or at (203) 879-4649. His current speaking schedule can be found at dhapc.com. Information on his hands-on lecture series, Comfort Zone Cosmetics, can be found at smilevison.net.