


INTRODUCTION
When it comes to executing a smile makeover, dentists have a variety of direct and indirect techniques to consider.1 With the emphasis today on minimally invasive techniques to preserve tooth structure and demand from patients for a natural-looking treatment result, direct resin composites have catapulted to the forefront as a method to save as much tooth structure as possible while providing the patient with long-lasting, highly aesthetic restorations that blend seamlessly in the mouth.2-4 Whether repairing enamel defects or a fracture on a single central; closing a diastema; or improving aesthetics by altering tooth size, shape, color, length, or alignment, chairside direct composite resin restorations provide the clinician and patient with a restorative option that is not only highly aesthetic and durable but also the least invasive, the most time-efficient, and more cost-effective.
However, the direct composite restorative option has historically challenged clinicians in terms of its technique sensitivity, aesthetic predictability, and often time-consuming nature, potentially leading to aesthetically disappointing results. To avoid these pitfalls, clinicians often turn to an indirect approach, prescribing minimally invasive or no-prep veneers. However, there are times when patients can neither afford the expense nor the time for the fabrication of indirect porcelain restorations and desire a chairside solution that not only meets these limitations but also preserves natural tooth structure.
Fortunately, advances in resin composite materials and adhesive techniques offer the ability to correct defects in the anterior arch chairside that ensure optimal aesthetics and strength as well as wear resistance.5 One of the most common treatment options for these patients is the direct composite veneer. These restorations have proven to be functional, highly aesthetic, and long-lasting ones that mimic natural dental tissues in the anterior region.
This case report describes a step-by-step smile makeover with direct composite veneers to correct defects on the central incisors and the tooth shapes, length, and shade of teeth Nos. 4 to 13.
CASE REPORT
A healthy 32-year-old male presented to the practice with the chief complaint that he disliked the shapes of his asymmetric teeth and lacked tooth display when smiling or speaking (Figure 1). As a recovered drug addict with plans to marry in the near future, he wanted a bright new smile for his wedding day and to regain his self-confidence. However, he was adamant that saving natural tooth structure and his limited finances must be top considerations for any treatment plan presented.
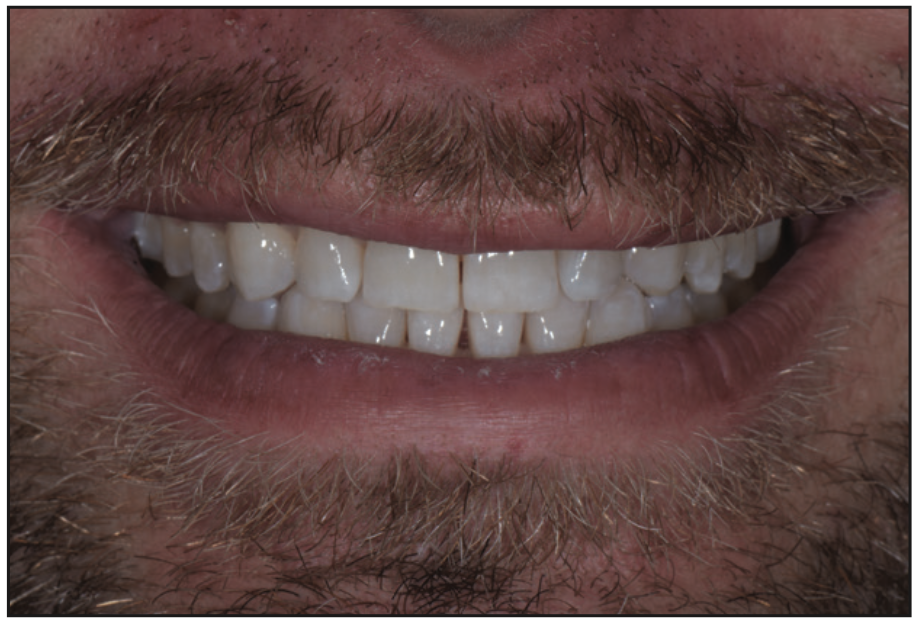
Figure 1. Preoperative photograph of a patient concerned about his lack of tooth display when smiling, the color and shape of his teeth, and the chipping of his central incisors.

Figure 2. An intraoral scan of both arches revealed a constricted bite with visible wear on teeth Nos. 7 to 10 and chipping on teeth Nos. 8 and 9 caused by intrusion with the patient’s lower teeth and a large diastema.
Initial examination and intraoral scans of both arches revealed a constricted bite with visible wear on teeth Nos. 7 to 10 and chipping on Nos. 8 and 9 caused by intrusion with the patient’s lower teeth (Figure 2). He had a large, 4-mm diastema between teeth Nos. 8 and 9 and saturated chroma from Nos. 6 to 11. Radiographs showed no decay in the anterior arch. Periodontal probing revealed pockets of 2 to 3 mm with no bleeding. The patient was in good health with no allergies or medical concerns.
Treatment Plan
To preserve his natural tooth structure and meet his financial goals, direct composite veneers were prescribed for teeth Nos. 4 to 13.5 Prior to restorative treatment, however, it would be necessary to treat the intrusive interference that was causing wear and chipping of his maxillary anterior teeth to ensure the longevity of the final restorations (Figure 3). Clear aligner therapy (Invisalign [Align Technology]) was prescribed for both arches to slightly flare the anterior teeth forward 1.5 to 2.0 mm, rotate tooth No. 10 into proper position for composite layering, and help close the diastema as much as possible while intruding the lower anterior teeth to create a non-intrusive anterior relationship. An intraoral scan (iTero [Align Technology]) of the patient’s upper and lower jaw was performed, and a series of aligners were ordered. The patient was instructed to change the aligners each week for the next 15 weeks to complete the therapy (Figure 4).
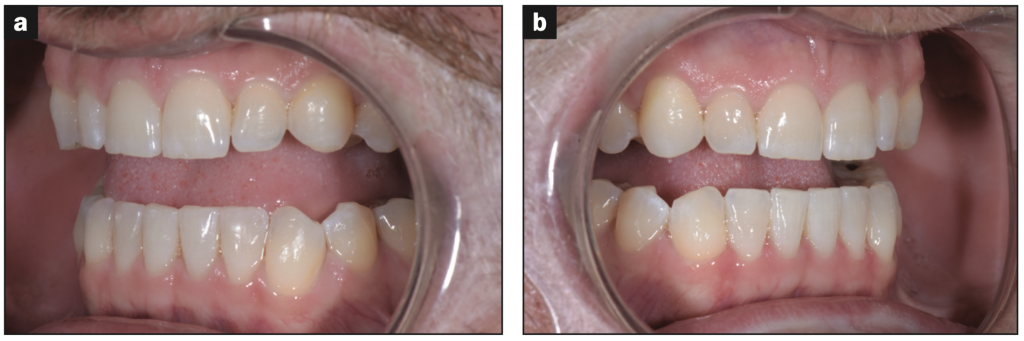
Figure 3. Prior to direct resin composite restorative treatment for veneers on teeth Nos. 4 to 13, clear aligner therapy was prescribed for both arches to flare the anterior teeth forward to create a non-intrusive relationship.
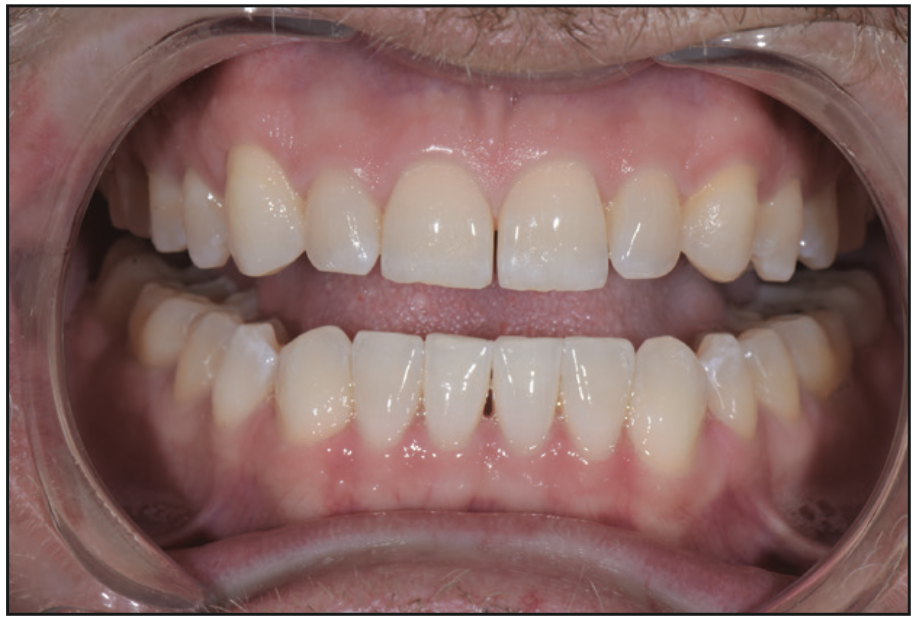
Figure 4. After 15 weeks of aligner ther- apy, the anterior relationship had been cor- rected, and the 4-mm diastema between teeth Nos. 8 and 9 closed to 0.5 mm.
The goal of the final direct composite restorative treatment was to bring his smile closer to golden proportions by lengthening his central incisors to match the length of teeth Nos. 6 and 11 and lengthen Nos. 7 and 10 to create a 0.5-mm step from the centrals to the laterals and permanently close the diastema.
Treatment
Once the orthodontic therapy was completed to provide a corrected anterior relationship and reduce the diastema from 1 mm to 0.2 mm, intraoral scans and a series of photos of both arches were taken (Figures 5 to 10) to fabricate a diagnostic wax-up for ideal tooth contour, shape, and occlusion. Once the patient approved the proposed treatment plan, a silicone putty matrix was fabricated and cut back to use as a lingual guide for tooth lengthening during the direct composite application. Because the index is the exact length and form of the patient-approved diagnostic wax-up, using the silicone index will guide the clinician in transferring the desired final outcome to the mouth.
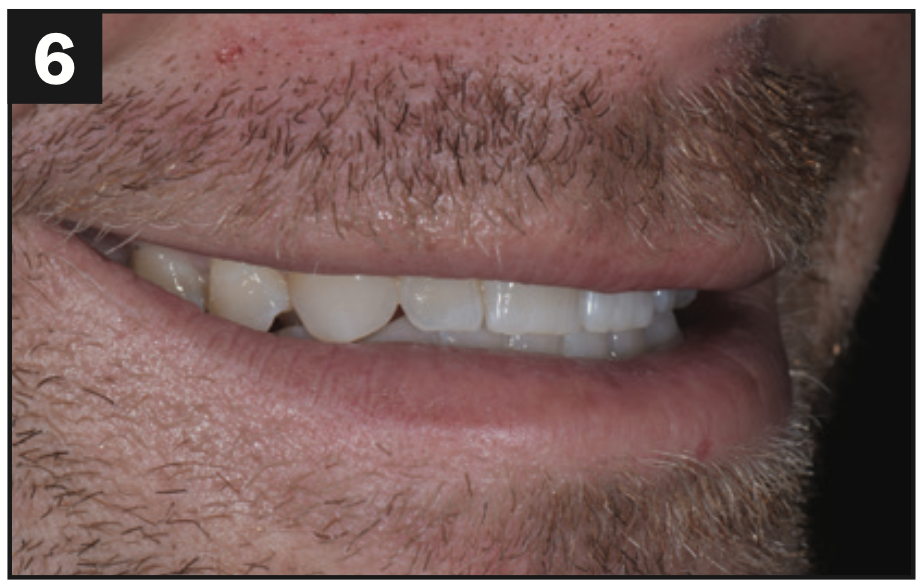
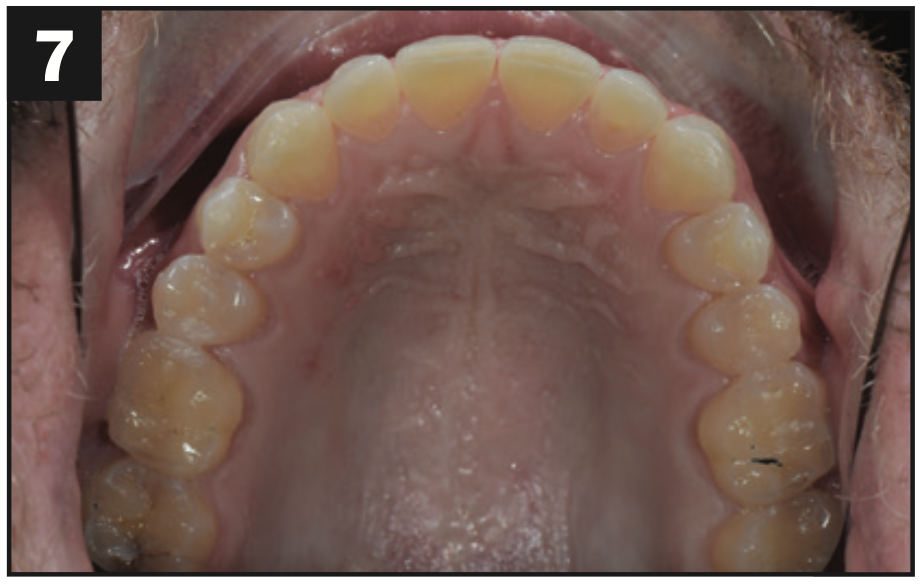
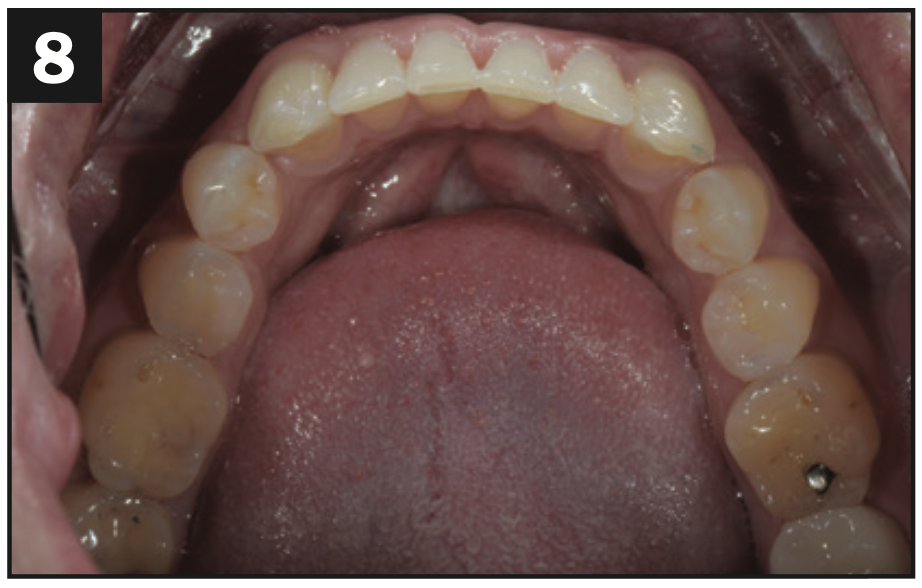
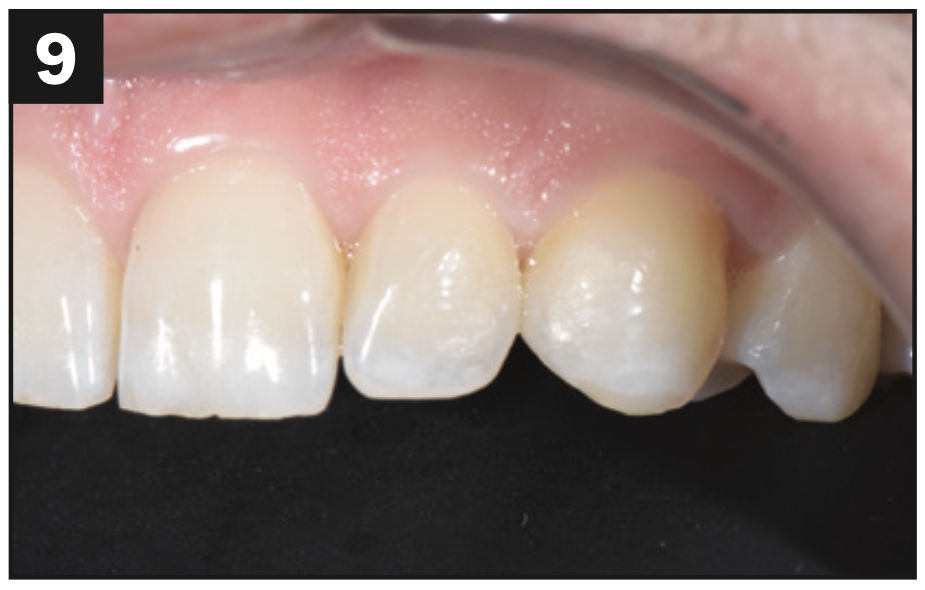
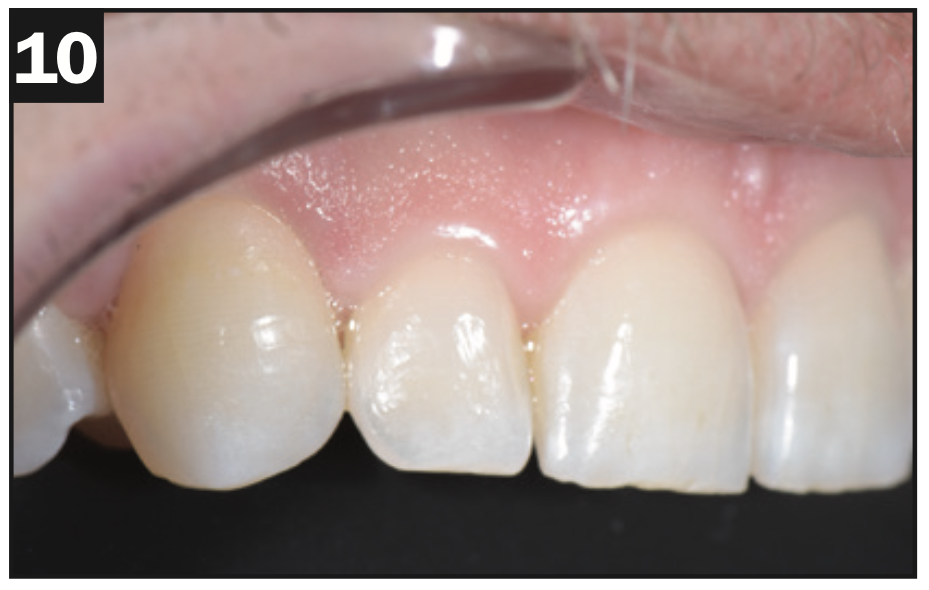
Figures 5 to 10. A series of treatment photos and intraoral scans of both arches were taken to fabricate a chairside diagnostic wax-up and create a silicone putty matrix to guide the application of direct composite veneers.
The patient was anesthetized with Lidocaine 2% with 1:100,000 epinephrine. Critical to aesthetic success when using the direct composite method is selecting the correct tooth shade. Shade analysis and matching should be completed while the patient’s teeth are hydrated and prior to isolation as dehydration results in teeth appearing whiter than if hydrated. A highly versatile composite (Inspiro [Edelweiss]) was chosen for this case due to its multiple shade options and ease of use. Skin and body shade tabs with glycerine were used to appropriately match the teeth to the proposed shade. Glycerine allows hydration between the tabs to give the true essence of how the shade will look in a “wet environment” like the mouth. The shades chosen for the layering technique were dentin shade Bi1 and enamel skin shade white and skin shade bleach to brighten and whiten the patient’s smile.
The patient was retracted (OptraGate [Ivoclar]), and the fit of the putty matrix was confirmed prior to the start of bonding. Teeth Nos. 4 to 13 were air abraded with aluminum oxide at 40 psi (Figure 11), etched with 37% phosphoric acid for 20 seconds, and then rinsed thoroughly. Once a frosty appearance was confirmed, a bonding agent (OptiBond Universal [Kerr]) was applied and cured after airing the solvent.
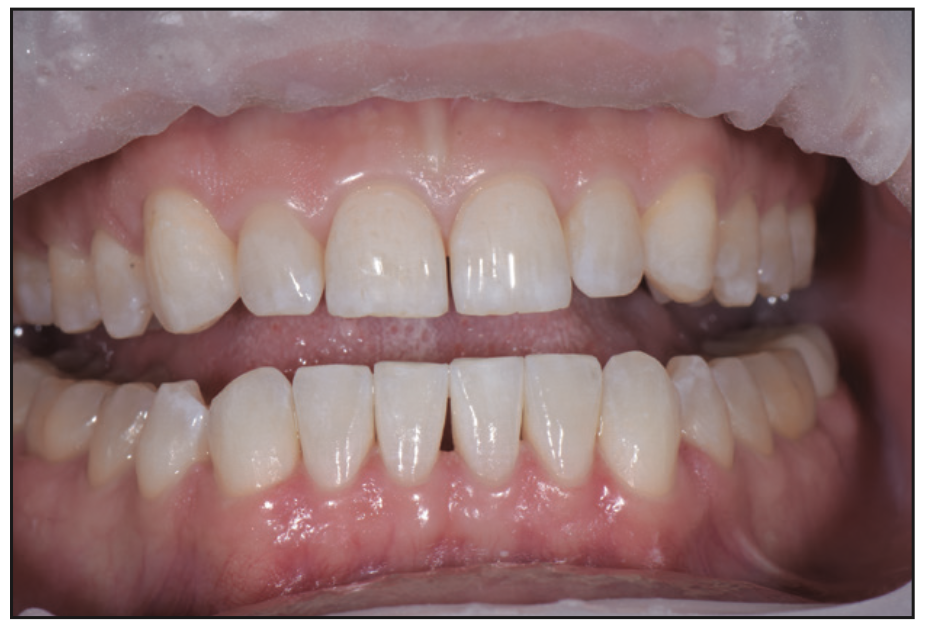
Figure 11. Prior to composite application, teeth Nos. 4 to 13 were air abraded with aluminum oxide at 40 psi, etched with 37% phosphoric acid for 20 seconds, and then rinsed thoroughly.
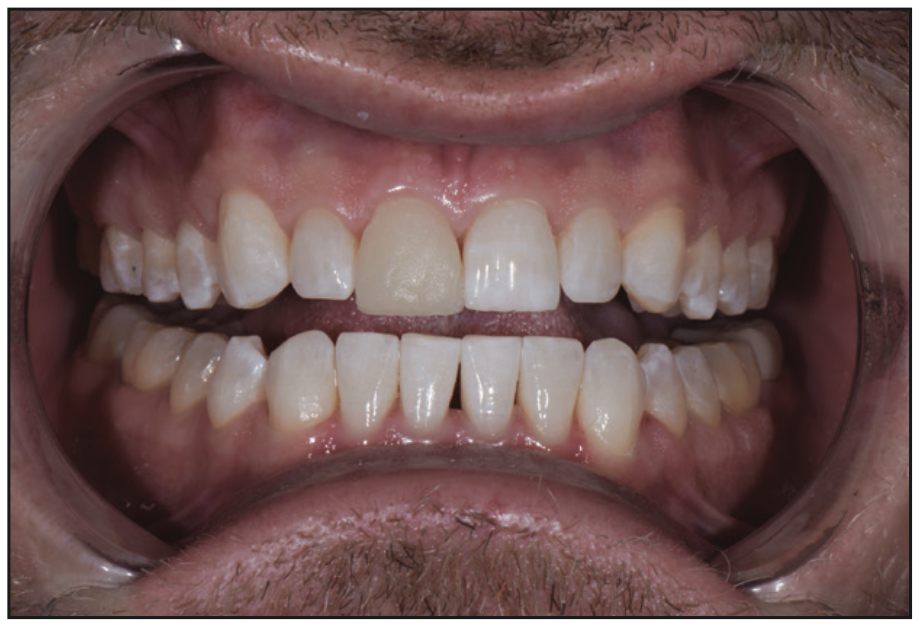
Figure 12. It was critical to establish the correct length, shape, and contour for the central incisors as a guide to layering the remaining teeth. Here, a dentin layer was applied to tooth No. 8 to establish the exact length envisioned.
For this case, it was critical to first layer the 2 central incisors to establish the exact shape, contour, and aesthetics that would guide layering of the remaining teeth.6-8 Beginning with tooth No. 8, a thin layer of skin shade was applied onto the lingual matrix and placed onto the tooth. The layer was held in place and cured. Next, a thin layer of Bi1 dentin was placed over the facial aspect and light cured to establish the correct length and desired shape (Figure 12). In order to establish the final white color of the composite veneers, the last layer placed was the skin bleach shade, then it was cured. A cutback window technique was used to create the space needed to apply tints and chromatic enamel shades. A fine diamond chamfer bur angled toward the cervical was used to create a bevel-like window 0.5 mm to 1 mm from the incisal edge. This technique provided a more natural appearance of the composite restoration and gave it greater dimension. Tint shades (inspiro Effect Shades Ice and Azur [Edelweiss]) were applied to the incisal edges and then covered with a thin layer of achromatic enamel (inspire Skin White [Edelweiss]). Once the central incisors were finalized, veneering of the remaining teeth followed the same procedure (Figure 13).
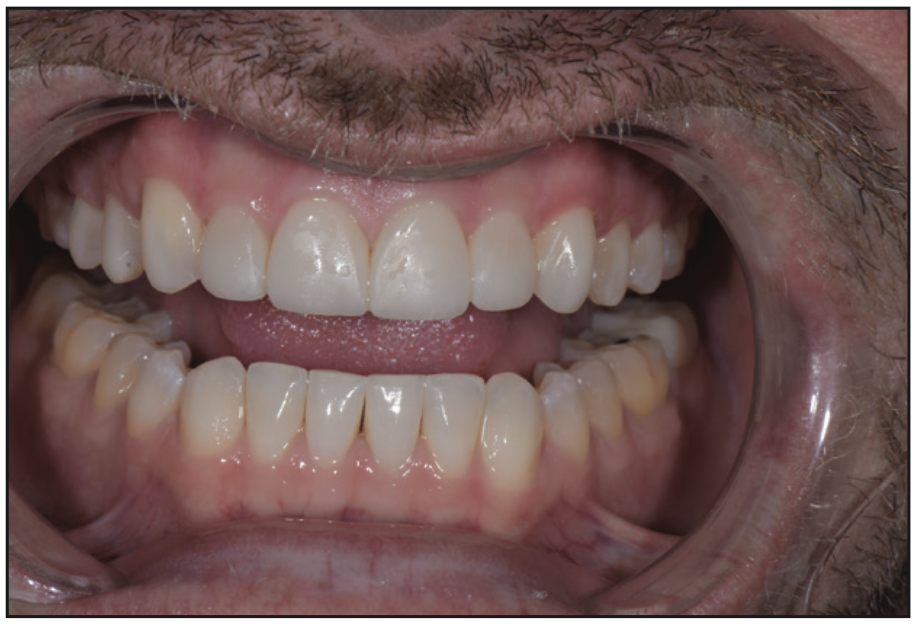
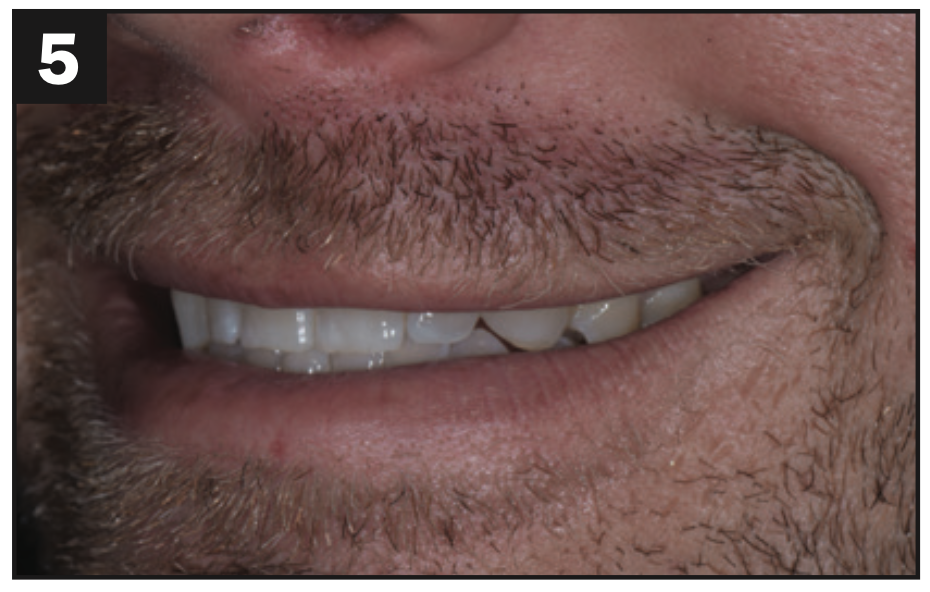
Figure 13. Once the shape, contour, and color of the central incisors were established, veneering of the remaining teeth was performed.
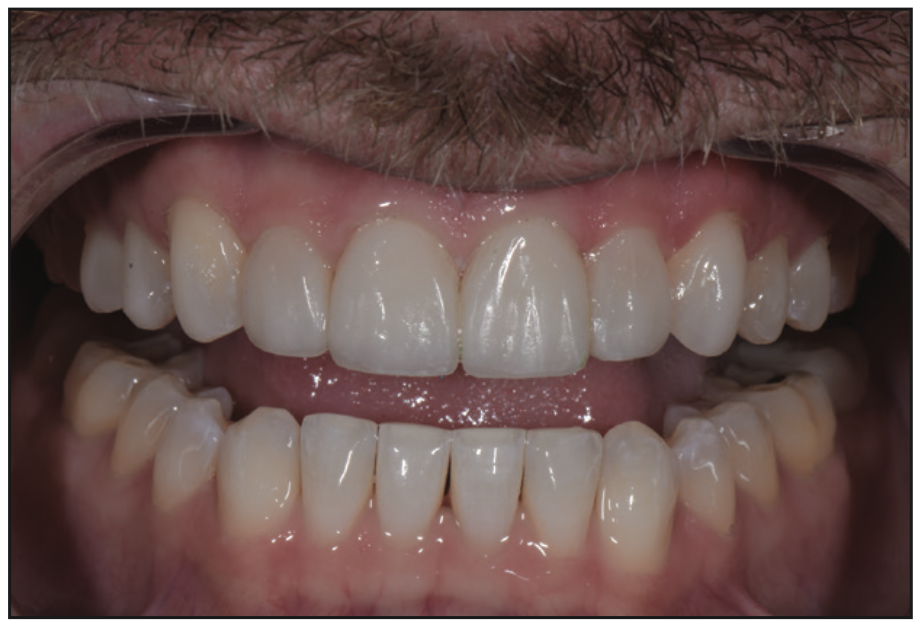
Figure 14. The veneered teeth were shaped using a disc, and the application of secondary and tertiary anatomies was completed.
The teeth were contoured and shaped using a disc (Cosmedent), and secondary and tertiary anatomies were placed (Figure 14). Then final polishing was performed using polishing paste (Enamelize [Cosmedent]) and polishing discs (FlexiBuff [Cosmedent]).
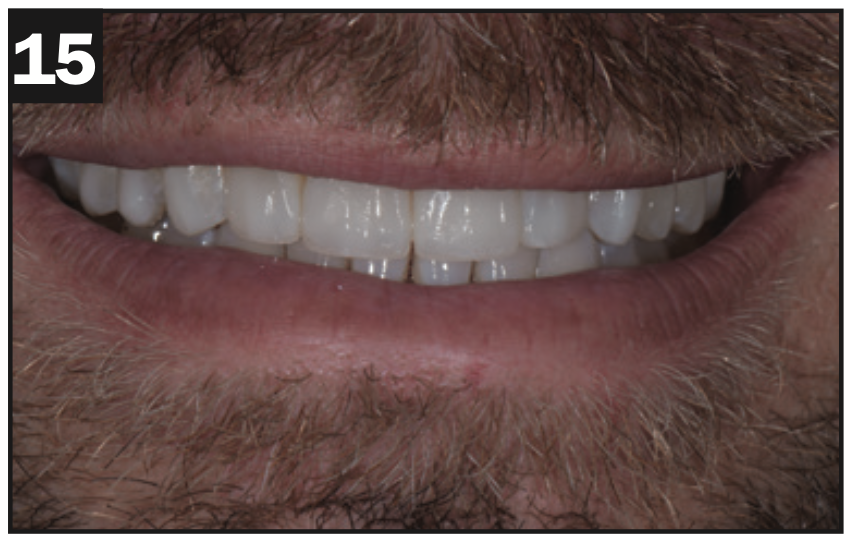
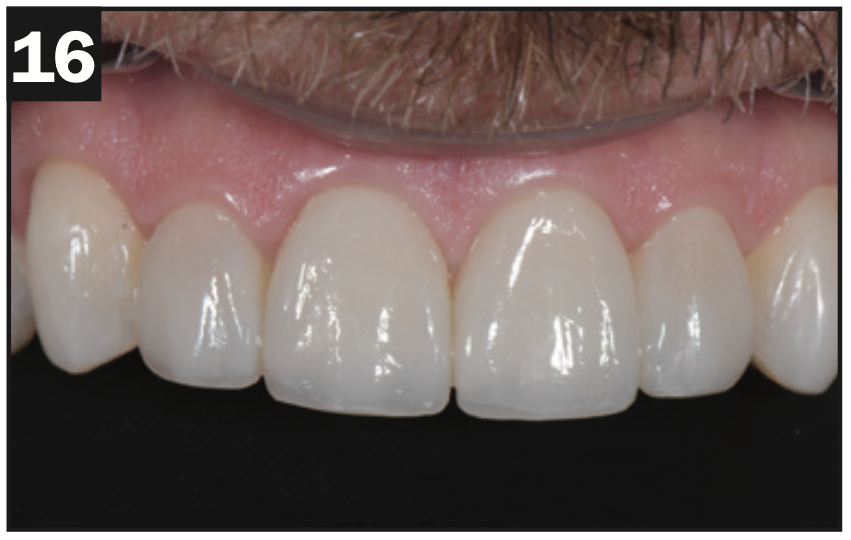
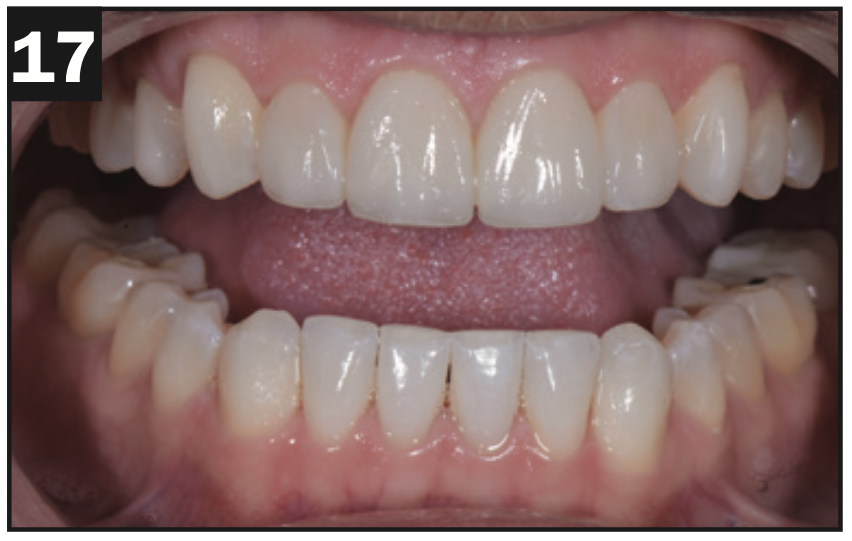
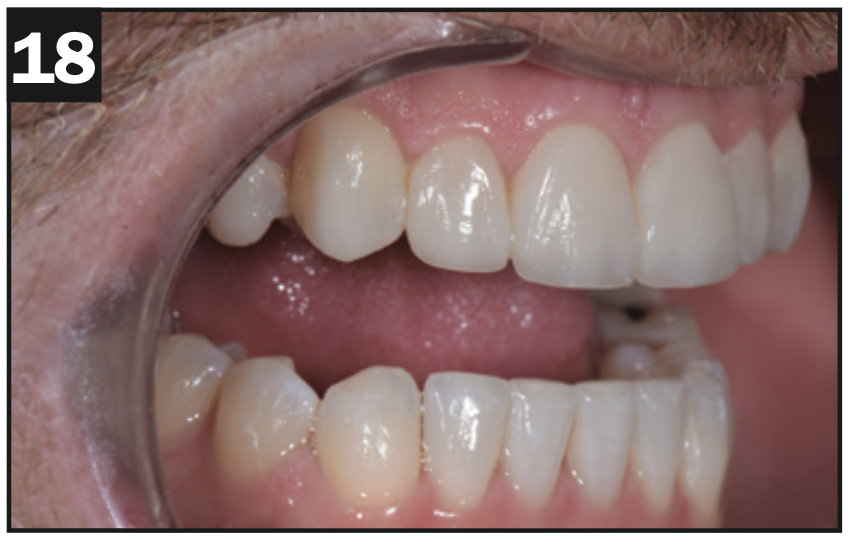
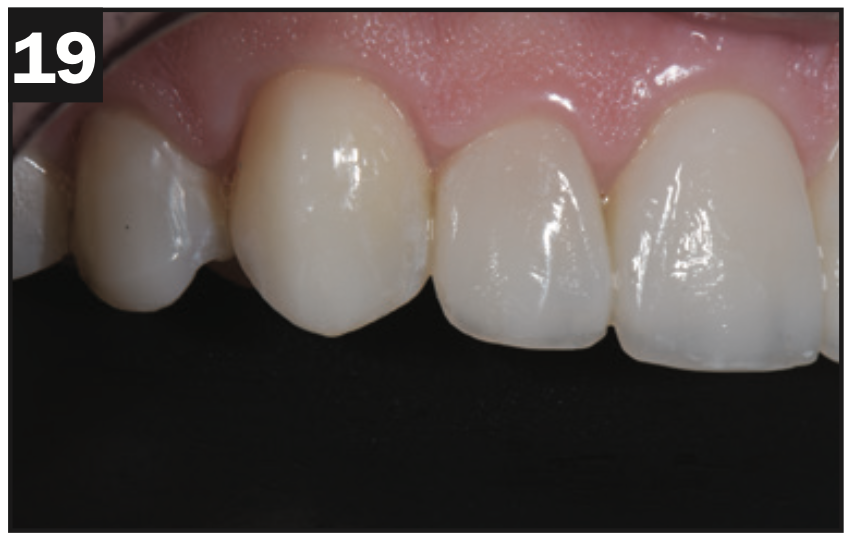

Figures 15 to 20. Final occlusion was checked, and protrusive and lateral excursions were verified. The patient was pleased with the final outcome.
Final occlusion was checked, all protrusive and lateral excursions were verified, and all contacts were flossed. The patient was pleased with the final outcome (Figures 15 to 20).
CONCLUSION
Multi-layered composite resin restorations for addressing patients’ aesthetic and financial concerns are a conservative approach that can deliver truly lifelike restorations. Although direct resin composite veneers can challenge the most seasoned clinician, their execution helps develop a deep understanding of tooth anatomy: tooth contours, shape, and color. With new developments in material formulations, today’s direct composite resins offer a predictable and reliable alternative to more invasive and costly indirect restorative approaches to arrive at the patient’s vision of an ideal smile.
REFERENCES
1. Fahl N Jr. Direct-indirect composite veneers: Balancing esthetics and minimal intervention. Dental Economics. February 14, 2023. https://www.dentaleconomics.com/science-tech/article/14288234/directindirect-composite-veneers-balancing-esthetics-and-minimal-intervention
2. Korkut B. Smile makeover with direct composite veneers: A two-year follow-up report. J Dent Res Dent Clin Dent Prospects. 2018;12(2):146-151. doi:10.15171/joddd.2018.023
3. Heintze SD, Rousson V, Hickel R. Clinical effectiveness of direct anterior restorations—a meta-analysis. Dent Mater. 2015;31(5):481–95. doi:10.1016/j.dental.2015.01.015
4. Yesil ZD, Alapati S, Johnston W, et al. Evaluation of the wear resistance of new nanocomposite resin restorative materials. J Prosthet Dent. 2008;99(6):435–43. doi:10.1016/S0022-3913(08)60105-5
5. Fortin D, Vargas MA. The spectrum of composites: new techniques and materials. J Am Dent Assoc. 2000;131 Suppl:26S-30S. doi:10.14219/jada.archive.2000.0399
6. Dietschi D, Fahl N Jr. Shading concepts and layering techniques to master direct anterior composite restorations: an update. Br Dent J. 2016;221(12):765–71. doi:10.1038/sj.bdj.2016.944
7. Fahl N Jr. Mastering composite artistry to create anterior masterpieces, part 1. J Cosmetic Dent. 2010;26(3):56-68.
8. Fahl N Jr. Mastering composite artistry to create anterior masterpieces, part 2. J Cosmetic Dent. 2010;26(4):42-55.
ABOUT THE AUTHOR
Dr. Desai is a cosmetic dentist practicing in Newport Beach, Calif. She is the founder of Luminous Smiles, an interdisciplinary dental practice focusing on rejuvenating patient’s lives through their smile. Dr. Desai received her DDS from the University of Southern California in 2008 and was selected to become a member of the national dental society, Omicron Kappa Upsilon. Dr. Desai returned to her Alma Mater in 2018 to serve as a clinical adjunct professor until 2020. She has been recognized as a Top Dentist locally for 4 consecutive years and was recognized nationally as a Top 40 under 40 Dentist in 2020. Dr. Desai is a proud accredited member of the American Academy of Cosmetic Dentistry and has published numerous articles highlighting her patient cases in nationally and internationally circulated dental publications. She can be reached via email at drdesai@luminoussmiles.com.
Disclosure: Dr. Desai reports no disclosures.


