
INTRODUCTION
Direct composite veneers have gained an important role in clinical applications following the advent of recently developed materials and techniques in adhesive dentistry. A direct resin veneer can be a very conservative, functional, and long-lasting restoration.1 Some indications for direct resin veneers are discolorations of teeth or restorations, dental malformation or malpositions, diastemas, and cervical abrasion or erosion defects. A good example of this is on a patient with a peg lateral that needs to be stabilized during and immediately after orthodontic treatment. The composite material can be shaped and adjusted to obtain the best anatomic and physiologic contour. When restoring a tooth with a direct resin veneer, an advantage to the patient is that this procedure can be done in one visit, is very conservative, and costs less to the patient than a lab-fabricated restoration.
This case report article will demonstrate the use of the recently introduced universal composite resin (OMNICHROMA [Tokuyama Dental America]) to easily and successfully replace an old, discolored direct facial composite restoration. This single-shade composite has the ability to blend into the color of the surrounding enamel. It is able to do this due to its identical supranano (260-nm) spherical fillers (SiO2/ZrO2) that result in the effects of structural color, unlike other composites with chemical color created from the use of added dyes/pigments. Once light cured, this composite material mimics the color of the surrounding tooth structure, allowing clinicians to predictably restore the vast majority of teeth (shades A1 to D4) using a single shade of composite.
CASE REPORT
Diagnosis and Treatment Planning
A 26-year-old male presented who did not like the looks of an old direct composite veneer restoration on tooth No. 7, which had discolored over time. The adjacent tooth No. 6 also had a discolored restoration. The patient wanted to have the discolored tooth (No. 7) restored first, and he expressed a desire to have the color of the new restoration match the much lighter shade of his central incisors. After this work was done, he planned to have tooth No. 6 restored. The old layer of composite on tooth No. 7 appeared to be not too thick, and, hopefully, most of the enamel was intact. It was determined that this would be an excellent case to remove the old composite and conservatively replace it using the new single-shade universal composite.
 |
 |
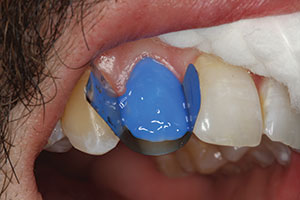
| Figure 1. The old, discolored bonding material on tooth No. 7. | Figure 2. Composite material was placed on tooth No. 7 and cured to test for a color match. |
 |
 |
| Figure 3. Old composite material was removed. | Figure 4. A MicroEtcher II (Zest Dental Solutions) was used to clean the surface. |
 |
 |
| Figure 5. The entire facial surface was acid etched. | Figure 6. The frosty enamel surface demonstrates that all of the old bonding material was removed. |
Clinical Protocol
The old composite material was carefully removed using a flame-tipped diamond bur, and a nice healthy layer of enamel was uncovered. The prepared tooth surface was then acid etched (Ultra-Etch [Ultradent Products]) and rinsed with water, and a bonding adhesive (Bond Force [Tokuyama Dental America]) was applied and light cured (Figures 1 to 7).
To simulate the diffuse white opacities of the adjacent central incisors (teeth Nos. 8 and 9), white tint (Estelite Color [Tokuyama Dental America]) was sparingly added directly to the bonded tooth surface and light cured. The sparse white patches (white tint) were evaluated, and it was ensured they were not too thick or too obvious. Next, the OMNICHROMA composite was added in one large layer. The composite was then evenly spread out over the facial of tooth No. 7. When initially placing the composite, a nice technique to evenly spread out the material is to use a clean-gloved finger (free of powder) to tap down on and compress the composite against the tooth. The anatomic form was contoured and refined with an Interproximal Carver (IPC) and then light cured (Figures 8 to 11).
Tooth No. 7 was then lightly contoured using a flame-tipped diamond bur. Next, the tooth was contoured with a red coarse disc (Sof-Lex-XT [3M]) to create an even and smooth facial surface. This same disc is very useful to open up the facial and incisal embrasures. It is helpful to draw pencil lines on the line angles and the incisal edge as an aid to achieving nice anatomic form. The tooth was then smoothed using a medium rubber cup (blue FlexiCup [Cosmedent]), followed by a fine rubber cup (pink FlexiCup). The final polish was achieved using FlexiBuff and Enamelize (Cosmedent). If any anatomic surface details (such as perikymata) are desired to match the adjacent teeth, this can be done by carefully tracing a diamond bur across the composite surface to create horizontal scratch lines, and then the entire restoration can be polished once again to a high shine.2-4 (Figures 12 to 18).
 |
 |
| Figure 7. The bonding agent was added. | Figure 8. White tint (Estelite Color [Tokuyama Dental America]) was added sparingly to match white spots on teeth Nos. 8 and 9. |
 |
 |
| Figure 9. White tint was diffused and subtle. | Figure 10. OMNICHROMA (Tokuyama Dental America) composite was added. |
 |
 |
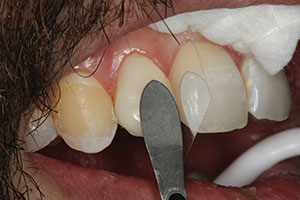
| Figure 11. A Gold Almore instrument was then used to spread out the composite. | Figure 12. The restoration after contouring and light curing. Note the color change. |
The patient was very happy to have the discolored old filling replaced with a more natural and lighter colored restoration. The OMNICHROMA composite makes shade selection very easy since a single shade is used. Only minor characterization was done using a white tint that was placed under the OMNICHROMA, allowing the final restoration to blend in perfectly with the adjacent teeth.
CLOSING COMMENTS
Modern restorative dentistry is based on the principles of adhesion and minimal invasiveness. A direct resin veneer is a very conservative (less invasive) procedure and, when restored properly, can be a long-lasting and aesthetic restoration. The dentist is in complete control of the restoration with this direct technique.5,6 This requires a little skill and practice, but it is worth the effort to benefit the patient and allow the restorative dentist options for treatment and the satisfaction of creating a “work of art.”
 |
 |
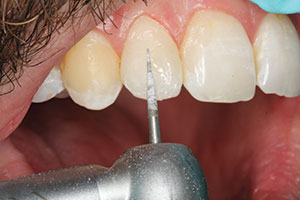
| Figure 13. A flame-tipped diamond bur on a high-speed handpiece was used for gross contouring. | Figure 14. A coarse disc was used to establish a smooth and even facial contour. |
 |
 |
| Figure 15. A blue FlexiCup (Cosmedent) was used for the initial polish. | Figure 16. The final high polish was achieved with FlexiBuff and Enamelize (Cosmedent). |
 |
 |
| Figure 17. Smile view of the final restoration (tooth No. 7). | Figure 18. A 1:1 view of the final restoration. |
A great way to test the option of a direct veneer is to do a mockup whereby the dentist places the composite material on the tooth (no etchant or bonding agent) and then sculpts the composite material, light cures the material, and shows the result to the patient. Then the dentist can pop it off and restore the tooth (etch, bond, and fresh composite) at the same appointment, if desired. The ability of the dentist to shape and create a direct veneer can be helpful in making temporaries, understanding dental anatomy better for communication with laboratory technicians, and making quick composite repairs. As with learning other techniques in dentistry, taking hands-on courses on direct resin veneers is an excellent way to improve the dentist’s skill.
References
- Korkut B. Smile makeover with direct composite veneers: a two-year follow-up report. J Dent Res Dent Clin Dent Prospects. 2018;12:146-151.
- Fahl N. Mastering composite artistry to create anterior masterpieces, part 2. Journal of Cosmetic Dentistry. 2010;26:42-55.
- Peyton JH. Finishing and polishing techniques: direct composite resin restorations. Pract Proced Aesthet Dent. 2004;16:293-298.
- Peyton JH, Arnold JF. Six or more direct resin veneers case for accreditation: hands-on typodont exercise. Journal of Cosmetic Dentistry. 2008;24:38-48.
- Lambert DL. Conservative aesthetic solutions for the adolescent and young adult utilizing composite resins. Dent Clin North Am. 2006;50:87-118.
- Nash RW. Direct composite resin veneers. Dent Today. November 1, 2017. https://www.dentistrytoday.com/restorative/minimally-invasive-dentistry/10361-direct-composite-resin-veneers. Accessed July 25, 2019.
Dr. Peyton maintains a private practice in Bakersfield, Calif. He graduated from the University of California, Los Angeles (UCLA) School of Dentistry in 1982. Dr. Peyton is a part-time clinical instructor at the UCLA School of Dentistry. He is also a lecturer at Esthetic Professionals (Tarzana, Calif) and a part-time instructor for the Fahl Institute in Curitiba, Brazil. He has lectured and given workshops for several American Academy of Cosmetic Dentistry (AACD) annual meetings. He has published articles in Practical Procedures and Aesthetic Dentistry and the Journal of Cosmetic Dentistry. He is also a contributing editor for the Journal of Cosmetic Dentistry. Dr. Peyton is an accredited member, fellow, and examiner for the American Academy of Cosmetic Dentistry. He can be reached at [email protected].
Disclosure: Dr. Peyton received an honorarium from Tokuyama Dental America for writing this article.
Related Articles
Class V (Cervical) Restorations That Just Blend Into the Tooth Using Omnichroma
Direct Composite Veneers: A Viable Treatment Option
Predictable Direct Composite Resin Veneers: A Template System Makes It Easier!

