


INTRODUCTION
Internal bleaching is a highly sought-after treatment and a great service to provide to patients. External bleaching differs from internal bleaching in the sense that external bleaching addresses superficial staining, while internal bleaching manages internal discoloration. External bleaching is generally applied to the entire dentition, but internal bleaching may only target one or a few teeth.
There are several reasons a tooth may become internally discolored: pulp necrosis, intrapulpal hemorrhage, retention of pulp tissue at the time of root canal therapy, calcific metamorphosis, or internal resorption.1 Other available treatment options to address discoloration include porcelain veneers and composite veneers with the use of opaquer. The advantage of internal bleaching is that it generally conserves tooth structure. Additionally, managing a discolored tooth with porcelain can present unique challenges. Teeth typically become darker as they are being prepared for a veneer. This can present a challenge to the ceramist to mask the discoloration when creating the veneer.
Composite with opaquer is an excellent option for masking a discolored tooth; however, this treatment modality also presents with its own unique challenges due to its technique-sensitive nature. The challenge involved with using opaquer is that it raises the value of the restoration. The clinician must be very mindful not to overuse opaquer to the extent that the tooth no longer matches the surrounding dentition and the tooth looks lifeless.
All things considered, internal bleaching also presents obstacles. The final outcome of the bleaching is not always guaranteed, and it may require multiple visits, depending on the technique utilized. Internal bleaching is, however, very safe. Historically, the “walking bleach” technique, a form of internal bleaching, was done with heated superoxol, which presented a considerably higher risk of resorption than modern sodium perborate or carbamide peroxide.
CASE REPORT
A 50-year-old female presented seeking treatment for a discolored No. 9. A shade-matching photo was promptly taken with a DSLR camera and macro lens (Canon 80D). VITA shade tabs were used to gauge the patient’s current tooth shade (A3.5) (Figures 1 and 2). It is important that the photo is taken quickly and before the tooth dehydrates. The value of a tooth is artificially raised as it becomes dehydrated. This may lead to an incorrect color match. Gathering the initial shade is helpful for tracking the progress of the bleaching therapy. A patient may feel that the bleaching has been unsuccessful but may gain new faith in the process when he or she sees before and after photos.
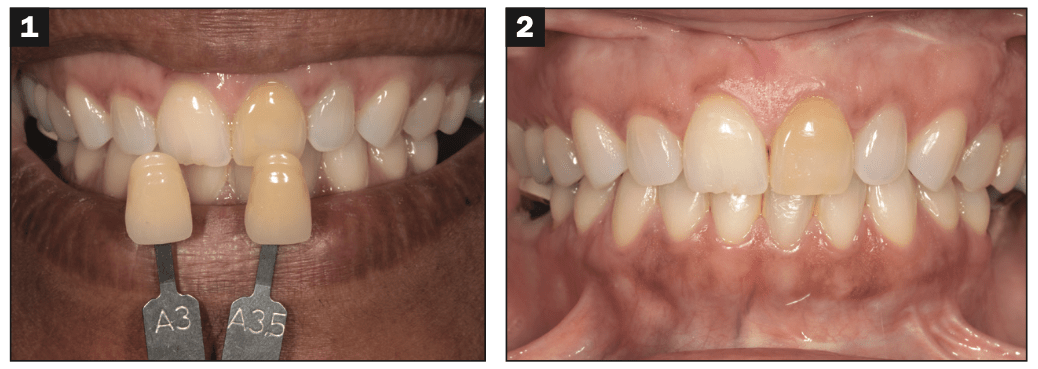
Figures 1 and 2. The initial presentation of No. 9.
It is vital for the clinician to determine the pulpal diagnosis prior to bleaching or restorative treatment. This may determine the treatment option the patient is best suited for. In the event the tooth still remains vital, the clinician may consider using a restoration to mask the dark tooth. Internal bleaching requires RCT, which some patients may not be amenable to. Additionally, in the event RCT has been previously completed, it needs to be determined whether or not the existing RCT is acceptable. The clinician should evaluate the fill, taper, and density of the obturation. In the event the previous treatment is not satisfactory, it should be re-treated prior to the completion of internal bleaching. Finally, a periapical diagnosis of the tooth should be determined prior to treatment. Although the RCT may appear acceptable, the patient may have an underlying periapical pathology (such as asymptomatic apical periodontitis or a chronic apical abscess) that should be ruled out prior to elective treatment.
A periapical radiograph was taken and reviewed of No. 9. This tooth had a previously completed RCT with a poor fill, taper, and density (Figure 3). No. 9 responded non-tender to percussion and palpation, and all probing depths were 3 mm or less. The poor existing fill, taper, and density warranted the RCT to be re-treated. A failure to redo the RCT can be thought of as building a house on “sinking sand.” A tooth should be free of disease or pathology prior to the placement of a restoration or internal bleaching.
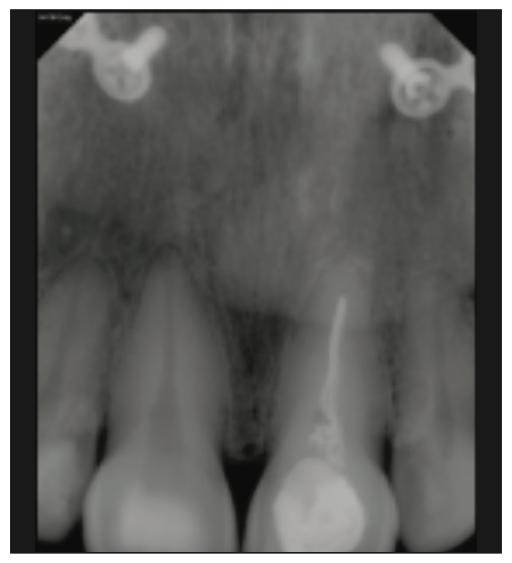
Figure 3. A periapical radiograph was taken of No. 9 in order to gauge the pulpal and periapical diagnosis and assess the quality of the root canal therapy.
The patient was then presented with several treatment options, including internal bleaching, a porcelain veneer, and a composite veneer. The risks and benefits were thoroughly reviewed, and she elected for internal bleaching.
The author completed the root canal therapy retreatment and then placed an orifice barrier with Vitrebond (3M) (Figure 4). The orifice barrier was placed at the level of the CEJ. If the orifice barrier is placed too far incisally, it will cause the cervical third of the tooth to not completely bleach. Alternative RMGIs that could have been used are GC Fuji II LC (GC) and BC Liner (Brasseler). The advantage of BC Liner is that it can come in a blue shade, which facilitates better identification of the orifice barrier in case of an RCT re-tx.
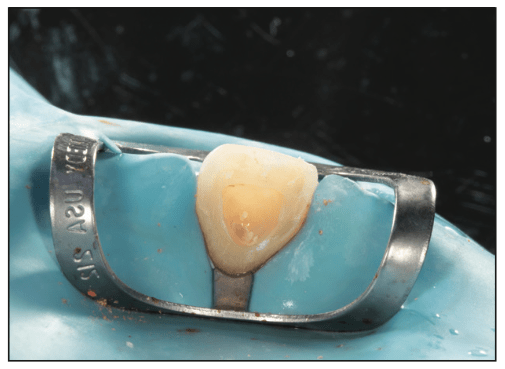
Figure 4. After RCT was completed, an orifice barrier was placed at the level of the CEJ with with an RMGI.
Next, any remaining core material was removed from the chamber under rubber dam isolation. This step is challenging but perhaps one of the most critical because it can be difficult to discern where the restorative material begins and ends. Failure to remove any core material completely will prevent the tooth from bleaching completely. If it is noticed that the internal bleaching is entirely ineffective, it may be because of the residual core build-up material. Clinicians should be particularly careful when removing the core material because it may result in a perforation of the facial tooth structure.
Different techniques for identifying remaining restorative material include (1) scratching the material, (2) placing phosphoric etch over the composite, (3) using a black light pen, and (4) taking a radiograph. Many core materials and composites, but not all, will display a black scratch when scratched with an explorer. Phosphoric-etch placement can also be used because it alters the optical properties of the composite. An inexpensive black light pen is useful as long as the composite has additives that fluoresce; not all composites have this additive.2 A periapical radiograph can also be taken if the operator is unsure if any composite remains. But even this step may be thwarted if the chamber is filled with a microfill composite, which typically lacks a radiopaque additive. In effect, it should be noted that the clinician should be prepared to utilize a range of techniques because no technique is guaranteed to be successful. In this case, the core was restored with a resin composite material that fluoresced, so a black light pen was used to remove all the composite.
Next, sodium perborate was crushed and moistened with water so that it had the consistency of wet sand. It was then placed in the chamber, and the access was sealed with Cavit (3M) (Figure 5). Alternatively, it could have been sealed with GC Fuji TRIAGE (GC), but the downside of this material is that because it bonds to tooth structure, it is more time-intensive to remove. In order for internal bleaching to be profitable for the clinician, replacing the bleach at follow-up appointments needs to be quick. The ratio of Cavit to bleach should also be weighed carefully by the practitioner. The advantage of having a thin layer of Cavit over the access is that there is more room for the bleach to be effective. But the downside is that the thin temporary material may be more likely to fall out. Neither the clinician nor the patient should be too concerned if the barrier falls out as long as a sound orifice barrier is in place.
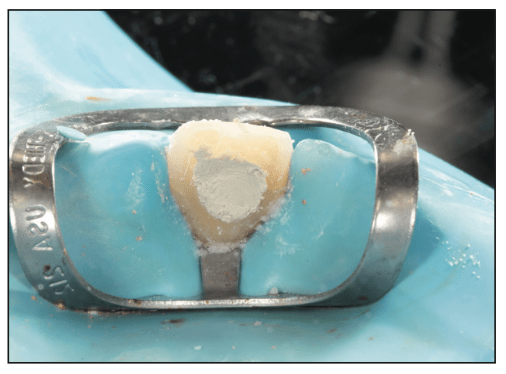
Figure 5. After crushed sodium perborate was placed in the chamber, the chamber was sealed with Cavit (3M).
The patient was instructed not to incise on No. 9 until treatment was completed and a definitive core could be placed. The patient was reappointed for the bleach to be replaced within 7 days. Clinicians should anticipate that they will be replacing the bleach about every 5 to 10 days for about 2 to 4 appointments.
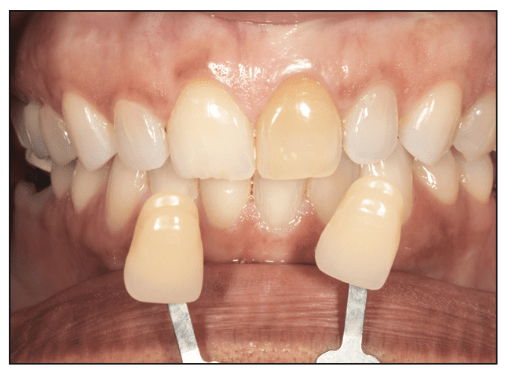
Figure 6. A follow-up shade-matching photo was made after the 3 rounds of internal bleaching using the “walking bleach” technique with sodium perborate.
After 3 rounds of internal bleaching with sodium perborate, No. 9 failed to respond to treatment (Figure 6). All variables as to why No. 9 failed to respond to sodium perborate were ruled out. The expiration date on the material was re-verified, and a periapical radiograph was taken to ensure all composite core material had been removed.
A second bleaching technique was employed. A rubber dam was placed over No. 9, and 40% hydrogen peroxide (Opalescence Boost PF 40% HP In-Office Power Whitener [Ultradent Products]) was placed inside the chamber and on the outside according to the manufacturer’s instructions (Figure 7). It should be noted that, per the manufacturer’s instructions for use, this material is also intended for internal, nonvital bleaching. This product was not used off-label. Once the in-office whitening was completed, the chamber was sealed with Cavit, and the tooth was given 3 days to rehydrate in order to determine the new shade. The attempted in-office bleaching also achieved a minimal increase in value (Figure 8).
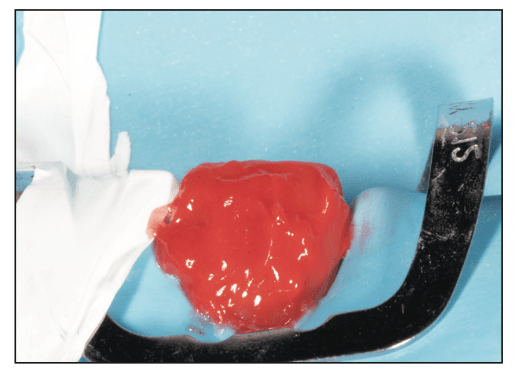
Figure 7. In-office bleaching was attempted on No. 9 following the manufacturer’s instructions.
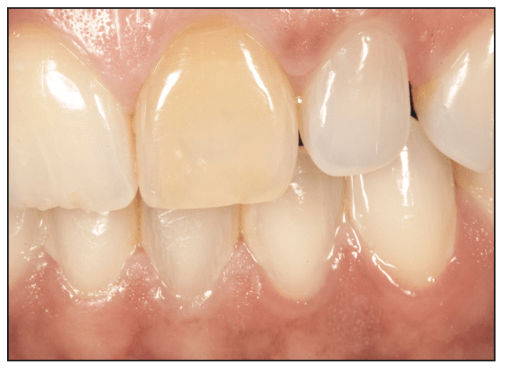
Figure 8. A follow-up photo was taken of No. 9 to gauge the progress of bleaching following the in-office treatment.
A third technique was employed to internally bleach No. 9. The “inside-outside” bleaching technique, which involves at-home external and internal bleaching, was attempted. In this technique, the orifice barrier is left intact, but the chamber is removed of any temporary materials and thus left hollow. Clinical data has demonstrated that this technique is as safe and effective as the walking bleach technique.3 Next, the patient was given a bleaching tray and instructed to fill the chamber and external surface of No. 9 with 10% carbamide peroxide (Opalescence 10%-Carbamide Peroxide [Ultradent Products]) (Figures 9 and 10). The patient was instructed to remove the bleaching tray when eating and drinking and to rinse out the chamber with water (using a Monoject syringe [Cardinal Health]) before and after eating. In order for this technique to be effective, patient compliance is paramount. The patient must ensure the chamber is free of debris before filling it with bleach. She was also carefully instructed to avoid incising on No. 9 because it was hollow and particularly brittle. Once she was done eating or drinking, she was to refill the chamber and external surface of No. 9 with the bleaching gel. The patient was then dismissed and returned 21 days later.
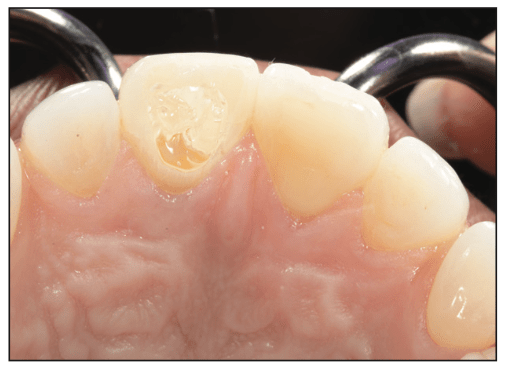
Figure 9. Ten percent carbamide peroxide was placed in the chamber of No. 9.
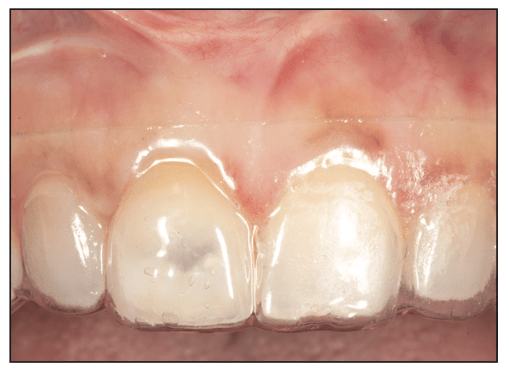
Figure 10. The patient wore a bleaching tray with carbamide peroxide that was placed in the chamber and on the external surface of the tooth. It should be noted that No. 9 appeared translucent on the facial surface because Cavit was not cur- rently in the chamber. In previous images of No. 9, Cavit was in the chamber, which made the facial appearance of No. 9 look less translucent. The facial surface of No. 9 was translucent due to the removal of the core material.
It is the author’s opinion that case selection for the inside-outside technique is a key factor in success. Only patients who demonstrate they will be compliant should be selected. The patient is responsible for keeping the chamber clean and faithfully applying bleach.
Following completion of the treatment, her desired outcome was finally achieved (Figure 11). The chamber was then temporarily filled with Cavit once more for 2 weeks prior to placement of the final restoration. A tooth should never be restored immediately after bleaching but rather 10 to 14 days later.4 After 14 days, the chamber of No. 9 was restored with a bleach shade resin composite under rubber dam isolation. Restoring the chamber with a bleach shade composite is an important final step for success in achieving patient satisfaction.
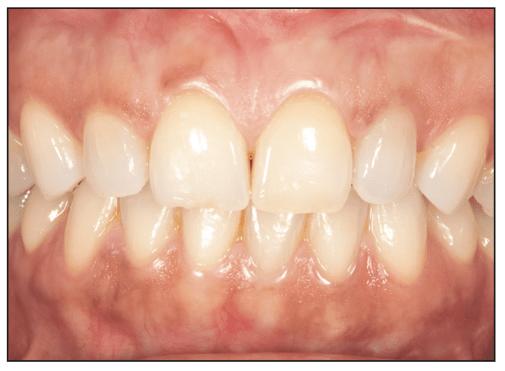
Figure 11. The final postoperative photo of No. 9 after the completion of bleaching.
The hypothesized reason as to why the inside-outside technique achieved a favorable outcome over the other techniques is that No. 9 was continuously being exposed to fresh bleach for a lengthy period of time. The downside of using sodium perborate in the walking bleach technique is that the efficacy of the material decreases over time. Although the in-office technique utilizing 40% hydrogen peroxide involved a high concentration of bleach, the tooth may not have been exposed to the bleach for enough time.
ACKNOWLEDGMENT
Special thanks to Dr. Jason Smithson for introducing me to this technique.
REFERENCES
1. Hattab FN, Qudeimat MA, al-Rimawi HS. Dental discoloration: an overview. J Esthet Dent. 1999;11(6):291-310. doi:10.1111/j.1708-8240.1999.tb00413.x
2. Brauer, J. The scorpion technique: a veneer-seating pearl. Dent Today. 2024;43(1):97-99.
3. Pedrollo Lise D, Siedschlag G, Bernardon JK, et al. Randomized clinical trial of 2 nonvital tooth bleaching techniques: A 1-year follow-up. J Prosthet Dent. 2018;119(1):53–9. doi:10.1016/j.prosdent.2017.03.004
4. Attin T, Hannig C, Wiegand A, et al. Effect of bleaching on restorative materials and restorations—a systematic review. Dent Mater. 2004;20(9):852–61. doi:10.1016/j.dental.2004.04.002
ABOUT THE AUTHOR
Dr. Seibert is the deputy program director for the AEGD residency at Langley Air Force Base in Virginia and a clinical instructor at the University of Creighton School of Dentistry. She is the creator and host of the Dental Digest podcast, a podcast in the top 1% of all podcasts globally. She lectures to national and international audiences and has multiple publications related to clinical dentistry. She was recently named a top 40 under 40 dentist in America by Incisal Edge magazine. She can be reached at dr.melissaseibert@gmail.com.
Disclosure: The views expressed are those of the authors and do not reflect the official views or policy of the US Air Force, Uniformed Services University, Department of Defense, or its components. The author does not have any financial interest in the companies whose materials are discussed in this abstract.


