INTRODUCTION
I began placing restorations using composite resins very shortly after graduating from dental school in 1978. Since that time, my usage increased dramatically in the early ‘80s after taking seminars from some of the early pioneers like Drs. Irwin Smigel, Buddy Mopper, Norman Fiegenbaum, Paul Belvedere, and Ron Goldstein. These leaders illustrated how a dentist can bond composite resin to tooth structure, build it in layers so that color can be varied and blended, cure it on command with a light-curing unit, and shape and polish it with rotary instruments. Dentists and expanded duty assistants can literally create artistic work directly on the patient’s tooth structure. Matrix materials can be used to build the shape of the materials, or they can be applied using a free-hand technique. The quality and aesthetics of the final result are in the hands of the clinician, and the outcomes can vary greatly as some operators have more artistic ability than others. However, what the leaders above and others have demonstrated is that the aesthetic role of composite resin in dentistry is an art that can be taught and learned.
Restoration Types
Class I, II, III, IV, and V lesions can be restored with composite resin today. Both anterior and posterior applications are routine at this time. Materials have improved to a point that functional applications are possible, as well as those using elective veneers for cosmetic improvement alone.
Only minimal preparation is needed for a direct composite resin veneer. In some areas, because it can be added directly onto the tooth structure, composite resin can built up on teeth with paper-thin thickness. Indirect veneers need some thickness in order to go through the dental laboratory fabrication techniques and to be carried to the tooth and bonded to place without breaking. Indirect restorations require the preparation to draw so undercuts must be eliminated. Direct restorations can be built around corners or into undercuts, so less tooth structure removal is possible.
Removal and Repairs
When it is necessary to repair a fracture or chip, composite resin can be roughened with an air-abrasion unit or a diamond bur and etched with phosphoric acid to clean the abraded surfaces. A bonding agent can then be applied and new composite resin can be added and light cured. The new material can be finished and polished, and the repair can often be imperceptible and may last for the life of the restoration.
When it is necessary or desirable to remove composite resin from the tooth, it can be accomplished by using a carbide-finishing or diamond bur in a high-speed handpiece. Very little or no additional tooth structure removal is possible in these cases. When I use a diamond bur to remove a porcelain veneer, I inevitably remove more natural tooth structure.
Fees
Fees can generally be lower for direct than for indirect procedures because there is no second appointment required and no lab bill incurred (thus resulting in a savings). The clinician must realize that the proper and aesthetic placement of direct composite resin veneers takes tedious attention to detail and artistic talent and is physically demanding on the dentist or the expanded duty dental assistant. In the author’s opinion, a fee of at least 50% of the indirect alternative is a justifiable charge for direct veneers. This is, of course, a business decision that each individual practitioner must make on his or her own, and it must be based upon his or her unique business goals and numbers.
Longevity
My own clinical experience has shown that direct composite resin veneers can be expected to last 10 years (or more) when placed properly. Of course, occlusion and home care play big roles in projecting the length of life for these direct restorations.
The younger the patient, the more likely I will recommend direct composite as the material of choice. It comes down to helping the patient preserve as much natural tooth structure as possible for the future. Many of my patients have chosen this modality as a first step in improving the aesthetics of their teeth, even if they later choose to replace their direct veneers with indirect porcelain alternatives. I have had a number of patients who chose to have direct composite restorations redone after a number of years of use. The lower cost and immediate result are often the reasons cited.
CASE REPORT
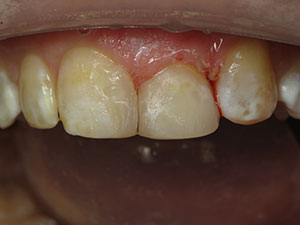
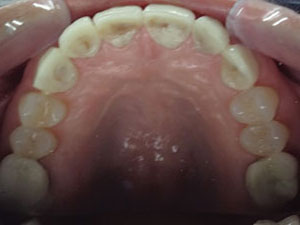
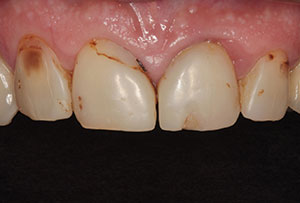
As seen in the preoperative photos (Figures 1 and 2), the composite restorations that had been previously placed in the patient’s maxillary central and lateral incisors had experienced some wear, chipping, and staining during the 11-plus years of use. Composite resin had been used to place direct veneers. The patient was missing his maxillary lateral incisors, and there was a wide diastema between his central incisors. The canine teeth were recontoured to accommodate the shape of lateral incisors, and the central incisors were reshaped to allow for application of composite in the proper shape.
Ceramic alternatives were offered to the patient, but he preferred to have new direct composite restorations placed. He felt that the longevity expected from direct composite veneers was acceptable and the cost was affordable.
 |
 |
| Figure 1. Preoperative facial view. | Figure 2. Pre-op incisal view. |
Clinical Protocol
After local anesthesia was administered, the old composite resin material was removed from the right central incisor and both canine teeth. A diamond bur was used to remove the composite and to prepare the teeth for the new restorations. In Figure 3, the composite is shown being removed from the left central incisor. The final preparations can be seen from the facial view in Figure 4 and the incisal view in Figure 5.
Next, the prepared surfaces of the right central incisor were etched with phosphoric acid-etching gel for 10 seconds (Figure 6), thoroughly rinsed, and lightly dried with oil-free air. A universal dentin and enamel adhesive (One Coat 7 Universal [COLTENE]) was applied liberally to the etched surfaces (Figure 7). The universal adhesive was gently air-thinned to remove the solvent carrier and residual water and then light cured for 10 seconds with an LED curing light (S.P.E.C. 3 [COLTENE]).
 |
 |
| Figure 3. Previously placed old composite was removed using a diamond bur. | Figure 4. Facial view of the prepared teeth. |
 |
 |
| Figure 5. Incisal view of the prepared teeth. | Figure 6. Phosphoric acid-etching gel was applied on the right central incisor for 10 seconds and then rinsed with water. |
 |
 |
| Figure 7. A universal adhesive (One Coat 7 Universal [COLTENE]) was applied to the tooth surfaces, air-thinned, and light cured (S.P.E.C. 3 [COLTENE]). | Figure 8. After flowable composite resin (Synergy D6 Flow [COLTENE]) was applied to the gingival margin area and light cured for 10 seconds to create a tight and sealed margin (this step is not shown in the photo series here), a submicron universal composite (BRILLIANT EverGlow [COLTENE]) was then placed at the mesio-proximal area to build the shape there and light cured. |
 |
 |
| Figure 9. Additional dentin-shade composite (BRILLIANT EverGlow) was added to the facial surface and light cured. | Figure 10. Finally, a translucent enamel-shade composite (BRILLIANT EverGlow, BL Trans [COLTENE]) layer was applied to the facial surface. |
 |
 |
| Figure 11. The enamel layer was light cured. | Figure 12. A fine, tapered finishing diamond bur (Alpen [COLTENE]) was used to contour the facial surfaces. |
Next, a flowable composite resin (Synergy D6 Flow [COLTENE]) was applied to the gingival margin area and light cured for 10 seconds. The author finds that this technique creates a tight and sealed margin. A submicron universal composite (BRILLIANT EverGlow [COLTENE]) was placed at the mesio-proximal area to build the shape there. This increment of dentin-shade composite resin was light cured for 10 seconds (Figure 8). Next, more of the same dentin-shade composite was applied to the facial surface (Figure 9), and then a composite contouring instrument was used to shape this layer. The composite layers were all light cured for 10 seconds. The final layer consisted of a translucent enamel shade (BRILLIANT EverGlow; BL Trans [COLTENE]) that was applied over the facial surface (Figure 10) and shaped using the composite contouring instrument. This last layer was then light cured for 10 seconds (Figure 11).
Next, a long, tapered finishing diamond bur (Alpen [COLTENE]) was used to place the final contours into the facial surface of the direct veneer (Figure 12). A football-shaped finishing diamond bur (Alpen) was used to shape the lingual area. A No. 12 surgical blade was used to remove a slight interproximal overhang. Lastly, diamond impregnated polishers (Alpen ShapeGuard Polishers [COLTENE]) were used to smooth the contoured surfaces (Figure 13) and to establish the final surface gloss. The completed first central incisor can be seen in Figure 14.
 |
 |
| Figure 13. The composite surface was polished (Alpen ShapeGuard Polishers [COLTENE]). | Figure 14. The first completed direct composite veneer (tooth No. 8). |
 |
 |
| Figure 15. The final outcome of all the anterior completed direct composite veneers as viewed from the incisal. | Figure 16. Facial view of the final result. |
The second central incisor was built in the same fashion and placed directly against the mesial polished surface of the first veneer. Because it was polished, no bond was created against the completed central incisor, and a stiff composite spatula was used to lightly torque the 2 teeth apart; an excellent proximal contact resulted. The second restoration was contoured and polished in the same fashion. Both lateral incisors were also built in the same way.
The 4 new direct composite veneers can be seen from the incisal view in Figure 15 and from the facial view in Figure 16.
CLOSING COMMENTS
There can be many advantages to properly placed and aesthetic direct composite veneers. As demonstrated in this case, we were able to achieve the desired aesthetic result and the whole procedure was done in a single appointment at a cost that was affordable for the patient. These veneers may last 10-plus years before he chooses or needs to replace them again. Should any repair of the restorations be needed along the way, it can easily be accomplished using standard direct composite resin techniques.
Dr. Nash earned his undergraduate degree from North Carolina State University (Raleigh) as a textile engineer and, 4 years later, went on to the University of North Carolina at Chapel Hill for his dental degree, graduating in 1978. He maintains a private practice focusing on cosmetic and aesthetic dentistry in Huntersville, NC. He has provided continuing education courses on aesthetic and cosmetic dentistry for several dental schools, including Baylor, New York University, and the Medical College of Georgia. An international lecturer and consultant to numerous dental products manufacturers, Dr. Nash is one of fewer than 80 Accredited Fellows in the American Academy of Cosmetic Dentistry, and several of his cases have been featured on the cover of its journal. He has authored chapters in 2 textbooks on aesthetic dentistry and has published numerous articles in dental publications. He has been an editorial advisor to several dental publications and for New Beauty Magazine. He is co-founder of the Nash Institute for Dental Learning in Huntersville and can be reached at (704) 895-7660, via the email address rosswnashdds@gmail.com, or via the website thenashinstitute.com.
Disclosure: Dr. Nash was paid an honorarium by Coltene.
Related Articles
Marrying Clinical Techniques and Teamwork
A Combination Case: Satisfying Function and Aesthetics
Optimizing a Smile Enhancement: Combining Alignment, Composite Bonding, and Ceramic Resurfacing