


INTRODUCTION
Dentistry seems to be in the middle of an evolutionary tale, and possibly one of a revolution, about how one approaches the technical side of clinical practice. It seems that we, as clinicians, cannot escape the ever-present push of dentistry to incorporate digital techniques into our practices. One cannot read a newsletter, magazine, or journal or attend a trade show without the ever-present glitz and glamor of the latest in intraoral scanning technology, cone-beam computed tomography (CBCT), 3D printers, and milling machines. While it can be relatively straightforward to see some value in digital vs analog methods, some authors have raised concerns regarding the eagerness of clinicians to embrace technology that may be potentially disruptive to the clinical practice.1,2 Clinicians have the challenge of embracing the need to stay current and proactive vs a balancing act of ensuring one is providing the highest quality of service to the patient with restorations that meet or exceed expectations.
Digital workflows for fabricating fixed restorations, such as indirect full-coverage crown and bridge restorations, tend to be widely accepted as normal and routine. Part of the genesis of greater implementation of this style of dentistry is due to the efficiency and simplicity of clinical-laboratory systems such as CEREC (Dentsply Sirona). When comparing these efficient workflows to that of the full dental laboratory workflow, one can see that the traditional dental laboratory setting is a challenge for clinicians to embrace but ultimately can result in improved clinical outcomes.3 This is magnified by the need and desire to enhance patient communication, building a digital database, and the assumption of legal challenges associated with producing definitive restorations within the dental office.4
Clinicians who focus their practices on implant dentistry, especially full-arch reconstruction with dental implants, are tremendously impacted by the growth and penetration of digital dentistry. Many clinicians are often first introduced to digital production methods when preparing patients for template-driven guided surgical applications.5,6 Patients with failing dentitions and those with extensive clinical needs are also often challenging to diagnose and treatment plan using outside-the-box concept approaches. Those same patients are often very self-conscious about their teeth and smiles and often have a greater overall fear of the process, including the thought of having teeth inadvertently removed during impression-making procedures. Digital impression-making procedures combined with CBCT scans and planning not only assist the clinician in visualizing proposed implant sites, bone volume, and density but also further enhance patient communication by creating a more personalized experience for the patient.
Clinicians have been impacted by the shrinking dental laboratory industry and its effects upon clinical practice. While some laboratories are growing tremendously through market consolidation, the number of total dental laboratories and qualified dental technicians has dropped steadily during the past 30 years.7,8 As the clinician is faced with the challenges of balancing the clinical demands of the patient with that of a diminishing laboratory industry, a growing number is beginning to envision the future of dental practice as that of clinicians and technicians working side by side within the confines of a group practice environment. The aim of this article is to highlight the incorporation of digital workflows into clinical practice and that of a combined clinical-laboratory environment.
CASE REPORTS
Case 1: Mandibular Implant Overdenture
A patient presented to the author’s clinical practice with a challenging dentition and a request for rehabilitation with implants and dentures (Figure 1). A CBCT scan (GreenCT [Vatech America]) and an intraoral scan (TRIOS [3Shape]) were made (Figure 2). The CBCT files were imported into implant planning software (Implant Studio [3Shape]), and implants (ET III [Hiossen]There’s ET III SA and ET III NH. Do we know which one he is talking about? AG) were planned within the software (Figure 3). Initially, only 2 implants were placed in the areas corresponding to the mandibular canine region. However, upon further investigation, there was adequate bone bilaterally in the first molar regions. We presented both 2-implant and 4-implant options to the patient utilizing models depicting both clinical scenarios, demonstrating the stability and retention differences between the 2. He was amazed at how the combination of intraoral and CBCT scanning was able to visualize the 4-implant option as he had seen several other dentists who said he didn’t have sufficient bone for implants without using digital technology.

The surgical guide was 3D printed using a 3D printer (NextDent 5100 [3D Systems]) and UV cured to ensure biocompatibility. Working closely with a dental technician in the office, the intraoral scan optical files were imported into dental laboratory software (exocad [exocad GmbH]) for planning his maxillary and mandibular prostheses. Using photography and intraoral measurements, the teeth were positioned to plan for immediate dentures. Completed designs were imported into a milling machine (R5 [VHF]) machining software, the denture bases were milled using pink-colored PMMA (Ivotion CAD [Ivoclar Vivadent]), and teeth were milled using tooth-colored PMMA (Ivotion CAD). After the milling cycle was completed, the discs were removed from the milling machine, and teeth were luted to the denture bases using specialized bonding resin (Ivotion Bond [Ivoclar Vivadent]). The dentures were polished conventionally using pumice and a ragwheel.
Local anesthetic was applied (2% Lidocaine [Zahn]), maxillary and mandibular teeth were extracted, and the surgical guide placed onto the mandibular dentition to confirm full adaptation of the guide. Osteotomies were prepared using a contemporary guided surgery kit (OneGuide [Hiossen]) and the surgical guide to assist with the preparation and placement of the osteotomies. With the assistance of the surgical guide, the shorter and larger posterior implants were placed first, followed by the longer and narrower anterior implants (Figure 4). Cover screws were placed, and allograft bone particulate (RegenerOss Allograft [Zimmer Biomet]) was placed around the areas of the dental implants within extracted tooth sockets. Primary closure was achieved using chromic gut sutures. A panoramic radiograph (GreenCT) was made to confirm implant placement (Figure 5). The dentures were placed and adjusted using a disclosing medium (Pressure Indicating Paste [Keystone Industries]) and acrylic burs (CHAIRSIDE Denture Prep & Polish Kit [Zest Dental Solutions]).
The patient returned approximately 3 months after implant placement, and a panoramic radiograph was made confirming adequate bone healing around all implants. Afterward, anesthetic was applied, crestal incisions were made, and the cover screw was replaced with transgingival healing abutments. Measurements of height from the implant platform to the superior portion of the gingiva were made to assist in ordering a cuff height for overdenture abutments (Figure 6). Contemporary overdenture abutments were placed (LOCATOR R-Tx [Zest Dental Solutions]) until finger-tight (Figure 7). A panoramic radiograph was made to confirm complete adaptation (GreenCT), and abutments were torqued according to the manufacturer’s recommended torque values.

Denture attachment housings were placed onto each abutment, and optical impressions of the edentulous ridges and existing dentures were made using an intraoral scanner (TRIOS). The optical scan files were imported into dental laboratory planning software (Dental System [3Shape]), and virtual denture teeth were placed using the scans of the existing dentures to guide tooth placement within the software. Maxillary and mandibular prototype prostheses were 3D printed using a desktop-level 3D printer (Form 3B [Formlabs]) and biocompatible resin (Temporary CB Resin [Formlabs]). The 3D printed prostheses were tried onto the edentulous ridges to confirm aesthetics, phonetics, centric, and stability.
The definitive restorations were imported into a milling machine software (R5) for milling of the definitive prostheses. The denture bases were milled using pink-colored PMMA (Ivotion CAD), and teeth were milled using tooth-colored PMMA (Ivotion CAD). The teeth and bases were luted using the aforementioned protocols within our in-office laboratory. The areas corresponding to the locations of the denture attachment housings were slightly enlarged using a recess bur (CHAIRSIDE Denture Prep & Polish Kit) to assist in the clinical delivery of the prosthesis.
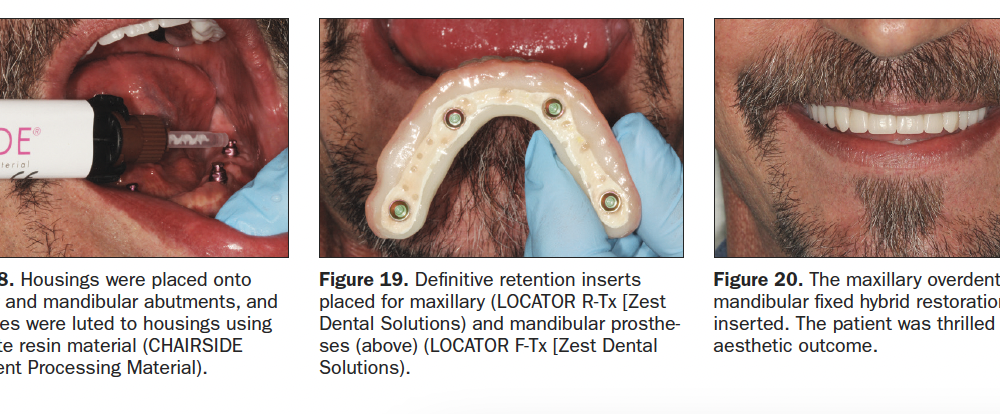
The patient returned for placement of the definitive prosthesis. Block out rings (LOCATOR Block-Out Spacers [Zest Dental Solutions]) and housings were placed onto each abutment. The prosthesis was tried onto the edentulous ridge, and the passivity of fit around the housings was confirmed. Mechanical retention features were placed within the prepared recesses of the prosthesis, and a lingual vent connecting the recesses to the cameo surface of the prosthesis was placed. Composite resin (CHAIRSIDE Attachment Processing Material [Zest Dental Solutions]) was placed onto each housing and into the recesses in the definitive prosthesis and the prosthesis seated onto the edentulous ridge, ensuring light finger pressure holding the prosthesis in place. After complete polymerization, the prosthesis was removed, verifying proper attachment of the housings prior to additional laboratory procedures. Polishing procedures were completed, and definitive retention inserts (LOCATOR R-Tx Inserts [Zest Dental Solutions]) were placed (Figure 8). Prosthesis stability, proper occlusion, and acceptable phonetics were confirmed, and the patient was given wear and care instructions for the prosthesis, including hygiene and maintenance. The patient was pleased with the final aesthetic appearance (Figure 9).
Case 2: Maxillary Overdenture and Mandibular Fixed Hybrid
A patient presented to the author’s clinical practice with a hopeless dentition due to extensive caries and tooth abrasion (Figure 10). The patient indicated he has been to several other dentists who indicated that his teeth were hopeless and he would need dentures with extensive surgery prior to implants. He presented to our office seeking an implant option that was affordable and expedited. A CBCT scan (GreenCT) and an intraoral optical scan (TRIOS) were made during this initial visit. The CBCT files were imported into implant planning software (Implant Studio) where implants (Advanced Classic [Paltop]) were planned using the software to guide the virtual placement. The surgical plan was presented to the patient, and he was surprised that he could have implants at the same time as extractions and that he did not need extensive surgical procedures. He was thrilled and wished to proceed with treatment.
Intraoral optical scans were imported into dental laboratory software for planning maxillary and mandibular prostheses (Dental System). Using photography and intraoral measurements, the virtual teeth were positioned to plan for 3D-printed immediate dentures. Completed designs were 3D printed using pink-colored resin (Denture 3D+ [NextDent]), and teeth were 3D printed using tooth-colored resin (C&B MFH [NextDent]). The bases and teeth were cleaned in isopropyl alcohol, dried, and UV cured according to manufacturer’s recommendations. The teeth were luted to the denture bases using pink 3D printing resin and UV cured. Teeth were stained and glazed using a light-cured characterization kit (OPTIGLAZE [GC America]) to highlight a natural shape and color. A surgical guide (3D Print Surgical Guide [SprintRay]) was 3D printed using a desktop 3D printer (SprintRay Pro [SprintRay]) and UV cured to ensure biocompatibility.
Local anesthetic was applied (2% Lidocaine [Zahn]), maxillary and mandibular teeth were extracted, and the surgical guide was placed onto the maxillary and mandibular dentition. Ostetotomies were prepared using a contemporary surgical guide kit (Fully Guided Surgical Kit [Paltop Dental]) the surgical guide to assist with preparation and placement of the osteotomies. Mandibular implants were placed first, then maxillary implants with larger diameters were placed, shorter implants were placed in the molar regions, and narrower-diameter implants were placed in the anterior regions (Figure 11). Healing abutments were placed on each implant as sufficient primary stability was achieved during implant placement. Xenograft bone particulate (Endobon Xenograft Granules [Zimmer-Biomet]) was placed around the areas of the dental implants within extracted tooth sockets. The dentures were placed and adjusted using a disclosing medium (Pressure Indicating Paste) and acrylic burs (CHAIRSIDE Denture Prep & Polish Kit).

The patient returned approximately 4 months after implant placement, and complete implant healing and osteointegration was verified. Healing abutments were removed, tissue measurements were completed, and contemporary overdenture abutments (LOCATOR R-Tx) were placed on the maxillary implants until finger-tight. Contemporary fixed hybrid abutments (LOCATOR F-Tx [Zest Dental Solutions]) were placed on the mandibular implants until finger-tight (Figure 12). A panoramic radiograph was made to confirm complete adaptation of the abutments (GreenCT), and each was torqued according to the manufacturer’s recommended torque values (Figure 13). The interim prosthetics were adjusted using acrylic burs until properly seated around the newly placed maxillary and mandibular abutments (Figure 14).
Denture attachment housings were placed onto each abutment, and optical impressions of the edentulous ridges and existing dentures were made using an intraoral scanner (TRIOS) (Figure 15). The optical scan files were imported into dental laboratory planning software (Dental System), and maxillary and mandibular frameworks were designed for an overdenture and a fixed bridge. The STL file for the maxillary overdenture framework was sent to an outside dental laboratory for CoCr metal-based 3D printing (Bertram Dental Lab, Menasha, Wis), and models were 3D printed using a desktop-grade 3D printer (Form3B [Formlabs]) (Figure 16). The mandibular framework design file was imported into the in-house laboratory milling machine (R5), and the framework was milled using a fiber-reinforced polymer hybrid (TriLor [Harvest Dental]) (Figure 17).
Wax rims were placed onto each of the frameworks, and the patient returned for jaw relation records and tooth selection. Denture teeth (Pala Mondial [Kulzer]) were placed according to guidelines established during the clinical appointment. The patient returned, and the trial prostheses were tried onto each edentulous ridge, confirming adaptation, stability, aesthetics, centric, and phonetics.
The maxillary prosthesis was heat-processed using injection-molded acrylic resin (Ivocap [Ivoclar Vivadent]). After processing the maxillary prosthesis, the mandibular wax-up was scanned using an intraoral scanner (TRIOS), and optical scan files were imported into dental laboratory software (exocad) for planning of the final restoration. The completed mandibular design was imported into milling machine software (R5) for milling of the definitive prostheses. The teeth were milled in a contemporary ceramic-polymer hybrid material (Crystal Ultra [Digital Dental]), and pink composite (GRADIA [GC America]) was added to the completed milled prostheses to give a simulated tissue appearance. The teeth section was luted to the polymer framework using a resin luting agent (PANAVIA V5 [Kuraray Noritake]).
The patient returned for placement of the definitive prostheses. Block out rings (LOCATOR Block-Out Spacers), maxillary housings (LOCATOR R-Tx), and mandibular housings (LOCATOR F-Tx) were placed onto each abutment.[SC: both max and mand on all abutments?] The prostheses were tried onto the maxillary and mandibular edentulous ridges, and passivity of fit around the housings was confirmed. Mechanical retention features were placed within the prepared recesses of the prosthesis, and a vent connecting the recesses to the cameo surface of the prosthesis was placed. Composite resin (CHAIRSIDE Attachment Processing Material) was placed onto each housing and into the recesses in the definitive prosthesis, and the prosthesis seated onto the edentulous ridge, ensuring light finger pressure holding the prosthesis in place (Figure 18). After complete polymerization, the prostheses were removed, verifying attachment of the housings. Polishing procedures were completed, and definitive retention inserts on the maxillary (LOCATOR R-Tx Inserts) and mandibular (LOCATOR F-Tx Retention Balls [Zest Dental Solutions]) were placed (Figure 19). Prosthesis stability, proper occlusion, and acceptable phonetics were confirmed, and the patient was given wear and care instructions for the prosthesis, including hygiene and maintenance (Figure 20).
CLOSING COMMENTS
Patients with terminal and/or failing dentition are often seeking solutions to challenges that some clinicians may not address due to complexity, surgical concerns, and potentially patient-derived factors. While complete arch reconstruction with dental implants can be a challenging diagnostic, surgical, and prosthetic modality, digital dental technology permits the surgeon and the restorative doctor to enhance prosthetic outcomes without enhancing the complexity of the procedures. Combining intraoral scanning, digital design, 3D printing, milling, and contemporary abutment systems permits the clinician to greatly simplify and create efficient workflows for the restoration of challenging cases.
References
- Brown D. Outdated reasons for modern technology. Dent Econ. 2019;109(9):57-60.
- Rekow ED. Digital dentistry: The new state of the art – Is it disruptive or destructive? Dent Mater. 2020;36(1):9-24.
- McCracken MS, Litaker MS, Thomson AES, et al. National Dental PBRN Collaborative Group. Laboratory technician assessment of the quality of single-unit crown preparations and impressions as predictors of the clinical acceptability of crowns as determined by the treating dentist: findings from the national dental practice-based research network. J Prosthodont. 2020;29(2):114-123.
- Gross D, Gross K, Wilhelmy S. Digitalization in dentistry: ethical challenges and implications. Quintessence Int. 2019;50(10):830-838.
- Scherer MD. Presurgical implant-site assessment and restoratively driven digital planning. Dent Clin North Am. 2014;58(3):561-595.
- Scherer MD. A contemporary approach to intraoral optical scanning and in-office 3D printing. Dent Today. 2015 Dec;34(12):46-47.
- Research indicates further decrease in laboratory numbers by 2017. Inside Dental Technology. 2015;6(8):6.
- Mazda J. The effect of consolidation. Inside Dental Technology. 2019;10(10):12-18.
Dr. Scherer is an assistant clinical professor at Loma Linda University, a clinical instructor at the University of Nevada, Las Vegas, and maintains a practice limited to prosthodontics and implant dentistry in Sonora, Calif. He is a fellow of the American College of Prosthodontists and has published articles, books, and in-person and online courses related to implant dentistry, clinical prosthodontics, and digital technology with a special emphasis on full-arch reconstruction. As an avid technology and computer hobbyist, Dr. Scherer’s involvement in digital implant dentistry has led him to develop and pioneer new approaches with 3D printing and CAD/CAM surgical systems and implement interactive CBCT implant planning and outside-the-box radiographic imaging and digital design concepts. He can be reached at mds@scherer.net.
Disclosure: Dr. Scherer is the chief clinical advisor, implants and prosthetics for Zest Dental Solutions.
Related Articles
Future Trends in Implant Dentistry: Full-Arch Rehabilitation and Desktop 3-D Printing


