If you haven’t initiated a digital photography system in your office (or even thought about it), then certainly 2004 is your year. Resistance is futile!
Having walked the floors of several dental shows in the past few months (and many years), I’ve found irony in the assortment of megabuck items on which our colleagues are willing to spend money. Such items range from those that actually make our jobs easier to those that are destined to be shelf dwellers in short order. Here’s the irony: If you blink at the wrong time, you might walk right past the tiny booths devoted to dental digital photography, the very locales that possess more marketing and diagnostic muscle than any other technology currently available to the profession. While certain other technologies cost $20,000 or more and probably won’t make the doctor any richer at the end of the year, a $2,000 digital camera system (when properly used) can dramatically increase the amount of high-end dentistry performed along with increasing one’s bottom line. Let’s examine this area from a different perspective.
DECISIONS…DECISIONS…
Being the moderator of an online digital photography forum, I’m able to listen in on many a perplexed clinician trying to decide which camera to buy, where to get it, and how he might shave a few bucks off the transaction. Often encountered are those who purchased an “off-the-shelfer” from Electronics R US and are trying to “back it in” to being a dental digital camera. Commonly heard are the start-up docs, who are understandably very cost-conscious. Ironically (again), they are the practitioners most likely to benefit and adapt quickly, having grown up with PCs.
Not too long ago, there were valid reasons to ponder the above. At present, however, such concerns have been made obsolete by the recent introduction of a sub-$1,000 digital SLR camera body from Canon. While I promise to supply more details on “the camera,” suffice it to say that equipment selection has ceased to be an issue. Choices for the new buyer can really be limited to 2 system types, as will be discussed shortly.
THE BIG ISSUES
Here’s the major hurdle (the biggie! the deal breaker!). Are you willing to commit to the short learning curve necessary for managing image files in a Windows environment? Further, are you willing to squeeze a PC into your operatory? That’s what it boils down to. Camera selection and cost, when compared to the rewards that such a system can bring you, have now been rendered incidental. Your willingness to learn a somewhat new language is what’s at issue here. If you don’t commit to either of the above, digital imaging will not provide the panacea that its proponents (myself included) promise the user.
Using a digital camera and learning to take the appropriate shots used in dentistry can be accomplished in about an hour. Systems arrive pre-set from dealers such as PhotoMed or Norman Camera. The learning curve begins when we need to copy and paste or rename a file, or back it up, or crop it, or make it small enough to e-mail, or print it in 4×6 format, or … OK, you get it. Those of you who are already computer savvy, your ship has come in. Those who aren’t, put your mind to it and you will be rewarded many times over—even outside your office when your child wants to know how to send a JPEG to grandma.
OK, you’ve been advised of digital photo reality in 2004. Let’s take the obligatory look at what constitutes a viable system.
HARDWARE CONCERNS
The PC
Somewhere in your office you’ll need a PC, even if it’s not in your operatory. For the record, I’ve had wonderful success with Dell computers. With 14 PCs in my office, the only ones that have never failed are the 3 Dell computers. A current favorite of mine is Dell’s 4600c, which at the time of this writing can be purchased with a 17-inch, flat-screen monitor for under $1,500. Tech specs on this system can be obtained at dell.com. The form factor of this system is c=compact; it’s easy to squeeze into tight spaces. Even if you’re not interested in networking it to a business computer that you have elsewhere, the “show and tell” ability afforded you by operatory placement remains formidable. And, if you choose, you can network it later (Figure 1).
 |
| Figure 1. Dell compact computer snuggled between countertop and mobile cabinet. |
The Printer
Two types of printers are available: ink jet and dye sublimation, but I’ll narrow it down for you. The ink jets are more versatile. That is, they can print text and accept multiple paper types unlike a dye sublimation printer. Canon has recently released its i900d, which is as close to being perfect for us as currently possible. It can operate as a stand alone printer (ie, no computer needed) or it can be controlled by a PC (something you’ll ultimately want to do). The i900d has a small LCD screen that will let you see what’s on your digital film after it has been plugged into the “built in” digital film slots that allow you to upload your images to your PC (Figure 2). In essence, the printer becomes what your PC recognizes as a “drive” once the film has been inserted into one of the film slots. The i900D also possesses a nifty 4×6 paper adapter that allows for convenient lab photo prints. It must also be mentioned that Canon printers are accompanied by Easy Photo Print, the most idiot-proof printing utility known to man; effortless, side by side, borderless prints for the asking.
A word about dye sublimation printers: requiring proprietary paper and ink ribbons, the dye sub printer can have a place in a crowded operatory. It’s ideal for rapid issue of 4×6 prints to a patient or lab. A personal favorite is Hi-Touch’s 640 PS (Figure 3). It, too, can operate as a stand-alone printer, and houses built-in film slots and an LCD enabling you to select images for printing without having a PC attached. It can only print 4×6 images and cannot print text in its stand-alone configuration.
 |
 |
| Figure 2. Digital film slots make it easy to download images to your computer. | Figure 3. HiTouch’s 640 PS dye sublimation printer with built-in film slots and LCD. |
SOFTWARE CONCERNS
Did you know that on a Windows XP-configured computer, you can satisfy the core digital imaging processes with no more than its built-in functionality? Specifically, you can upload, view, store, catalog, e-mail, and print your images all with Windows XP Wizards without ever adding more software. What Windows XP lacks is a capable editing module, one that will allow you to make imperfect photos more perfect. This might mean cropping or trimming away unnecessary parts of an image, or improving the contrast, color, or sharpness of an image. For this purpose, a current favorite is Cerious Software’s Thumbs Plus Pro version 6.0 (Figure 4). This full-feature viewer/editor currently sells for $90. Additionally, PhotoMed offers this software bundled with what is an effective, intelligent user guide/tutorial (at additional cost).
You should also know that the Canon cameras that I will discuss next are typically accompanied with Canon’s own photo manipulation program (Zoom Browser) as well as a copy of Photoshop Elements 2 (Adobe), a highly capable editor with more learning curve than the beginner might want initially. For the seasoned veteran, however, Photoshop Elements 2 may well be the only editor ever needed. Some individuals find the software that accompanies the camera is all they need to get started.
Once you’ve spread your digital wings and are in full flight, you may wish to consider what I term the “whole digital enchilada.” I’m speaking of SciCan’s Image FX. This imaging package will accommodate all forms of digital input including cameras, intraoral video, scanners, and digital X-ray systems. Its cataloging, image editing, and simulation capabilities are, in this author’s opinion, second to none. Once past the price tag, ownership of the Image FX suite would, for the most part, preclude the need for any other software and would streamline the entire digital operation in one’s office. And note that Image FX can be bridged to the major practice management packages to link your patients’ images to their respective records (scican.com) (Figures 5 and 6).
At present, this author uses Image FX for rapid downloads, image archiving, and patient demos, which include cosmetic simulations, Thumbs Plus Pro for sorting and basic editing of images that need it, and Photoshop Elements 2 for more in-depth image editing. Canon’s Easy Photo Print typically generates quick hard copies, as does Image FX (prints).
Finally, one other software favorite, TigerView, is an excellent way to import and catalog any kind of digital image (photo, x-ray, video captures) into a patient database. It will synchronize with most major software packages such as Softdent or Dentrix, or it will put together its own database of patient images for you. Capable of basic image handling and editing capabilities, its ability to build an image database of photos, video, and x-rays that interfaces with your existing business software (at a reasonable price) makes it worthy of your consideration. Highly recommended! (tigerview.com) (Figure 7). One other note: TigerView excels at x-ray scanning and digitization. My office currently uses TigerView for scanning of all new patient x-rays, affording us many of the benefits of digital radiography while still using film and chemical processing.
 |
 |
| Figure 4. Thumbs Plus Pro version 6.0 desktop display. | Figure 5. SciCan’s Image FX used to simulate diastema closure. |
 |
 |
| Figure 6. Bleaching simulation in Image FX. | Figure 7. TigerView screen shot: multiple digital input capabilities. |
For those of you with dental management packages, be sure to find out what modules are built into your program’s own database capability. Many of the packages offer full digital image functionality, making it less necessary to add software.
AT LAST: THE CAMERA
If you haven’t purchased a system yet, your choice of cameras can boil down to your desire, or lack thereof, to take the camera on vacations. If your new digital camera is to serve a dual role (family and office), then Canon’s G5 is the ticket. This point-and-shoot camera (when equipped with a PhotoMed macro/diffuser) is the perfect hybrid camera (Figure 8). It’s small enough to tote easily, but possesses the professional feature adjustments needed to make it handily perform digital dental photography.
The one mark against such systems is the need to frame and focus on your images by viewing what the lens sees through the camera’s LCD screen (much like a video camera). Additionally, use of PhotoMed’s diffuser, while providing exceptional quality images, takes “autofocus” out of the equation. The G5, when used for intraoral shots, is manually focused by moving the camera to and from the subject at hand. This process is assisted by a manual focus button that brings up an enlarged “picture in picture” for easier focusing; very elegant and very effective. Five-megapixel resolution affords highly detailed images, while its Digic microprocessor makes everything happen more quickly than in previous models. A single thumbscrew secures the PhotoMed attachment, providing the easiest dental/nondental conversion in the business (Figure 9). The system can be purchased as a whole from PhotoMed, or the diffuser can be added separately if you already own a G5. The diffuser is accompanied by an adapter for the G5 as well as the appropriate camera settings. (Note: macro/diffuser attachments are also available for the G2, G3, and Olympus Camedia series cameras at photomed.net).
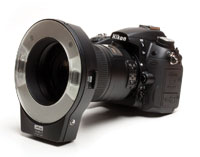
Canon’s Digital Rebel, the first sub-$1,000 digital single-lens reflex (SLR) camera offered, has set the digital camera world on its ear. The Fujis, Nikons, and Olympus of the world are currently scrambling to come up with a Rebel solution. Backwards compatible with Canon’s fine EOS lens system, the 6.5-megapixel Digital Rebel allows the user to frame and focus while peering through a traditional viewfinder, seeing just what the lens sees. When coupled with Canon’s MR-14EX ring flash and an EOS 100-mm macro zoom, the depths of the oral cavity become child’s play for even the novice user. Either auto or manual focus methods can be used to expose an image (Figure 10).
Its big brother and this author’s main squeeze, the Canon 10D (Figure 11), offers similar functionality with a magnesium (as opposed to plastic) body, and possesses additional adjustability, albeit not critical to our needs for dental imaging. Its heavier weight is accompanied by a moderately higher price tag.
 |
 |
| Figure 8. Canon G5 camera with PhotoMed macro/diffuser attachment. | Figure 9. Removal of the PhotoMed device using but a single thumb screw. |
 |
 |
| Figure 10. Canon Digital Rebel with ring flash and macro lens. | Figure 11. Canon 10D with ring flash and macro lens. |
The 10D and Digital Rebel can also go home, but their bulk might dissuade the average individual from toting it on vacation. For the photo buff, however, the Digital Rebel could be the hobby/professional match made in heaven.
The Canon line is so heavily endorsed by the profession (not to mention proven), that you needn’t ever second-guess your decision. Your choice can really be limited to form factor. As mentioned above, it’s the least difficult decision to be made during the entire digital adaptation.
One last note on cameras: Do yourself a favor. Buy from a dealer that does “dental.” Shopping the general market to skim a few bucks off of the top from nondental sources will leave you exposed to an absence of “back up” when the need arises. This could come in the form of a loaner camera when yours goes down or a coach to help you reconfigure your camera should the settings be lost. Two companies that I have had positive experiences with would include PhotoMed Inc and Norman Camera (normancamera. com).
NOW WHAT?
OK….you’ve got your system up and running. What do you do with it? Below are the top 10 things that I do with my Canon 10D and G5 outfits.
(1) Take digital portraits and upload them to Smile Vision for cosmetic simulations (smilevision.net). Simulations equal more cosmetic cases (Figure12).
 |
| Figure 12. Smile Vision for outsourced cosmetic simulation of the highest caliber. |
(2) Take digital portraits and do my own simulations with the Lorin Library (digident.com) and SciCan’s Image FX (scican.com).
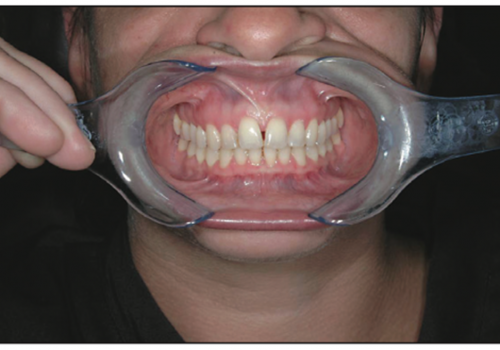
(3) Demonstrate both symptomatic and asymptomatic coronal fractures to patients and third-party carriers in order to validate full coverage recommendations (the Motherlode, Figure 13).
 |
| Figure 13. Demonstrating a fracture to a patient. |
(4) Take digital full-mouth photos (5 shots) at all new patient evaluations and justifiably collect a fee for doing so (Figure 14); use those same photos at a return treatment recommendation visit to have the patient “co-diagnose” his or her condition.
 |
| Figure 14. Preparing a digital photo “full-mouth series” with Image FX. |
(5) Send before-and-after pictures home with patients (brings in new business).
(6) Send photos to labs for better aesthetic results and better communication (fewer remakes=better profitability) (Figure 15).
 |
| Figure 15. Better laboratory communications when digital photos are provided. |
(7) Take digital images of wet films on a view box either to aid endodontic treatment or show a patient his or her condition on a 17-inch screen (Figure 16).
 |
| Figure 16. Digitizing a photo by photographing it on a view box. |
(8) Take photos of soft-tissue lesions for documentation and second opinion consultation (Figure 17).
 |
| Figure 17. Documenting and demonstrating an oral lesion. |
(9) Incorporate my own photos into CAESY demonstrations (CAESY.com) (Figure 18).
 |
| Figure 18. Importing my own images into CAESY. |
(10) Document procedures for the articles and PowerPoint shows that I compose.
CONCLUSION
What other dental investment can afford you all of the perks just listed for so modest an investment of time and money? Need I say more? If by now you’ve gotten the itch, you can find those tiny booths featuring digital dental magic at all of the major dental meetings and explore the subject in depth at seminars throughout the land. Keep a sharp eye out.
I’ll check back with you in 2005.
Dr. Goldstein practices general dentistry in Wolcott, Conn. He lectures and writes extensively concerning cosmetics and the integration of digital photography into the dental practice. A contributing editor for Dentistry Today, he also has authored numerous articles for the Compendium, CERP and other international dental publications. He can be contacted at martyg924@cox.net. His current speaking schedule can be found at dhapc.com, and information on his Comfort Zone Cosmetics hands-on seminars is posted at smilevision.net.