INTRODUCTION
As dentists, one challenge that we are faced with these days is the constant barrage of marketing involving an ever-growing list of new products. It is hard to keep pace and even harder to almost blindly incorporate some of these products when one’s normal routine consists of simply trying to provide good results. In searching out the best “go-to” direct restorative materials, clinicians have traditionally looked for ease of handling, placement, durability, aesthetics, and consistency in order to provide predictable restorations. That is why, for years, dental amalgam had a history of widespread use, when aesthetics was of little concern. In fact, an ADA position statement in November, 2012 reported that, “Dentists value amalgam for its durability and ease of placement.”1 However, they continue to be less desirable for our patients, and there appears to be a declining trend in many other countries as well.2
Brief Background on Direct Restorative Options
The use of metal-free restorations continues to increase as our patients request more natural looking, aesthetic fillings. As this occurs, we have only 2 choices of aesthetic direct restorative materials: composite resins—with which most clinicians are aware of the options, advantages, and disadvantages—and glass ionomers (GIs).
Direct restorations make up a large part of most general practices, but the technique sensitivity and time required can be disruptive to the clinician. Multiple amalgam restorations are quick and fairly easy to place.3 Comparable composite resin restorations typically take much longer to place and finish due to handling characteristics and physical properties. However, composite resins have been accepted for many years now as a primary restorative material for anterior and posterior direct restorations. Their downside is the higher level of technique sensitivity, as compared to amalgam. Fortunately, there have been many advances in composite resin materials in recent years in terms of strength, shrinkage, polishability, durability, and aesthetics. However, for most products, a well-planned layering technique is required for optimal results.
It would not be uncommon, in the usual restorative practice, to find several patients each day who need a number of posterior restorations to be accomplished in one appointment. The clinician’s ability to place these restorations in a simple, timely, and predictable fashion would not only benefit the practice, but would also be best for patients who value their time. The advent of bulk-fill options has helped reduce the time required to place these restorations.
An alternate bulk-fill option would be the use of a GI restorative material. Wilson and Kent4,5 first introduced GIs in the early 1970s. These materials are derived from a chemical reaction between silicate glass particles and a polyacrylic acid to form an ion-leachable material; and they chemically bond to tooth structure and facilitate the release of fluoride and a variety of other ions that have the ability to remineralize tooth structure.6-9 Initially, they were introduced in the form of GI cements, but they have now evolved into more comprehensive restorative materials.
Traditionally, GIs have served several roles that have been routine in everyday dentistry for years. The most common applications are as cement for indirect restorations, as a liner/base under restorations, and as a core material under crowns. The fact that they form a chemical bond with tooth structure and release fluoride (anti-cariogenic effect) is a great benefit. On the contrary, GIs have traditionally lacked aesthetics, durability, and strength due to low abrasion resistance and low tensile strength.10 However, with changes in chemistry and physical properties, GIs are now providing long-term restorative options as an alternative to amalgams and composite resins. Evidence exists showing that GIs have survived well when compared to amalgam in single-surface and conservative 2-surface restorations.11 In comparison to composite resins, GIs have shown comparable retention rates after 2 years in Class I and II restorations.12
The recent introduction of a GI “restorative system” combines a high viscosity GI with a light-cured resin glaze (EQUIA Fil and EQUIA Coat [GC America]). The use of a light-cured resin coat (layer) has been shown to increase strength and wear resistance of the GI.13,14 The resin coat, which may be reapplied periodically as needed, provides an overall appearance that is comparable to most composite resin materials. This combination appears to provide another option for conservative posterior direct restorations. Clinical studies are ongoing; however, interim reports are very favorable for long-term outcomes.15
CASE REPORTS
Case 1
Diagnosis and Treatment Plan—An 80-year-old patient presented with a lost amalgam restoration on her maxillary left first bicuspid (No. 12) (Figure 1). She was experiencing transient sensitivity to cold, but was otherwise asymptomatic. She was interested in a direct restoration, so a GI restoration was planned to restore this tooth. She was informed that if further breakdown of the tooth would occur subsequent to placement of the new direct restoration, the tooth would likely require a full-coverage restoration.
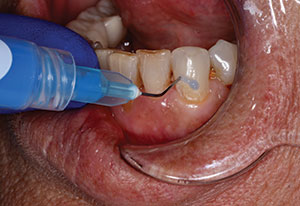
Clinical Protocol—Local anesthetic was administered and then a caries indicator dye (Sable Seek [Ultradent Products]) was used to verify the presence and location of caries. Caries removal was then carried out using a No. 4 round bur (SS White Burs). After verification of caries removal, the preparation was completed using a fine diamond bur (KS2 [Premier Dental Products]). A Tofflemire Matrix Band (Waterpik) was placed around the tooth prior to placement of the restoration. Next, the cavity was conditioned with polyacrylic acid on a microbrush by scrubbing for 10 seconds (GC CAVITY CONDITIONER [GC America]) (Figure 2), and then rinsed and gently air-dried. A capsule of EQUIA Fil GI was activated by shaking it, then tapping the capsule on a flat counter surface, and lastly, depressing the yellow plunger. Following this, it was placed into the capsule applicator gun and clicked once prior to placing it into a CAPSULE MIXER CM-II (GC America) for 10 seconds. The capsule was placed back into the applicator gun, and then clicked twice to prime the material for delivery. Next, the GI material was extruded into the preparation within 10 seconds of activation, and then it was allowed to set for 2 minutes and 30 seconds from the start of the mix (Figure 3). Once set, the excess was removed. Then, the restoration was finished and contoured using a multifluted carbide bur (SH133UF [Shofu Dental]). The restoration will have a slightly matted appearance after finishing and contouring (Figure 4).
| CASE 1 | ||||||||||||||
|


The final step in the procedure involved the placement of a light-cured resin coating over the restoration (EQUIA Coat). The self-adhesive coat was applied over the entire restoration without any thinning with air (Figure 5). Next, this coating was cured for 20 seconds using an LED curing light (Elipar S10 [3M ESPE]) (Figure 6).
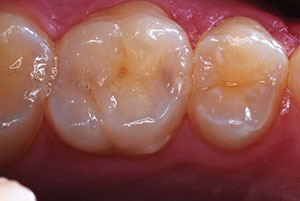
The final restoration then demonstrated an appearance of a typical composite restoration that had been finished and polished to a high gloss (Figure 7).
Case 2
Diagnosis and Treatment Plan—A 47-year-old female presented with a carious lesion on the mesial of her mandibular left second molar (No. 18). Her first molar (No. 19) had been previously extracted, and she was unaware of this asymptomatic carious lesion (Figure 8). The caries was easily accessible with a minimally invasive preparation and restoration that would be limited to the proximal surface. She agreed to the placement of a conservative GI restoration to restore this tooth.
Clinical Protocol—Local anesthetic was administered, and then tooth No. 18 was isolated, and caries removal was done using a fine diamond bur (KS2 [Premier Dental Products]) (Figure 9). A polyacrylic acid conditioner (GC CAVITY CONDITIONER) was applied with a microbrush, then scrubbed for 10 seconds (Figure 10). The conditioner was rinsed off and then gently air-dried (Figure 11). A capsule of EQUIA Fil GI was activated (as described in detail in case 1) and then placed in a capsule mixer for 10 seconds. After priming the capsule, the GI was dispensed into the cavity preparation (Figure 12), and then the material was packed and shaped using a composite resin sculpting instrument (PTF 11 [Hu-Friedy]) (Figure 13). The restoration was then allowed to set for a minimum of 2 minutes and 30 seconds from the start of mixing. Next, the restoration was finished using a multifluted carbide bur (SH133UF). Following this, EQUIA Coat was placed over the restoration with a microbrush, then light cured for 20 seconds (Figures 14 and 15).
The completed restoration can be seen in Figure 16.
| CASE 2 | ||||||||||||||||||
|


IN SUMMARY
The material options for posterior direct restorations are amalgam, composite resin, and GI; when an aesthetic solution is desired, the latter 2 options are our only choices. Composite resins are still the primary “go-to” direct restorative material. However, in cases where conservative Class I and II restorations are desired, GI materials are making strides to compete. These materials have a remineralizing effect, can reduce sensitivity, are compatible with dentin, and may be easily bulk-filled for convenience. The introduction of a resin coating has now imparted some durability and aesthetics that should serve to provide more consideration for GIs for specific direct posterior restorations.
References
- ADA statement on the American Public Health Association’s newest policy on dental amalgam [news release]. Chicago, IL: American Dental Association; November 7, 2012.
- Burke FJ. Amalgam to tooth-coloured materials—implications for clinical practice and dental education: governmental restrictions and amalgam-usage survey results. J Dent. 2004;32:343-350.
- Mitchell RJ, Koike M, Okabe T. Posterior amalgam restorations—usage, regulation, and longevity. Dent Clin North Am. 2007;51:573-589, v.
- Wilson AD, Kent BE. A new translucent cement for dentistry. The glass ionomer cement. Br Dent J. 1972;132:133-135.
- Wilson AD, Kent BE. The glass-ionomer cement: a new translucent dental filling material. Journal of Applied Chemistry and Biotechnology. 1971;21:313.
- Burgess JO. Fluoride-releasing materials and their adhesive characteristics. Compend Contin Educ Dent. 2008;29:82-94.
- Tam LE, Chan GP, Yim D. In vitro caries inhibition effects by conventional and resin-modified glass-ionomer restorations. Oper Dent. 1997;22:4-14.
- Scherer W, Lippman N, Kaim J, et al. Antimicrobial properties of VLC liners. J Esthet Dent. 1990;2:31-32.
- Ewoldsen N, Herwig L. Decay-inhibiting restorative materials: past and present. Compend Cont Educ Dent. 1998;19:981-992.
- Manhart J, Chen H, Hamm G, et al. Buonocore Memorial Lecture. Review of the clinical survival of direct and indirect restorations in posterior teeth of the permanent dentition. Oper Dent. 2004;29:481-508.
- Zanata RL, Fagundes TC, Freitas MC, et al. Ten-year survival of ART restorations in permanent posterior teeth. Clin Oral Investig. 2011;15:265-271.
- Ersin NK, Candan U, Aykut A, et al. A clinical evaluation of resin-based composite and glass ionomer cement restorations placed in primary teeth using the ART approach: results at 24 months. J Am Dent Assoc. 2006;137:1529-1536.
- Shinohara M, Antunes A, Padovano J, et al. Effect of resin coating on the ultimate strength of glass ionomers. J Dent Res. 2010;89(special issue A). Abstract 796.
- Turkun LS, Kanik O. Clinical evaluation of new glass ionomer-coating combinated systems for 18-months. J Dent Res. 2010;89(special issue B). Abstract 402.
- Basso M, Heiss MA, Khandelwal P. Permanent restorations with glass ionomer cements. Clinical evaluation on 319 cases. J Dent Res. 2013;92(special issue A). Abstract 594.
Dr. Shah holds a master’s degree in physiology (1987) and graduated from the University of Manitoba Dental School in 1991. He maintains a private practice in Winnipeg, Canada, with a focus on implant, aesthetic, and interdisciplinary care. He serves as a co-director for a Seattle Study Club in Winnipeg and has a proficiency certificate in aesthetic dentistry from the State University of New York, University at Buffalo in 2007. He is a part-time instructor at the University of Manitoba in the fixed prosthodontics department. He is a consultant for several dental manufacturers and lectures internationally on aesthetics, implants, and interdisciplinary care. He focuses on providing solutions, updates, and techniques to make everyday dentistry simple, reproducible, and predictable. He can be reached via email at the address shahp@mymts.net or visit the website at drpareshshah.com.
Disclosure: Dr. Shah has received honoraria from GC America for writing this article and for product evaluations.