


INTRODUCTION
At age 14, I declared that I would be a dentist someday, but what I didn’t realize was how my work would allow me to impact people’s lives well beyond the dental chair. I never dreamed I would be able to quickly and effectively rehabilitate smiles using digital technology.
Admittedly, my happiest moments are when I get to both be creative and provide an exciting and easy experience for someone. Maybe this is why sharing what I do consistently on social media comes so easily. My enthusiasm to share what can be done using digital dentistry and the adrenaline rush I get from impressing the patient has always felt like a win-win scenario.
However, if my 20-plus years of experience has taught me anything, it is that you cannot underestimate the value of digital planning, smile design, and effective workflows. This was never more evident than when I performed a combination of orthodontics and restorative bonding on my cousin, Jocelyn, who lives 2 provinces away, in only 9 months and 3 visits. Without the help of these key elements, we could not have performed this treatment with such incredible results.
Although I do many cases with a combination of orthodontic and restorative (porcelain or composite veneers), I chose to share this case because I want all doctors to realize that even the most basic digital workflows will help them to transform a patient’s smile much more simply than they can without them. Many doctors are hesitant to start using digital workflows because they think they are too difficult to learn or will ultimately not be any faster. I am here to suggest the opposite.
CASE REPORT
Background
In July 2019, I was vacationing in Newfoundland, the most easterly province in Canada, where I grew up. For reference, my practice is in Saint John, New Brunswick, nearly 1,500 km (900 mi) away. Known for its remote living and rugged, beautiful coastline, I met up with my cousin, Jocelyn, who accompanied me on a hike on Change Islands, where our families are originally from. She was in the process of completing her master’s degree and wanted to apply for a more advanced position in her profession. But the problem was that she felt her smile was holding her back from being confident enough to pursue and achieve her goals.
As any rational dentist would, we stopped on the trail as I got her to lift her lips and cheeks and show me her teeth from every angle. Something in me just wanted her to know it was possible. I wanted to give her hope when she had not received much encouragement in the past. Newfoundland is a very large province but has less access to advanced services like smile reconstruction and specialized health care.
I not only told her it could be done but that it would be “relatively easy” using the old “fake-it-til-you-make-it” mindset. I was so excited to help her!
The truth is, I knew I could do it in a minimally invasive way, but the challenges included the fact that my clinic was so far away and that she would require orthodontics first. The thing I didn’t realize was how important my digital planning and systems would be. I wanted a plan that would be minimally invasive and efficient travel-wise, so digital planning saved us time and potential mistakes.
Clinical Exam
Jocelyn, a 44-year-old female, made her first visit to the clinic in January 2020. We performed diagnostic records, including a panoramic x-ray, a 3D iTero scan (Align Technology), a full complement of intra- and extraoral photos, and a clinical exam (Figures 1 to 3).
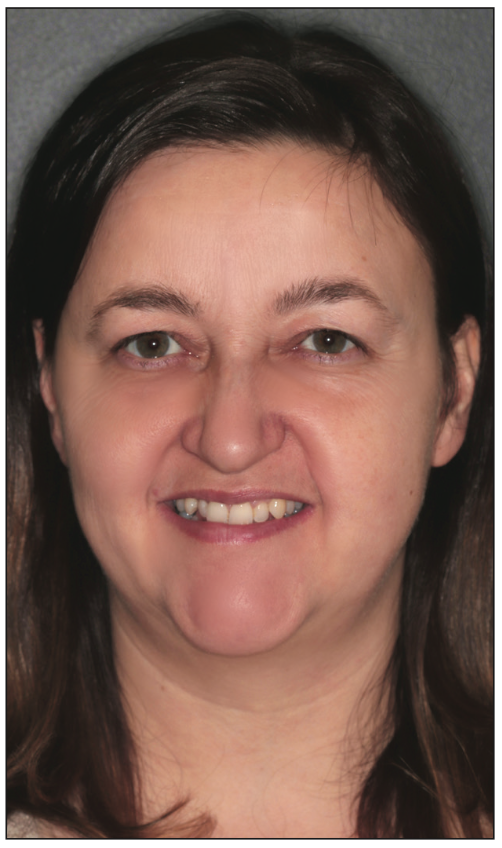
Figure 1. Preoperative portrait image.
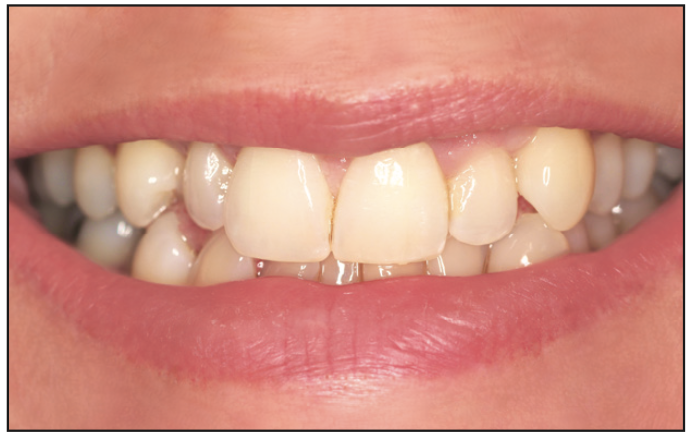
Figure 2. Pre-op close-up smile.
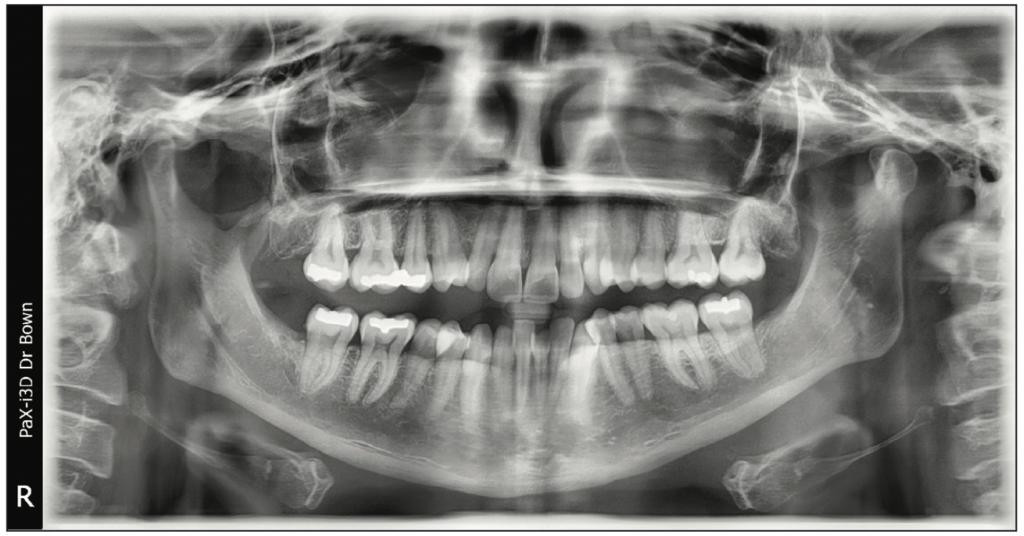
Figure 3. Pre-op ortho panoramic x-ray.
Diagnosis
My examination and digital records found an overall deficiency in the upper arch tooth structure and arch form. In addition, there was a significant asymmetry on the right side due to a missing canine and a particularly small peg lateral. This left the smile asymmetric and slightly canted. Furthermore, when she spoke, the severe crowding on the lower arch was very noticeable
Clinical Observations
Lower arch: There was normal to excessive tooth structure with severe crowding and a lingually displaced and severely chipped lower left central (it was also the most displaced due to the crowding).
Upper arch: There was narrow arch form, deficient in tooth structure (missing right canine and peg laterals, and the right lateral was smaller than the left).
Other notable findings included a Class I molar, normal attached gingiva, minimal tooth wear (except for the lower central), and a maxillary midline slightly to the right and canted (Figure 4).
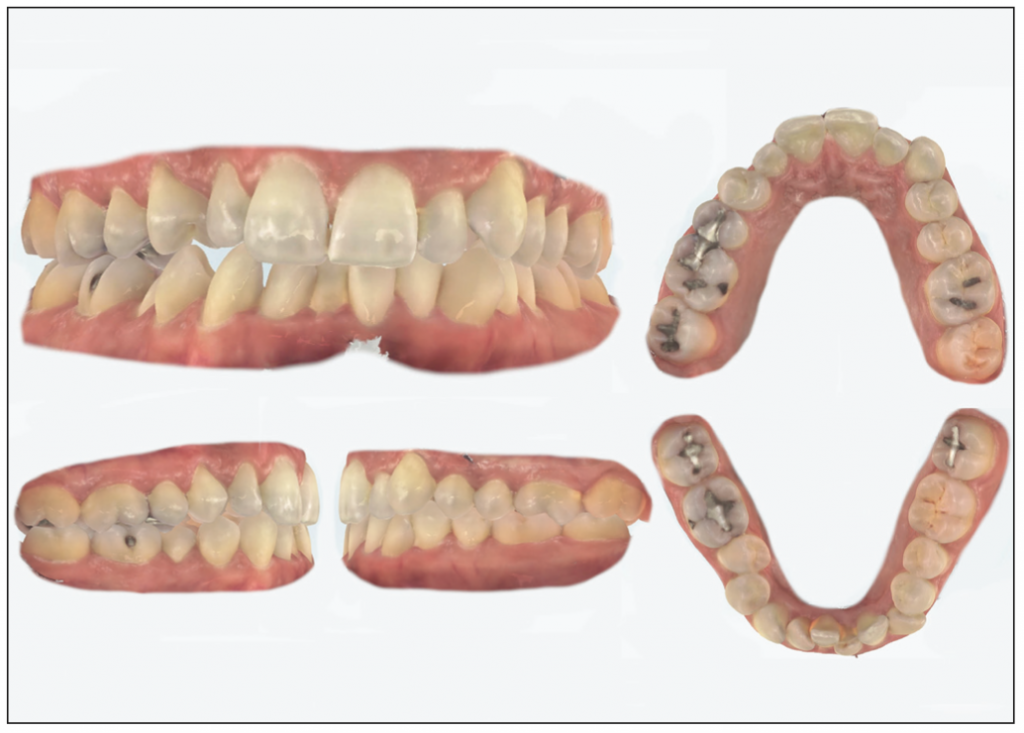
Figure 4. STL intraoral images of the initial scan.
Treatment Plan
Overall, my goal was to align teeth and make restorative space for bonded restorations, which would be done after orthodontic correction using clear aligners. To provide harmony to the smile, I would need to make the upper arch bigger and replace the missing tooth structure while reducing crowding on the lower arch for an overall more aesthetic appearance.
Two options to correct crowding on the lower arch were presented to the patient.
Option 1 was to do maximum interproximal reduction (IPR), where every tooth on the lower arch would give up approximately 0.25 mm of tooth structure on every side, as far back as the first molars. The con to this would be an extra trip to the clinic (along with added treatment time).
Option 2 was to extract one lower incisor (ideally the most crowded and damaged).
Using the iTero’s Invisalign Outcome Simulator Pro and the Invisalign website (Align Technology), I was able to play out both scenarios and choose the best option for the case and the situation. Again, thanks to the digital help, I could quickly and efficiently, without harm to the patient, simulate different options. Due to the nature of the crowding and the midline issue, in addition to the fact that IPR would mean an extra 2 flights or a 21-hour drive, we chose to extract the lower left central tooth (Figure 3).
As a GP who does both restorative and ortho, I felt confident to build up the peg laterals with bonded resin restorations and transform the upper right bicuspid into a canine. I just needed to make enough space around the lateral to allow for the material. Then the neighboring bicuspid (the second premolar) could take its place.
Because I had done many cases with peg laterals and ortho, I knew my restorative for this would be more minimally invasive using composite over porcelain, although I do use porcelain in some cases. I also knew that we needed to expand the upper arch as much as possible before bonding and make space around the peg laterals before closing later with the bonded resin restorations.
I did consider moving the teeth on the upper right to make an implant space for the upper right canine, but again, knowing what I could do with bonding and how long implant placement would add to treatment time, this particular adult patient did not want this longer and more complicated treatment plan.
Treatment Timeline
The clear aligners used in this case were Invisalign (Align Technology), and delivery of the appliances occurred in late Feburary 2020 (which was quite fortunate given the unfortunate closure of the clinic just a few weeks later). Jocelyn’s lower left central incisor was removed on the delivery day, and vertical rectangular attachments were placed on neighboring teeth using Tetric EvoFlow Transparent (Ivoclar) to move the other crowded teeth into the space, closing it in just 3 months! She was instructed to change her trays every 3 days as we had performed Propel MOPS (micro osteo-perforations), and 75 upper and lower trays were provided. To note, when the trays were in place, the space was not nearly as noticeable because the plastic made the area look “blurry.” This was great because she was then not bothered by the temporary gap in her smile (Figure 5).
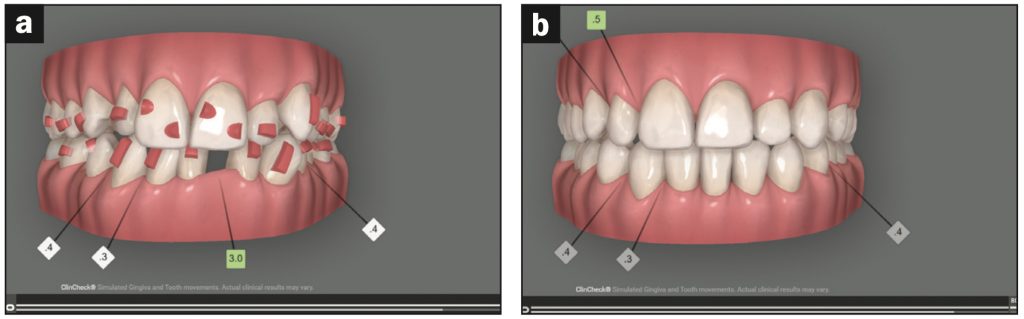
Figure 5. Before and after images of the ClinCheck treatment plan (Align Technology). The image on the left with pink attachments shows stage 1 (aligner 1) with attachments in place. The image on the right has green, square boxes that indicate spaces of 0.5 mm around the lateral that were created once expansion occured and that allowed for bonding material.
Jocelyn’s teeth finished active movement at the end of September 2020. Thanks to digital help, we were able to order her passive (non-active retention) aligners from the website to hold her teeth and stabilize movement for 6 weeks before final restorations. She began wearing her non-active aligners in October, and we performed the restorative procedure in mid-November, luckily just prior to the next shutdown due to COVID-19. This gave a total treatment time of just more than 9 months (Figures 6 and 7).
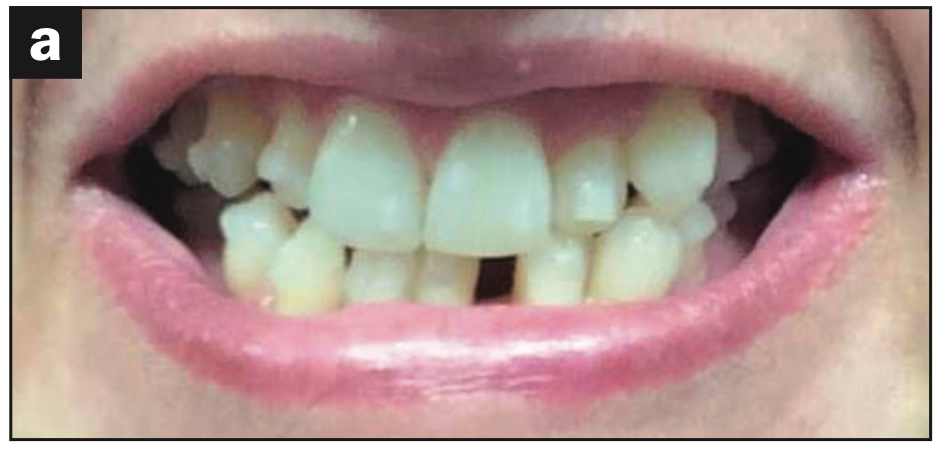
Figure 6a
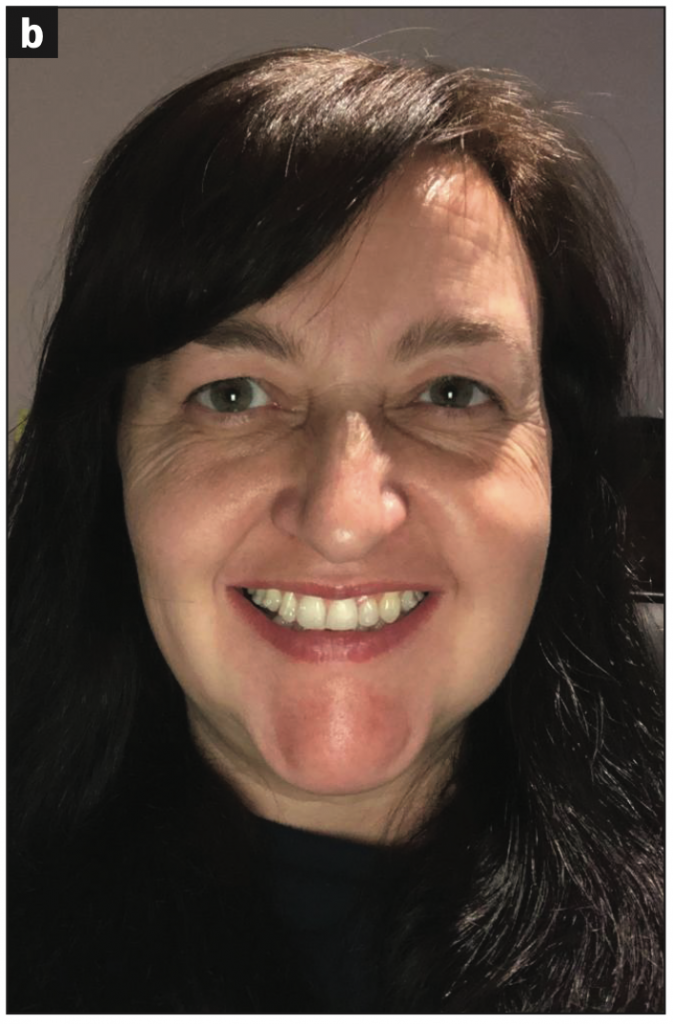
Figure 6. (a) During week 1 (without align- ers in). (b) The patient, once home, sent a clinical photo using an iPhone for progress check-in.
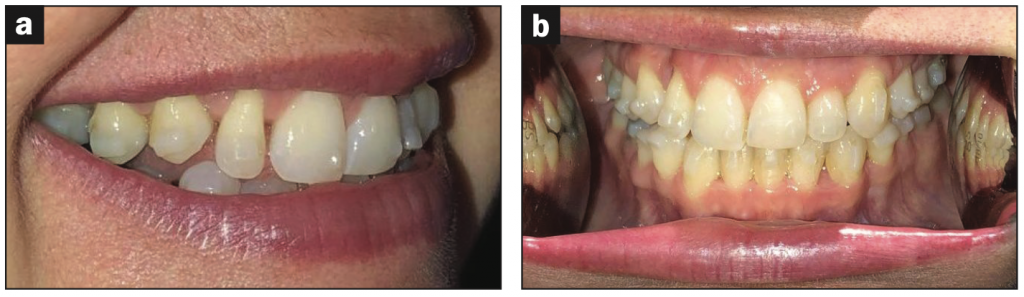
Figure 7. Progress photos sent during the final week of active Invisalign treatment (September 2020).
She presented in November to remove the attachments and receive aesthetic restorative treatment. Because she had been sending digital images of the teeth monthly during her orthodontic movement, there was little surprise that we ended up with what we had digitally planned from the beginning (spaces around the upper right lateral and canine), allowing the bonding in this area to appear natural. Due to limitations on her work, I had only one day to finalize the smile design, remove the attachments, laser the gingival tissues to even the smile, perform direct resin restorations, and scan for final retainers.
After removing the attachments on both arches and taking more photos, I used the Epic diode laser (BIOLASE) first to modify the gingival contours of the tissues (this provided more symmetry and was required on the laterals only). Immediately following the laser (often, I would do this weeks in advance of the restorations), I added aesthetic composite restorations on all the upper teeth from premolar to premolar to make the smile as symmetric and color-matched as possible.
Materials used included IPS Empress Direct (Ivoclar) A1 Dentin, B1 Enamel, B1 Tetric Evoflow (Ivoclar), and the Bioclear Matrix System to close the larger spaces on the upper lateral and canine. IPS Empress Direct material was then used on the surface to match, and A.S.A.P. All Surface Access Polishers (Clinician’s Choice) were used for the final polish.
Final photos were then taken, an iTero intraoral scan was performed, and Vivera retainers (Align Technology) were ordered. Again, due to the travel distance, the retainers were mailed to her.
She was so blown away by her smile. We asked if she would do a testimonial video interview to help us show our followers and the public how easy the process was (Figures 8 and 9). Footage from this video is currently on our YouTube channel, called Peggy Bown Dentistry.

Figure 8. (a) Before and (b) after portrait of our patient smiling.
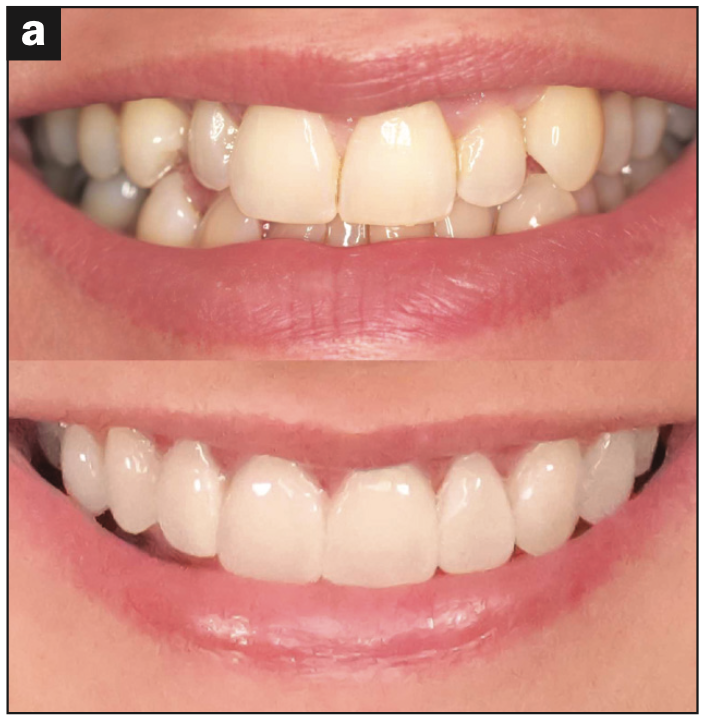
Figure 9a
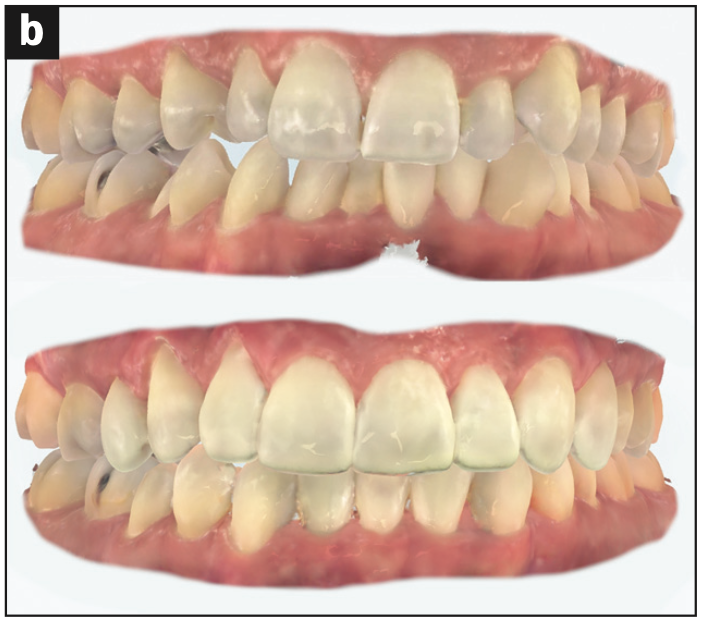
Figure 9. Before and after (a) smile photos and (b) STL 3D intraoral scans.
CONCLUSION
There is really nothing quite like dentistry today (and that is not a pun for this publication). When we stop and think about what we can do, the time we can do it, and the highly predictable ways in which we do it, we should all be walking around with our own beaming smiles.
It is so awesome to be a dentist with access to digital planning and aesthetic adhesive dentistry. I am grateful I get to create stunning smiles that can give my patients a new and better life, and it is extremely rewarding work, which I now share how to do in my digital and mentorship program called the Modern Dentist. It is cases like this that remind me how fortunate we are as dentists, especially when I think about what dentistry was like not so long ago.
ABOUT THE AUTHOR
Dr. Bown is a 2001 graduate of dentistry from Dalhousie University. In 2015, she opened a modern and fully digital clinic in Saint John, NB, Canada. Her passion is creating the ultimate patient experience while performing interdisciplinary treatment, including Invisalign. In 2016, Dr. Bown became Canada’s first Digital Smile Design Master and has taught doctors both nationally and internationally on the topics of digital workflows and social media/dental marketing. She hosts a weekly podcast called The Truth About Dentistry, covering a wide array of topics in general dentistry, and in 2021, she developed a mentorship program called the Modern Dentist. In includes one-on-one, live, and on-demand courses. Her passion for the patient experience stems from a childhood exposure to dentistry where patients were made to feel special, educated, and included in the treatment process. This is a very important part of her clinic culture and professional mission. She can be reached at peggy@smilesbybown.com, the website smilesbybown.com, or via her Instagram handle @drpeggybown.
Disclosure: Dr. Bown reports no disclosures.


