


INTRODUCTION
This case report describes using Pac-Dent’s Rodin Sculpture, a ceramic nanohybrid resin, to make successive temporary bridges for a patient with 3 old maxillary bridges, 2 of which had fractured due to a history of bruxism. The second temporary was a long-span bridge that opened the bite 2 mm to reduce maximum intercuspation load on the anterior teeth before delivery of the definitive prosthesis. This case demonstrates using the 3D printing protocol for same-appointment treatment.
CASE REPORT
A 90-year-old patient presented for an emergency exam. She was an existing patient who, until then, was basically on routine hygiene recall. The previous dentist had provided her with 3 maxillary bridges spanning from teeth Nos. 3 to 6 with pontics at teeth Nos. 4 and 5 and abutments at Nos. 3 and 6, from teeth Nos. 7 to 9 with a pontic at No. 7 and abutments at Nos. 8 and 9, and from teeth Nos. 10 through 14 with pontics at teeth Nos. 11 to 13 and abutments at Nos. 10 and 14.
The anterior right bridge had fractured off, and she was complaining of pain in the area. Clinical examination and an x-ray indicated that the root of tooth No. 6 had partially fractured (Figure 1). The mobility of the fractured portion of the root was causing the pain. Tooth No. 6 had previously received root canal treatment. It was also noted that the bridge from teeth Nos. 10 to 14 had fractured at tooth No. 11.
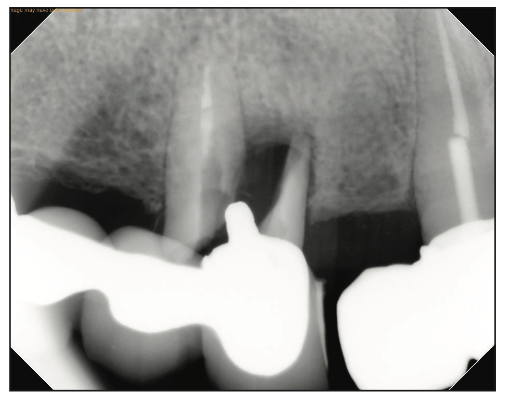
Figure 1. Digital x-ray of the fractured portion of the tooth No. 6 root.
The patient’s mandibular teeth exhibited a cant with occlusal surfaces rising toward the left side. She did not want any treatment done on her lower teeth and declined to have any implants placed. The topography of the bone was such that using implants in conjunction with natural teeth abutments was not feasible. It would have been necessary to extract the remaining teeth and use an All-on-X, full-arch implant prosthesis to use implants.
Treatment Plan
The treatment plan included a full-arch roundhouse porcelain-fused-to-metal (PFM) bridge with metal occlusal because the patient had a history of fracturing porcelain restorations due to her grinding habit. The vertical dimension would be increased to reduce the maximum intercuspation load on the anterior teeth. The fractured portion of tooth No. 6 would be extracted, and a post-and-core buildup would be done on the remaining portion of tooth No. 6 to help support the new bridge. The bridge on the left side would be left intact for the time being, and the 2 bridges on the right side would be combined temporarily for same-day treatment. At a later appointment, a new temporary full-arch bridge would be created.
The abutment teeth for the roundhouse bridge would be teeth Nos. 3, 6, 8 to 10, and 14. The pontics would be teeth Nos. 4, 5, 7, and 11 to 13.
Immediate Treatment Using 3D Printing
At the same appointment, the bridge from teeth Nos. 3 to 6 was removed, and the fractured portion of tooth No. 6 was extracted. After cleaning up the root that was still evident within the remaining part of tooth No. 6, a post-and-core buildup was placed to enable retaining tooth No. 6 as an abutment tooth.
Next, an intraoral scan was taken to design a temporary bridge spanning from tooth No. 3 to tooth No. 11 at the current bite. The prosthesis was designed in exocad (Figures 2 to 4). The 2 existing maxillary right bridges were replaced with one as a temporary measure.
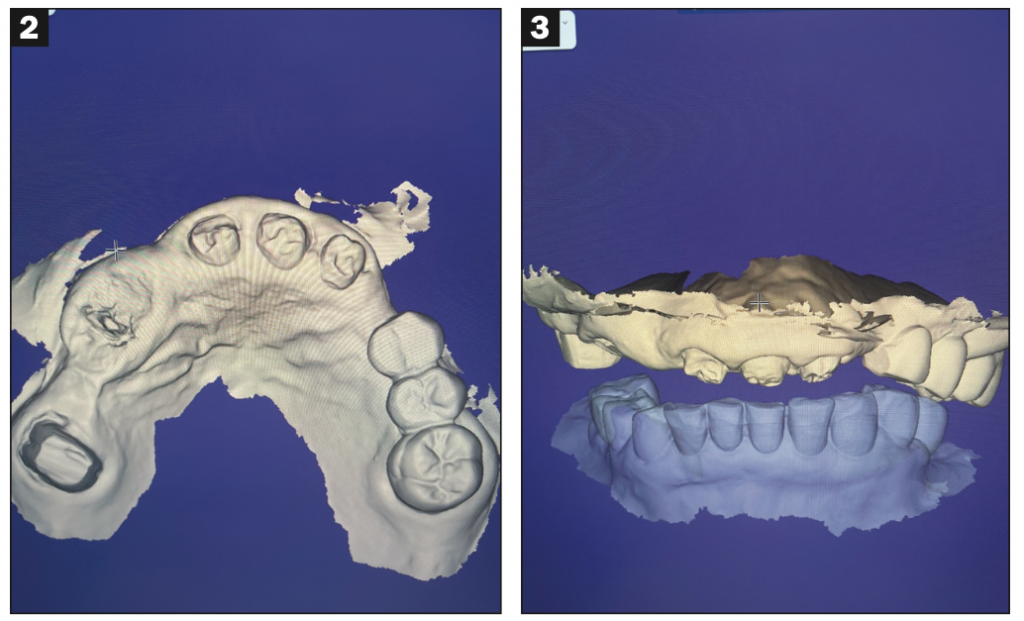
Figures 2 and 3. Occlusal and frontal views of the intraoral scan after the broken bridge and fractured root tip were removed.
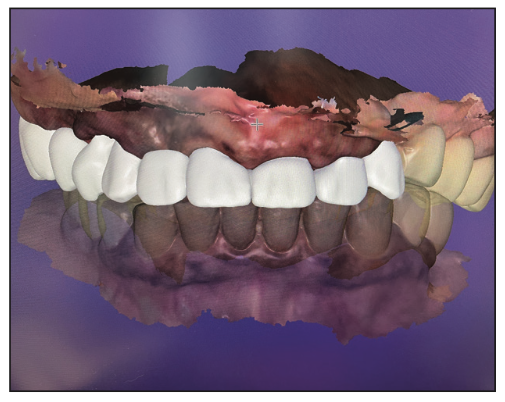
Figure 4. Temporary bridge design at current occlusion using exocad.
The prosthesis was printed using Rodin Sculpture resin in the SOL 3D printer (Ackuretta). The print time was approximately 30 minutes, followed by a 7-minute cure in the Otoflash (NK-Optik) light-curing unit. No adjustments were needed when the temporary bridge was seated.
A ceramic-reinforced nanohybrid material such as Rodin Sculpture is an excellent material to use for long-span temporary and permanent bridges. It was one of the first printable ceramic resins approved for definitive single full-contour crowns, inlays/onlays, and veneers. It can also be used to fabricate All-on-X immediate prostheses, monolithic dentures, and split-file denture tooth arches. It is biocompatible and light-curable, and its high concentration of true nano-ceramic fillers provides excellent radiopacity. Sculpture has demonstrated superior mechanical characteristics and can be customized to produce natural-looking aesthetic restorations that will last. It also contains enough ceramic filler to be coded as a ceramic crown according to the new CDT 2023 coding.
One of its most attractive features for same-day treatment is time savings. On average, a temporary bridge milled from polymethyl methacrylate is estimated to take about 2 hours. Milling is a subtractive process requiring a bur to grind one portion of the bridge at a time. It is more feasible for same-appointment treatment to use 3D printing because it is an additive process that builds the prosthesis in layers. Whether the case calls for one crown or 10 crowns, they print in the same amount of time if they are all on the same plane. Three-dimensional printing is limited only by the size of the printer build plate, ie, if multiple arches are planned.
In this case, the advantage of 3D printing was the reduced amount of time spent printing large-span temporary bridges, which were delivered to the patient in less than an hour at each visit. The fit and occlusion of the first temporary bridge were checked, and it was cemented with temporary cement (Figures 5 and 6).
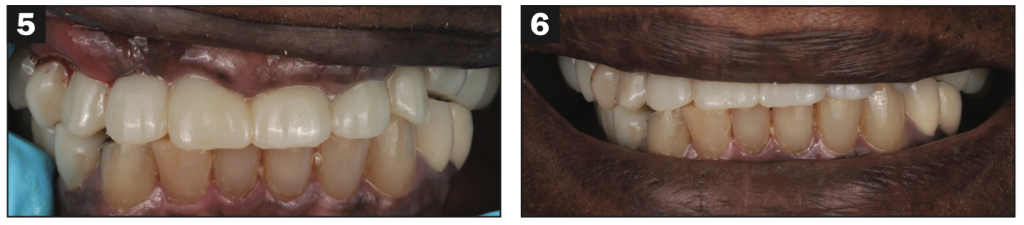
Figures 5 and 6. The first temporary bridge was printed with Rodin Sculpture Resin and cemented in the mouth.
Printing also has advantages for patients who may not be able to afford zirconia crowns and bridges. As a temporary and permanent measure for patients diagnosed with bruxism who potentially fracture restorations more frequently, printing will allow the capability to duplicate identical temporary prostheses in a short amount of time.
In addition to time savings, accessibility to 3D printing vs a milling machine should be taken into consideration. More offices are purchasing 3D printers because the prices are lower than milling machines.
Implant Cases
Rodin Sculpture has also been used for implant-supported bridges in the initial temporary phase. The process is similar: The implants are placed, intraoral scans are taken, the prosthesis is designed in exocad, and the temporary bridge is printed and screwed onto the implants. Final implant crowns were also placed by the author with this material. The initial research shows that the material is beneficial for implant crowns because it disperses the stress away from the implant itself and more onto the crown compared to zirconia, which is very rigid and causes more stress on the implant.1-3 As a result, failure of the prosthesis is more likely to occur than implant failure, and the 3D printed crown helps dissipate the stress through the bone.4,5 In the case of prosthetic failure, a new prosthesis can be printed. This is initial research, so we must wait for long-term results to be reported.
Fabricating the Second Temporary Bridge
About a week later, the second appointment focused on opening the bite and creating a temporary roundhouse bridge. A wax-up was prepared ahead of time using the intraoral scans from the first appointment with exocad. This extended the prosthesis to the other side of the mouth, where the left-side bridge was broken (Figure 7). The wax-up opened the bite 2 mm.
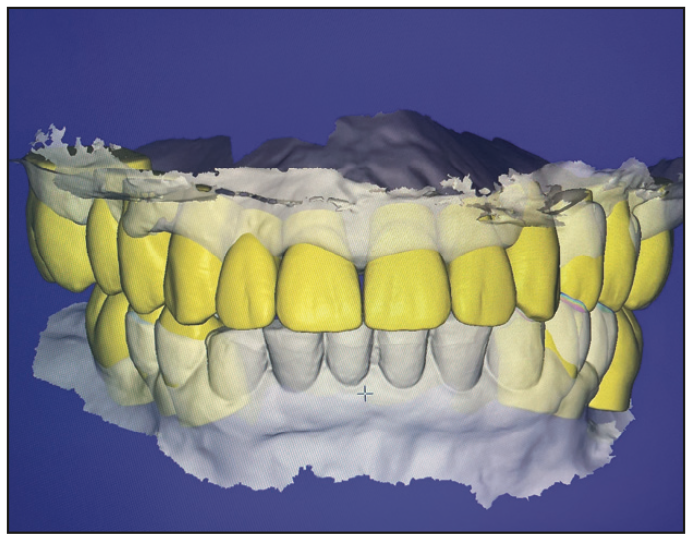
Figure 7. Wax-up of the roundhouse bridge opening the bite 2 mm.
The temporary bridge and the remaining fractured bridge spanning from teeth Nos. 12 to 14 were removed, and a new digital intraoral scan was completed. Next, the wax-up created in exocad was used to design a second temporary roundhouse bridge that would open the bite 2 mm. Using this digital technology instead of a wax-up decreased the time from more than 30 minutes to less than 10. The new temporary bridge was again printed with Rodin Sculpture (Figure 8) within 30 minutes, cleaned, and cured in the Otoflash for 7 minutes.
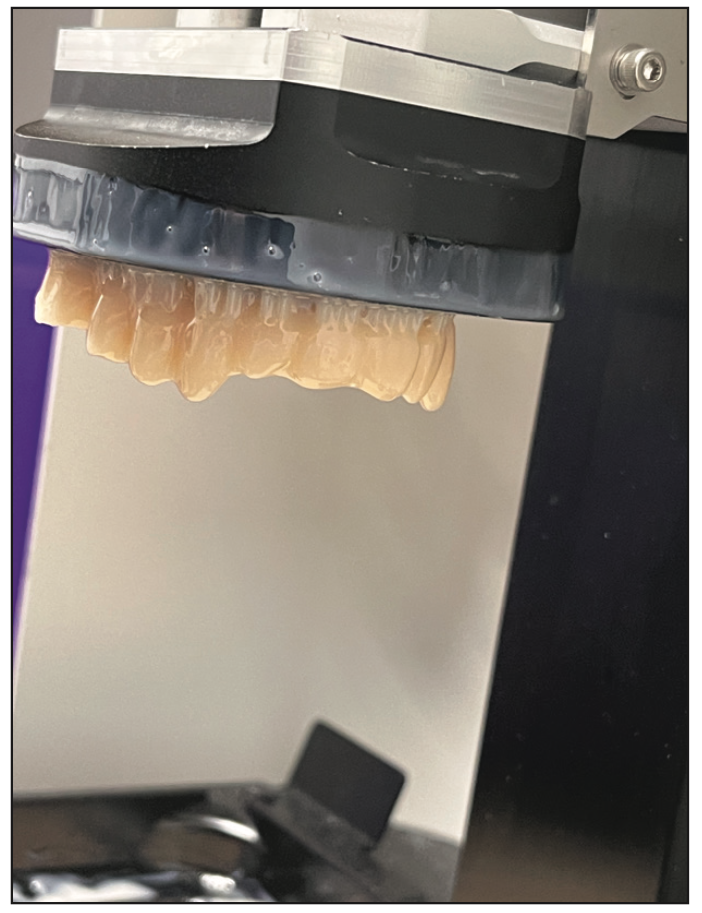
Figure 8. The second temporary bridge was printed in Rodin Sculpture on the SOL 3D printer (Ackuretta).
After try-in, the occlusion was adjusted, and the second temporary bridge was cemented with temporary cement (Figures 9 and 10). The new impression was sent to the dental lab, along with the scan of the new temporary that included the opened bite, to fabricate the final bridge. This process ensured that the final bridge would require minimal adjustments and allowed the lab to compare the aesthetics of the temporary to a smile picture to adjust the final prosthesis design aesthetically.
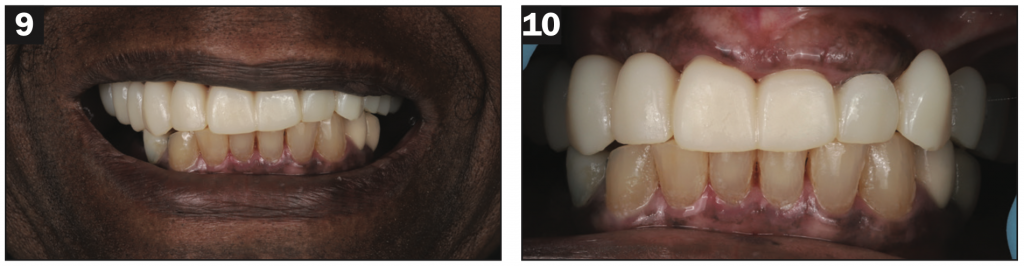
Figures 9 and 10. The temporary roundhouse bridge was cemented in the patient’s mouth.
Note that if necessary for aesthetics or if the patient requests it, Rodin Sculpture can be stained to customize the color of temporary restorations to blend in with surrounding natural teeth.
It is important to follow the manufacturer’s guidelines, especially for long-span bridges. This requires ensuring connectors for the bridge are large enough to prevent fractures. In the posterior, the manufacturer advises that the connectors be at least 27 mm to reduce or eliminate fracture of the material. The material is not recommended for bridges spanning longer than 3 units or for patients diagnosed with bruxism. This case pushed the limits of those parameters and, with proper occlusion and maintenance, allowed the patient to have teeth while waiting for the final prosthesis.
Framework Try-in
About 2 weeks later, the lab delivered the metal framework for try-in to check the fit (Figure 11). This timing also left the patient in the open bite to make sure she could tolerate it and that there were no further fractures or adjustments needed.

Figure 11. The patient returned for a third appointment to try in the metal framework before adding porcelain to the final bridge.
The fit of the metal framework should be checked before the porcelain is added to ensure that it fits properly on the teeth, and it did. It was then returned to the lab with an additional bite to confirm the previous digital bite matched well on the articulator.
Final Bridge Insertion
The patient returned for the final full-arch PFM bridge insertion after another 2 weeks (Figure 12). This period allowed even more time for her to become used to the open bite and verify that she would continue to tolerate it. Because the printed prototype had captured the bite, it translated to the final bridge needing no adjustments. The final bridge was cemented with GC FujiCEM cement (GC America) (Figure 13).
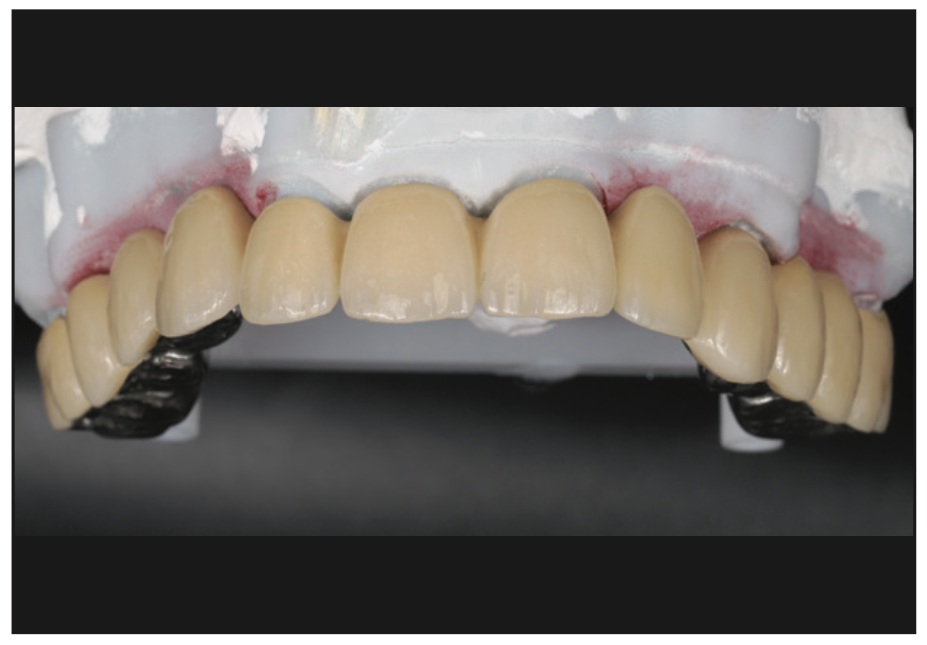
Figure 12. The final PFM bridge.
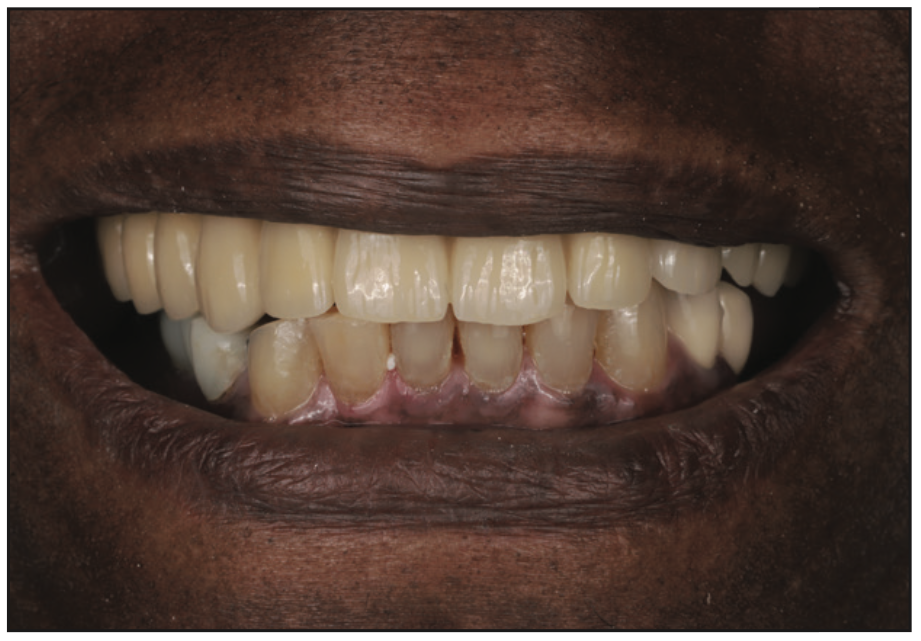
Figure 13. Because the printed prototype captured the bite, it translated to the final bridge without needing adjustments.
CONCLUSION
Innovations in 3D printing and resins like Rodin Sculpture have allowed a quick and accurate turnaround for temporary and permanent solutions in emergency situations. This patient presented with an emergency, and a solution was provided in the same appointment, solving multiple issues with 3 bridges by gradually converting the case to one full-arch prosthetic with a more open bite. This process eliminated taking impressions, sending her home, and having her return in a week to receive a lab-fabricated prosthetic. This approach provided her with an immediate, functioning, and aesthetic temporary prosthesis, allowed time for her to adjust to a more open bite, and enabled her to eat normally throughout treatment. It also allowed the lab to make a final prosthesis accurately based on the design and bite of the temporary.
REFERENCES
1. Corbani K, Hardan L, Skienhe H, et al. Effect of material thickness on the fracture resistance and failure pattern of 3D-printed composite crowns. Int J Comput Dent. 2020;23(3):225–33.
2. Gad MM, Alalawi H, Akhtar S, et al. Strength and wear behavior of three-dimensional printed and prefabricated denture teeth: an in vitro comparative analysis. Eur J Dent. 2023. doi:10.1055/s-0042-1759885
3. Rosentritt M, Schneider-Feyrer S, Behr M, et al. In vitro shock absorption tests on implant-supported crowns: influence of crown materials and luting agents. Int J Oral Maxillofac Implants. 2018;33(1):116–22. doi:10.11607/jomi.5463
4. Bonfante EA, Suzuki M, Lubelski W, et al. Abutment design for implant-supported indirect composite molar crowns: reliability and fractography. J Prosthodont. 2012;21(8):596-603. doi:10.1111/j.1532-849X.2012.00872.x
5. Bijjargi S, Chowdhary R. Stress dissipation in the bone through various crown materials of dental implant restoration: a 2-D finite element analysis. J Investig Clin Dent. 2013;4(3):172–7. doi:10.1111/j.2041-1626.2012.00149.x
ABOUT THE AUTHOR
Dr. Siddiqui received his DDS degree from the University of Maryland School of Dentistry and went on to complete his AEGD program at Virginia Commonwealth University, in which he focused on complex restorative and implant procedures. He maintains a full-time practice in Chevy Chase, Md, incorporating digital design, 3D printing, and in-office milling. He can be reached via email at jay@radiant-dental.com.
Disclosure: Dr. Siddiqui reports no disclosures.


