
In part 1 of this 3-part series entitled “The ‘First Implant’: Protocol for the GP,” the authors discussed treatment planning concepts for dentists who want to place their “first implant” in an ideal receptor site. Cone beam computed tomography (CBCT) imaging was utilized to verify abundant bone in the chosen site, ensuring this highly predictable and safe procedure for the placement of a single implant. Part 2 will review, in detail, the protocol of the surgical appointment and the preparation steps for the surgical placement of an implant. Part 3 of this series will then cover the recommended protocol to restore the implant with this “first implant protocol” (FIP). It must be reemphasized that this series of articles describes a protocol that ideally requires and highly recommends an appropriate adjunctive hands-on course prior to clinicians placing their first implant.
PREPARING FOR SURGERY: REVIEW OF TREATMENT PLANNING AND SURGICAL APPOINTMENT STEPS
During the treatment planning phase clinical records were taken and a thorough medical history was completed. Once the patient who exhibited abundant available bone in the recommended sites was selected, a CBCT scan was performed and submitted to an imaging service provider and radiologist.1 Once the ideal receptor site was identified through the use of interactive treatment planning software, a surgical guide was fabricated, tried in the patient’s mouth to validate fit, and the patient was appointed to have the implant placed. Appropriate prescriptions were provided to the patient for medications to be taken prior to the surgical visit.
To avoid undue stress for the clinician, we advocate that at least 2.5 hours of uninterrupted time be put aside for the surgical appointment. Prior to this implant placement appointment, various background steps have to occur for the implant to be placed successfully. The appropriate armamentarium and implant drilling unit has to be set up and tested, the room should be set up in a sterile/clean protocol, and the required implant components, and ancillary surgical instruments have to be on hand. Many of these steps involve dental team (staff) roles and organization.
The surgical appointment consists of the following steps:
- Anesthetizing the patient with conventional local agents. (We are not advocating the use of other modalities for the placement of a single implant.)
- Placing the surgical guide in a stable position.
- Creating a bleeding point through the surgical guide.
- Punching the soft tissue to access the bone.
- Preparing the osteotomy site in the bone using the manufacturer’s recommended drilling sequence.
- Placing the implant into the osteotomy.
- Ensuring stability and fixation of the implant before moving to the next step.
- Preparing the 3inOne abutment (BioHorizons) (extraorally) to receive a temporary crown.
- Delivering the provisional restoration on the implant, out of occlusion.
- Checking for any working, protrusive, or lateral occlusal contacts.
The FIP requires that everything is in place prior to the procedure and that the dental team is well prepared and understands all the steps involved. A presurgical review of what will happen during this appointment is highly recommended so that the doctor and team can be as relaxed as possible during the procedure. It is not uncommon for a certain amount of nervousness to be present in the treatment team during this new procedure, so any measures to reduce potential anxiety should be taken.
UTILIZING A STERILE/CLEAN TECHNIQUE AND STERILE SETUP
While this FIP is performed without flapping the tissue or using sutures, it will be done in a sterile/clean field2 (Figure 1). Placing a dental implant involves an open wound into soft tissue and bone. Through the use of a disposable sterile setup kit, any chance of exogenous bacteria entering the implant site is reduced. To enhance overall success and minimize potential complications, as well as from a medical-legal perspective, the authors recommend these steps be integrated as part of the FIP.
The clinician will be opening a sterile vial containing the sterile implant that will be placed once the osteotomy is prepared with sterile instruments, while maintaining a sterile field for all component parts.
 |
| Figure 1. Example of sterile field, as per first implant protocol (FIP). |
For ease of use and setup, there are several sterile packages that the authors recommend. Professional Sterile Systems has customized surgical packs which allow the doctor, assistant, patient, and room to be draped in a fully sterile environment. Anything that needs to be touched, such as the overhead lamp, should be covered with a sterile barrier. There is also a similar sterile drape package available called the Salvin Standard Implant Pack (Salvin Dental Specialities). A hands-on demonstration at an appropriate course will show the proper technique on sterile setup, or you can watch an informative video tutorial on the Internet at: infection-control.salvin.com/Salvin-Standard-Implant-Pack-plu1033.html.
REVIEW OF ARMEMENTARIUM
In order to prepare the bone at an implant site correctly, there is certain armamentarium needed for the FIP protocol.
Monitoring Equipment
The FIP implements safety for the patient on every level. The standard of care prior to surgically placing an implant is to record a preoperative blood pressure and take a postoperative reading.3 An electronic blood pressure cuff is an option to allow periodic automatic blood pressure readings during the procedure. A digital pulse oximeter is recommended, but not required. The pulse oximeter monitors the patient’s oxygen saturation and the patient’s pulse during the surgical procedure.
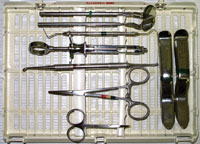
A specific sterile instrument kit—should be organized, containing everything necessary for placing an implant. This can be accomplished with either a cartridge type tray or separate autoclavable bag. The authors prefer a hard cassette tray as it reduces the chance of an instrument accidentally puncturing the bag, while allowing for better organization. The benefit of having a separate instrument kit for implant placement is that it guarantees everything needed is in one place, and that during the surgical appointment, staff isn’t running around looking for things. While this FIP is flapless and incisions are not made with a blade, there are certain instruments that are specific to this procedure (Figure 2) that need to be available.
This FIP kit should ideally have:
- Two Minnesota retractors. These are wide stable surgical retractors that allow for good visibility. One is for the doctor and one is for the surgical assistant.
- Periodontal probe. A periodontal probe will allow measurement of the tissue height after punching the tissue for implant placement providing guidance as to how deep the implant platform will be from the free gingival margin. The probe is also used after using the tissue punch to sound the bone buccal and lingual, and verify the targeted position of the osteotomy.
- A fine surgical scissor. This is important to use sometimes after using the tissue punch, to either remove the tissue core, or neaten up any tissue tags around the punched area.
- A dental mirror. This is used at times to visually check into an osteotomy site, and to facilitate access to views of the site from different angles.
- A dental anesthesia syringe and cartridges of appropriate anesthetic agents.
- A double-ended two fourths molt surgical curette. This is used to help remove the keratinized plug above the osteotomy site.
- A college forceps. This is used to hold gauze and cotton rolls and to move smaller items.
- A curved hemostat.
- Clinicians may want to add other instruments as they get more experience, but in the authors’ opinion, this is a core starting point for the FIP.
A few miscellaneous items include the following (Figure 3):
- A sterile 20 cc disposable monojet syringe with a curved tip. This is used to irrigate the osteotomy site, with sterile saline, of any possible debris after preparation. This gets dropped sterile on the sterile tray.
- A disposable 4 mm or 5 mm biopsy tissue punch.
- Two medium-sized steel sterile bowls. One is used to put sterile saline in for irrigation of the osteotomy site with a Monojet Syringe, and to occasionally clean an osteotomy bur with. The other has Chlorhexidine Gluconate 0.12% Oral Rinse (Peridex [3M ESPE]) to wipe the patient’s mouth prior to implant placement.
- Three carpules of dental anesthetic and a needle that has been wiped down with a sterile wipe.
- Sterilized dental gauze and cotton rolls (10 each). These are used to absorb any blood, put pressure in an area, and to wipe the patient’s face with Peridex.
- Cold sterilized saliva ejectors and small and large suction tips. These are used to keep the surgical field isolated.
- Size-appropriate sterile gloves for the doctor and assistant.
 |
 |
| Figure 2. Example of FIP tray set-up in cassette. | Figure 3. Miscellaneous setup items for FIP. |
 |
 |
| Figure 4. Example of dedicated implant drill and setup. | Figure 5. The BioHorizons internal surgical kit. |
A dedicated electric implant motor and angled handpiece need to be purchased for the FIP (Figure 4). An electric implant drill specifically designed for surgical procedures has the correct torque needed to place a dental implant, is cooled by a sterile saline pump, and does not present any air into the implant site, eliminating the possibility of an air emphysema.4 Air emphysema is the introduction of air into the soft tissue and fascia. Air introduced into an implant site also has the potential of creating an even more serious and life-threatening condition called an air embolism.
A dedicated implant motor and handpiece will also have the appropriate speed setting for osteotomy preparation and implant placement as recommended by the manufacturer. It will also have torque settings to measure how firm the implant is seated into the bone during insertion. Having an electric implant motor and handpiece makes the FIP safer and is required. A correct drilling speed is important to reduce heat generation during osteotomy preparation.5 A good electric implant motor and handpiece can often be purchased with a minimum order of implants from the various implant manufacturers as a package or bundle. Implant surgical supply companies such as Salvin Dental also supply these instruments, motors, handpieces, etc. The recommended implant motor and drill utilizes a bag of self-contained sterile saline as irrigation. If you do not have this equipment, you might want to reach out to your local representative. As this is an essential component of the FIP, the surgical motor and handpiece may be available as a loaner from the dental implant manufacturer, for purchase at a later date.
Required Presurgical Planning Steps for the First Implant Protocol
Once the clinician has documented all of the required information about the implant patient and the surgical plan has been formulated, a presurgical consultation visit needs to be scheduled. At this appointment, the patient will be educated about the risks and benefits of dental implant surgery information contained in the required “informed consent form.” The surgical and restorative plan will be reviewed in detail, along with the financial plan, and prescriptions for the surgical appointment will be given. Any questions the patient has will be answered. It is essential that the tooth-supported surgical guide be tried in the mouth to make sure it fits, and that there is adequate interarch clearance for proper utilization. The try-in of the surgical guide also verifies that it will be there for the surgical appointment.
The pharmacological protocol the authors utilize for single flapless implant placement is to give the patient an 800 mg dose of Ibuprofen one hour prior to the appointment, then twice a day for 3 days; a 2,000 mg dose of Amoxicillin one hour prior to appointment, then 500 mg 3 times a day for 7 days; Chlorohexidine Gluconate 0.12% Oral Rinse 3 times a day for 7 days; and 18 tabs of Lortab 7.5mg, as needed, for pain after the appointment. The prescriptions are printed and given to the patient at this presurgical consultation appointment. Home care instructions of a soft diet, bland foods, and not to brush the implant area for 2 weeks is reviewed with the patient.
The financial plan is reviewed with the patient and payment sequence is established. If a financial company is financing the plan, the terms are reviewed and signed. Informed consent for implant surgery is reviewed with the patient and signed, and the patient is given the opportunity to ask any questions at that time.6 The previously mentioned implant organizations offer informed consent form samples to members.
The patient is now ready to appoint for the surgical placement of the implant. It is recommended that extra time be allotted for the surgical appointment, as this is a new protocol for the clinician. There is no need to rush! Remember to allow for at least 2.5 hours of uninterrupted time, as the doctor and dental team acclimate to this new procedure. (In this part of the series, we will also demonstrate how part of this time will include the fabrication of a provisional nonfunctional restoration on the implant.)
Surgical Appointment Steps
The first step is to seat the patient and record presurgical blood pressure values, set up the pulse oximeter, take and record the pulse. This is also a good time to see if there are any last minute questions or concerns and to reassure the patient how easy the procedure will be for him or her, and for the patient to focus on relaxing as much as possible.
The patient, doctor, assistant, and operatory are scrubbed and draped in a sterile fashion. Next, the patient rinses for 30 seconds with Chlorhexidine Gluconate 0.12% Oral Rinse and the patient’s mouth is also wiped with this disinfectant solution. Local anesthesia is then given. The authors use buccal and palatal infiltration on the maxillary arch, and a block and long buccal injection on the mandible. Usually 2% Lidocaine HCL with 1/100,000 epinephrine is used, unless the patient’s physician has recommended Carbocaine without epinephrine.
Surgical Intervention Steps for the First Implant Protocol
The FIP implant osteotomy drilling sequence is designed with simplicity and safety on every level. This protocol allows the clinician who has never placed an implant to prepare the initial implant site with guided depth control, and all subsequent preparation to be done with implant drills that allow for controlled preparation. The surgical implant drilling kit the authors recommend for the FIP is the Internal Surgical Kit (BioHorizons) (Figure 5). However, as we will require the use of a CT-derived template, the actual preparation starts with a separate initial surgical template drill kit (BioHorizons).
After the patient has been adequately anesthetized, the clinician securely positions the Compu-Guide intraorally, the surgical template with embedded stainless steel cylinder that will guide the placement of the single implant (Figure 6). The clinician then uses the initial 2-mm pilot drill to create a bleeding point in the attached gingiva. This bleeding point will mark where the tissue punch will remove a core of tissue. The clinician then removes the Compu-Guide from the mouth, and using a 4 mm or 5 mm (depending on the implant size) disposable tissue punch (Figure 7), a core of tissue around the bleeding point is removed utilizing a two fourths molt curette (Figure 8). The recommended sterile Surgical Guided Surgery Drill Kit (BioHorizons) consists of four 2-mm initial prep burs with incorporated stops to control depth. The stops are at 17, 21, 24, and 28 mm (Figure 9). The extra length of the specialized drills is necessary to compensate for the vertical height of the stainless steel cylinders within the surgical template. The specific drills to be used will be indicated on the “Drill Sequence Report” that will come with the Compu-Guide. Once the Compu-Guide is placed back in the mouth, the appropriate 2-mm pilot drill is used to create the initial penetration through the crestal bone and establish the depth of the implant osteotomy site based upon the length of the implant to be used. The drilling unit should be set at 2,500 rpm for the most efficient cutting without overheating the bone. The drill should be used in a straight up and down direction to facilitate irrigation and particle removal.
Once the initial depth cut has been made, the Internal Implant Surgical Kit will be used. Utilizing the recommended sequencing, the 2.5-mm depth cutting drills (BioHorizons) will be used next to widen the osteotomy. This will be accomplished without the Compu-Guide, following exactly within the path of the initial 2 mm depth cut to guide the wider 2.5-mm drills. Care must be taken to go slowly, and with a direct up and down parallel, vertical movement of the drill to avoid deviating from the original path. If the wrists rotate facial or lingual during drilling, there is a danger of creating an ovoid osteotomy. The 2.5-mm burs incorporate definitive “stops” that correlate to the predetermined planned implant depth. They are available in 9 mm, 10.5 mm, 12 mm, and 15 mm lengths, providing the clinician with the comfort of knowing that there is a definite safety stop. The clinician simply inserts the 2.5-mm bur into the initial site that corresponds to the implant length being placed and drills until the bur stops at the controlled depth (Figure 10). A 2-mm radiographic check pin, also found in the BioHorizons surgical kit, is used after the 2-mm starter bur is used to verify the angle. A periapical radiograph can be taken at this stage (Figures 11 and 12).
 |
 |
| Figure 6. Surgical guide secured intraorally. | Figure 7. A tissue biopsy punch is used to create a core of tissue for implant placement. |
 |
 |
| Figure 8. The core of tissue is removed with a two fourths molt curette. | Figure 9. The 2-mm wide BioHorizons surgical guide drills with depth stops. |
 |
 |
| Figure 10. The 2.5-mm wide BioHorizons depth drill with stop at 12 mm. | Figure 11. The 2-mm radiographic check pin. |
 |
 |
| Figure 12. Radiograph of 2-mm radiographic check pin. | Figure 13. BioHorizons 4.4 mm nonend-cutting width drill. |
 |
 |
| Figure 14. BioHorizons Crestal Module bur to create taper at crestal area for implant. | Figure 15. BioHorizons 4 mm x 12 mm implant being inserted at 35 rpm concentrically. |
 |
 |
| Figure 16. BioHorizons 4 mm x 12 mm implant being inserted with hand ratchet for final torque. | Figure 17. BioHorizons 4 mm x 12 mm implant in final position with flat side of abutment on the buccal. |
 |
| Figure 18. Radiograph of 4 mm x 12 mm BioHorizons implant in final position. |
The next burs that will be used are the BioHorizons width widening burs. These burs are not end-cutting and will not go past the previous 2.5 mm depth of the initial osteotomy. This is another safety factor for the clinician. For the 3.5-mm platform implant, the 3.0-mm width drill is used. For the 4.0-mm implant the 3.4-mm width drill is used. For the 5.0-mm implant the 3.9-mm followed by a 4.4-mm width drill are used. All of these burs are drilled at 2,500 rpm (Figure 13).
The next item in the kit to be utilized is the crestal module drill that “tapers” the crestal area of the implant to correspond to the specific coronal shape of the BioHorizons internal implant. The osteotomy will then be completed and ready for the implant to be delivered (Figure 14).
Sterile saline is used to irrigate and clean any debris from the osteotomy site. The implant is removed from the sterile packaging by inserting the correct latch-type abutment level driver into the 3inOne abutment (BioHorizons) that comes attached to the implant. Using the surgical handpiece with the abutment level driver, the implant is carefully delivered to the site. The surgical motor should be set to a very slow speed of only 35 rpm. It may be advisable to stabilize and steady the drill with the index finger of the opposite hand gently pushing downward into the osteotomy. The implant is driven approximately two thirds of its depth, allowing concentric placement of the implant without wobble (Figure 15). The final one third of the implant placement is accomplished by hand with the special implant ratchet tool and a separate abutment level driver. The hand ratchet provides the clinician with greater tactile feel that is important as the implant takes a firm hold into the bone (Figure 16). For restorative consistency and accuracy, the rotational position of the implant is very important. Part of the FIP is to make certain that the implant is placed so that the flat of the internal hexagonal connection is positioned toward the buccal or facial aspect of the site. The internal hex connection correlates to the flat part of the 3inOne Abutment, which also contains “flats.”7,8 The process of “indexing” allows for a consistent placement of the abutment, which will become apparent when the transitional and final crown is fabricated. This concept will be explained in further detail in part 3 of this series of articles (Figure 17).
A final radiograph should be taken after implant placement to verify the correct position relative to the adjacent teeth, and to serve as a baseline for long-term follow-up evaluation of the bone level (Figure 18).
CONCLUSION
The steps that are needed to prepare for placement of a dentist’s “first implant” has been established. The presurgical prosthetic steps required for the surgical procedure and rationalization of each step has been discussed in this article. The use of CT or CBCT and incorporation of sophisticated 3-dimensional planning concepts have been reviewed, along with the steps required to fabricate a surgical guide or template. The surgical setup, supplies, protocols, and various essential parts and pieces of the dental implant procedure have been explained. The exact steps it takes to precisely prepare an osteotomy using a CT-derived preplanned surgical template has been described in detail.
The fabrication of a patient’s provisional restoration in a nonfunctional manner will be the next step. After a recommended healing period of 3 months, it will be time to restore this “first implant.” The final article in this series, part 3, will clearly describe the steps to restore a single dental implant and the laboratory communication involved with that process. Once again, it must be emphasized that while this 3-part series of articles show a protocol for a dentist to place and restore his or her “first implant,” a hands-on course and interactive instruction is highly recommended prior actually performing these procedures.
References
- Ganz SD. 3D imaging and cone beam CT is “Where the action is!” Inside Dentistry. 2007;3:102-103.
- Garg AK, Reddi SN, Chacon GE. The importance of asepsis in dental implantology. Implant Soc. 1994;5:8-11.
- Misch CE. Medical evaluation of the implant candidate. Part I: Vital signs and urinalysis. J Oral Implantol. 1981;9:556-570.
- McKenzie WS, Rosenberg M. Iatrogenic subcutaneous emphysema of dental and surgical origin: a literature review. J Oral Maxillofac Surg. 2009;67:1265-1268.
- Cordioli G, Majzoub Z. Heat generation during implant site preparation: an in vitro study. Int J Oral Maxillofac Implants. 1997;12:186-193.
- Strietzel FP. Patient’s informed consent prior to implant-prosthetic treatment: a retrospective analysis of expert opinions. Int J Oral Maxillofac Implants. 2003;18:433-439.
- Ganz SD. Use of stereolithographic models as diagnostic and restorative aids for predictable immediate loading of implants. Pract Proced Aesthet Dent. 2003;15:763-771.
- Ganz SD. CT-derived model-based surgery for immediate loading of maxillary anterior implants. Pract Proced Aesthet Dent. 2007;19:311-318.
Dr. Tischler is a general dentist in private practice in Woodstock, NY. He is a Diplomate of the American Board of Oral Implantology Implant Dentistry, a Diplomate and Fellow of the International Congress of Oral Implantologists, a Fellow of the American Academy of Implant Dentistry, and a Fellow and graduate of the Misch International Institute. He is on the CE editorial board for Dentistry Today and on the editorial advisory board for the Journal of Implant and Advanced Clinical Dentistry. He has published many articles in various dental journals and lectures internationally on the principles of implant dentistry and bone grafting. He is the director of implant education for Davinci Dental Studios and is also on the BioHorizons educational speakers’ panel. He offers in-office courses at his teaching facility in Woodstock many times during the year and has a popular instructional DVD available that covers the principles of implant dentistry and bone grafting. He can be reached at (845) 679-3706 or at tischlerdental.com.
Disclosure: Dr. Tischler lectures for BioHorizons and is compensated at times for speaking.
Dr. Ganz graduated from the University of Medicine and Dentistry of New Jersey (UMDNJ) Dental School, and then completed a 3-year specialty program in maxillofacial prosthetics at MD Anderson Cancer Center in Houston, Tex. Dr. Ganz is now on the board of directors of the International Congress of Oral Implantologists. He maintains a private practice for prosthodontics, maxillofacial prosthetics, and implant dentistry in Fort Lee, NJ. He is on the implant faculty of many preceptorship programs nationally, is on the staff of Hackensack University Medical Center, and is presently on faculty at UMDNJ Dental School. He currently serves as associate editor for the peer-reviewed journal Implant Dentistry and is on the editorial staff of many other publications. He has published more than 55 articles in various scientific journals. Dr. Ganz authored a book, An Illustrated Guide to Understanding Dental Implants. He has presented internationally on the prosthetic and surgical phases of implant dentistry. He can be reached at (201) 592-8888, at [email protected], or at drganz.com.
Disclosure: Dr. Ganz is a lecturer for BioHorizons, Imaging Sciences, and Materialise Dental.

