This article describes the rationale, clinical technique, and laboratory procedures for producing aesthetic porcelain-to-metal posterior crowns with gingival margins as thin as 0.4 mm.
The single-molar crown is one of the most important services that dentists in the United States can provide for the health of their patients and for the financial health of their practice. These teeth generally are heavily restored and most of the remaining sound tooth structure is located on the buccal and lingual aspects of the tooth. Often, this procedure is performed when the patient perceives an urgent need such as when a large restoration breaks, a tooth is splitting, or decay is apparent under an old restoration. The patients’ main concern is to keep their tooth with maximum comfort, function, and durability. They also require that their crown have a natural appearance.
The dentist’s responsibility is to provide the optimal quality service that meets the patient’s requirements with a minimum biologic cost. (In this case, biologic cost is the removal of sound tooth structure.) Most dentists would agree that the ideal full-coverage restoration for a maxillary second molar is a full-cast gold crown. However, most patients reject the idea of full-cast gold crowns due to their aesthetic appearance.
 |
 |
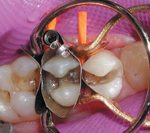
| Figure 1a and 1b. Completed crown with minimal reduction preparation. |
The technique to fabricate an aesthetic, durable, full-coverage, porcelain-fused-to- noble-metal crown on a modified gold crown preparation is the ideal and most effective solution to provide the desired aesthetic appearance. This innovative procedure has been used successfully by the authors for the past 10 years and is described in this article (Figures 1a and 1b).
THE GEOMETRY AND PHYSICS OF TOOTH PREPARATION
The traditional preparation of a tooth for a porcelain-fused-to-metal crown requires a 360° reduction of 1.5 mm at the gingival margin. This provides room for 0.5 mm of metal and 1.0 mm for porcelain. For ease of calculation, let us assume that the shape of the gingival margin of a prepared tooth is a circle. Therefore, if a 9-mm-diameter molar is prepared with a 1.5 mm shoulder, the effective diameter is reduced by 3.0 mm, which represents a 33% reduction of the original diameter. However, since the area of the circle is related to the square of the radius, the reduction in area is 56%, which is significant. Consider the following calculations:
The area of a circle = π r2 (r is the radius). Therefore, original area = π (9/2)2 = 63.58 mm2 . The area after allowing for 1.5 mm shoulder = π ([9-3]/2)2 = 28.26 mm2. The percentage reduction in area = 1 – (28.26/63.58) = 56%.
Given that the volume of tooth structure remaining is directly related to the area at the base of the preparation and that the height of the prepared tooth would be constant, the volume of tooth structure remaining after a 9-mm tooth is prepared with a 360º 1.5-mm shoulder margin versus a chamfer margin will also be reduced by 56%.
 |
| Figure 2. Tooth prepared with a shoulder (left) and tooth with minimum reduction preparation. |
In contrast, a 9-mm-diameter molar that is prepared with a 0.4-mm shoulder has its effective diameter reduced by 0.8 mm, which is only 8.8% reduction compared to the 33% from the traditional method of preparation. The reduction in the volume of the tooth in this case is only 17% compared to the earlier 56% reduction. This significant difference results in maintaining a larger volume of the tooth structure and a stronger, more durable crown (Figure 2).
 |
 |
| Figure 3a and 3b. Molar crack and buildup. |
A solid foundation for the crown is created when the voids created by the removal of old restorations and decay are restored with either a self-adhering resin ionomer or a bonded composite.1,2 This procedure restores and strengthens the remaining tooth structure so the crown becomes a protective, aesthetic covering (Figures 3a and 3b). The minimally reduced crown preparation not only has approximately twice the mass of a traditional preparation, but this larger core also contains significantly more vital tooth structure than the traditional preparation. This tooth structure greatly increases the strength and resistance to fracture of the prepared core.3 Additionally, the increased surface area of the larger preparation allows for greater chemical and mechanical retention.
Heavily restored teeth requiring crowns frequently have no tooth structure on the mesial or distal aspect of the tooth since it has previously been replaced with large “fillings.” Often, the only sound tooth structure remaining is on the buccal and lingual aspects. Consequently, when the old restoration and decay are removed after the initial occlusal, buccal, and lingual reduction, only a fragile shell of the tooth remains.
The tooth illustrated in Figure 3 with deep internal cracks is not an unusual situation. In this case, if a 360° 1.5-mm shoulder was prepared, the lingual cusps would be eliminated and the buccal cusps would become slivers of dentin. Tooth structure to help retain the buildup is lost, as is the ferrule on sound tooth structure that would hold this tooth together and provide for resistance and retention. A ferrule averaging at least 2 mm on sound tooth structure in addition to any buildup material is advised. (The ferrule may be only 1 mm interproximally but will be 4 to 5 mm on the buccal and lingual aspects.) Retaining the maximum amount of tooth structure significantly strengthens the preparation and increases the crown’s durability. It also decreases sensitivity and the possibility that root canal therapy might be required.
In cases where aesthetics is of the utmost importance, such as anterior teeth, more radical tooth reduction may be required and warranted to achieve the desired results. There is a biologic cost for optimum aesthetics. With most posterior crowns, significant reduction in the remaining tooth structure is not necessary or desirable.
TOOTH PREPARATION PROCEDURE
First, the occlusal surface is reduced by 1.5 mm. Next, the occlusal half of the buccal surface is reduced by 1.5 mm and the lingual by 1.0 mm. This is followed by a gentle taper to the gingival margin. A 2-plane reduction is done on the buccal and lingual, but when the preparation is complete, it appears to be a single plane with a gentle taper.
At this point, the old restoration and any decay are removed, and the voids created are restored with either a self-adhering resin ionomer or a bonded composite.4 The buildup is critical since the technician requires a smooth uniform preparation with no undercuts or irregularities so the fit of the finished crown can be totally passive, allowing no flexing of the thin porcelain and metal at the gingival margin.
Finally, a 360° chamfer margin is scribed, leaving a tooth that looks like it has been prepared for a full-cast crown. Generally, the reduction at the margin is less than 0.4 mm.
CREATING A MINIMAL THICKNESS CROWN: THE LABORATORY PERSPECTIVE
Most skilled dental technicians find pleasure in creating a restoration that duplicates nature. In 2003, we have the material and the training to provide the very demanding patient witha natural-appearing crown. Ideally, we desire a preparation that gives us the room to fluidly exercise our craft. However, a preparation with a circumference the size of the lead from a pencil might not be what is best for the long-term viability of the crown.
Most of the time, we are forced to accommodate reality, and that 1.5 mm might become 0.7 mm. This does not mean the technician gives up and says, “Doctor, the crown is going to be ugly.” Here is where the individual skill of the technician becomes the standard. There is not any magical trick to make this work. It requires that we take all of the materials to the limit of their dimensional stability and aesthetic acceptability (Figure 4).
 |
 |
| Figure 4. Crown 0.6 mm on facial. | Figure 5. Meniscus on leading edge of pour. |
The first task the clinician can do to ensure success is to provide the laboratory with an accurate impression of a uniform preparation with no sharp edges. This can assist the laboratory technician with the pouring of the model. Dental stone in its viscous state has a meniscus on the leading edge of the pour that does not like sharp edges or undercuts. It could be argued that each pour could be accurate regardless of the defects. However, the production level required in the average lab could lead to errors. The bottom line is this: smooth preps will average less mistakes and be more predictable (Figure 5).
The waxing and metal work sets the foundation for the final crown. After waxing, the patterns are invested and made ready for casting. The resulting nonferrous castings are technically in a dead-soft state. If we are working with a minimal thickness (less than 0.5 mm), any irregularity becomes a liability. Nonferrous metal can start to foil or work-harden if it endures excessive hammering. Grinding on precious metal substructures is in effect hammering. Excessive surface variation on the preparation will necessitate more internal and external metal finishing. Metal that has been foiled will re-anneal at furnace temperatures necessary to process most porcelain. What this means to the technician is margin creep. What this means to the dentist and the patient is a higher incident of open margins and chipped porcelain. Here again, a simple prep design will create more predictable results (Figure 6).
 |
 |
| Figure 6. Thin metal coping finished for porcelain application. | Figure 7. Gold appliqué fired on surface of metal. |
Metal alloys play a critical role for the successful minimal-thickness crown. Some of the higher-gold-content alloys tend to move when the porcelain is vitrified; however, the gold hues tend to be more homogenous in the oral environment. Just the opposite conditions occur with some of the 50% to 65% gold-alloy metals. They tend to be more rigid in their dead-soft state; however, when they are conditioned for porcelain, a grey oxide occurs. This grey scale can unduly influence porcelain color at the margin when the finished crown is very thin. We can have the best of both by using a 24-karat-gold appliqué on the metal areas most affected by the dark grey oxide. This will help prevent the unsightly grey margins. There are several products on the market to achieve this result. One of the authors, Mr. Rockwell, uses a Metalor product called Aurofilm 2000 (Figure 7).
 |
 |
| Figure 8. Opaque applied for value. | Figure 9. Finished crown using lower-value opaque. |
After the metal has been conditioned, opaque is applied in a value approach instead of a hue or chroma technique. It is necessary in the posterior region of the mouth to control value. In general, posterior crowns look bright. To overcome this, use an opaque of a lower value. For example, use a C/3 opaque when making a D/3- shaded crown. A posterior crown that is lower in value will be less obvious than a crown that is higher in value. If you solve value, then hue and chroma are less important (Figures 8 and 9).
 |
| Figure 10. Anatomical porcelain buildup. |
Mr. Rockwell is currently using d.Sign porcelain by Ivoclar Vivadent. This porcelain seems to be biocompatible in the oral environment and maintains good color when it is thin. It is very important to build the porcelain to size. Overbuilding the crown will put stress on the thin substructure. When the crown is fired in the porcelain furnace, it goes from a ground powder to a liquid, then to a solid. During this change of physical state, there is expansion and contraction that can affect the metal dimensionally. This is especially true when we are dealing with thin metal (Figure 10).
 |
 |
| Figure 11. Refined porcelain margin. | Figure 12. Check occlusion and contacts. |
Ideally, after the crown comes out of the porcelain furnace, there should be little finish work to do. Basically, refining the margins, checking the occlusion, and adjusting the contact should be all that is necessary to prepare the crown for final glazing and staining (Figures 11 and 12).
 |
 |
| Figure 13. Crown on die. | Figure 14. Crown on model with natural anatomy. |
We can evaluate our success by the lack of die abrasion and accuracy of the fit. There should be little change in accuracy from the start of processing to the finished crown. Additionally, the crown should match the form of the adjacent teeth and the shade chosen by the dentist (Figures 13 and 14).
LABORATORY SUMMARY
When we make any object by hand, success is achieved when we exercise economy of means. The crown will look like a clone of nature when the skills of the dentist and the skills of the technician are congruously applied for the benefit of the patient. The spirit of the hand works best when nothing gets in the way. The only way we can arrive at this ideal product is for the technician to completely understand the goals of the restorative dentist and for the dentist to understand the technical needs of the laboratory. Each step along the way should be flawless and singular in effort. Compromise is the result when superimposed techniques are utilized. Creating a restoration that looks good and lasts a long time gives practitioners and technicians purpose.
CONCLUSION
The minimal-reduction crown preparation discussed in this article saves significant amounts of healthy tooth structure and produces a core that has twice the volume of a traditionally prepared porcelain-to-metal crown. This significantly stronger and larger core allows for greater mechanical and chemical retention of the crown.
The core of each preparation is restored to an ideal shape with either a resin ionomer or a bonded composite. This strengthens the core, reduces sensitivity, and allows for accurate replication of the preparation in the impression- and die-making process. With this technique, a smooth, uniform preparation is essential to achieve a reliable, predictable result, and a highly skilled laboratory technician is required to produce an aesthetically acceptable and durable result.
References
1. Resin/glass ionomers. REALITY. The Ratings and First Look. Vol. 17. Houston, Tex: REALITY Publishing Co; 2003:812-829.
2. DeLopez TE. Molar crowns that are faster, better, and more enjoyable. Dent Today. 2003;22(6):64-69.
3. Christensen GJ. Ensuring retention for crowns and fixed prostheses. J Am Dent Assoc. 2003;134(7):993-995.
4. Goldstein MB. Rapid-fire crown buildups. Dent Today. 2002;21(7):104-107.
Dr. DeLopez maintains a private practice in Tallahassee, Fla, with an emphasis on restorative and cosmetic dentistry. He is the
former president of the Leon County Dental Association. He received his DDS degree from Emory University in 1971. He can be reached at drtomd@nettally.net.
Mr. Rockwell owns and operates a dental lab in Tallahassee. Fla. He received both his MS and MFA from Florida State University. He has been in the dental laboratory business for over 20 years and has served on the board of directors for the Florida Dental Laboratory Association. He can be reached at rockwell_labs@hotmail.com.