
Our clinical results are directly proportional to the quality of information that we send into our dental laboratory. If the dental technician could sit with us at the chair and see exactly what we see as we work on our patients, our restorations would dramatically improve. Being a visually-based art, excellent digital photography may be the best way of communicating exactly what we need with our dental ceramist.
Communication has evolved from words and drawings to digital communication. Showing tooth color, character, and texture can be done with images much more efficiently than words or drawings alone. Perhaps the ultimate challenge is to match single teeth to an existing dentition and have them blend in seamlessly. Using quality images with consistent techniques can lessen remakes and provide a level of care that may be unrivaled.
THE DENTAL TECHNICIAN’S EXPECTATIONS
| Table 1. Expectations for the Dental Technician |
|
Since communication is a 2-way street, our dental technicians must be able to correctly use the images that we send to them. There is no need to waste time capturing precise color and detail if inaccurate images are then printed out in the laboratory, the ceramist has no monitor to look at, or if the images are ignored (Table 1).
The dental technician should have the ability to see a monitor while the restoration is being fabricated, and then again to check and compare the final restoration with the images. There is a greater chance for more accurate laboratory work if the images are viewed on a color-corrected monitor. Calibration maximizes the settings for color, contrast, brightness, and white balance. A colorimeter (such as the Spyder 2 [Calibration-Direct]) is inexpensive, simple to use, and can make a difference in image matching.
Any time images are printed on photo paper from an ink jet printer, the dental technician should use those only as a quick reference and to introduce the case to the laboratory team. Each printer induces color error into the photo because of inherent variance in printer settings, ink, paper, and other factors. Therefore, it is dangerous to rely on these printings. Even with printer color calibration, it is difficult to maintain correct color through the process.
Before any new cameras are purchased or protocol is adopted, call your dental ceramist! It does no good for a doctor to do high quality photography if their dental technician does not have the desire or equipment to be able to use it. Teamwork is critical and both parties must be on the same page for the work to be excellent. That said, most dental technicians working in detail-oriented laboratories are more than willing to work to become better at their art and will entertain your pursuit of excellence with some education.
QUALITY EQUIPMENT FOR QUALITY WORK
 |
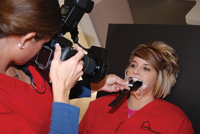 |
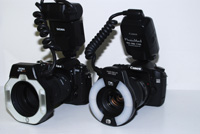
| Figure 1. The Nikon D300 and Canon 40D digital single lens reflex (DSLR) cameras (both shown with a macro lens and ring flash) can be used for more accurate doctor-technician communication. | Figure 2. Retractors are placed to keep soft tissues and shadows out of the images. A contraster (PhotoMed) is used to reduce flash bounce back from behind the teeth during exposure (Nikon D70). |
 |
 |
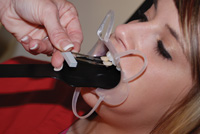
| Figure 3. When taking shades, the tabs are held with the necks slightly behind the tooth being matched and angled to reduce glare. The midportion of the tab should be at the same distance from the camera as the tooth being matched. | Figure 4. The first shade image is the entire arch showing the numbers on the shade tab for accurate reference (A mode, f/32). |
 |
 |
| Figure 5. A close-up view is then taken with the shade tabs angled and held on the same plane as the tooth being matched. The tipped tabs reduce glare (A mode, f/45). | Figure 6. It is critical with thin, all-ceramic restorations that the ceramist know what preparation (stump) shades are present that may influence final restoration color/character. Center of shade tab is at same plane as tooth being matched (A mode, f/45). |
 |
 |
| Figure 7. In the same way as pre-preparation shade images, the first image is taken with a full shade tab and the second closeup. The tooth must be kept slightly moist to ensure accurate color. | Figure 8. The restoration was bonded in with a clear luting material, therefore with little influence on final shading/character. |
 |
 |
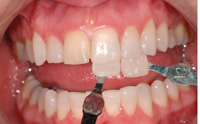
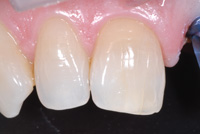
| Figure 9. Maximum close-up image showing terrific matching of tooth shade/character. The ceramist and dental laboratory team used dental images and a written description of the tooth. |
Figure 10. The key with any restoration, particularly when matching a single tooth, is to provide accurate materials for the ceramist to create with. The better the information shared, the better the result. |
The accuracy of communication between doctors and dental technicians is directly proportional to the quality of digital equipment used and the precision of the capturing techniques. We must use equipment capable of capturing correct tooth color, character, and surface texture; and then be able to get this to our technicians without a loss of detail.
The digital single lens reflex (DSLR) systems are clearly superior to their compact brethren, and now rival the quality that comes from 35 mm film cameras. Nikon’s D80, D200, and D300—along with Canon’s Rebel XSi, 40D, and 5D—are all terrific cameras very capable of capturing great images. Those cameras matched with a macro lens and flash system can give the ultimate in communication photography (Figure 1).
Sensor quality, light control, and distortion-free closeness are the key components in achieving photographic accuracy. Compact point-and-shoot cameras usually have smaller (often less accurate) sensors than their big brother DSLRs which decrease the chance of color and character accuracy. Sensors convert light energy to digital information which is then interpreted by the camera’s “software” to make color. The arrangement and accuracy of these light converting photodiodes, and their interpretation by the camera, are important factors in how well our teeth and restorations will match.
Light control may be the most important aspect of all in matching teeth. Exposure is determined by how the camera and its flash are set. If an image is too light, the detail we need to mimic is not seen, and those images are usually worthless. For the most part, we want to control the light entering the camera by aperture settings (f-stop) and not by the through the lens (TTL) metering system of the camera. Shooting in A aperture priority or M manual mode allows us to control the light with a single setting change.
Macro lenses give us the most versatility and do not limit the ability to capture minute details visible in teeth. Digital zoom by the camera cropping by computer software causes a lessening of image quality and a less reliable mechanism for accurate message. The 100- or 105-mm macro lens gives us the versatility to capture detail of individual teeth, while being able to get far enough away to acquire great portraits. This is DSLR and macro lens flexibility, and it is unrivaled by point-and-shoot cameras.
IMAGE CAPTURE AND SETTINGS: CONTROVERSIES
There are varying opinions as to which camera settings are best used for capturing dental images. Undoubtedly, a variety of settings can produce excellent detail for doctor-technician communication. There are 2 predominant arguments: First, should images be shot in A aperture priority or the M manual mode on the camera? In A mode, the amount of light coming into the camera is adjusted by controlling the size of the hole (opening) letting light through—the aperture. This sizing of the hole is the “f/stop”…the smaller the hole, the less light that is allowed to come through. M mode allows you to adjust the aperture in the same way, but also lets you adjust the time the hole is opened. That time is the “shutter speed”…with less time, less light. Generally, A mode is sufficient for dental needs and provides nearly “point-and-shoot” ease.
The second area of controversy is a built-in camera-light-metering system, TTL. The most reliable way to get correct color and tooth detail of restoration matching, particularly with very close-up images, is to have this TTL metering turned off at the flash. The ultimate lighting control is in the hands of the photographer by controlling this f/stop. This view is popular with many macro photography educators.
| Table 2. Doctor Protocol for Anterior Tooth Matching | ||||||||||
|
Another factor that affects image quality is the format and size of the image that is stored. RAW means the image is stored in a format that is unprocessed by the camera, containing the original information received through the lens and onto the sensor. JPEG is a very popular storage format because of ease-of-use and smaller file size, but inherently has less accuracy because of infor
mation compression. Most new SLR cameras allow images to be captured in RAW and JPEG formats at the same time. In this way, the quality is preserved in RAW, and ease of use is accomplished with the JPEG format. Choose RAW plus a high quality JPEG for image storage to have the best quality and ease-of-use (Table 2).
 |
 |
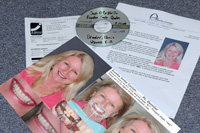
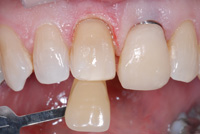
| Figure 11. Included with each aesthetic case sent to the ceramist is a written description, digital images, and printed images for a quick reference. |
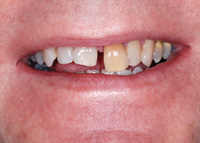
Figure 12. Hopeless prognosis for tooth No. 9. |
 |
 |
|
Figure 13. A full series of images was taken before any work initiated for liability and documentation. Final images for color matching would not be done for months later after implant placement and integration to compensate for any character change that may have taken place during that time. |
Figure 14. Retractors, contraster, and shade tabs were placed at the impression appointment and a photo was taken with a DSLR camera (Nikon D200, A mode, f/22). |
 |
 |
| Figure 15. The lens is then adjusted for a close-up image with the shade tabs and tooth filling the frame (A mode, f/32). | Figure 16. Incisal detail is captured for the dental technicians with a 30º image. This image may provide a heightened sense of incisal character (A mode, f/32). |
 |
 |
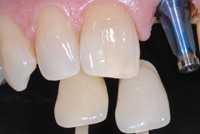
| Figure 17. After preparation, a shade tab is held on the same plane as the tooth and an image taken while keeping the tooth moist (A mode, f/22). | Figure 18. Adjusting the lens for close-up image to give the ceramist more data to use for tooth matching (A mode, f/32). |
 |
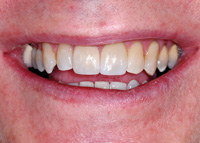 |
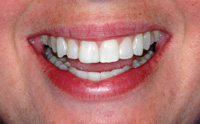
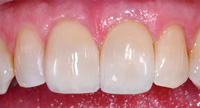
| Figure 19. The results were restorations created to cover 2 different abutment materials; one prepared tooth, and the other zirconia. Note the excellent shade matches. | Figure 20. The final restorations blended in naturally with the dentition due to the excellent doctor-technician communication made possible by digital information. |
CASE 1: SHADE MATCHING PROTOCOL FOR A SINGLE TOOTH
Retraction of the soft tissues is the critical first step for acquiring excellent images (Figure 2). Proper retraction reduces the shadows produced from soft tissues and help to control fluid during image capture. There are a variety of retractors, some that do not need to be held (SeeMORE [Discus Dental]), and others that must be held by either the patient or the assistant. Photos are taken with retractors before anesthesia is given, or any desiccation (dehydration) of the teeth occurs during operative procedures. Dehydration increases the value (or lightness) of the tooth structure.
A black contraster (Anterior Contraster, Occlusal Contraster [Photomed]) is used to decrease light reflection from behind the teeth during the flash. This reduces potential overexposure as light bounces unnaturally off oral tissues, making tooth character more difficult to see. In our office, the protocol for image capture when matching a shade is as follows: the retractors are placed, the patient holds the contraster, the assistant holds the 2 closest in shade tabs near the tooth, and the doctor captures the image (Figure 3).
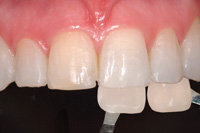
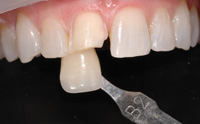
In this case, we are matching a porcelain restoration on tooth Nos. 8 and 9. Before any treatment is started, 2 matching shade tabs are held on the same plane as the teeth, slightly behind, and tipped forward to decrease glare. This image is taken at a distance so that the shade tab numbers are clearly seen so there is no miscommunication with the lab (Figure 4). This prevents mistaken shade tab identity. The tabs are then moved together without changing position and an image is captured showing the entire tooth and both shade tabs (Figure 5). The contraster is placed before the first or second image.
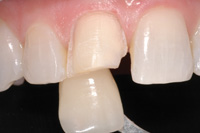
Because the preparation shade (sometimes called the stump shade or dentin shade) affects the color of the final porcelain—especially with thin restorations—its color must be factored into the opacity of the final restoration. It also helps if the dental ceramist is familiar with the luting material that you will be using, since this can influence technical decisions they may have to make regarding the degree of opacity that may need to be built into the restoration. A shade tab closely matching the prep color is chosen and held in the same plane as the tooth. The first image is taken to see the shade tab identity (Figure 6). It is followed by a closeup showing the entire preparation and shade tab as done preoperatively (Figure 7). You will need to change the camera or shade tab angle if glare covers a large portion of the image.
With a written prescription, digital images should be sent. While printed images are fine to send for quick reference, they are not to be used to match restoration color. Printing images, like the images in this journal, impart a change to the digital image; and despite printer calibration, there is more likely to be color errors than with the images on a monitor. That being said, the dental ceramist should have access to a color-corrected monitor (Spyder 3 Pro [Calibration-Direct]). Again, it must be stressed that the doctor should visit the dental laboratory to interview the dental technicians, and to see what equipment is being used to ensure accura
cy in tooth shades and character.
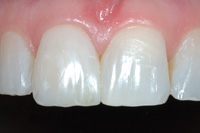
All of these techniques factor into the construction of the final restoration. In this case (Figures 8 and 9), the all-ceramic crown was cemented with a clear luting material and all of the color was built into the restoration with very little influence from the underlying adhesive system. By knowing preoperative tooth color and character, the preparation (stump) shade, and being familiar with the doctor’s luting material/ technique, the dental technician can create a restoration that will appear both natural and harmonious with the existing dentition (Figure 10). Communication is the key! Written, printed, and verbal tooth description provided to a quality-minded laboratory technician team will result in restorations that will meet everyone’s expectations (Figure 11).
CASE 2: VENEER AND IMPLANT CROWN
Matching implant crowns to restorations on natural teeth can be a challenge because of the varying characteristics of the underlying abutment materials. A patient reported with a hopeless tooth No. 9 (Figure 12). In this case, tooth No. 9 was extracted and a root form implant (Tapered Groovy [Nobel Biocare]) was placed and allowed to integrate for 4 months. Photos were taken before any work was started to provide true “pretreatment” images for liability and documentation reasons (Figure 13).
After time for integration, an appointment was made for implant uncovering, and soft-tissue development with abutment temporization. Images were taken with the retractors, contraster, and shade tabs as described in the case above (Figure 14). The close-up images were then taken after an image showing the shade tab numbers was done. The shade tabs were held with the necks lingual, but angled toward the facial —on the same plane as the teeth to be matched (Figure 15). Another view, particularly useful to many ceramists, was taken from the gingival at about 30º to 45º. With the contraster in place, this view is excellent at making the incisal character and detail stand out. The reflection and absorption of the light as it passes through the tooth makes incisal craze lines, color changes, and other nuances particularly evident (Figure 16).
Prep shades were captured again (with the full shade tab shown at the same plane as the tooth) 2 weeks after implant uncovering and temporary abutment placement (Figure 17). The tooth was kept moist in order to keep the tooth color as natural as possible, and shades were taken without concern for abutment color of the implant as that will be constructed by the lab (Figure 18). It must also be noted that when laser crown lengthening is done (as in this case), bleeding must be kept under control so as not to influence shade taking. Our primary goal in this situation was to provide this information regardless of abutment color or material used for the implant restoration of No. 9. The goal of the ceramist was to match our preoperative shade of Nos. 7 and 8 by using a custom zirconia abutment and crown. Incorrect preoperative or preparation (stump) shades will limit the laboratory team’s ability to return restorations to us that match the natural teeth. The quality of the dental technicians’ work, as it relates to the quality of the work that is returned to us, is in direct proportion to the quality and level of detailed information that we provide to them.
In this case, the dental ceramist was able to use our written description with the digital images to create excellent restorations that blended in very well (Figure 19). The key was to take accurate images and use a dental laboratory team that was willing to use the images in a correct way preserving the data (Figure 20).
SUMMARY
The goal of the dentist is to share accurate color and other tooth characteristics about the tooth being matched. The doctor must also communicate what preparation (stump) shades the ceramist is tasked with covering since this may influence the final outer porcelain color, depending on the restorative material selected. The higher the quality of the data that we share with our dental technicians, the greater chance they have to provide us with a final restoration that matches what we and the patient sees.
Dental technicians are at a great disadvantage since they are usually not able to actually see the patient. Therefore, quality digital photo images can fill that important missing link. Precise digital images can be a tremendous asset for most dental offices and they provide a mechanism for heightened communication with the ceramist and the dental laboratory team—one of the keys to aesthetic restorative success.
Dr. Griffin completed his general practice residency and maintains a general practice in Eureka, Missouri, focusing on efficiency in almost all phases of general dentistry while providing state-of-the-art care for affordable fees. He enjoys teaching and sharing his experiences in creating practice efficiency and predictable posterior techniques. He can be reached at (636) 938-4141 or via e-mail at [email protected].
Disclosure: Dr. Griffin, Jr reports no conflict of interest.

