


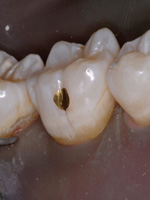
Direct gold, or gold foil, is the oldest dental restorative material and continues to be used by many dentists today. Although not in general use due to many factors, it is the only dental material that if carefully placed and finished can approximate the cavosurface margin with zero marginal gap (Frederick Eichmiller, phone conversation, January 21, 2004) and last longer than any other dental material. As a comparison, average marginal gaps are 30 to 50 µm for amalgam, 25 to 100 µm for direct composites, 100 µm for indirect composite, 100 to 200 µm for all-ceramic restorations, and as low as 20 µm for cast gold restorations.1 The advantage of the lower marginal gap is primarily that it allows less of an opportunity for continued degradation, stain, and caries.
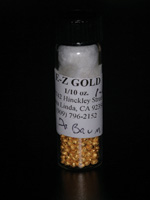
There are two basic types of gold foil available today: gold foil available in sheets supplied in books (Figure 1; Jensen Industries), which then can be rolled in various sizes, and E-Z Gold (Figure 2; Lloyd Baum), which is gold foil wrapped around a mixture of powdered gold and molten wax.
The purpose of this paper is to confront the reasons why gold foil is not in general use today and show how relatively easy and cost-effective it can be to use this material, which due to its biocompatibility can potentially last the patientís lifetime.
 |
 |
|
Figure 1. Book of gold foil (Jensen Industries). |
Figure 2. Vial of gold foil (Lloyd Baum). |
WHY NOT GOLD FOIL?
Education
The primary reason that gold foil is not in more general use in restorative dentistry is that, unfortunately, the technique is not taught in many dental schools. In addition, there are very few postgraduate opportunities for learning how to use it. Those dentists who did learn the technique may have diminished their use of gold foil due to time constraints and negative memories of using foil in dental school.
Clinical Technique
The clinical technique for placing an acceptable gold foil restoration is somewhat more demanding than placing an amalgam or direct composite in the same clinical indication. Historically, more time and clinical skill level was necessary when compared to other materials in order to place an adequate gold foil restoration, particularly when placing a class II, III, or V restoration. This may still be true to a certain degree, but the procedure has become more efficient due to the use of E-Z Gold. The time that it takes to place a buccal pit or casting repair when using E-Z Gold can be equal to that of a direct composite or amalgam, including anesthesia, rubber dam, cavity preparation, placement, and finishing.
Aesthetics
Another reason dentists say they choose not to use gold foil is aesthetics. In todayís society this is understandable and appropriate in many cases, but it should not obviate the use of foil completely. There are many indications where a small gold foil restoration can be placed as the treatment of choice. These indications include buccal pits (particularly mandibular molars), small lesions in other nonaesthetic areas (small occlusal pits, lingual grooves of maxillary molars, lingual pits of maxillary incisors), and any repair to an existing cast gold restoration. Millions of patients have chosen cast gold restorations in their mouths and donít mind having them repaired if possible. Rather than replace a serviceable cast gold inlay, onlay, crown, or bridge, gold foil can be used to repair small defects and extend the life of that restoration.
Dental Insurance
Another reason dentists do not use gold foil is the perception that dental insurance will not reimburse the patient for the procedure. This is not true. Dental insurance will pay a certain amount if the proper codes are used and those codes are not archived. Since gold foils are not used as often as other restorative materials, some insurance companies have archived the code numbers. When predetermination of benefits or reimbursement is applied for, many times a computer or inexperienced secretary denies the claim or applies the payment for an amalgam or other restoration. The code number that has been used successfully by the authors for class I and V gold foils is 02410.
Clinical Technique
The following is a detailed description of the replacement of a buccal pit amalgam with E-Z Gold and gold foil.
Anesthesia
Depending on the individual patientís needs, dental anesthesia can be applied using the technique of the operatorís choice.
Rubber Dam Application
In order to place a gold foil restoration successfully, it is imperative to utilize the rubber dam. Using proper hole placement, clamp selection and placement, retraction when necessary, and inversion of the dam, the operative site should be isolated in order to give the operator ideal access, dryness, and visibility to the operative site.
Removal of Existing Restoration
Using a 55, 56, 169, or 170 fissure bur, the clinician can carefully remove an old restoration without enlarging the cavosurface margin. The operative goal is to keep the cavity preparation as small as possible while giving the operator room to place and condense the gold properly.
Cavity Preparation
 |
 |
|
Figure 3. A 34 inverted cone flattening floor and placing retention. |
Figure 4. A 7901 finishing bur refining the margin. |
The ideal depth of the preparation should be 2 to 3 mm and into dentin. The shape of the preparation could be circular, pear-shaped, or triangular depending on operator choice. If after removal of the existing restoration the depth of the cavity is deeper than 3 to 4 mm, a base should be placed to protect the pulp, limit the amount of gold foil utilized, and allow the ideal depth to be achieved.
Polycarboxylate or zinc phosphate cement is a material that has been used successfully to base cavities of this size; the material can be placed easily if mixed a little on the thick side and cemented using a thinner second mix. This allows the cement to flow into all parts of the cavity, leaving no voids after condensing with an amalgam condenser. The ideal depth is then made using a flat-ended bur; the walls are smoothed and retention is achieved using a 34 inverted cone bur at the base of the preparation (Figure 3). The final step of the preparation is to use a 7901 finishing bur to smooth the outline and remove any unsupported enamel rods (Figure 4). This step also places a very small bevel and helps create a sharp cavosurface margin. This allows the operator to visualize the margin as the excess gold foil is removed and gives the preparation a smooth and flowing outline form.
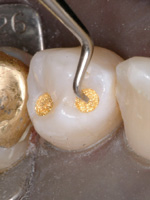
Gold Placement and Condensation
 |
 |
|
Figure 5. E-Z Gold being condensed and held with holder. |
Figure 6. Beavertail burnishing gold foil from gold to tooth. |
Using a placement instrument (Suter Manufacturing), a pellet of E-Z Gold is placed in the top of an alcohol flame. The pellet should be held in the flame until the wax is burned off (2 to 3 seconds). The pellet is then carefully placed in the cavity and gently pushed in place using a condenser or parallelogram (Suter Manufacturing). At this point the gold must be made as dense as possible using any of a few condensation methods. The simplest method is using just hand condensation with amalgam condensers. Using a fair amount of pressure, the gold should be pushed as far into the cavity as possible, leaving no air space. Other classic methods of condensation that can be used are various condensers and hand malleting, an electromallet, or a pneumatic condenser. Which-ever method is used, the E-Z Gold should be condensed against the walls in a circular path around the cavity, making sure no contact is made between the condenser and cavosurface margin (Figure 5). Additional pellets of E-Z Gold are then placed and condensed into the cavity until it is almost filled. The entire cavity can be filled using only E-Z Gold, or the final layers could be placed using gold foil. Gold foil can be rolled in small pellets that will allow the operator more precision at the cavosurface than E-Z Gold, and if properly condensed and finished, gold foil may give the restoration a more highly polished surface. Following completion of the gold placement, a foot condenser can be utilized to condense the foil surface firmly as well as identify any soft spots. A beavertail burnisher is then used to burnish and harden the surface of the soft gold. The burnisher should always be used in a direction from gold to the tooth (Figure 6).
Finishing
 |
 |
|
Figure 7. Fine sandpaper disk being used to remove excess. |
Figure 8. Discoid hand instrument removing excess gold and placing anatomy. |
Finishing is defined as leveling the gold with the tooth surface in 3 planes. This can be accomplished using sandpaper disks (Figure 7) with air spray for cooling, or hand instruments such as gold knives, cleoid discoids (Figure 8), etc, but also can be completed more quickly and efficiently using a high-speed round bur with water spray. Being very careful not to touch the cavosurface margin, the excess gold is peeled away slowly using the round bur with water. This can be followed by using a fine finishing bur to remove small surface irregularities. If there is any small amount of excess gold that remains, a cleoid discoid can be used, at the same time creating anatomy if desired.
Polishing
 |
 |
|
Figure 9. Rubber cup with aluminum oxide powder polishing foil. |
Figure 10. Super greenie in high speed used with very light pressure and air spray. |
 |
 |
|
Figure 11. Completed class I gold foil. |
Figure 12. Pre-op of second case-2 occlusal restorations on bicuspid. |
 |
 |
|
Figure 13. Condenser being used with holder to condense foil against walls. |
Figure 14. Occlusal view of condenser in use. |
 |
 |
|
Figure 15. A No. 4 round bur slowly peeling away excess foil. |
Figure 16. Fine finishing diamond smoothing gold foil. |
 |
 |
|
Figure 17. Brownie in use (note that tip has been modified to fit the restoration surface). |
Figure 18. Greenie being used to polish foil. |
 |
|
Figure 19. Completed restorations. |
The final step is making the surface very smooth and removing any excess that may be causing reflection from the margins. Flour of pumice and aluminum oxide powders can be used with ribbed rubber cups (Figure 9), but this step can also be accomplished in small restorations using brownies, greenies, and super greenies (Figure 10). Using light pressure with higher speeds, always with an air stream, a highly polished surface can be achieved quickly (Figure 11). (Note: A second case is demonstrated in Figures 12 to 19.)
Summary
Gold foil is the most underused restorative material in dentistry, and contrary to popular belief, it is still being used in many dental practices. As demonstrated, it can be used more easily than years ago and give the patient a restoration that may last a lifetime. Reasons for not using it have been addressed, and a simplified method of restoration has been explained in detail. It is the hope of the authors and the American Academy of Gold Foil Operators that this paper may stimulate some readers to investigate the use of gold foil as a restorative material. More information and educational opportunities may be obtained by contacting the authors or the Academy of Gold Foil Operators (goldfoil.org)
Dr. Small is an assistant professor at the University of Medicine and Dentistry of New Jersey (UMDNJ) and practices restorative dentistry in Lawrenceville, NJ. He is a member of the Academy of Operative Dentistry, the AGD, the American Academy of Gold Foil Operators, and the RV Tucker Academy of Cast Gold Study Clubs. He is a board member of the Pankey Foundation. Dr. Small mentors a gold selective/elective at UMDNJ and a study club. He can be reached at dr.bruce.small@gmail.com.
Dr. Johnson is a past president of the American Academy of Gold Foil Operators, the RV Tucker Academy of Cast Gold Study Clubs, and the Academy of Operative Dentistry. He is also a member of the American Academy of Restorative Dentistry, practices restorative dentistry in Seattle, and mentors 5 study clubs. He can be reached at wkj@oz.net.


