INTRODUCTION
Clinical procedures concerning the need for posts and the protocol for core buildups in endodontically treated teeth have evolved significantly over the last few decades with the advent of dentin bonding protocols. Likewise, the dental literature has evolved yet is fraught with contradictions. However, the consensus in the literature today is that posts weaken teeth, and when adequate tooth volume is present, a post is contraindicated, and only a core buildup should be done.
There is a misconception often quoted in the literature that the reason a post is needed is to retain the core buildup. Perhaps this was true before adequate dentin bonding protocols existed, but this is simply no longer true. Posts cannot retain a buildup because the post itself is retained by the cement and buildup. Posts have no inherent retention. The only reason to place a post is to avoid horizontal fracture of the core buildup. In addition, many authors subscribe to the necessity of the ferrule effect, while others debunk the idea. Many clinical studies on the ferrule effect are simply studying residual tooth structure volume rather than any effect ferrules may have. Clinical decisions on how to best restore endodontically treated teeth must be made with a jaundiced eye toward the literature since there are so many contradictions in the “evidenced-based” literature.
Much of the conflict in the endodontic literature on post placement stems from the clinical protocols used in the studies. Any study done using paper points to dry a canal where dentin bonding is used is flawed because paper points simply will not sufficiently dry a canal for dentin bonding to work. Studies done with acid-based cements that do not bond to the unique post space dentin and the post are also flawed. Likewise, the use of dual-cured resins to place posts results in a flawed study since complete conversion requires light activation, and light will not penetrate to the depth of a post space.
Therefore, a clinician is left to decide on how to restore an endodontically treated tooth based on observable “facts” within their own practices. Those observations over decades with teeth they have restored and followed will lead the clinician to prudent management. I have been fortunate to have observed these “facts” for more than 5 decades. My first lecture was in 1972 to our local dental society on how to fabricate and place a gold post. Since that time, I have restored thousands of endodontically treated teeth out of the more than 65,000 units I have placed and have been fortunate to practice in the same community for more than 50 years. I have followed the outcome of what I did for my patients on the majority of those 65,000 units. As materials and my experience evolved, so did my clinical protocols on how best to restore endodontically treated teeth.
Here are the thoughts I have on restoring endodontically treated teeth today in the 21st century based on my clinical experience for more than 5 decades and a belief in shards of uncompromised dental literature:
1. Properly restored teeth are better than implants. Implants are considered the route of last resort in our office. Well-done endodontic treatment, coupled with appropriate restorative procedures, can preserve teeth for decades.
2. Posts should not be placed when there is no need since the placement of a post weakens teeth and is fraught with complications both from the endo-
dontic fill and biomechanical perspectives.
3. Active screw posts should never be used because they split teeth.
4. Acid-soluble cements should never be used to place posts. The function of the cement is to retain the post. Acid-base cements are too weak to do that.
5. Glass ionomer cemented posts do not resist the formation of decay along the post space.
6. The need for a post is not to retain the core but rather to prevent horizontal fracture of the core buildup. There is no other need for a post.
7. Posts are not indicated for teeth that are not planned for full-coverage restorations.
8. Posterior endodontically treated teeth require cusp-coverage restorations. Simple direct composites as definitive restorations are inadequate for the long-term success of endodontically treated teeth.
9. Metal posts resist fracture of the core better than plastic or ceramic ones, which are prone to fracture.
10. Post spaces should never be initially prepared with end-cutting drills. Root perforation is common when this is done. Initial prep to depth (anything less than 10.0 mm is almost worthless) should be done with Peeso reamers or Gates Glidden drills, followed by sizing the post space with the end-cutting drill.
11. Post spaces can only be properly rinsed and dried with a Stropko Irrigator (Stropko). Paper point drying a canal to evaporate alcohol or acetone in primers simply will not take the substrate to the hydrophobic level necessary for successful bonding.
12. Teeth with core buildups that have adequate dimensions to resist fracture do not need posts. Molar teeth with posts result in many catastrophic failures.
13. Core buildups should always be separate from the crown. Casting, pressing, or milling the core as part of the crown is a significant compromise.
14. The primary cause of failure on teeth restored with posts is root fracture, which is secondary to the cement’s failure to retain the post. Once the post is loose, any occlusal force will likely stress the fragile root enough to fracture it.
15. The secondary cause of failure on teeth restored with posts is coronal microleakage down the post space, resulting in failure of the endodontic fill.
16. Endodontically treated teeth become brittle over time and, additionally, are usually biomechanically compromised. Appropriate distribution of occlusal forces on endodontically treated and restored teeth is critical for long-term success.
17. Posts should be embedded in the core buildup as much as possible since the opacity of the buildup will block the appearance of the metal post, and if it is centered in the buildup, it will increase the fracture resistance of the buildup.
18. Titanium posts do not rust like stainless steel. Rust compromises cosmetics. Flexure of the core buildup causes fracture of the buildup and, frequently, the roots. Plastic posts flex and often break because they do not resist fracture of the core buildup. Ceramic posts do not flex but fracture easily.
19. Titanium ParaPosts XP (Coltene) smaller than 4.5 are flexible and should be used with caution. Titanium alloy is more flexible than stainless steel, but that flexibility is clinically insignificant.
20. Only chemically activated composite cement should be used to cement posts. Dual-cure cement requires light to fully cure, and light will not penetrate to the base of the post space where a complete cure is mandatory.
21. Molars almost never need posts since the volume of core material will not need to be reinforced to prevent fracture.
22. Bicuspids rarely need posts unless they are fractured off at the tissue level.
23. Most posts “succeed” because there was never a need to place one initially. This is one of the confusing aspects of retrospective studies on posts.
24. There are cases where heroics can keep a tooth for quite some time, but when the volume of tooth structure is severely compromised, the prognosis is poor, and the outcome eventually will be failure.
25. It is prudent to attempt heroics when the age of the patient is factored into the treatment plan. Elderly patients may well benefit from a decade or so of service out of a heroic attempt to keep a tooth. Likewise, younger patients may benefit from keeping a tooth for a decade or so as the knowledge and prognosis of implant management grows at an exponential rate. Who knows, but what stem cell may grow a new tooth in the next decade or so?
26. Placing a post or core buildup requires a precise protocol to ensure decades of success. Protocols that we use for core buildups and post placement are free to download at our website,
struppbrummseminars.com. Click on “Protocol Downloads” to access them. These protocols are bulletproof, if followed precisely. In addition, our products list is also free to download. It contains all the products we use and a contact source to get them.
Two cases are presented here with captions to explain what was done. In addition, other photos are included to expand on certain aspects that require clarification. If you have any questions about this article, we will be happy to answer them on our Facebook page, Strupp/Brumm Dental Protocols, where more than 16,000 of the best dentists in the world gather to learn.
CASE REPORTS
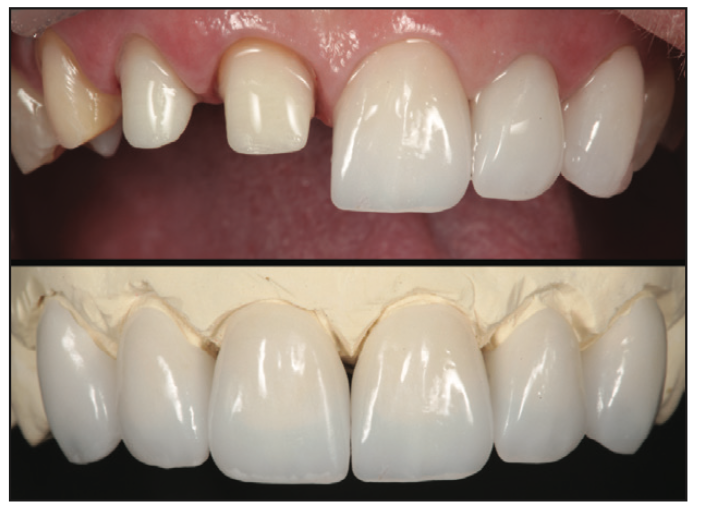
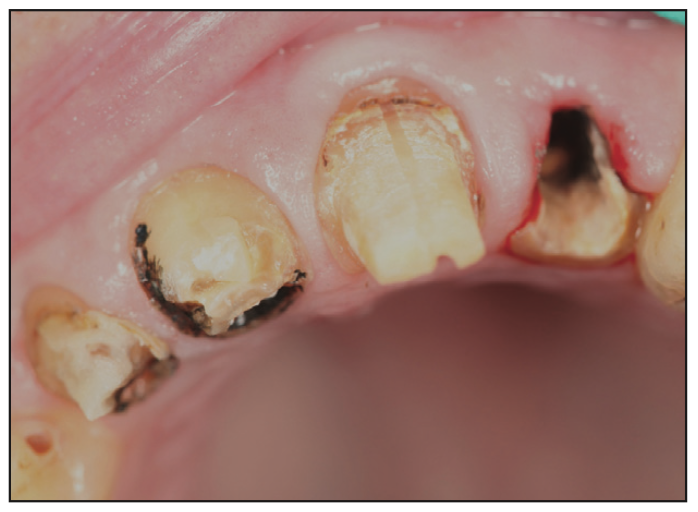
Case 1: Teeth Nos. 6 to 11 necessitated replacement. These restorations were made with porcelain butt joints in the cosmetic zone and placed with zinc phosphate cement. Posts were placed with Fuji Glass Ionomer Cement (GC) in Nos. 7, 8, and 10 (Figure 1).
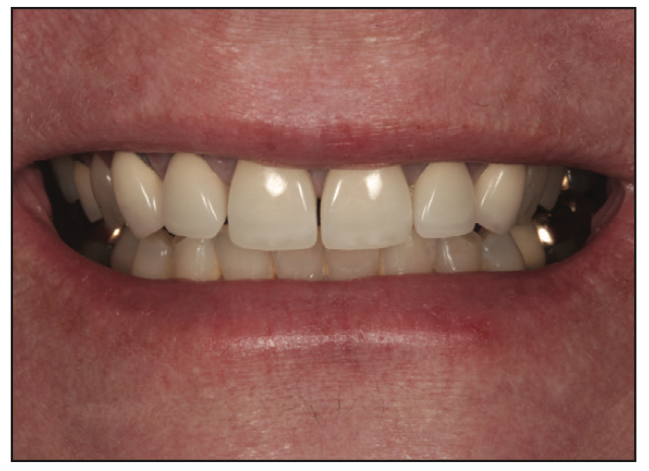
Case 2: Black discoloration along the labial porcelain butt joints was clinical evidence of decay. A 0.2 to 1.0 mm of recession over 30 years, coupled with the black discoloration along the margins, created a “cosmetic need” for the patient. The degree of pathology under the restorations was not clinically evident. Most restorations cemented with acid-soluble cement should be replaced after 2 to 3 decades, even if they “look” good (Figure 2).
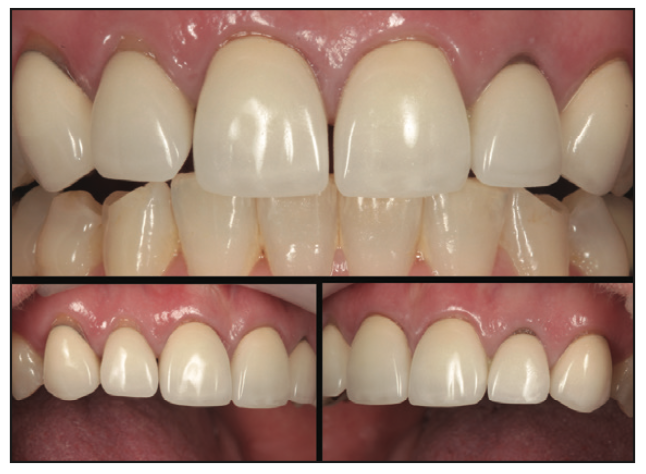
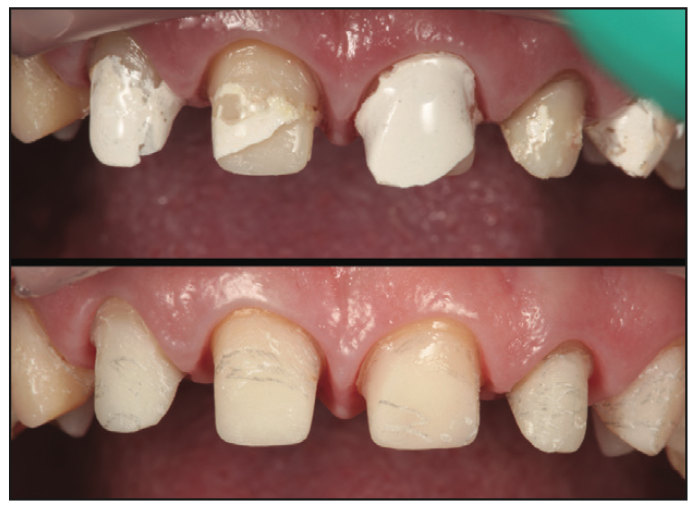
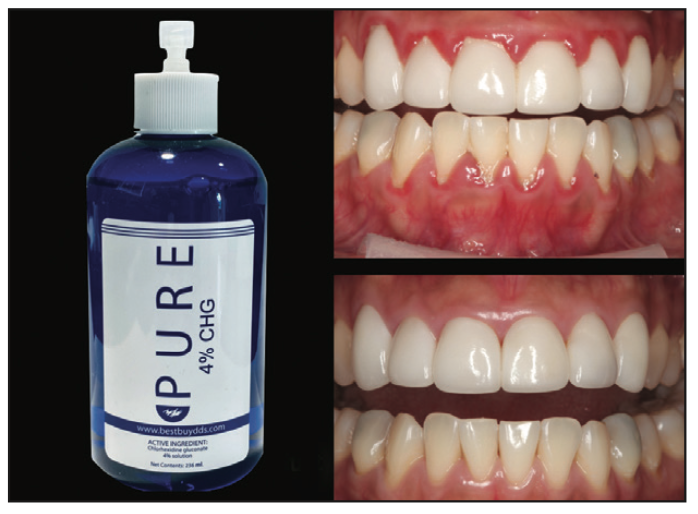
After removing the old restorations, a significant amount of tooth structure was decayed because of the leaking restorations and dissolution of the acid-soluble cement. This was made worse by the patient’s habit of drinking acidic beverages. There was no bleeding tissue because a soft-tissue scrub with Pure 4% CHG (Best Buy Discount Dental Supply) was done 2 days before the preparations (Figure 3).

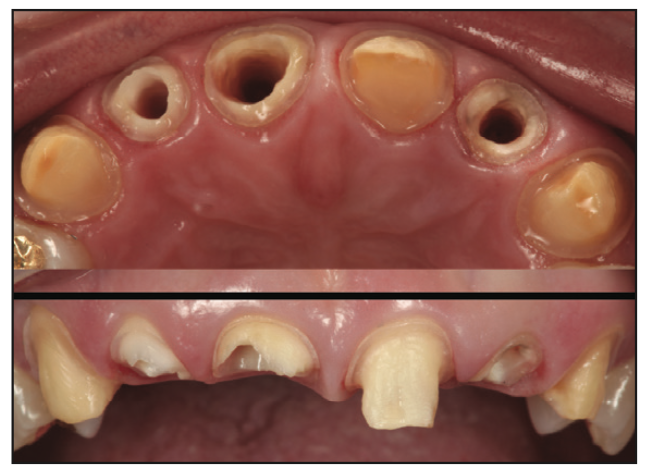
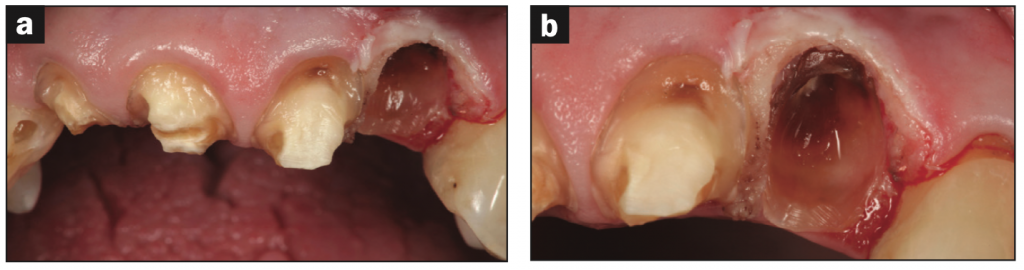
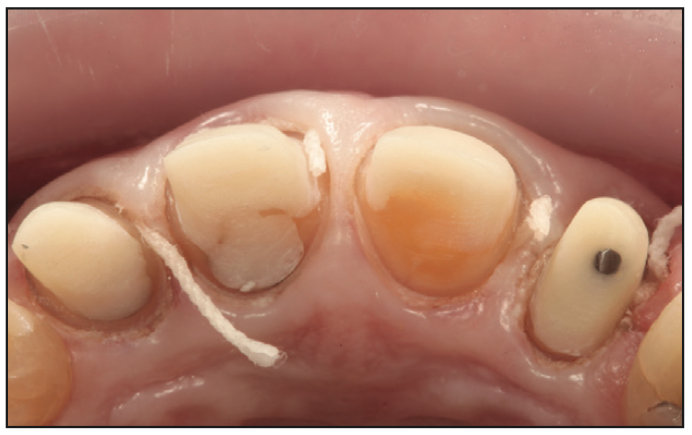
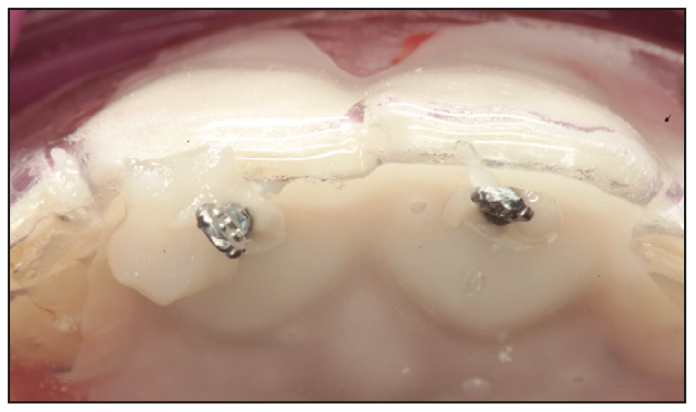
Case 3: Extensive loss of tooth volume occurred as the diseased tooth structure was removed. The glass ionomer cemented posts were removed using a sonic scaler. This exposed extensive decay along the post space walls, especially in the post space of No. 8. Because the projected volume of core buildup in No. 8 would satisfactorily resist horizontal fracture, a post was not indicated. Posts were indicated to resist horizontal fracture of the core buildups in Nos. 7 and 10, however, because the projected thin dimension of the core buildups were at risk for horizontal fracture without them (Figure 4).
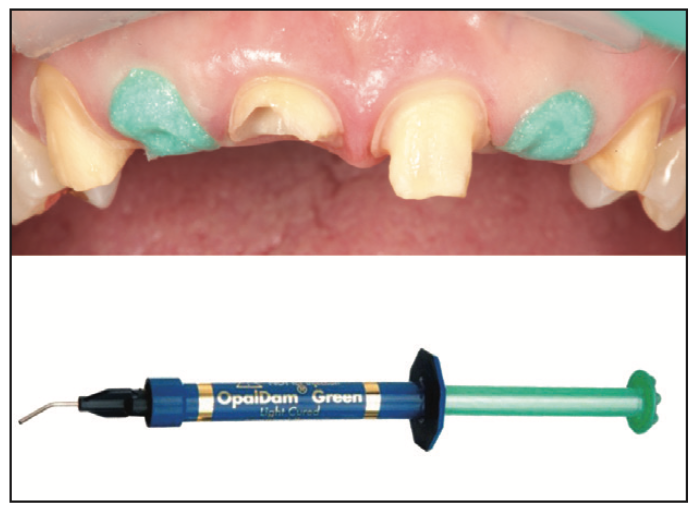
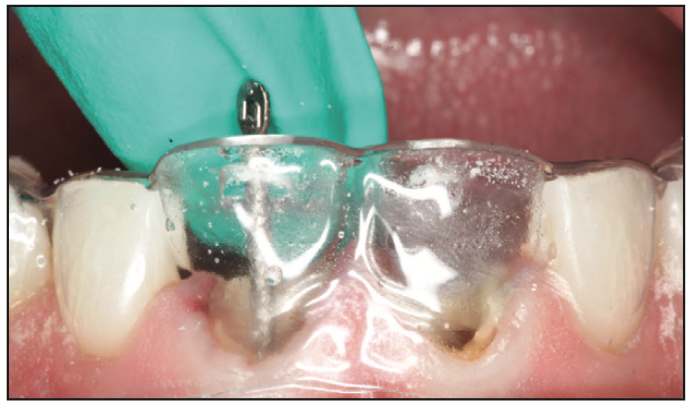
Case 4: Our post placement protocol is the most critical protocol we use in advanced restorative cases, and the substrate to which we will bond must not be compromised. OpalDam Green (Ultradent Products) was used to cover the substrates and post spaces in Nos. 7 and 10 to prevent the products used in the core buildup protocol for Nos. 6, 8, 9, and 10 from touching the substrates and post spaces (Figure 5).
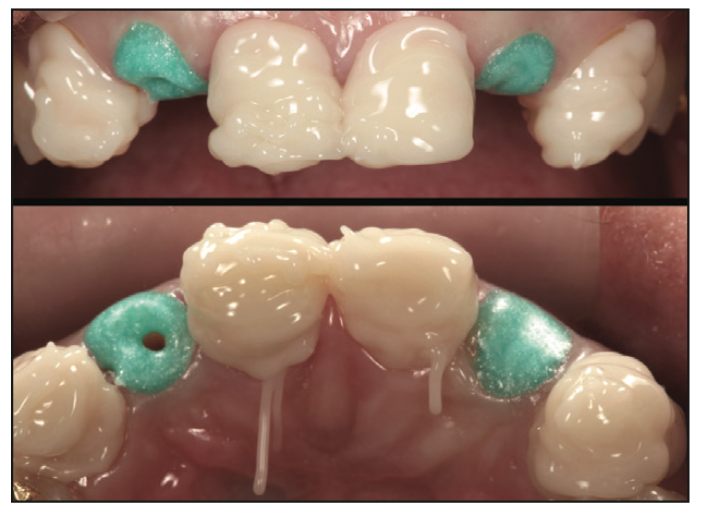
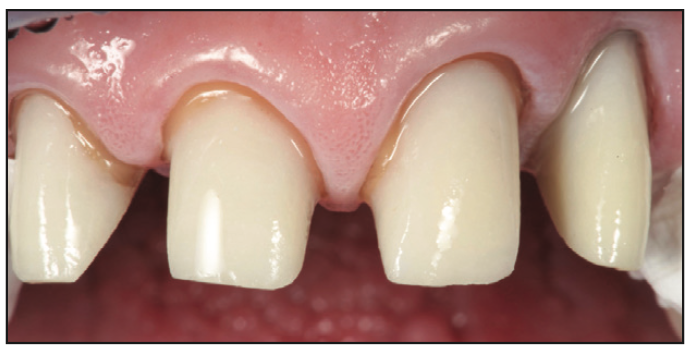
Case 5: Core buildups were done for Nos. 6, 8, 9, and 11. Excessive buildup material was placed to allow preparation of an ideal shape and form and to cover as many open tubules as possible in the vital teeth. Properly done core buildups on vital teeth are like immediate dentin sealing on steroids (Figure 6).
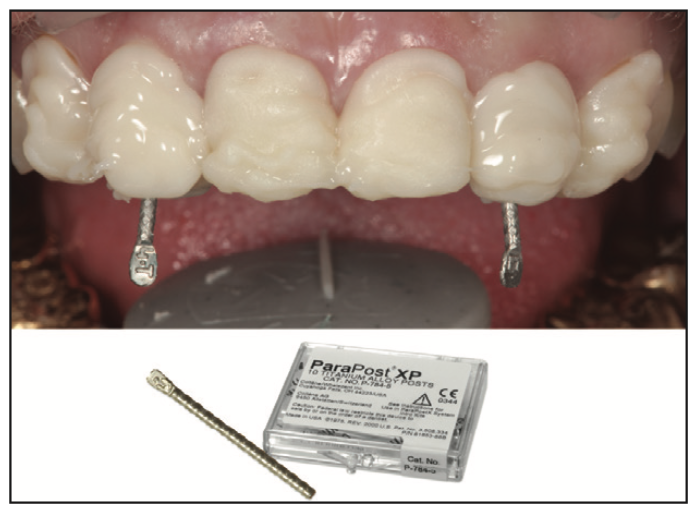
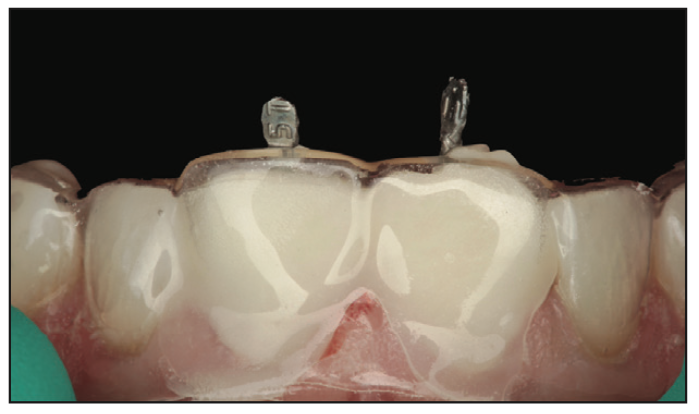
Case 6: Using the Strupp/Brumm protocol, 4.5 Titanium ParaPost XP (Coltene) posts were placed with the chemical cure cement PANAVIA 21 (Kuraray). The core buildups were placed simultaneously with post cementation so that both composites would set together. There is a dot after the 4 and before the T on the post. This indicates a size 4.5 and that the post is titanium alloy (Figure 7).
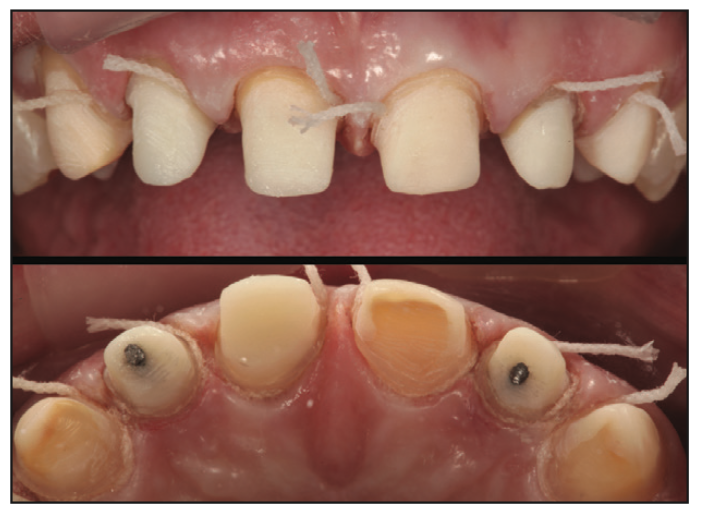
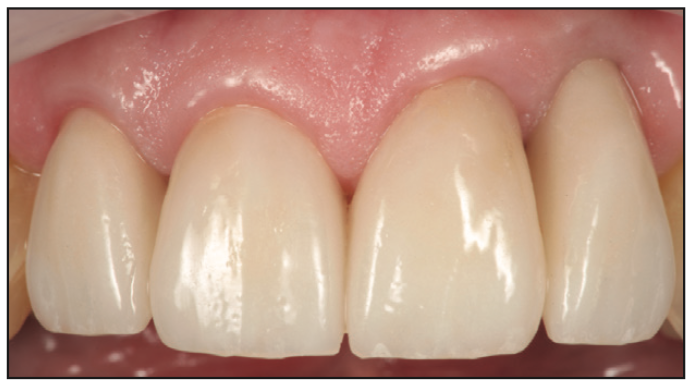
Case 7: Definitive preparations were done. We avoid touching the tissue as much as possible while creating an ideal shape and form to the abutments, which will accept the final lithium disilicate restorations. A single Sil-Trax Epi #00 retraction cord (Pascal) was soaked in Retrax AC (Pascal), blotted, placed, and immediately rinsed after placement on each tooth. Highly acidic hemostatic agents (which all hemostatic agents are) must immediately be rinsed to avoid severe damage to the abutments and necrosis of the tissue. Postoperative sensitivity usually results if these agents are not thoroughly rinsed immediately after use (Figure 8).
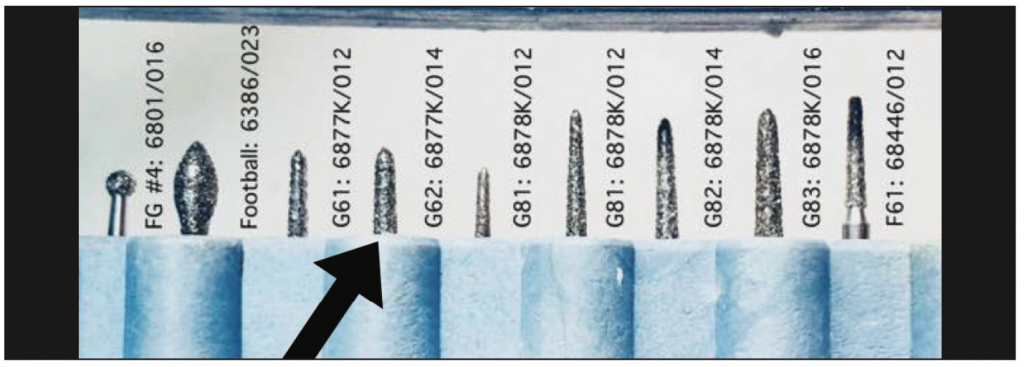
Case 8: The ideal shape to make a perfect chamfer margin is the Diamond Bur #6877K/014 (Brasseler), which has a 55° elliptical radius. The same shape in the Polaris Diamond is #G-62 (Figure 9).
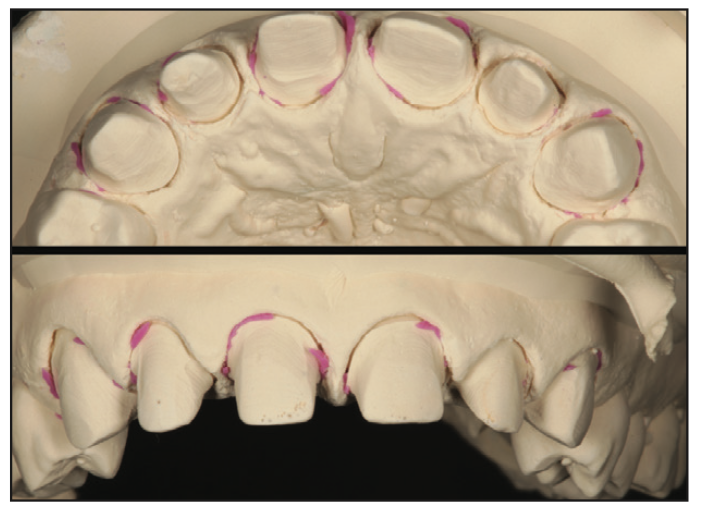
Case 9: A definitive impression using Imprint 4 VPS (3M) was made that recorded unprepared tooth structure apical to the margin along with the entirety of the preps. We believe all margins recorded in an impression must include sound tooth structure apical to them to ensure a perfect fit of the final restoration (Figure 10).

Case 10: The cast from the first pour of the impression is used for dies. A second pour cast is made but not sawed. The second pour cast is used for checking proximal contacts on the final restorations after the soft-tissue zones are trimmed away from the margins to ensure a definitive seat of the final restorations (Figure 11).
Case 11: Provisional restorations that fit perfectly and are cemented with Durelon (3M) are critical for tissue health on the day of final cementation. Patients are seen one week post-op to ensure all provisional cement is removed and the patient is doing appropriate home care and for a scrub with Pure 4% CHG (Best Buy Discount Dental Supply). Controlling the microbiome during the provisional phase is critical for long-term success. Cementing into a pool of blood produces certain failure, and is a disservice to the patient (Figure 12).
Case 12: Durelon sticks to the teeth when the provisionals are removed. Its antimicrobial character keeps vital pulps vital and calm and minimizes the issue of cement sepsis (microbial growth under a restoration). Durelon is easily removed with a SONICflex (KaVo), which leaves black marks on the buildups. Painless anesthesia is always used for definitive cementation because we never want to hurt a patient during the placement process. Without anesthesia, the patient will never refer their friends because we hurt them (Figure 13).
Case 13: Air abrasion with CoJet Sand (3M) removes all of the black marks and residual Durelon. Air abrasion can open a capillary, but that is usually very easy to control by scrubbing the open capillary with Retrax AC, which must be thoroughly rinsed away to avoid compromising the resin cement and substrate to which we will bond (Figure 14).

Case 14: The cosmetic outcome is approved by the patient before definitive placement. Tissue health is mandatory for placement. A Pure 4% CHG scrub 2 days before placement minimizes bleeding, which is caused by a dysbiotic microbiome that invariably forms around margins on provisional restorations near the tissue. The second pour solid cast with the tissue trimmed away is used to confirm perfect interproximal contacts in the laboratory. Adjusting contacts clinically is a time suck and invariably results in loss of patient confidence (Figure 15).
Case 15: All of our patients are taught preventive dentistry techniques, and any bleeding tissue is scrubbed with Pure 4% CHG on a weekly basis until there is no bleeding due to aggressive brushing. This patient received preventive dentistry instructions, 3 scrubs with Pure 4% CHG, and a prophy. The microbiome present at the end of this protocol was symbiotic, and there was no bleeding tissue. The success of any clinical protocol depends on soft-tissue health before, during, and after the using the protocol. Posts or core buildups cannot successfully be done in a sea of blood, nor can cementation be successful in such conditions (Figure 16).
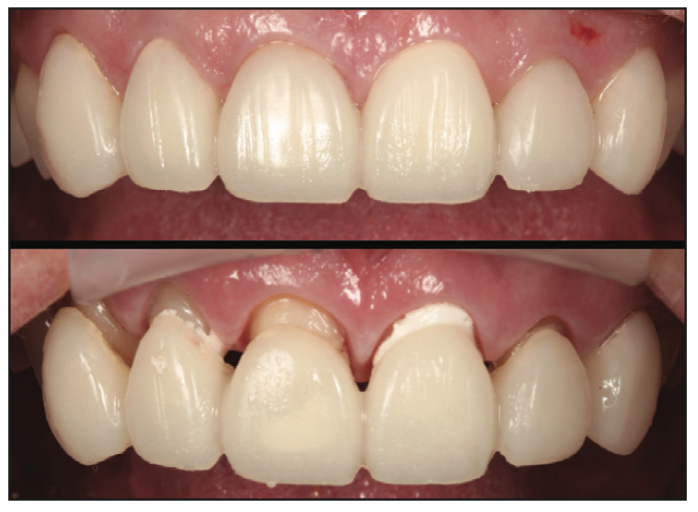
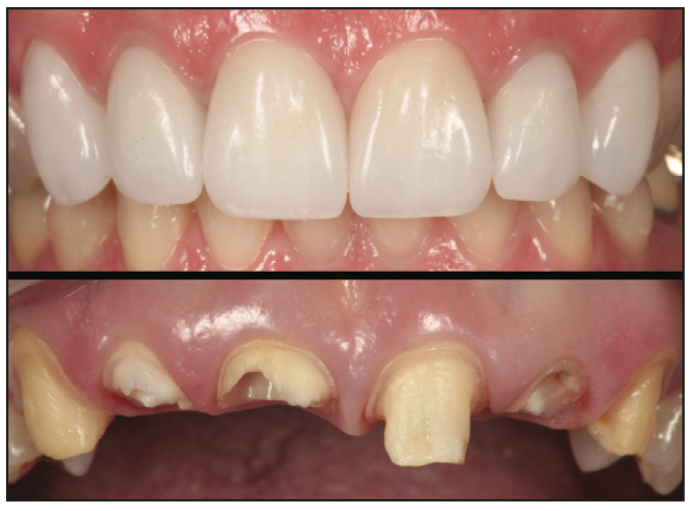
Case 16: The photos before core buildups/post placement and after crown placement were remarkable and were given to the patient. The anterior envelope of function was designed in the laboratory with the weak teeth in mind, and occlusal loading was placed where it could best be sustained by the available biology. Communication with the laboratory and precise placement protocols are critical in cases with weakened biology. The bonding protocols used for post placement and core buildups will make or break a case of this complexity, but they are meaningless unless the occlusal forces are properly distributed (Figure 17).
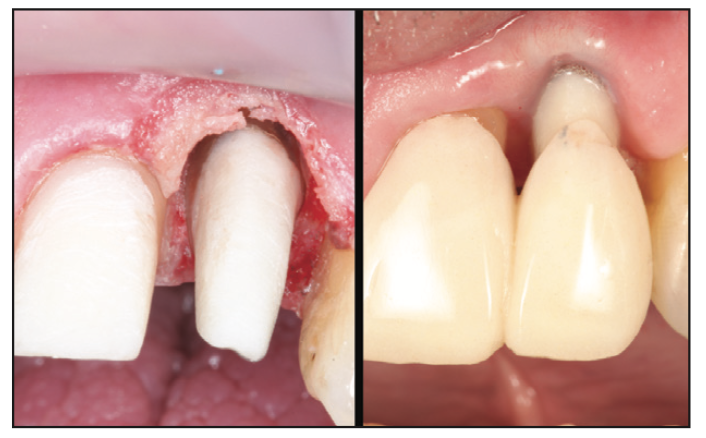
Case 17: When does the implant become the treatment of choice? Should heroic dentistry be done? Every dentist must make this decision and live with the consequences. If a patient says he or she wants to keep the tooth, when do we say no? This patient was in his 80s, and the fee was no object. He just wanted to keep the tooth. I explained the poor prognosis and proceeded to accommodate his wishes (Figure 18).
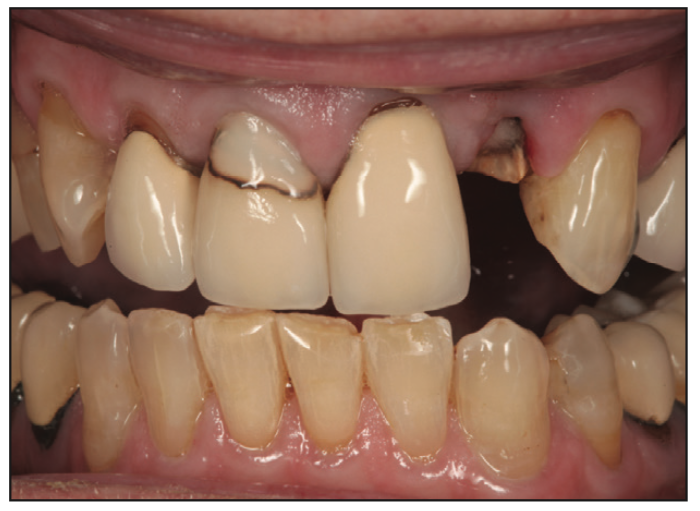
This case will combine many of the issues and treatments discussed here so far. An 88-year-old patient had been keeping a loose post/core/crown in place with denture adhesive for over a year. His dentist was OK with that. He was also OK with the obvious failing dentistry. Go figure? Before I understood proper bonding protocols for core buildups on these vital teeth, I was afraid the core buildup would come out when I removed the provisional. This is an unwarranted fear today because our buildup protocol is bulletproof.
Only a shell of a tooth was left, and decay extended close to the crest of the bone. Removing bone to accommodate a ferrule or to gain crown length to avoid the issue of violation of the biologic width would compromise the bone needed for an implant when one would most certainly need to be done at some point in time for this case. A closed-flap biologic shaping protocol was used instead to allow fabrication of a final restoration with an equigingival margin (Figures 19 and 20).
A post was placed to resist fracture of the core buildup in No. 10, and closed-flap biologic shaping was accomplished with the plan to marginate at the crest of the tissue on core paste after healing. The core buildup on No. 10 was in violation of the biologic width, but it was reshaped along with tooth structure apical to it, then both the prepared root surface and core buildup were highly polished. Core buildups were d one on the vital teeth Nos. 7 to 9. The provisional was made on No. 10 with margins well coronal to the tissue level to allow proper healing. See Figure 21 for what it looked like 1 month later.
He returned 7 months later for re-evaluation. The objective of closed flap biologic shaping is to create an interface between the soft tissue and the core buildup, which was placed in violation of the biologic width in a perfectly dry environment, that can be maintained with good home care and Pure 4% CHG scrubs every 3 months. There is no “attachment” of the soft tissue to the core buildup; rather, there is a hemidesmosomal approximation of the soft tissue to the core buildup, much like what exists with implants. The post will resist fracture of the core buildup and is hidden by it, so metal is not a cosmetic issue when the post is properly contained within the core buildup. Ceramic or resin posts are woefully inferior in resisting fracture of the core buildup on thin teeth. The patient was away for 7 months before we had a chance to finalize the case. Well-made provisionals will enhance healing (Figures 22 to 24).
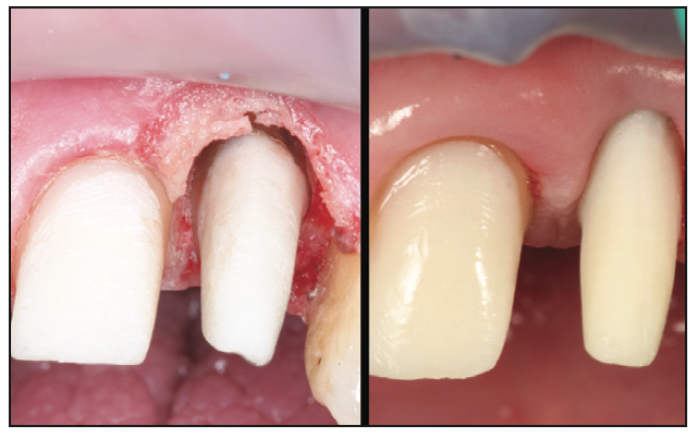
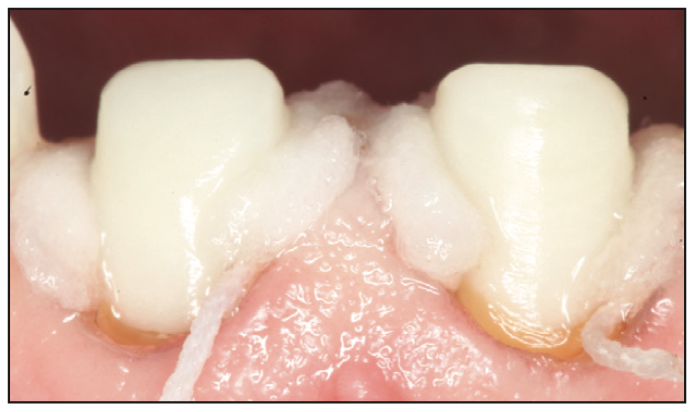
Here is how the case resolved at 2.5 years after placement. The final monolithic Lisi Press (GC) case with equigingival margins placed on the core buildup on No. 10 resulted in perfect tissue health. Clearly, this case is destined to fail if the patient bites into little more than a potato chip, but he has been very careful not to abuse the severely compromised biomechanical situation. Without proper protocols for placement of the post and core buildup and appropriate distribution of occlusal forces, this case would have failed within weeks (Figure 25).
We should mention here that all of our cases, which are either HP 77 gold (Argen) or Lisi Press, are bonded in with PANAVIA F 2.0 (Kuraray). It is the only cement we have used this century to place our restorations (more than 25,000 units).
CONCLUSION
Some final words about our post and core preparation protocol. Correct positioning of a post can be accomplished using a prep shim with a hole drilled just lingual to the incisal edge for the post to exit coronally so it is positioned exactly where is should be to both support the buildup in resisting fracture and be hidden by the core buildup. This keeps the post from being visible. There is simply no need for a “cosmetically” colored post that is too weak to resist fracture (Figure 26). The sequence is critical. The post is placed using our PANAVIA 21 cement protocol, Core Paste XP Enamel (DenMat) is used to displace as much of the cement as possible, the prep shim is seated to guide the post into the correct position before the snap set of Panavia 21 occurs, and the rest of the core buildup is “injection molded” through the hole in the prep shim (Figure 27). The posts then must be properly covered. The prep shim properly positions the posts to aid in resisting horizontal fracture of the core buildup (Figure 28). As a result of following this sequence, no metal shows. The opacity of Core Paste XP Enamel blocks metal easily. Margination subgingivally is necessitated by the discolored roots secondary to long-standing root canals (Figure 29).
We hope we have brought you along on this 50-plus-year journey helping patients with more than 65,000 units and given you all new ways to look at your patients and give them the best possible care.
ABOUT THE AUTHORS
Dr. Strupp was the inaugural speaker at the American Academy of Cosmetic Dentistry (AACD) founding meeting in 1984. He is an Accredited Fellow in the AACD. Fellowship, a select group of fewer than 100 people worldwide, is the highest level of achievement recognized by the AACD. The status of Accredited Fellow of the AACD is granted only after completion of all requirements. He is or has been a member of virtually every meaningful academy in dentistry. Dentistry Today has selected Dr. Strupp as a Leader in Continuing Education in dentistry every year the leaders have been recognized. He has lectured to more than 45,000 dentists and is considered to be at the top of the most elite group of teachers in dentistry. Elite clinical results are routine for the many complex cosmetic and restorative cases he has completed since entering private practice in 1969. He can be reached at [email protected].
Dr. Brumm received his DMD degree from the University of Louisville in 2006. He is an Accredited Fellow Member of the American Academy of Cosmetic Dentistry. He is also former president of the Florida Academy of Cosmetic Dentistry. Dr. Brumm is a certified dental technician. The CDT designation is a great achievement and demonstrates a significant mastery of the knowledge and applied skills needed in dental technology. Dr. Brumm has also lectured nationally and internationally to dentistry professionals on the subject of simplifying complex cosmetic and restorative dentistry. He can be reached at [email protected].
Disclosure: Drs. Strupp and Brumm manufacture and sell Pure 4% CHG.