Compound border modeling for the master impression has been a dreaded experience for the dentist as well as the patient. Even master practitioners with years of experience have dreaded the uncontrollable drips of hot burning compound. By employing the following technique, the dentist or an assistant should be able to apply the compound to the impression tray prior to the muscle trimming chairside. This will reduce the master impression chair time by half, will considerably reduce the mess in the operatory, and in most cases will produce a far better master impression.
In my 50 years of practice and teaching in prosthodontics, I realized that a good lab would provide the assurance necessary to achieve good results chairside. This dependence on lab quality forced me to do most of my own lab work. Doing my own lab work led me to develop techniques that not only gave me the quality I desired but made my chair time simpler, less stressful, and more productive. This technique for compound border modeling is one of many techniques I developed. I developed this technique because I literally hated the insecure feeling of repositioning the tray in the mouth with each addition of compound. I knew that the accuracy of the master impression was vital for the success of a properly fitting denture. With this technique, border modeling the master tray with compound in the mouth can produce this needed accuracy.
Briefly, the accuracy of the impression determines the retentive qualities of the bases of the bite rims as well as the final denture. Retention depends on adhesion and other factors. Without the adhesion the record bases or bite rims will not give accurate records. Without accurate records the occlusion will not allow use of cusped teeth. Cusped teeth must be returned to centric relation on each and every closure. Without accurate impressions you cannot achieve accurate occlusion. Without accurate occlusion the denture is a failure. There will be a loss of adhesion on every closure because of the prematurities in occlusion, which also cause the elusive sore spots and endless adjustments.
TECHNIQUE
 |
 |
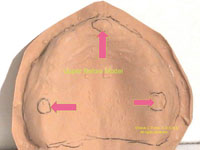
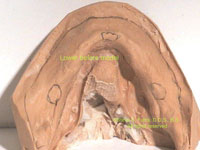
| Figure 1. This is an upper alginate ìbeforeî model used to make the custom impression tray with 3 rest areas marked with red arrows. The black lines around the periphery are drawn where the custom tray is to stop. | Figure 2. Here the relief wax is in place with holes cut out for the 3 rest stops. The red beading wax prevents the acrylic from going into the mucobuccal fold. This mucobuccal space is where the compound will be applied later. Mix enough of the tray material for both the upper and lower in one mix. |
 |
 |
|
Figure 3. Here the tray is applied over the wax relief and just to the beading wax. |
Figure 4. Here the wax relief is removed at the proper time. It is a clean removal with no mess left in the tray. |
 |
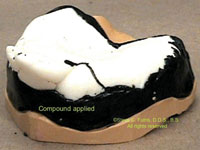 |
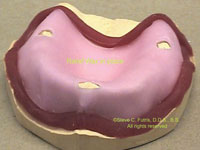
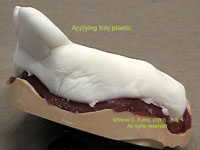
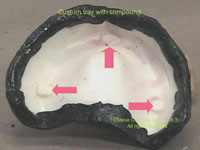
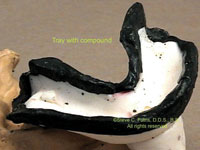
| Figure 5. Here the tray is ready for adding the compound on the model for the muscle trimming in the mouth. Notice how the tray sets up on the ridges. The purpose of the stops is to provide for peripheral space for adding the compound that will be muscle trimmed in the mouth. | Figure 6. Wet the model and add the compound. By adding the compound here on the model, it stabilizes the tray so that it makes muscle trimming far easier in the mouth. |
 |
 |
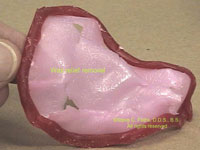
| Figure 7. After applying the compound, use a sharp knife to clean up the inside over extensions into undercuts that would hinder the insertions in the mouth, remembering that nothing should be impinging on the tissues. Notice the red arrows pointing to the pressure stops that will stabilize the tray while muscle trimming in the mouth. | Figure 8. This is a studentís alginate model before the wax is applied. Note the lines applied to make corrections in creating the trayís borders. |
 |
 |
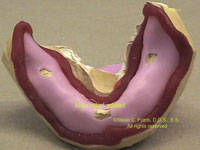
| Figure 9. Wax relief applied to the lower alginate ìbeforeî model. |
Figure 10. Tray plastic applied just to the peripheral beading wax. |
 |
 |
|
Figure 11. Lower tray ready for adding compound on model. |
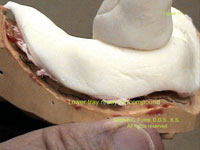
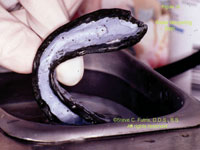
Figure 12. Compound applied to lower tray while on the alginate ìbeforeî model. |
 |
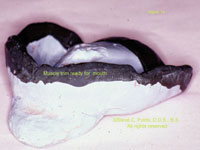 |
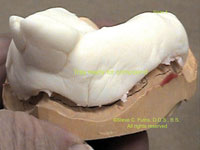
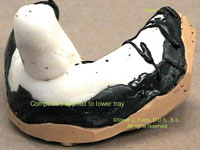
| Figure 13. The inside must be trimmed of any overextensions into any undercut areas that would hinder a smooth insertion. | Figure 14. At this stage you are ready to go chairside. This is the tray with the compound that was added on the model ready for muscle trimming in the mouth. |
 |
 |
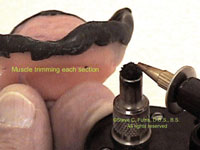
| Figure 15. After applying the compound on the model all the way around, reheat each section, temper it in the water bath, and then muscle trim in the mouth. | Figure 16. After heating each quadrant with the torch, temper that section in the tempering bath before going to the mouth for muscle trimming. |
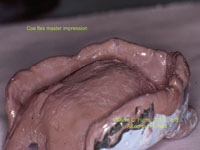 |
| Figure 17. This is a COE-FLEX, a hand-mix rubber material. It is a very accurate impression for a denture. It flows easily. There are no wrinkles, no ridges, and good adhesion. |
CONCLUSION
This article has described a technique for compound border modeling for a master impression. Using this technique, the dentist or an assistant should be able to apply the compound to the impression tray prior to muscle trimming chairside. This will reduce the master impression chair time, reduce the mess in the operatory, and in most cases will produce a far better master impression.
Dr. Futris received his DDS from the University of Tennessee (UT) and bachelorís degree in physical chemistry from the University of Memphis. Originally an art major, Dr. Futris has practiced all phases of dentistry, combining science and art while concentrating heavily on prosthodontics and gnathological mountings. He practiced dentistry full time in Memphis from 1957 until retiring in 2002. Since 1967, Dr. Futris has been a part-time assistant professor in the UT Department of Fixed Prosthodontics. A life member of the ADA, Tennessee Dental Association, Memphis Dental Association, Delta Sigma Delta, Omicron Kappa Upsilon, and Deanís Honorary Dental Societies, Dr. Futris has lectured nationally and internationally, has kept abreast of the latest dental technology, and has received CE awards from 1992 to the present time. He can be reached at (901) 323-2135 or zoeste@bellsouth.net.