
In endodontics the old, smaller shape was better for the tooth than the new large shape (as presented in the cover-featured article for Dentistry Today’s October 2010 issue). It is the inverse for direct restorative dentistry; the old cavity shapes and filling techniques for posterior teeth that we cling to should be discarded.
Part 2: REINVENTING RESTORATIVE DENTISTRY
Posterior Composites: A Troubled History
North American dental schools rapidly integrated changes for anterior composites; most notably the cavity preparations were adapted to the material. Overall, the success in terms of longevity and durability of the anterior composite has been deemed as acceptable. Two factors were key: first, the clear matrix allowing simple, single-phase filling; second was an early recognition by dentists and schools that the cavity shapes would benefit from significant change from the preparation design that was utilized for silicate restorations. Thirty years later, after constant evolution, the modern anterior cavity preparation (with little or no mechanical undercuts and long infinity edge margins) bears little resemblance to the silicate and gold foil preparations that the anterior composite has replaced.
The integration of posterior composites, in comparison to its cousin, the anterior composite, has been a somewhat tumultuous journey. Because of a lack of a regimented cavity shape and filling technique, the posterior composite continues to suffer a somewhat dysfunctional relationship with the dental schools, as many dental schools discourage the placement of posterior composites knowing full well that upon graduation most will place posterior composites on a wholesale basis. In the schools’ defense, the outcome studies, combined with the parade of failing (leaking) composites that they observe, validates the schools’ resistance to embrace the posterior composite.
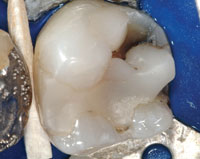 |
| Figure 1. Lower molar with cuspal fracture. Posterior composite placed in a G.V. Black design retentive preparation does not protect the tooth from fracturing any more than amalgam would! |
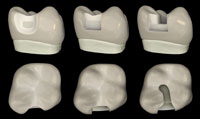 |
| Figure 2. Comparison of Preparation Designs: Comparing the Clark Class II preparation (left), versus the slot preparation (center), versus the G.V. Black “MO” preparation (right). |
The biggest flaws in posterior composites can be easily remembered as the 6 Cs:
- Crack Initiation
- Cure
- C Factor
- Circulatory Insult
- Contacts
- Contamination
The 6 Cs of Class I and Class II restorations present several challenges to the clinician. Currently, accepted techniques for prepping and filling these restorations leaves them prone to leaking, chipping, wholesale fracture, recurrent decay, and, ultimately, higher failure rates when compared to amalgam.1-3 The classic cavity preparation designs, first created by Dr. G.V. Black, represented a significant advance during his day; however, that day was sometime back in 1890. Black’s traditional MOD style restoration, the slot preparation, and other boxy, retentive preparations that are derivatives for posterior teeth; all aggravate the 6 Cs:
C1. Crack Initiation: In spite of the widespread belief that “adhesive resin restorations” strengthen the tooth, we are finally seeing evidence that the accepted cavity shapes weaken the dentition and placement of composite in no way reduces the incidence of cuspal fractures (Figure 1).4
C2 and C3. Cure and C Factor: The practice of applying several separately cured layers of composite in a deep and boxy preparation creates risks for voids, gaps, and seaming between layers. In spite of careful layering, the composite shrinks as the stress builds to potentially create marginal gapping or enamel microfracturing. Table 14-10 features the main 5 reasons to throw out the way we think about cutting and filling a Class II composite. C4 to C6 will be addressed further on in the article.
The Fissurotomy Style Class I Combined with the Clark Class II
The first major change in the modern posterior preparation is disconnecting the occlusal restoration from the interproximal restoration. That statement is the inverse of the way we think about posterior preparations. Unfortunately, many doctors would rather die than change. With all due respect, we may have to wait for a generation of dentists and instructors to retire before we see real change. As discussed above, the traditional boxy shape of a Class II preparation creates sharp internal line angles, promotes crack initiation, and leaves dentin vulnerable to fracture.11 Moreover, this shape of preparation makes the restoration prone to unfavorable composite shrinkage, as the composite shrinks away from opposing walls of the preparation (think of parallel walls as “battling” each other), creating gaps and/or stress.
| Table 1. Five Main Reasons for Changing the Paradigm Regarding Cutting and Filling a Class II Composite | ||||||||||||
|
C4. Circulatory Insult: An unfavorable and rather mindless feature of retentive restorations, whether a classic G.V. Black preparation or a slot preparation, is that they maximize the overall exposed dentin surfaces while minimizing bondable enamel surface area. Consider that there are 10,000 dentin tubules per square millimeter of dentin and that there are no long-term studies showing that dentin bonding will retain its initial seal over the years. The intimate connection of the dentin tubules to the pulp can bring about circulatory insult to the tooth, resulting in pain or, worse yet, pulpal death.
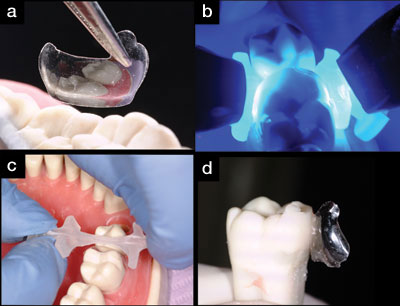 |
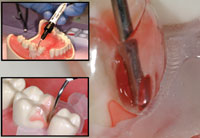
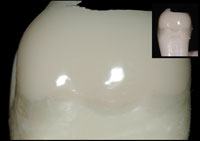
| Figures 3a to 3d. A clear matrix (6.5 mm Average Molar Matrix [Bioclear]) ready for insertion (a), the Interproximator (Bioclear) after being “flossed” into position (b), 2 curing lights used for buccal-lingual light curing (c), and the “extracted” ivorine tooth shown here with the matrix partially peeled away (d). |
With a completely different, not redesigned, preparation that is flat and shallow, the typical C-factor problems are eliminated or mitigated (Figure 2). A saucer-shaped preparation, designed to include an infinity edge (also known as the “Drs. Bob Margeas and Paul Belvedere feather edge”), will avoid the sharp angles found in the traditional preparation. This will also allow the composite to sit on the tooth instead of in it. By using a shallower preparation, the composite resin can be injected in one phase instead of increments, thus saving time and eliminating the risk of gapping between layers, an even more important consideration. The Clark Class II can shift the overall enamel/dentin ratio to the point where we minimize the reliance on the dentin bond, instead securing the restoration with enamel bonding. More dentin tubules are covered with enamel, not resin.
G.V. Black Class II Prep Gave Way to the Slot Prep, and Now the Gopher Hole
So what’s wrong with the gopher hole Class II prep? Well, besides the fact that nobody got permission from those pesky critters to copy their burrowing, the gopher hole has 4 inherent problems. First, it is prone to leak because of poor enamel rod engagement and horrific C factor. Secondly, it can lead to incomplete caries removal and gouging of the neighboring tooth because of poor visualization. The third problem is that it won’t allow light for buccal-lingual curing trough a transparent matrix: this in turn requires multiple layers from gingival to occlusal to allow for full curing. (Bulk filling with the new low-stress flowable composites is not recommended, in spite of what some manufactuers are selling/telling us). Fourthly, the severely undermined enamel rods are not strengthened by adhesive resin composite materials12 and are prone to microfracturing, which leads back to the number one problem…microleakage.
Re-Thinking the Matrix
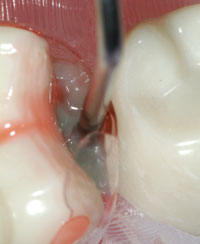
True injection-molded composite resin dentistry requires the use of a new kind of matrix system which utilizes translucent matrices (such as the Bioclear Matrix System). A clear matrix makes it possible to perform buccal-lingual curing, and also facilitate the single-load filling. While traditional metal matrices limit the clinician to light-cure only from the occlusal surface, a translucent matrix allows the composite to be cured from both buccal and lingual angles, in addition to the occlusal. The 2 sides (buccal and lingual) can be cured simultaneously with 2 lights, and even a 7-mm tall preparation can be cured in a single load (as long as it is no deeper than 2 mm in the axial dimension).
 |
 |
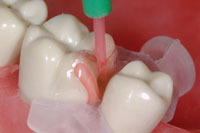
| Figure 4. High magnification view of the bonding resin. (Dyed orange for demonstration purposes only.) |
Figure 5. Several views of the cannula of the flowable composite (Filtek Supreme Plus [3M ESPE] poised to be injected into the pool of uncured bonding resin. |
 |
 |
| Figure 6. Filtek Flowable (dyed green for only for demonstration purposes) is injected into the pool of bonding resin, but not light-cured. | Figure 7. Composite resin paste (Filtek Supreme Ultra [3M ESPE]) is then injected into the flowable composite to act as a “snowplow” or “squeegee” to drive out the lesser resins. (The bonding resin is orange, and the flowable composite is green.) |
 |
| Figure 8. The traditional incremental approach as done with a wedge and metal matrix. |
C5. Contacts: The anatomic features of the Bioclear Matrix achieve shapes that are simply not possible with metal matrices. The more biomimetic shapes of these individually formed and tooth-specific matrices achieve contacts that are much broader in both buccal-ligual and occlusogingival dimensions than we have been able to achieve with traditional wedges and metal matrices. The generous size and correct physiological position of the contact in composite dentistry is just as important as the tightness of the contact. Because teeth come in many shapes and sizes, the Bioclear system has multiple posterior matrices, which nicely eliminates the need to cut and burnish ill-fitting metal matrices.
Balancing the Utilization of Paste and Flowable Composite Resin
Sadly, many dentists who have ventured into minimally invasive and nonretentive posterior preparations report to me that they quietly went back to G.V. Black preps because the fillings started falling out, or, they simply could not pack the filling material into the organic style cavity prep. The Clark Class II exacerbates that problem, as it is shaped like a saucer instead of a hole; and because paste composite is so heavy, it doesn’t easily flow into deep areas. To address the above problem, practitioners often make the mistake of relying too heavily on flowable composites, which have at least 3 inherent weaknesses. First, flowable composites are more prone to shrinkage than are paste composites, and the new claims of reduced stress don’t fix flowable’s other shrinkage related problems. Secondly, flowables are typically not as strong as pastes. Thirdly, flowable composite near the cavo-surface is more prone to wear than paste composite. Dr. Pascal Magne has repeatedly demonstrated that enamel replac
ement should be engineered to recreate the hard, stiff “helmet”-like porcelain, or to a slightly lesser degree, paste composite, provides. In addition to being too soft, flowable composite is not as biomimetic as paste composite because it is too flexible. That said, flowable composites can be extremely useful when applied in moderation. By marrying flowable composite with paste, the practitioner is able to mitigate the shortcomings of flowable while maximizing its superior handling characteristics.
Injection Molded Dentistry—Dawn of a New Era?
(Please note that the brevity of this article precludes a full explanation of injection molding.)
Many, many dentists that I talk to have quietly been performing injection molding of one sort or another for years, and with great success. We are certainly a resourceful group. Injection molding (process patent pending) recommends that before beginning the technique, if a significant amount of dentin is exposed, that dentin is either covered with glass ionomer or dentin bonding agents, essentially “basing up” the tooth. The next step of injection molded composite resin dentistry technique (Table 2) calls for first applying a bonding resin to both the previously covered dentin and freshly etched enamel inside the matrix, then injecting a flowable composite into the pool of bonding resin, and then finally injecting the paste composite. The flowable is essentially squeegeed out the sides of the prep. No condenser is used. The resin-flowable-paste continuum is polymerized together in a single lightcure. The clinician should aim for the paste composite to make up 80% to 90% of the overall volume of the filling, while flowable should account for 10% to 20%. With traditionally boxy preps and the new low stress flowables, it is common to see restorations with 50% to 70% of the overall volume made up by flowable composite. That amount (greater than 25%) of flowable can be a liability for the dentist and patient, as our observations lead us to believe that these volumes can contribute to unacceptably high rates of marginal ridge fracture and complete filling dislodgement, not to mention problems with poor contacts. Another concern of this recent marketing blitz, or “Low-Stress Flowable 4 mm Bulk Fill Revolution” is that a large percentage of the external surface of the restoration is now built from the softer flowable composite which is at the mercy of the hygienist’s scaler and the patient’s toothbrush.
| Table 2. Injection Molding Technique Steps Using the Bioclear Matrix System | |||||||
|
In order for the reader to see the clear difference between the injection molding process with the Bioclear matrix and traditional incremental loading with a metal matrix, 2 ivorine teeth were restored with each technique (Figures 3 to 9a). Note that for the injection molding technique, excess bonding agent (dyed orange) and excess flowable composite (dyed green) were purposely placed in this case and yet the final view demonstrates how effectively the paste composite displaced almost all of the lesser filled resins. Four problems are evident in the traditional preparation (Figure 9b): First, there is excessive flowable composite (green) with the aforementioned shortcomings. Second, there is a seam between the flowable and the paste. Third, the finish is not as smooth as the injection molded method because metal matrices have a much rougher surface, especially rough with a burnished matrix, than does the Mylar surface and the resultant composite surface. Fourth, air thinning the resin (which is required of most bonding agents) drives it past the margins, leaving a gingival margin that is not light-cured because the metal matrix blocks the light, which is then prone to dissolution and an eventual void. The wicking process begins rapidly as bacteria creep between the tooth and the composite. Not surprisingly, a recent study showed the composite group to have a staggering 3.5 times higher secondary caries rate when compared the amalgam group.13 Further dooming the result is the ever present biofilm at the gingival margin. Add it all up: A mass of poorly filled resins laying on biofilm and a sharp margin (that composite hates), with little hope of light curing at and just apical to the matrix-tooth margin interface.
All is not lost! There are 2 ways to best describe the Injection Molding technique; first is to compare it to seating a porcelain onlay. With a porcelain onlay, the bonding resin is not cured separately and the resin cement is squeezed laterally, the excess cement cleared away, then the complex (porcelain, resin cement, bonding resin) is cured all at once. The second example is found when impressioning, where the heavy body impression material (stronger but doesn’t flow well or wet the tooth easily) displaces much of the light body material (weaker but wets the tooth easily).
C6. Contamination: Poorly cured resin (see above) interfacing with biofilm at the gingival margin is one very large problem with posteri
or composites. Make sure to view the video posted at dentistrytoday.com for tips on cleaning and abrading the gingival margin before filling. A coarse lightning strip works like a charm!
A BRIEF CASE REPORT
The Clark Class II and Injection Molding Technique Clinical Case Presentation
 |
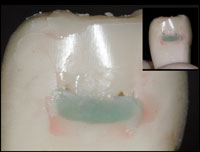 |
| Figure 9a. Depicted here are low- and high-magnification views of the seamlessly smooth and predominately paste composite result of the Bioclear matrix as done with the injection molding technique. | Figure 9b. Shown here are low- and high-magnification views of the usual result found after incremental loading of a Class II using a metal matrix: excessive percentage of flowable composite (green) with increased polymerization shrinkage; a seam is observed between the flowable and the paste composites, a less than smooth, rough finish, and a gingival margin that is incompletely (light) cured. |
 |
 |
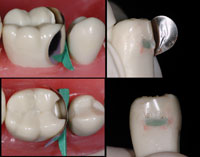
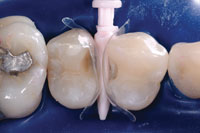
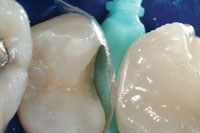
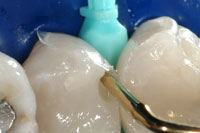
| Figure 10. Medium (left) and small (right) Clark Class II saucer preparations. Note the 45º cut through enamel. | Figure 11. High-magnification view with bicuspid matrices (Bioclear) and a Sabre Wedge (Bioclear). Note the infinity edge margins which compliment the 45º cut through enamel. |
 |
 |
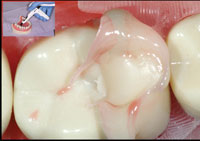
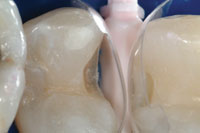
| Figure 12. Injection molding is completed on the first tooth (right), and the internal aspects of the tooth are “based up” with bonded and cured Filtek Supreme Ultra Flowable composite. | Figure 13. The small Interproximal “well” should be rounded and smooth. It should also have significant taper, thus allowing for seamless second-stage injection molding. |
 |
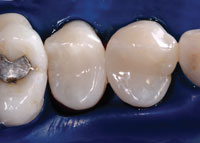 |
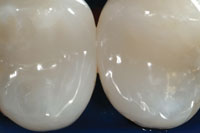
| Figure 14. Magnification view, at 8x, of postoperative result. Tooth splinting plus leak and stain and wear resistance require a change in cavity design, first and foremost. | Figure 15. Low-magnification view. Mirror-like finish was achieved using polishing tips especially designed for composite resins (such as Jazz polishers [SS White Burs] or Shape and Shine [Clinician’s Choice]). |
A 45-year-old woman presented with interproximal decay on the distal of tooth No. 12 and mesial of tooth No. 13. I started the saucer shape with a fresh original fissurotomy bur (SS White Burs) and finished with a fine needle diamond (Shofu PN848F) (Figure 10). These preparations allow beautiful visualization, especially when paired with high-level magnification. I noticed a slight gap in the wedge/matrix adaptation (Figure 11) and changed from the medium to the large Bioclear Sabre Wedge which significantly improved the gingival seal (Figure 12). When the contact area of the matrix does not line up naturally to the proximal tooth or when the interproximal seems to be deeper than 2 mm in the axial dimension (and depth of cure is questioned) a small well is formed with a round-ended instrument (Bioclear C2) (Figure 13). That instrument is then withdrawn slightly from the composite and the matrix is pressed firmly against the proximal tooth while light curing. The completed change in both the Class II preparation and the filling techniques allows an ideal integration of the Filtek Supreme Ultra Flowable (3M ESPE) and Filtek Supreme Ultra Paste (3M ESPE) composite, and a “bulletproof” margin that is free from white lines (Figures 14 and 15). Preliminary studies show ideal resistance to marginal ditching with this overhaul of the Class II. The final nail in the coffin of the parallel sided/retentive prep is marginal ditching. The wear resistance of the Clark Class II saucer and Calla Lily preparations show superior marginal wear resistance in SEM analysis when compared to a 90° cavity wall, whether
or not the 90° wall is beveled at the cavo-surface.
SUMMARY
As is the case in other paradigm shifts, the biggest impediment to progress in posterior composites may be simply an emotional one…the fear of change. The move away from boxy, retentive preparations is exciting. However, this transition will be difficult to achieve without dramatic changes in cavity design, matrixing, and filling techniques. “Halfway” techniques may lead to frustration and failure. And lest I forget, a microscope or high powered loupes is a cornerstone of tooth colored dentistry.F
Suggested Reading and Further Study
Please visit Dentistry Today’s video library for the injection molding technique and for other articles on the subject (dentistrytoday.com). You are also encouraged to consider attending one of Dr. Clark’s hands-on courses.
References
- Van Nieuwenhuysen JP, D’Hoore W, Carvalho J, et al. Long-term evaluation of extensive restorations in permanent teeth. J Dent. 2003;31:395-405.
- Sjögren P, Halling A. Survival time of Class II molar restorations in relation to patient and dental health insurance costs for treatment. Swed Dent J. 2002;26:59-66.
- Mjör IA, Dahl JE, Moorhead JE. Placement and replacement of restorations in primary teeth. Acta Odontol Scand. 2002;60:25-28.
- Wahl MJ, Schmitt MM, Overton DA, et al. Prevalence of cusp fractures in teeth restored with amalgam and with resin-based composite. J Am Dent Assoc. 2004;135:1127-1132.
- Lindberg A, van Dijken JW, Hörstedt P. In vivo interfacial adaptation of class II resin composite restorations with and without a flowable resin composite liner. Clin Oral Investig. 2005;9:77-83.
- Efes BG, Dörter C, Gömeç Y, et al. Two-year clinical evaluation of ormocer and nanofill composite with and without a flowable liner. J Adhes Dent. 2006;8:119-126.
- Ernst CP, Canbek K, Aksogan K, et al. Two-year clinical performance of a packable posterior composite with and without a flowable composite liner. Clin Oral Investig. 2003;7:129-134.
- Flowable composites: laboratory test methods. ADA Professional Product Review (Online). Spring 2009;4:2. ada.org/sections/scienceAndResearch/pdfs/0904_ composites_testmethods.pdf. Accessed September 28, 2010.
- Hilton TJ, Quin
n R. Marginal leakage of Class II composite/flowable restorations with varied cure technique. J Dent Res. 2001;80(special issue):Abstract 0502. - Opdam NJ, Roeters JJ, Deboer T, et al. Voids inside restored micropreparations using various resin composites and application techniques. J Dent
Res. 2002;81(special issue A):Abstract 3132. - Clark DJ, Sheets CG, Paquette JM. Definitive diagnosis of early enamel and dentin cracks based on microscopic evaluation. J Esthet Restor Dent. 2003;15:391-401.
- Latino C, Troendle K, Summitt JB. Support of undermined occlusal enamel provided by restorative materials. Quintessence Int. 2001;32:287-291.
- Bernardo M, Luis H, Martin MD, et al. Survival and reasons for failure of amalgam versus composite posterior restorations placed in a randomized clinical trial. J Amer Dent Assoc. 2007;138:775-783.
Dr. Clark is a general dentist and pioneer in biomimetic microendodontics and minimally traumatic restorative microdentistry. He can be reached at [email protected] or visit the Web site lifetimedentistry.net.
Disclosure: Dr. Clark is the inventor and owner of the Bioclear Matrix System. For further information visit Bioclear Matrix Systems at the Web site bioclearmatrix.com or at (253) 961-4935.


