


INTRODUCTION
Patients considering porcelain veneers to improve their smiles frequently express concern about conventional treatment modalities that require the removal of healthy tooth structure in order to achieve a highly aesthetic outcome.1 However, misunderstandings among dental professionals regarding the ability of no-preparation or minimally invasive porcelain veneers to achieve ideal aesthetics, as well as concerns about proper emergence profiles and periodontal complications as a consequence of over contouring the teeth, are often overriding apprehensions for prescribing these restorations.2,3 Although the vast majority of patients receiving porcelain veneers today are treated with traditional veneer-preparation approaches, there are a significant number of patients who can benefit from veneer options that do not remove any tooth structure or that require a very minimal amount of enamel contouring.4
The majority of instruction for porcelain veneer treatment focuses on traditional tooth preparation for delivering pressed or milled ceramics. However, with proper case selection and occlusal management, practitioners can use combinations of feldspathic and lithium disilicate restorations to deliver unprecedented aesthetics with conservative techniques in cases involving changes to the vertical dimension of occlusion (VDO). The case presented here addresses the treatment protocol for handling aesthetics and function to deliver 22 units of no-preparation porcelain restorations to a patient who is looking to improve her smile without drilling her enamel.
CASE REPORT
A 29-year-old female patient presented for a consultation to improve her smile. Her main concern was the minimal amount of tooth display when smiling. In addition, she wanted a brighter and fuller smile and said that “natural” results were also important. An evaluation of the patient’s labiodental dynamics, including repose position, revealed only 1.0 mm of central incisor tooth display at rest and canine exposure of – 2.0 mm from the inferior border of the lip. For incisal lengths, the canine position is considered the most ideal starting position. The canine should be +/- 1.0 mm from the border of the lip in the repose position.5 The mobility of the upper lip was less than average, resulting in less tooth display when resting and smiling.6 Tooth relationships revealed larger incisal embrasure spaces than the patient preferred and alignment concerns with the maxillary and mandibular incisors. Pictures also revealed minor chipping of lower incisors and a constricted pattern of wear on the facials of the more facially positioned lower incisors. The mandibular anterior teeth were retroclined to fit in an angle Class III malocclusion with the maxillary teeth.7 The patient presented to the office wanting veneers to correct the concerns for her smile (Figures 1 to 4).

Figures 1 to 4. The patient presented to the practice unhappy with the lack of tooth display when smiling and wanted veneer restorations to give her a fuller, more natural smile. Consultation images revealed open incisal embrasures, uneven central incisors, retroinclined mandibular incisors, and minimal central incisor edge display.
Evaluation and Occlusal Adjustment
The patient’s aesthetic goals could only be predictably achieved by understanding the role occlusion played in her aesthetics. In the author’s opinion, practitioners frequently choose stronger restorative materials to react to a patient’s current occlusion rather than understand and treat an occlusal imbalance and select more aesthetic, conservative materials and restorative techniques. Since the patient’s unstable occlusion was creating pathway wear in her natural dentition, lengthening her maxillary teeth in such a constricted occlusion might have had deleterious effects on the muscles of mastication, TMJ, and future restorations.8 Discussion with the patient regarding treatment goals led us to present a treatment plan for upper and lower veneers in order to create a more ideal smile and also control the occlusal imbalance with the new aesthetics. Her VDO would need to be opened with the TMJ in centric relation position in order to reduce the constriction of the anterior teeth and create restorative space for no-preparation ceramic restorations while simultaneously achieving a bite relationship to idealize the occlusal pathway.9,10
The patient received a full exam, including dento-functional analysis, multiple images, and digital intraoral scanning. A Kois Deprogrammer was prescribed, and her dental arches were scanned (iTero [Align Technology]). The scans were uploaded to the laboratory for design and delivery of a 3D-printed deprogrammer. The patient was instructed to wear the deprogrammer for 2 weeks. Deprogrammers work by disrupting the proprioceptive feedback pathway that coordinates mandibular closure in the patient’s current dental contact relationship. While wearing a deprogrammer, the elevator and depressor muscles work in coordinated muscle activity to allow for a centric relation position to be achieved without interference of premature tooth contacts (Figure 5).11 Because patients who have a constricted envelope of function could potentially deprogram with the mandible in a more forward position, it is wise to use deprogrammers that are passive and allow the complete freedom of the mandible to find the position for ideal occlusal relationships.7,8
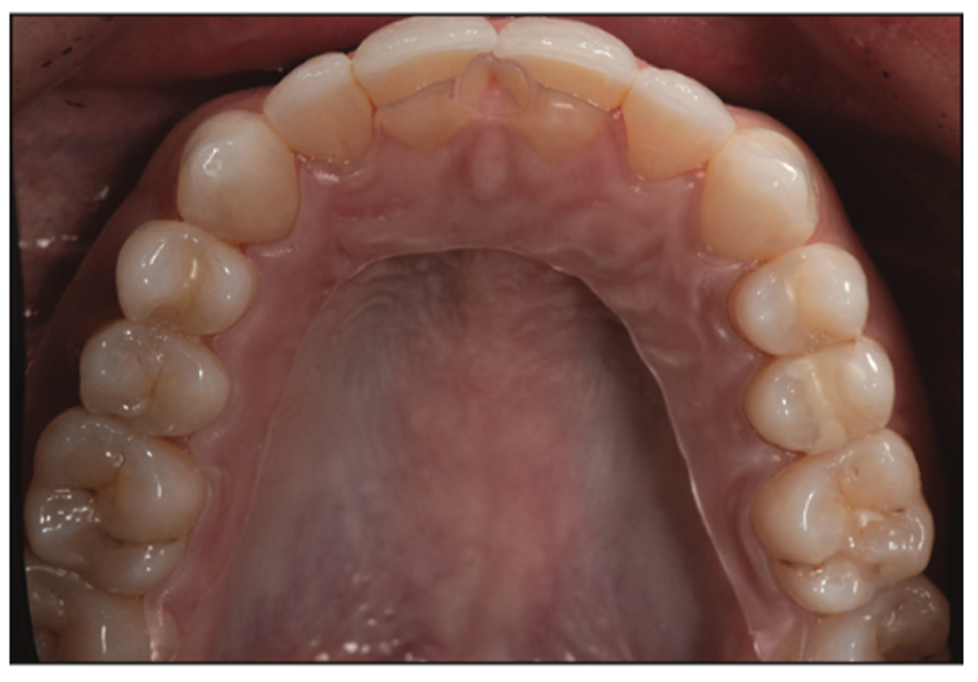
Figure 5. A Kois Deprogrammer was prescribed to deprogram the muscles of mastication, allowing for only one centric stop on the deprogrammer.
The patient returned after 2 weeks and was instructed to leave the deprogrammer in the mouth the day of her next appointment. Her tooth-to-occlusal-table contact was checked for repeatability with articulation paper (TrollFoil [TrollDental]), and the relationship of the upper to lower teeth was scanned as an open-bite centric relation record and sent to the laboratory for digital designing of the upper and lower restorations in centric relation.
Additive Mockup
At the laboratory, the images were used in CAD digital design software to align the 3D scans with the patient’s full-face photos. The smile design software was used for digital tooth manipulation to achieve predictable aesthetic results and to create 3D printed models of the smile design as well as a polyvinyl siloxane (PVS) transfer matrix.12 The smile design is done by the technician with care to only deliver to the dentist and patient what can be predictably recreated in porcelain in an additive technique13 for the anterior maxillary and mandibular restorations. The maxillary and mandibular scans were virtually mounted, and the vertical dimension opened 2.75 mm. This would allow for 1.5 mm of clearance on the first molars. Lower posterior teeth could be designed with ideal occlusal anatomy and still respect minimal thicknesses of the pressed no-preparation lithium disilicate restorations.
The technician made a PVS template of the mockup for the upper and lower dentition that was used at the patient’s next appointment to transfer the prototype to the patient’s mouth.
Preparation and Final Impressions
At the preparation appointment, bisacryl material (Luxatemp BL [DMG America]) was used to create upper and lower overlays on the natural teeth using the transfer matrix from the additive design mockup provided by the laboratory (Figure 6). This step enables the dentist and patient to establish and confirm the final aesthetics and functional relationship before taking final impressions of the teeth for the fabrication of ceramic restorations. Once the occlusal relationship was confirmed, molar control bites were taken with a hard bite material (Futar D [Kettenbach LP]). When the upper and lower intraoral mockups were removed, these molar control bites maintained the interarch relationship by taking an anterior bite while the posterior bites were in place. Using a PVS material (Virtual [Ivoclar Vivadent]), perfect master impressions were taken of the upper and lower teeth with no retraction cord placed.
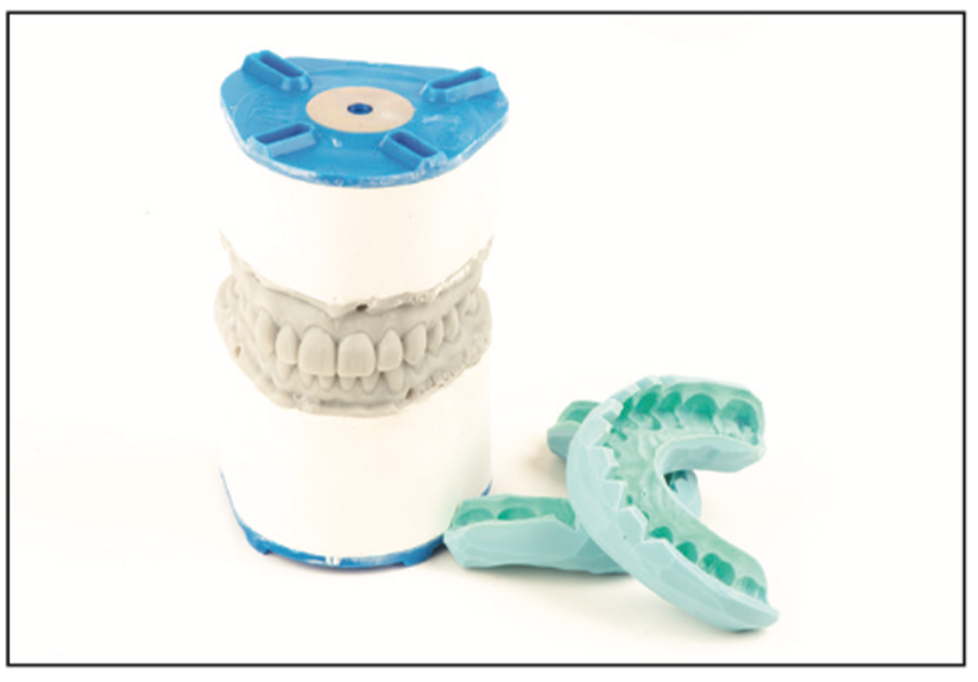
Figure 6. A polyvinyl siloxane (PVS) template of the mockup was made by the technician for the upper and lower dentition and used to transfer the prototype to the patient’s mouth to test drive the proposed final restorative solution.
Provisionalization
Using the shrink-wrap technique,14 provisional restorations were created to give the patient the ability to test drive the aesthetics and functional relationship of the restorative solution.14 First, the upper provisionals were created using the PVS transfer matrix created by the laboratory. Once they were trimmed and the flash was removed, the molar control bites were returned to position. A new anterior bite was taken to record the upper provisional restorations’ position in relation to the preoperative lower dentition. This bite would assist the technician in cross-mounting the case on an articulator (PCH [Panadent Corp]) where the pre-op and provisional models can be interchangeable at the same restorative position. Next, the lower provisionals were fabricated using the same method and then trimmed and adjusted for occlusion. Both the upper and lower provisionals were contoured and trimmed with a needle diamond (DET9F FG, 135F31.014, and 8392.31.016 FG [Brasseler USA]) and hand-polished using intraoral composite polishers (FLDC5-5M and FLDC5-5M Diacomp Feather Lite [Brasseler USA]). Following polishing procedures, the provisionals were tinted and modified with white and gray tints at the incisal edges and the bodies of the teeth (Creative Color [Cosmedent]), then glazed (Palaseal [Kulzer]). The application technique for these body modifications was done with horizontal movements using a composite brush (#3 dental composite brush [Cosmedent]) to create fine textures on the provisionals while being careful not to apply a layer that was too thick, which would create an unnatural appearance (Figure 7).
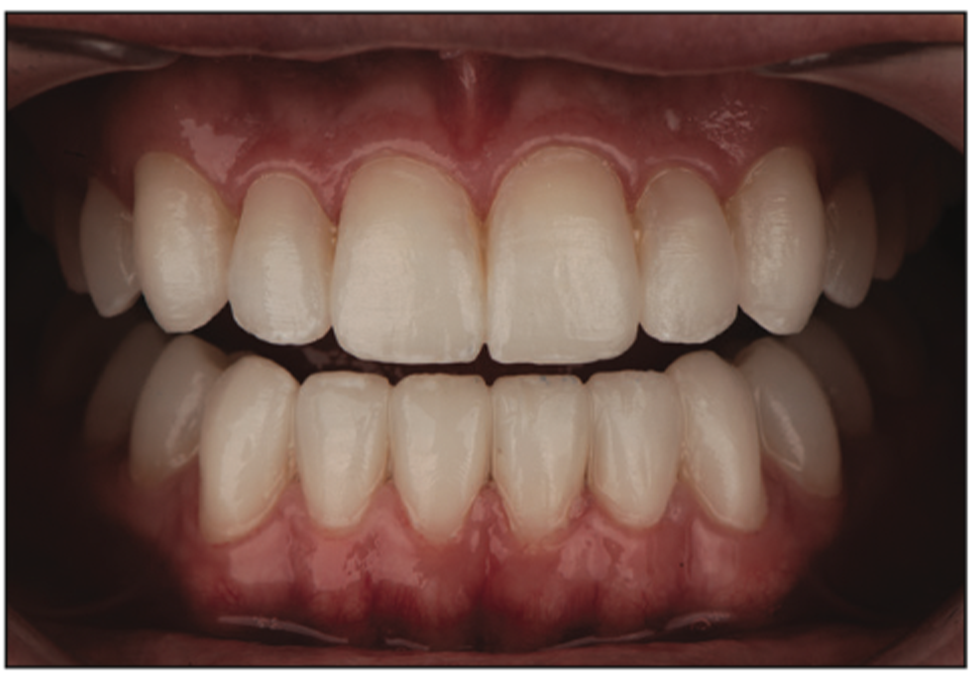
Figure 7. Care is taken to trim, polish, and modify the provisional restorations to create a prototype of the final restorations. This gives the patient and dentist an opportunity to copy or make changes of an approved prototype before the final res- torations are fabricated by the ceramist.
The upper and lower provisionals were scanned, and a face-bow (AD2 EZBow [Advanced Dental Designs]) was taken of the patient with the provisional restorations. Images were captured in the studio, and all the records were sent to the laboratory technician for ceramic fabrication (Figure 8).
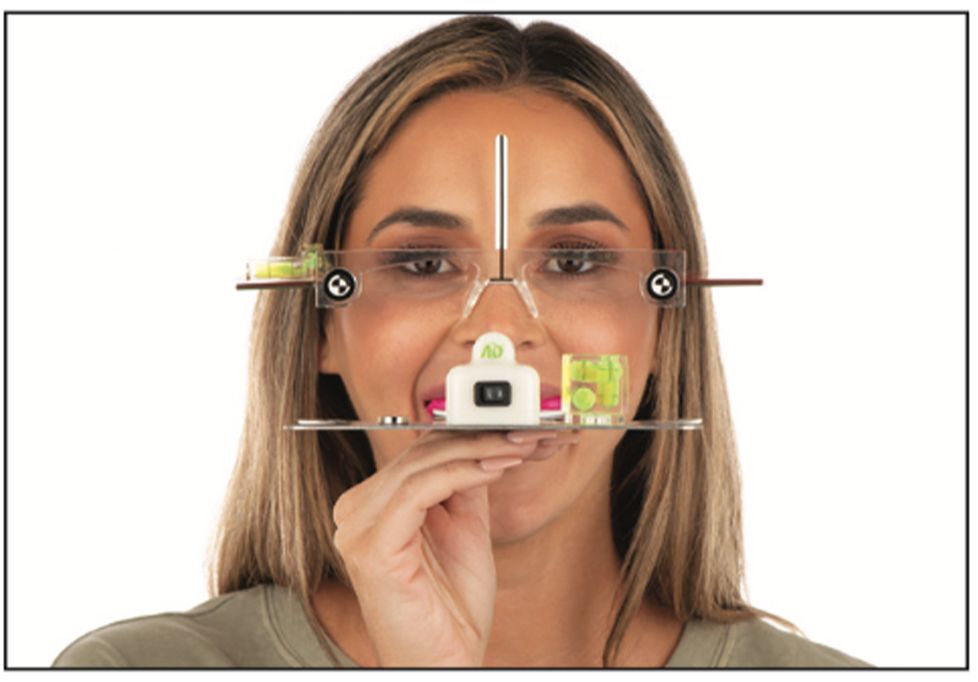
Figure 8. The upper and lower provisionals were scanned, and a face-bow was taken of the patient with the provisional restorations to send to the laboratory for final fabrication of the veneers. Recording the true aesthetic plane was facilitated with bubble levels and lasers on the AD2 face-bow in conjunction with Kois Facial Reference Glasses.
Laboratory Procedure
The fabrication of the restorations required a restorative material that provided excellent aesthetics and exceptional strength even at the minimal thicknesses that were required to duplicate the approved provisionals. There are numerous restorative materials that can be utilized depending on functional and aesthetic concerns. Improvement in the VDO allowed for the fabrication of feldspathic veneers for all maxillary teeth and the fabrication of anterior mandibular teeth (IPS Style [Ivoclar Vivadent]) using the platinum foil technique. Mandibular posterior teeth were fabricated with lithium disilicate porcelain (IPS e.max Press [Ivoclar Vivadent]), which is an ideal material for strength and aesthetics. It can be bonded to the existing posterior teeth, ensuring high compressive strength (500 MPa) while also offering superior optical properties.15
The laboratory, using the series of bite records, cross-mounted the models on a semi-adjustable articulator (PCH). The porcelain veneers closely followed the shapes of the provisional design, with slight enhancements that were done by the ceramist, and were delivered to the practice.
Cementation
At the seating appointment, the provisional restorations were removed, and the teeth were cleaned with non-fluorinated prophy paste (Ultrapro Tx [Ultradent Products]) and 2% chlorhexidine antibacterial solution (Consepsis [Ultradent Products]). The veneers were tried in one at a time for fit and 2 at a time to check contacts. The upper restorations where all tried in together with neutral color try-in paste (Variolink Esthetic [Ivoclar Vivadent]) to evaluate the overall look of the restorations.
Once evaluation of the veneers took place, and the aesthetics were approved by the dentist and patient using mirrors and pictures taken in the studio, the veneers were removed and prepared for cementation. In a holding container (Veneer ME [Smile Line USA]), the veneers were initially cleaned using a universal cleaning paste (Ivoclean [Ivoclar Vivadent]), then rinsed and dried (A-dec Tooth Dryer [A-dec]), and a ceramic primer (Monobond Plus [Ivoclar Vivadent]) was used, followed by a hydrophilic adhesive resin (ExciTE F [Ivoclar Vivadent]), and thoroughly air dried with moisture-free and oil-free air (A-decTooth Dryer) (Figure 9). A retraction cord was placed to control sulcular fluid and allow for moisture-free cementation. Under split dam isolation, each tooth was etched with a phosphoric acid etch total-etch technique (Total Etch [Ivoclar Vivadent]) for 15 seconds, then rinsed and dried for 15 seconds. A hydrophilic adhesive resin (Adhese Universal [Ivoclar Vivadent]) was placed for 20 seconds per tooth and air-dried to remove residual solvent and then light-cured for 5 seconds per tooth (Bluephase PowerCure [Ivoclar Vivadent]) (Figure 10).
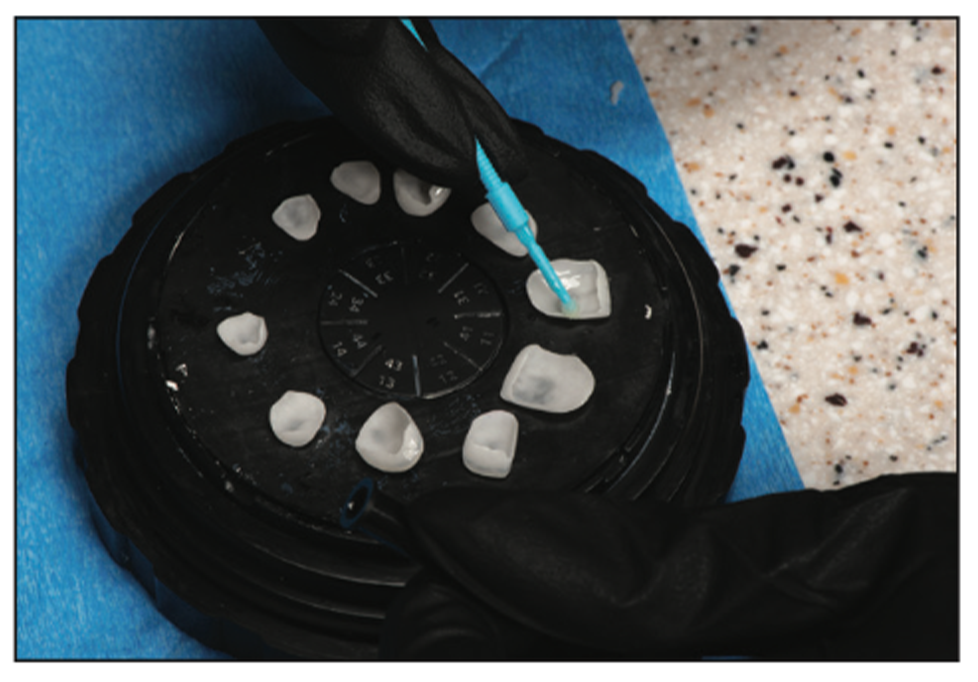
Figure 9. After porcelain try-in and patient approval, the ceramics were prepared for final cementation.
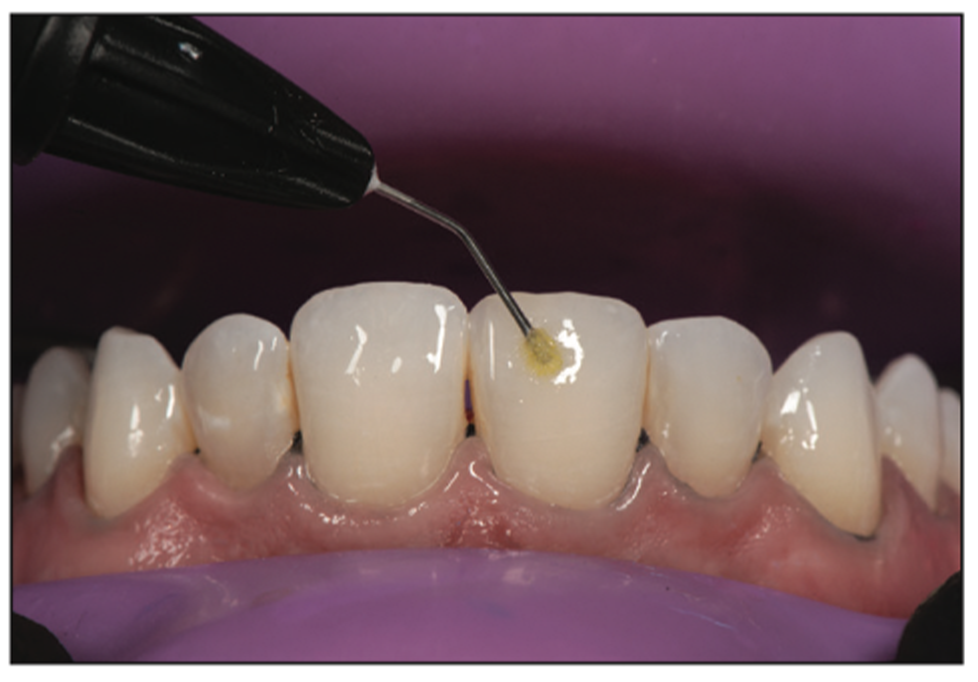
Figure 10. The teeth were isolated using the split dam technique to allow for moisture control while the teeth were prepared with the total-etch adhesive technique.
The prepared veneers, which had been prefilled with the correct light-cure cement shade (Variolink Esthetic) and kept in a light-protected container (Veneer ME), were gently placed on each maxillary tooth starting with the central incisors and finishing with the second bicuspids (Figure 11). Each veneer was carefully held in place (OptraSculpt [Ivoclar Vivadent]) while being tacked in place with a 2-mm tacking tip (Figure 12). Once the veneers were tacked into place, a curing light (Bluephase PowerCure) was used to soft set the cement and allow for easy cleanup. The cement was peeled off, and the proximal contacts were flossed. Residual cement was removed proximally with a scalpel. The margins were covered with glycerin gel (Liquid Strip [Ivoclar Vivadent]), and each veneer was cured from the facial and lingual for 20 seconds to complete polymerization. The retraction cord was removed, and margins were checked with an explorer to remove any ledges and then polished with a red needle diamond (Brasseler USA), followed by a white-striped 30-fluted carbide (Brasseler USA). Further contouring of ceramics around gingival margins took place to feather out porcelain, creating a seamless blend to the tooth surfaces at the gumline.
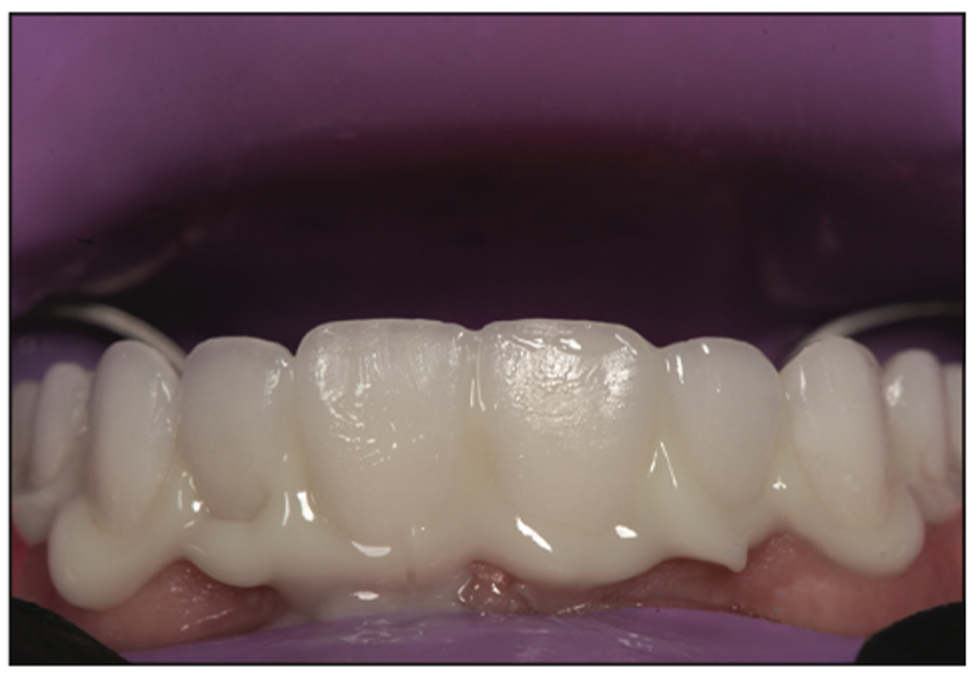
Figure 11. All maxillary veneers were seated one at a time, starting with the centrals, to verify the seat and aesthetics prior to tack curing each unit into place.

Figure 12. The tack cure technique enabled each veneer to be held into place with incisal and facial pressure while the assistant cured the center of the veneer using a tack tip light guide for 1 to 2 seconds.
After seating the upper restorations, the lower provisional restorations were removed, and the final restorations were tried in using the same method detailed above. The occlusion was verified for proper contacts prior to bonding the lower restorations (Figure 13).
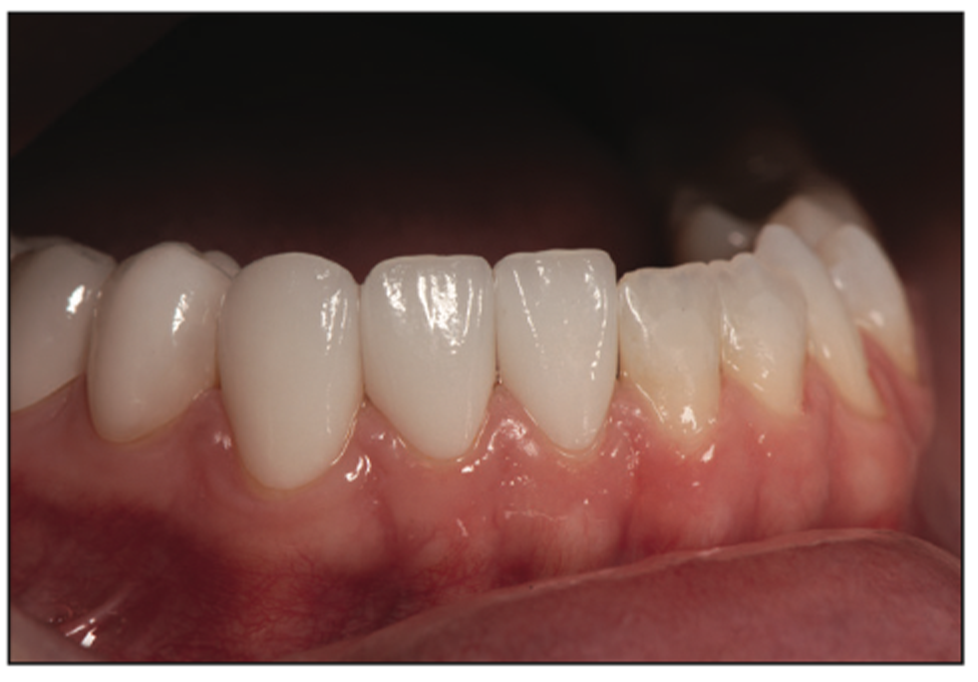
Figure 13. Lower veneers are tried in to verify aesthetics, fit, and occlusion prior to final cementation. An image was captured during the try-in of the lower veneers to highlight the change in proclination and length of the lower incisors created with the anterior feldspathic veneers.
The patient returned in one week for a postoperative appointment to check and make final adjustments to occlusion for proper centric stops and all excursive movements (Figures 14 to 18).
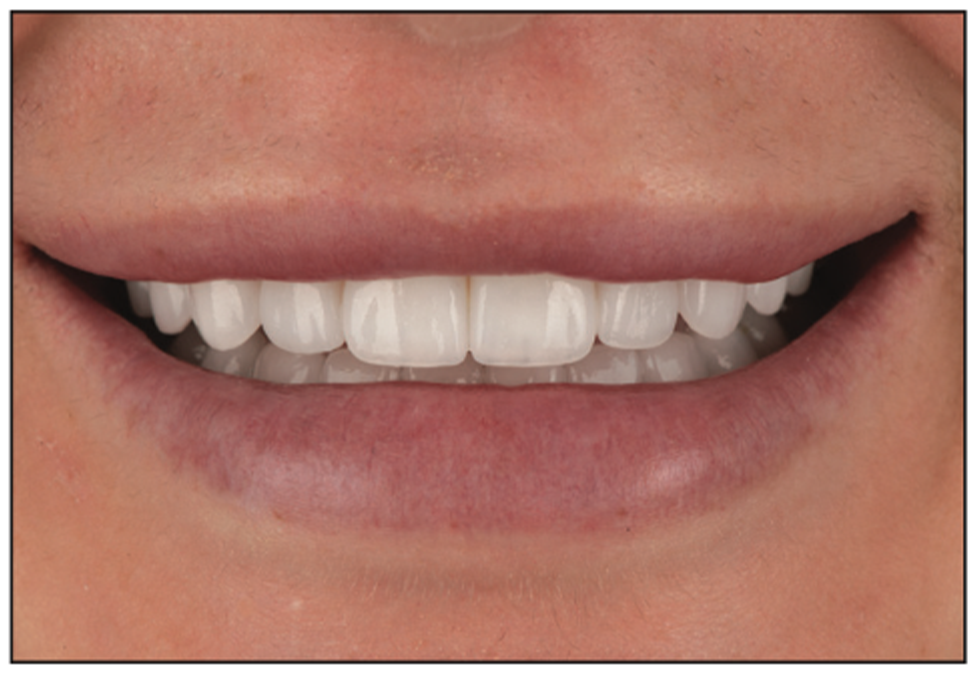
Figure 14. Postoperative view: The smile was brighter and fuller and created a “natural look” for the patient.
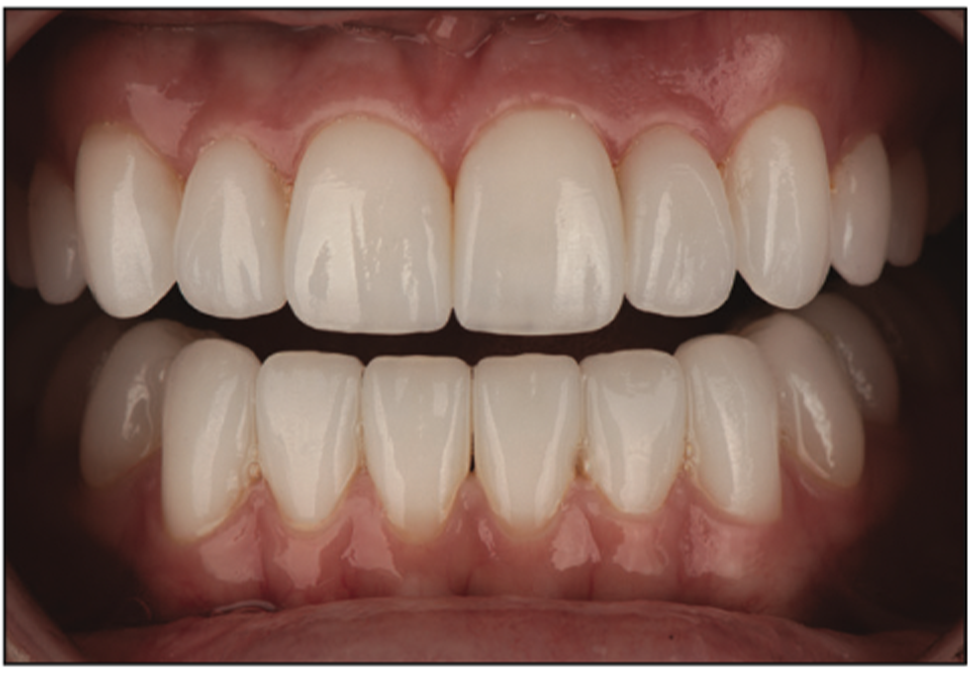
Figure 15. Retracted view of the final veneers, highlighting the new length of the teeth and integration of the no-preparation veneers into the gingival areas. The teeth now look straight, and ideal lengths were achieved while correcting the retroclined angles of the mandibular teeth.
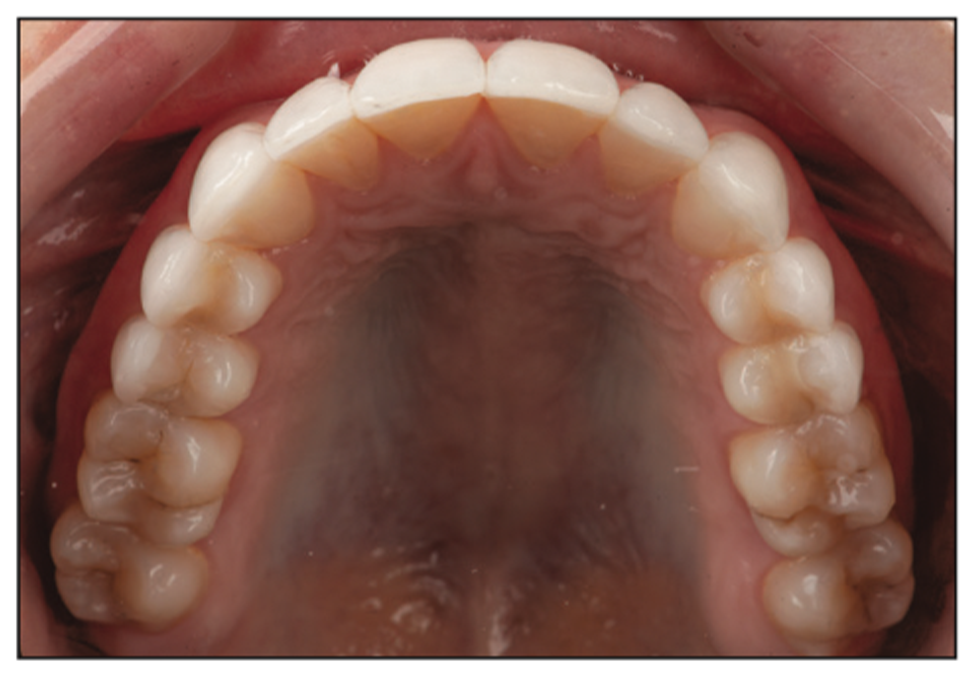
Figure 16. The maxillary occlusal view demonstrates how the no-preparation maxillary feldspathic veneers were bonded to the facial and incisal surfaces of the existing teeth.
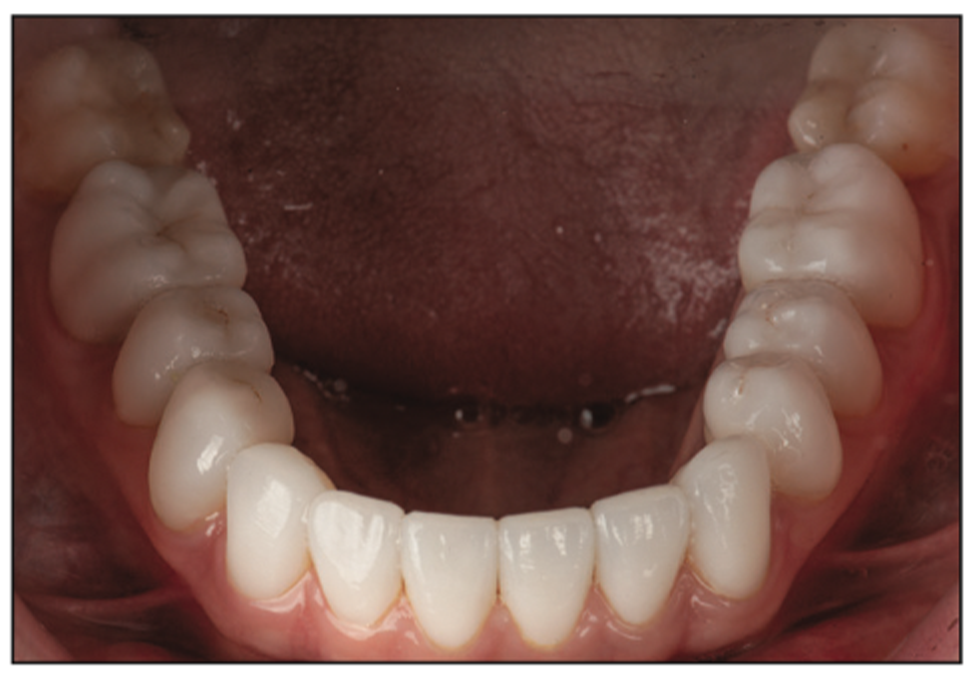
Figure 17. The mandibular occlusal view shows the feldspathic anterior veneers and the pressed posterior overlays that were used to increase the vertical dimension of occlusion without drilling the teeth.

Figure 18. The patient, sharing her new, confident smile in a photoshoot with the restoring dentist.
IN SUMMARY
With the correct knowledge and case selection, it is possible to provide porcelain veneers for patients with little to no drilling on their teeth. It is far more common for practitioners to resort to traditional veneer preparations in the majority of porcelain veneer cases. This case highlights the potential for prepless veneers to be fabricated for upper and lower teeth while increasing the VDO of the patient. It is common for dentists to believe that prepless veneers will yield less-than-satisfactory results in terms of aesthetics and durability; however, with proper protocols and material selection, it is possible to obtain lifelike results with no drilling on patients’ natural teeth.
ACKNOWLEDGEMENTS
The author would like to thank technicians Nelson Rego and Juan Rego of Smile Designs by Rego for their contributions to this case.
REFERENCES
1. Edelhoff D, Sorensen JA. Tooth structure removal associated with various preparation designs for anterior teeth. J Prosthet Dent. 2002;87(5):503–9. doi:10.1067/mpr.2002.124094
2. LeSage B. Establishing a classification system and criteria for veneer preparations. Compend Contin Educ Dent. 2013;34(2):104–12, 114–5; quiz 116–7.
3. Calamia JR, Calamia CS. Porcelain laminate veneers: reasons for 25 years of success. Dent Clin North Am. 2007;51(2):399-417, ix. doi:10.1016/j.cden.2007.03.008
4. Javaheri D. Considerations for planning esthetic treatment with veneers involving no or minimal preparation. J Am Dent Assoc. 2007;138(3):331–7. doi:10.14219/jada.archive.2007.0165
5. Misch CE. Guidelines for maxillary incisal edge position-a pilot study: the key is the canine. J Prosthodont. 2008;17(2):130–4. doi:10.1111/j.1532-849X.2007.00259.x
6. Tjan AH, Miller GD, The JG. Some esthetic factors in a smile. J Prosthet Dent. 1984;51(1):24–8. doi:10.1016/s0022-3913(84)80097-9
7. Sondhi A. Anterior interferences: Their impact on anterior inclination and orthodontic finishing procedures. Semin Orthod. 2003;9:204–15.
8. Isberg AM, Isacsson G. Tissue reactions of the temporomandibular joint following retrusive guidance of the mandible. Cranio. 1986;4(2):143–8. doi:10.1080/08869634.1986.11678139
9. Calamita M, Coachman C, Sesma N, et al. Occlusal vertical dimension: treatment planning decisions and management considerations. Int J Esthet Dent. 2019;14(2):166–81.
10. Fradeani M, Barducci G, Bacherini L, et al. Esthetic rehabilitation of a severely worn dentition with minimally invasive prosthetic procedures (MIPP). Int J Periodontics Restorative Dent. 2012;32(2):135–47.
11. Jayne D. A deprogrammer for occlusal analysis and simplified accurate case mounting. J Cosmetic Dent. 2006;21(4):96-102.
12. Coachman C, Calamita MA, Sesma N. Dynamic documentation of the smile and the 2D/3D digital smile design process. Int J Periodontics Restorative Dent. 2017;37(2):183–93. doi:10.11607/prd.2911
13. Magne P, Magne M. Use of additive waxup and direct intraoral mock-up for enamel preservation with porcelain laminate veneers. Eur J Esthet Dent. 2006;1(1):10–9.
14. Gurel G, Morimoto S, Calamita MA, et al. Clini cal performance of porcelain laminate veneers: outcomes of the aesthetic pre-evaluative temporary (APT) technique. Int J Periodontics Restorative Dent. 2012;32(6):625–35.
15. Bakeman EM, Rego N, Chaiyabutr Y, et al. Influence of ceramic thickness and ceramic materials on fracture resistance of posterior partial coverage restorations. Oper Dent. 2015;40(2):211–7. doi:10.2341/12-459-L
ABOUT THE AUTHOR
Dr. Olitsky is a 2001 graduate of the Temple University School of Dentistry, a past president of the Florida Academy of Cosmetic Dentistry, and an accredited member of the American Academy of Cosmetic Dentistry. He is the Program Director for the Clinical Mastery Series. He teaches aesthetics, occlusion and photography courses with The Clinical Mastery Series. Dr. Olitsky is on the editorial review board for The Journal of Cosmetic Dentistry. He publishes on various topics of cosmetic dentistry, has appeared in numerous national beauty and health magazines, and serves as a product consultant for dental product companies. He maintains a private practice in Ponte Vedra Beach, Fla. He can be reached at jason@smilestylist.com.
Disclosure: Dr. Olitsky reports no disclosures.


