


INTRODUCTION
Endodontic treatment involves many dependent procedures that are done in a consecutive manner. Each procedure is dependent on the preceding procedure having been done correctly. If and when one procedure fails, the subsequent procedure will either be more difficult to do, or it will also fail. Taken all together, this makes the endodontic treatment both difficult and time consuming for the dentist. In this article, some of the more common procedural failures that ultimately may lead to treatment failure will be discussed.
Endodontic Anatomy
One primary cause of failure is a lack of understanding or knowledge of endodontic anatomy. This commonly leads to not finding canals and, consequently, not treating those canals. A lack of treatment usually results in an infection of that canal and the tooth, leading to endodontic failure. Two fairly commonly occurring anatomical procedural errors can happen when finding the MB2 canal and in determining how many canals are present and where they are located in mandibular bicuspids.
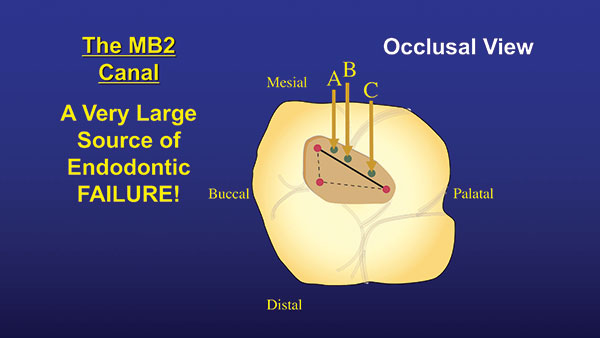 |
| Figure 1. The MB2 canal can be found a little mesial of a line drawn between the mesial and palatal canals. The canal is either in the A, B, or C position. |
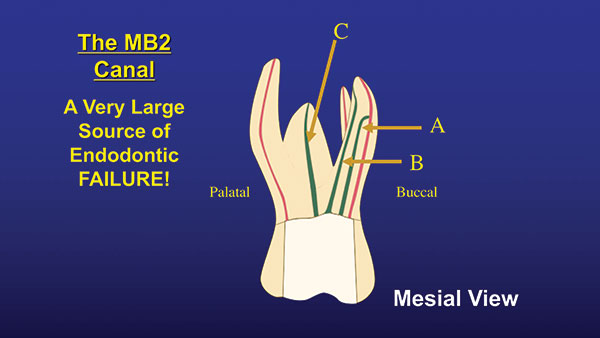 |
| Figure 2. Locations of the 3 orientations of the MB2 canals. |
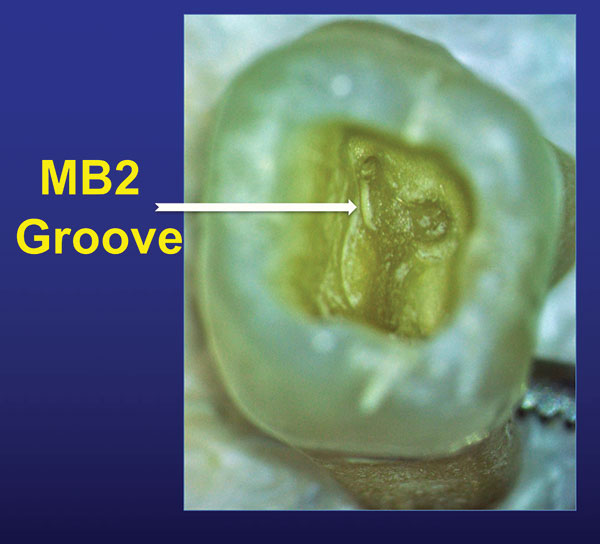
Finding the MB2 is difficult because it does not show up on a regular periapical (PA) radiograph. Until recently, it was found only by clinical “feel.” However, with the technological advancement of CBCT, the MB2 can easily be seen on radiographs, and we can at least know if it is there or not. Once you establish that the canal is there, where do you look? It can be found by drawing an imaginary line between the MB and palatal canals. The MB2 canal will be found slightly mesial of this line, somewhere fairly close to the MB canal. It is usually within 3.0 to 5.0 mm of the MB canal (Figure 1). Depending on where it is found, it can have one of 3 orientations. In the “A” position, it usually merges with the MB canal, and the 2 canals have a common apex. If it is found in the “B” position, the MB and the MB2 are separate, and each canal has its own apex. If it’s in the “C” position, there is actually a separate MB2 root located between the MB and palatal roots (Figure 2). If there is a groove coming off the MB canal, the MB2 most often will be found in that groove (Figure 3).
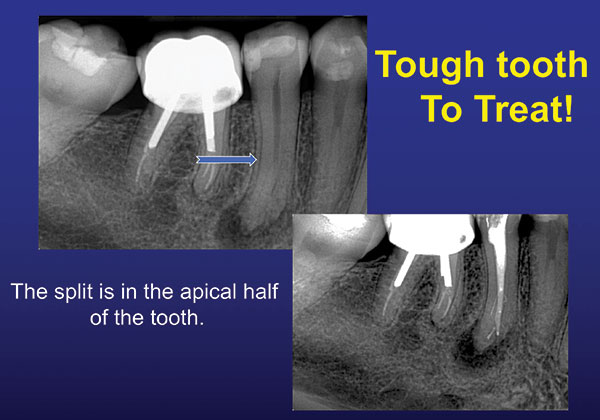
Anatomically, mandibular bicuspids can be very tricky. They can often be one of the most difficult teeth in the mouth to treat. This all depends on whether the canal splits and where along the length of the canal the splitting occurs. Luckily for us, this does show up on an ordinary PA radiograph and, of course, on a CBCT scan. If one sees a large coronal canal that either disappears somewhere down the root or becomes very thin, it means the canal is splitting into 2 or possibly 3 canals at that point (Figure 4). The closer the canal splits to the apex, the more technically difficult the case becomes to treat. If the canal splits in the apical third of the root, watch out. It may be best not to treat this case and to refer it to an endodontist. Figure 5 shows a case in which the canal splits in the apical half of the tooth. Not only does it split down low, but it splits into 3 canals. This is a very difficult case for endodontic treatment.
 |
 |
| Figure 3. Many times, the MB2 will be found within a shallow groove near the MB canal orifice. | Figure 4. If there is a large coronal canal and then it disappears or gets very small, it is splitting at the level where it changes. |
Irrigation
Irrigation is a key step during endodontic treatment and can easily lead to procedural error. The problem is that mechanical debridement only removes 35% to 50% of the debris in the canal.1-3 How do we get the rest out and kill the bacteria that are living in the canal and the tubules? The other problem is that there is no one irrigant that can accomplish all that is needed during irrigation. So, when do we use what? The only irrigant that dissolves soft tissue is sodium hypochlorite. I like using it right out of the bottle at roughly 6%. It will lose its oxygen and potency after about 3 months when kept under the sink. If fresh, it will have its characteristic smell and be slightly greenish in color. Refresh it in the canal often and keep it in contact with the canal as long as possible. Hypochlorite works much better if it is warm rather than at a cooler room temperature. I like to use hypochlorite from the beginning of instrumentation up until using the last 2 instruments. During use of the last 2 instruments, I switch to Irritrol (Essential Dental Systems [EDS]). Irritrol is a combination of EDTA and chlorhexidine (CHX). It eliminates using 2 separate solutions and does all the same work in one solution. The EDTA removes the smear layer and opens the tubules. This permits the CHX to kill the bacteria in the tubules very quickly. CHX is one of the few compounds that will kill Enterococcus faecalis (a leading cause of endodontic failures). Sodium hypochlorite will not consistently kill this bug. Once instrumentation is complete, passive ultrasonic irrigation (PUI) with hypochlorite and the EDS #6 PUI tip (EDS) is used to remove whatever debris is left in the canal and kill whatever bacteria are still remaining in the canal. The tip has a flat area at its apex, which acts like a paddle to dramatically increase cavitation of the hypochlorite (Figure 6). The entire irrigation sequence can be seen in Figure 7. Note: Always wash out the canal and access opening with sterile water or anesthetic solution after finishing with the use of sodium hypochlorite. This will prevent a precipitate from forming when sodium hypochlorite comes in contact with either EDTA or CHX.
 |
| Figure 5. The split is in the apical half. This is technically difficult to treat. |
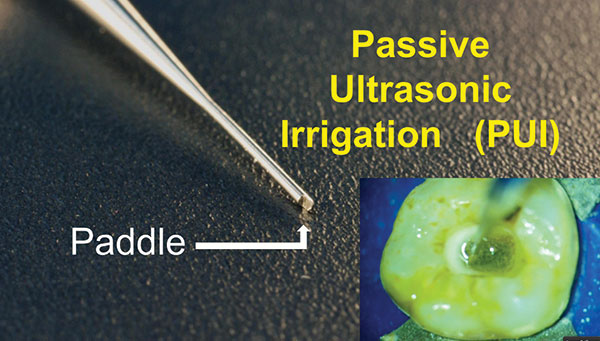 |
| Figure 6. The paddle, developed specifically for passive ultrasonic irrigation (PUI), enables the tip to create an extreme cavitation of the irrigating solution. |
 |
| Figure 7. Irrigation timeline, detailing when to use what. |
 |
| Figure 8. Example of a puff of epoxy EZ-Fill Xpress (Essential Dental Systems) sealer past the apex and resorbing over a 6-month period. |
Underfills and Overfills
We do not want to underfill the canal with gutta-percha (GP), and we do not want to overfill the canal with GP. So where is the sweet spot? The literature is replete with articles showing that the sweet spot is not the radiographic apex, and yet so many institutions teach this. What is going on? The literature shows that between 66% to 88% of the time, the anatomic apex does not coincide with the radiographic apex.4,5 On average, the anatomic apex (the point at which the neurovascular bundle enters the root) is between 0.0 to 2.0 mm short of the radiographic apex. Therefore, for the highest rate of endodontic success, you should place the GP at the anatomic apex. This can only be determined using an apex locator. Usually, when determining the working length with an apex locator, the GP will appear to be 0.0 to 2.0 mm short of the radiographic apex. Believe the apex locator, and you will have more successful cases and fewer returning patients with postoperative problems.
Obturation procedural errors can also be greatly reduced by using a simpler technique that allows you to reliably place the GP where you want it and not have it move. The simplest filling technique is single-cone GP with an epoxy sealer. Christensen6 asks the question, “Obturation in Endodontics: Are Newer Techniques Better?” He shows that all the filling techniques, from hot GP to single-cone, have about the same overall success rate.6 In my opinion, if all techniques have approximately the same success rate, then why not use the easiest, most repeatable, most operator-friendly technique: single-cone GP and epoxy sealer? I do, using EZ-Fill sealer (EDS) and EDS Gutta Percha. The specially designed bidirectional spiral spins the sealer down the canal without the sealer going past the apex, eliminating overfills of sealer that can slow, or even stop, apical healing. The epoxy sealer is initially antibacterial; sticks to everything; and, if it inadvertently goes past the apex, does not cause pain. It also resorbs in about 6 months to one year, depending on the patient (Figure 8). I prepare the apex to a 30/.04 dimension and use an EDS 25/.04 GP cone. The cone is slightly smaller than the preparation and will therefore go about 1.0 to 1.5 mm past the patent apex when fitted. I then measure the point and cut it back that 1.0 to 1.5 mm. Once the GP cone is cut and fitted, it will not move (Figures 9 and 10). This gives us a great seal at the correct position in the canal’s apical area and optimum healing conditions.
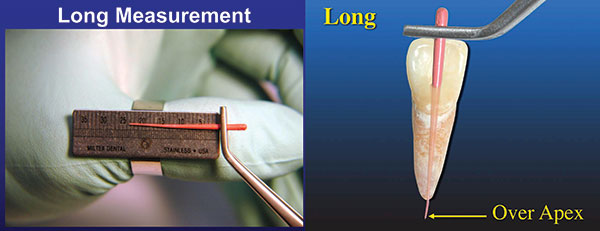 |
| Figure 9. Gutta-percha (GP) was placed in canal and then measured (left). An illustration of GP beyond the apex by 1.5 mm (right). |
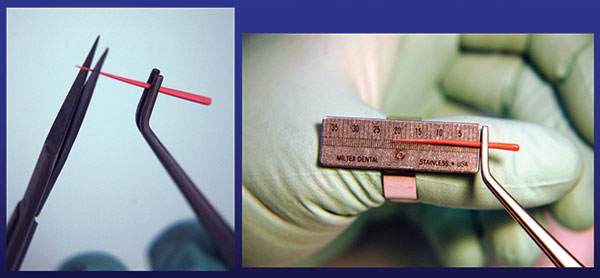 |
| Figure 10. The measurement was long by 1.5 mm, so it was cut back 1.5 mm (left). Measurement of the GP, after it was cut 1.5 mm shorter and retried into the canal (right). |
Inter-Appointment Temporization
The last topic that I will briefly discuss in this article is the interim appointment sealing of the access opening. When doing endo in multiple visits, this is a critical step in the procedure. However, we often do not give it the proper respect it deserves, and the consequence can be unexpected infections that start between appointments. These infections lead to patient discomfort, extra appointments, and overall frustration with the case. The problem originates with the use of Cavit as the interim filling material. Cavit, which is mostly calcium sulfate, is a soft material that washes out within one week in many patients. Once it washes out, saliva contaminates the access opening and causes an infection within 2 to 3 days. Therefore, I recommend using something harder for the temporary filling that comes in contact with saliva in the oral cavity. I do use Cavit underneath a temporary plastic crown, but never if it would come in direct contact with the saliva. Instead, I use something more resistant to wear as the filling, such as some ZOE-based material, a glass ionomer, or even composite. I currently use “plumber’s tape” to replace cotton as a spacer. Cotton spacers often stick to the filling material and are often difficult to remove from the access cavity. The plumber’s tape I use, Teflon, does not stick to the filling material or the tooth and, therefore, can be removed from the access opening very easily.
CLOSING COMMENTS
Procedural errors can be time consuming and costly for both the patient and the dentist and can add an extra level of frustration to the procedure. Although sometimes slightly more time-consuming, doing these procedures correctly will lead to less stress and more successful cases.
References
- Peters OA, Laib A, Göhring TN, et al. Changes in root canal geometry after preparation assessed by high-resolution computed tomography. J Endod. 2001;27:1-6.
- Vaudt J, Bitter K, Kielbassa AM. Evaluation of rotary root canal instruments in vitro: a review. Endodontic Practice Today. 2007;1:189-203.
- Neves MA, Provenzano JC, Rôças IN, et al. Clinical antibacterial effectiveness of root canal preparation with reciprocating single-instrument or continuously rotating multi-instrument systems. J Endod. 2016;42:25-29.
- ElAyouti A, Hülber-J M, Judenhofer MS, et al. Apical constriction: location and dimensions in molars—a micro-computed tomography study. J Endod. 2014;40:1095-1099.
- Ahmad IA, Alenezi MA. Root and root canal morphology of maxillary first premolars: a literature review and clinical considerations. J Endod. 2016;42:861-872.
- Christensen GJ. Obturation in endodontics: are newer techniques better? Clinicians Report. June 2019;12(6):1.
Dr. Deutsch co-operates an endodontic practice in New York City. He holds 18 patents for co-inventing endodontic products for Essential Dental Systems. He is one of the leading authorities in endodontics, having lectured in more than 150 worldwide locations, and has co-authored more than 200 dental articles. He can be reached at (800) 223-5394, via email at info@essentialseminars.org, or via the website essentialseminars.org.
Disclosure: Dr. Deutsch is vice president of Essential Dental Systems.
Related Articles
Preventive Endodontics: The Art of Avoiding a Root Canal
Endodontic Disease and Periodontal Problems: The Role of Occlusion
Adaptive Movement Improves Root Canal Success Rates


